| HISTORY |
The Finnish Draken story began on May 14 1970, when a contract of 12 Saab 35XS (Xport Suomi – Export Finland) all weather air defence fighters was signed. Saab would produce certain components, but the assembly of the aircraft, including the Swedish manufactured parts, would be done in Finland by Valmet Aviation Industries. Delivery of these planes was scheduled to 1974-75 as Saab at this stage was preoccupied in fulfilling orders for the Swedish and Danish Air Forces. In the meantime to prepare for the switch to the new aircraft, the Ilmavoimat (the Finnish Air Force) leased six ex-Swedish J35B’s designated 35BS in Finnish service (please note that the Finns didn’t use the J-prefix in their Draken variant designation) and they served as single seat fighter trainers, since the radar had been removed.
When the
12 35S (Finnish service designation) had been delivered it was decided
to buy the leased 35BS an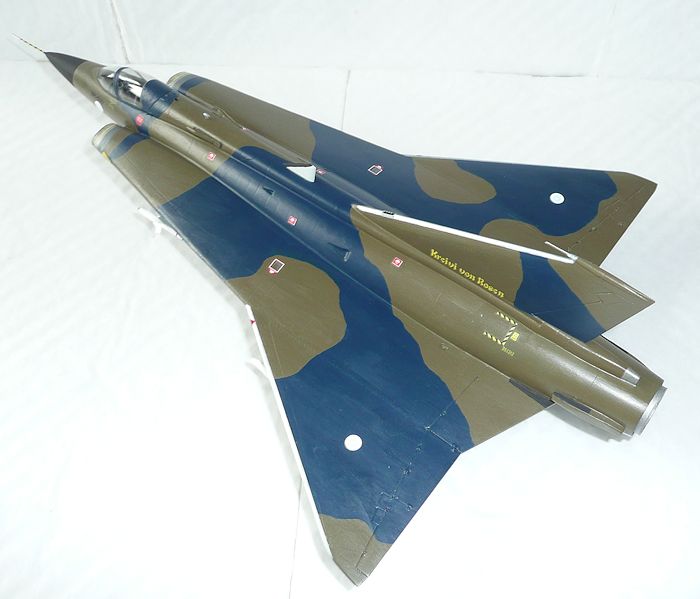 d in addition to purchase three 35CS
(ex-Swedish Sk35C two-seat trainers) plus six 35FS (ex-Swedish J35F) to
form a single squadron, namely the Hävittäjälentolaivue 11, in short
HävLLv 11 (Fighter Squadron 11) based at Rovaniemi in northern Finland.
d in addition to purchase three 35CS
(ex-Swedish Sk35C two-seat trainers) plus six 35FS (ex-Swedish J35F) to
form a single squadron, namely the Hävittäjälentolaivue 11, in short
HävLLv 11 (Fighter Squadron 11) based at Rovaniemi in northern Finland.
In the mid-eighties it was decided that HävLLv 21 at Tampere should also be equipped with Drakens, so an order for two 35CS and 18 35FS (plus a single attrition replacement for a 35BS to HävLLv 11) was despatched to Saab and fulfilled in 1986. Actually a 49th Draken was delivered in 1976: a retired Swedish J35A was donated to Ilmavoimat and painted up in full HävLLv 11 markings and given the registration DK-200. It never flew in Finland but served as a ground instructional airframe.
Finnish Drakens had by the way an interesting system of serial numbers; training variants were given even numbers and fighter variants odd numbers with the type letters DK:
35BS: 202-212 (even numbers); damaged airframe: 942
35CS: 262-270 (even numbers)
35S : 201-223 (odd numbers)
35FS: 225-271 (odd numbers)
35A : 200 (donated airframe)
As one of the 35BS was damaged in an in-flight fire, the airframe, DK-206, was written off as unrepairable. When the replacement aircraft was delivered, it was given the same registration but this meant that the original DK-206 airframe had to be re-serialled. The choice fell on DK-942, because 942 was the local telephone area code where the air base, the emergency landing due to the fire, took place.
The 35S was based on the 35XD but its systems (electronics and armament) closely resembled the J35F. It had an Ericsson PS-011/A track / scan radar which had the ability to illuminate aerial targets allowing the use of semi-active radar homing missiles. In addition it could be fitted with a Hughes S71N infra-red sensor under the nose as a very useful passive target acquisition supplement to the radar. As the J35F the 35S had a single 30mm Aden cannon in the right wing root and available missiles consisted of the Rb24 (AIM-9) Sidewinder, Rb28 (AIM-4D) Falcon and the radar guided Rb27 (AIM-26B) Falcon all being Swedish licence build versions of the original US missiles. In the late eighties the 35S fleet was upgraded to J35J standard plus a few extras were added such as the Bofors Electronics chaff/flare dispensers mounted on the coolant intakes for the afterburner on the tailpipe.
The
Finnish Drakens, with the exception of the 35CS which were in natural
metal finish, were painted as the Swedish planes, namely:
Under surfaces: 058M Blue Grey (the M denotes Matt = Flat sheen)
Upper surfaces: 328M Dark Olive Green
Camouflage: 438M Dark Blue
 In the
late eighties / early nineties as the individual aircraft passed their
next IRAN inspections the national insignia as well as the serial
numbers were shrunk considerably and given low viz character. The
roundels were reduced to about 20cm in diameter and the serial numbers
were moved from the rear fuselage to between the nose roundel and the
windscreen. The remaining paint scheme as well as stencils stayed the
same although small variations could in fact have existed.
In the
late eighties / early nineties as the individual aircraft passed their
next IRAN inspections the national insignia as well as the serial
numbers were shrunk considerably and given low viz character. The
roundels were reduced to about 20cm in diameter and the serial numbers
were moved from the rear fuselage to between the nose roundel and the
windscreen. The remaining paint scheme as well as stencils stayed the
same although small variations could in fact have existed.
Kreivi von Rosen:
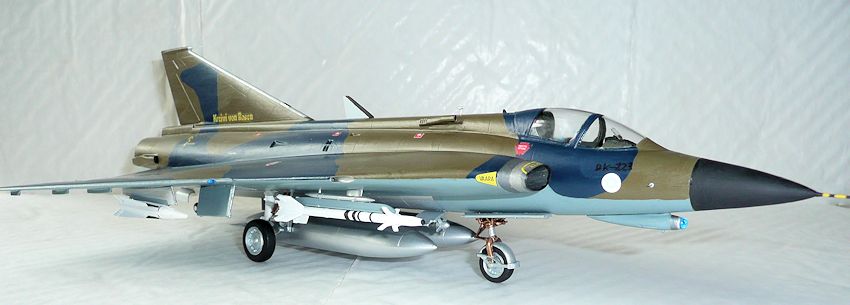
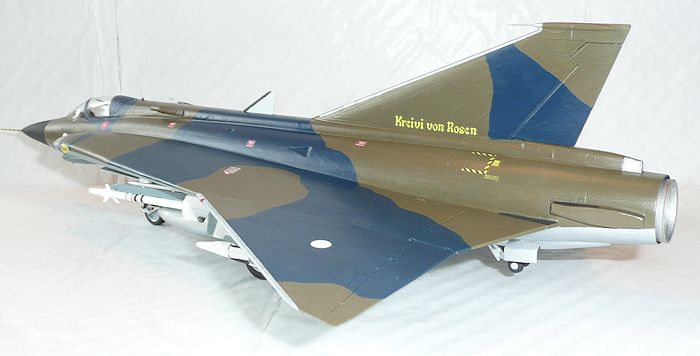
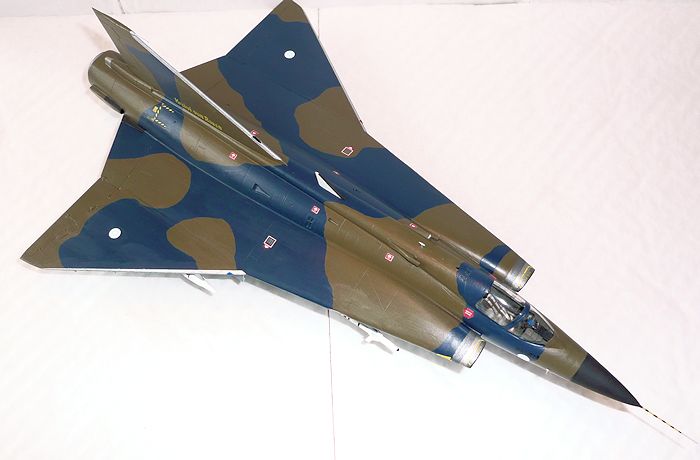
As Finland gained independence from Imperial Russia in 1918 a Swedish count, Erik von Rosen, donated the first aircraft to the newly formed Ilmavoimat on March 6 1918, a Thulin D, which was a Swedish derivative of the French Morane-Saulnier type L ”Parasol”. The aircraft was marked with the counts personal sign of good luck, a blue swastika on a white background, which was subsequently adopted as the first national insignia of the Ilmavoimat. In remembrance of the count a Folland Gnat F.1 was given the inscription “Kreivi von Rosen” (means count von Rosen) on the forward fuselage. When the Gnat was retired in the early seventies, the inscription was transferred to the fin of one of the newly-delivered 35S, serial number DK-223, which I chose to model and is the subject of this review.
The Draken served along side with the MiG-21 until they both were replaced by the McDonnell Douglas F-18C/D Hornet (Finnish Hornets carry the designation F-18 instead of F/A-18) in the years 1998 - 2000. As the final Draken retirement came closer, one of the 35S, DK-215, was painted in a striking yellow / black scheme with HävLLv 11’s squadron sign, a striking bull, painted on top of the fuselage and wings and with the inscription “1972000” on the left side of the fin meaning the years 1972-2000 the Draken served in Ilmavoimat. As HävLLv 11 never had got an official permit from Ilmavoimat headquarters to paint this scheme on DK-215, it meant that this aircraft was no longer allowed to perform operational flights. It was, however, popular at the few Finnish air shows it attended during the summer of 2000. The last Draken flight in Ilmavoimat service ended on 24 August 2000 when DK-207 touched down at Halli.
The “Kreivi von Rosen”, DK-223, is today exhibited at the Aviation Museum of central Finland at Tikkakoski airbase close to Jyväskylä approx 240km north of Helsinki.
| THE KIT |
The kit
offers four decal options, three 35S from HävLLv 11 and one 35FS from
HävLLv 21 but unfortunately only with the old style insignia and serial
numbers. When I examined the sprues, however, I realized that Hasegawa
(again could I say) didn’t do their research well. If you build this kit
straight from
 the box the only variant possible is the
35FS – not the 35S. If Hasegawa on the other hand had
included sprue Q, then it had looked much better, because when the 35S
aircraft were delivered, they had the larger external tanks as on Danish
Drakens and more important the main wheel hub face, which the 35S and
35XD also had in common – not forgetting the nose wheel from sprue E!
The solution of that problem was, that I simply took these parts from a
kit to a future Danish build, where the gear and tanks won’t be needed,
because it’s going to be build in flight mode and without the external
tanks. But that’s another story, which may be told another time! One
note of a funny thing in the instructions. In the paint and decaling
drawings, I found the most peculiar English text that I’ve ever seen on
an instruction sheet. It reads:
the box the only variant possible is the
35FS – not the 35S. If Hasegawa on the other hand had
included sprue Q, then it had looked much better, because when the 35S
aircraft were delivered, they had the larger external tanks as on Danish
Drakens and more important the main wheel hub face, which the 35S and
35XD also had in common – not forgetting the nose wheel from sprue E!
The solution of that problem was, that I simply took these parts from a
kit to a future Danish build, where the gear and tanks won’t be needed,
because it’s going to be build in flight mode and without the external
tanks. But that’s another story, which may be told another time! One
note of a funny thing in the instructions. In the paint and decaling
drawings, I found the most peculiar English text that I’ve ever seen on
an instruction sheet. It reads:
“12 J35F was ordered in 1970, knockdowns were produced in domestic Valmet and DRAKEN of a Finnish air force was named J35XS. It buys it though a Swedish air force leased J35B for the training of the other day. J35F in the Middle Ages is bought from a Swedish air force as J35FS in 1983 1975 after this.”
I’ll leave it to the readers to figure out what the meaning of that rubbish text is!
At least I had a good laugh about it!
| CONSTRUCTION |
As I now at this stage consider myself pretty well experienced to build Hasegawa’s 1/48 Draken, I will here emphasise things that has to be altered in order to get the most correct model of a Finnish 35S Draken. Right from the start the holes for the Fine Molds pitot probes were drilled in the nose cone parts as well as the fin tip to accommodate these extremely well done turned brass pitot probes.
As before, the airframe pretty much fell together, though not without a lot of filling and sanding sessions. Before painting the cockpit, I searched the net for photos of Finnish Draken cockpits and discovered thereby, that the 35S cockpits are green as Swedish Draken cockpits, so why Hasegawa tell you to paint it Dark Gull Grey, is a puzzle. Secondly the instructions tell you to install the cannon port parts (parts A7 and A8), so I did, only to discover later during the build, when I bought the newly published book “Nordic Airpower vol. 4” (please see reference section) that the 35S only retained the starboard cannon! I found it to be no big deal to fill and sand the cannon port hole in the left side, so this was corrected quickly.
As I had decided to do a late edition Draken with low viz roundels, I was going to add the Bofors chaff / flare dispensers, too. They were pretty easy to do, because their outline were cut out from sheet, a wedge shaped piece of plastic inserted at the back, then gluing the outline piece on top of the wedge piece as well as the coolant intake for the afterburner. It was then a question of several filling and sanding sessions to complete the outline of the dispensers. These were of course done before the tail section was glued to the fuselage.
 The
landing gear was also one of these research demanding items. After
assembling the gear, the main gear legs were painted Light Grey (Vallejo
70993), the forward leaning struts Bronze (Humbrol 171 Acrylic) and the
oleo scissors went Silver (Humbrol 11 Acrylic). The nose gear leg went
bronze with the exception of the oleo and mudguard and belonging support
struts which went silver. The wheels, which I nicked from another kit,
had the hubs painted silver and the tires Flat Black.
The
landing gear was also one of these research demanding items. After
assembling the gear, the main gear legs were painted Light Grey (Vallejo
70993), the forward leaning struts Bronze (Humbrol 171 Acrylic) and the
oleo scissors went Silver (Humbrol 11 Acrylic). The nose gear leg went
bronze with the exception of the oleo and mudguard and belonging support
struts which went silver. The wheels, which I nicked from another kit,
had the hubs painted silver and the tires Flat Black.
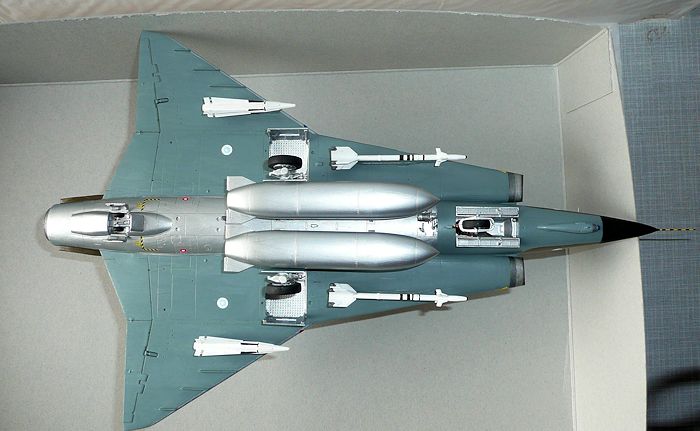
The
missiles, I had decided to arm my Finnish Draken with, came from two
sources. The Sidewinders (AIM-9Js actually) was taken from Hasegawa’s
own weapon set C, while the Rb27 Falcons came from Maestro Models. These
fine aftermarket missiles consist of a body cast in resin and with photo
etched fins. Together with the added alignment tool for the fins it made
assembly pretty easy; however, the alignment tool wasn’t user ready. I
had to sand some extensions (photo included) to the holes for the
missile body in order to get it fit as intended into the tool. The
missiles, once assembled, were painted white and added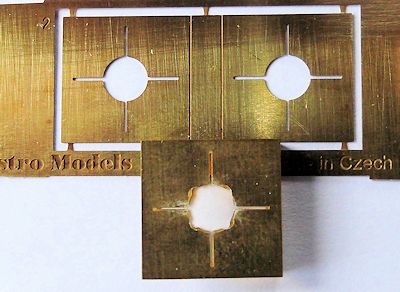 black detail
painting / decal stripes and some darkened metal for the missile
exhausts and fin tip points for the Sidewinders.
black detail
painting / decal stripes and some darkened metal for the missile
exhausts and fin tip points for the Sidewinders.
Once the airframe had been completed and cleaned up and gear installed it was time to paint it.
| COLORS & MARKINGS |
As I build this one together with my S35E it was the same paint and scheme of the camouflage, however, as my reference book shows several pictures of DK-223 in the air and on the ground, I altered the scheme of the Dark Blue camouflage color to closely match those of the pictures to get it as right as possible.
It wasn’t the only changes. When it came to the decaling, I had to substitute several warning stencils that Hasegawa suggests you to use, but as the decal sheet offers different variants of the same stencils it was not a problem.
When it
came to the roundels and serial numbers, I really had to be creative. It
would not be possible to use any of these in one form or another, but it
turned out that the roundels were the easiest to make. I figured out
that the outer diameter of the roundels, which are the same size on both
fuselage and wings, should be 4.5mm in diameter, the outer diameter of
the blue ring 3.0mm in diameter and the white dot in the middle 1.5mm in
diameter. I took some spare decal film and painted a piece of it white
and another piece light blue. The light blue color was mixed, so the
tone pretty much matched, what I could see on the available photos. When
the paint had dried, the disks were punched out of the sheet; only the
middle dot was unavailable to me in the required size. However, by using
a needle head with a diameter of exactly 1.5mm slightly dipped in white
paint and applying it to the blue disks I succeeded to come around t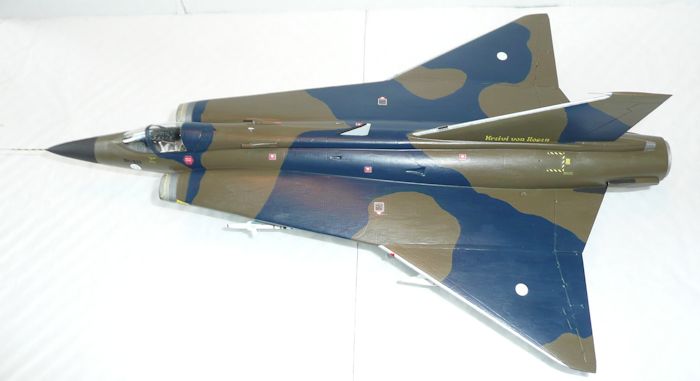 hat
issue. It took several attempts before I had six usable roundels, but
when they were applied to the model they just look great.
hat
issue. It took several attempts before I had six usable roundels, but
when they were applied to the model they just look great.
The last thing was the serials. I had no decal letters and numbers small enough, so I was forced to write them on the model myself using a pen with a tip point of 0.1mm. After practicing for some time on a piece of paper, I felt confident to try it on the model. It went pretty easy, because I felt that the practicing had sharpened my skill a lot, so I put down the model and waited for the ink to dry. The next day I was going to give the model the flat coat to secure the decals and the serials…..NOT! The ink had virtually gone from the gloss surface, and I could with my fingertip wipe the rest clean off as it had not been there! It turned out so that even if the ink was waterproof, it didn’t necessarily mean that the ink is permanent!
After that painful discovery I decided anyway to flat coat the whole model. While the flat coat dried, I took my permanent black pen (which had a larger tip) and practiced on a piece of paper to write the required letters and numbers with the thinnest possible line because the tip was a bit out of order, too, and besides this, I also had discovered, that my permanent pen was unable to draw on a gloss surface! When the flat coat had dried I took the model and the permanent pen and began to write the serial numbers steady and secure. It was not perfect, but some of the newly applied ink could be scraped off with the tip of a no 11 blade. However, I was also forced to use the green and blue paints to get it all just fine with a very fine brush. When that had dried, the serials were secured with the flat coat together with forgotten spots (where the gloss still shined through), but never the less I had finished the painting and decaling.
| FINAL CONSTRUCTION |
It was now time for the remaining parts, the biggest of which being the drop tanks which were glued together, the fins modified and painted silver. All though photos in Nordic Airpower showed 35S Drakens with the smaller Swedish style drop tanks as well, I had decided me for the larger ones so that was the way it was going to be! All the antennas and other small details were painted the required colors and then glued to the model with CA glue. The last things to be attached were all the under wing stores and the afterburner can and another Draken model was finished.
| CONCLUSIONS |
When it comes to finish a 1/48 Hasegawa Draken it’s all about doing a research that can rectify some of the errors which unfortunately are with this kit. For me personally it didn’t matter, because I had done the necessary research and when you have build quite a few kits of the same object, things tend to get easier each time, but that should also be the case anyway. So this was my sixth Hase dragon and I am looking forward to get the next started. As I’ve stated before this kit is only recommendable to modelers with some experience – not beginners.
| REFERENCES |
Nordic Airpower vol. 4: Ilmavoimat, Scenes from Finnish military aviation history, by Jan Jørgensen and Jyrki Laukkanen. ISBN 978-87-993688-3-9. This book I consider indispensable when it comes to model Finnish aircraft. Highly recommendable. Can be bought at www.nordicairpower.com, if not available locally.