Hasegawa 1/48 AH-64D Apache
| KIT: | Hasegawa 1/48 AH-64D Apache |
| KIT #: | PT 23 |
| PRICE: | £24.99 GBP |
| DECALS: | One option |
| REVIEWER: | Patrick Barratt |
| NOTES: |
| HISTORY |
The AH-64D
Apache Longbow was developed as a project of the U.S.Army's Advanced Attack
Helicopter (AAH) program. Beginning with the all-weather attack copter AH-64A
model, the line was expanded to include the AH-64D Apache Longbow, a type
 equipped with radar, and the
AH-64C, which was not fitted with the radar gear.
equipped with radar, and the
AH-64C, which was not fitted with the radar gear.
By the end of 1993, the "C" designation was abandoned, and both types are now referred to as the AH-64D Apache Longbow, regardless of onboard radar equipment. The most visibly recognizable characteristic of the AH-64D is the Longbow fire control radar (FCR) mast protruding from the top of the main rotor axle. The FCR is capable of sensing, categorizing, tracking and engaging a multitude of enemy targets, making it an awesome force to be reckoned on the modern battlefield. This information can then be uploaded to AWAC’s who can then vector CAP aircraft to the target or it can be shared directly with other Apache beyond target visual if the original Apache should want to stay on station undetected. This may seem a little odd to some but it never ceased to amaze me how a helicopter in the hover behind trees or a building can somehow remain quiet enough and un-noticed to take you by surprise!
| THE KIT |
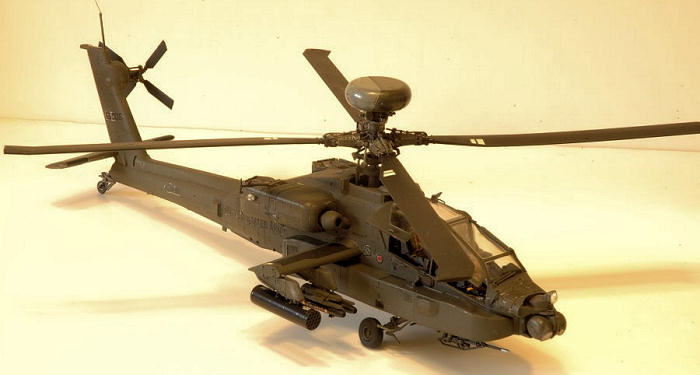
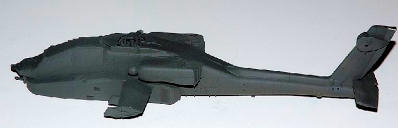
 First thing you notice with
this kit is the size! It’s big with a length of 34cm. (13.5”) and a rotor
Diameter of 30cm (12”) it also has in excess of 300 parts so your getting quite
a bit for your money as well. It’s moulded in a crisp light grey plastic with
sharp recessed panel lines and “lots of rivets”. A quick check on some reference
photos I took last year shows that they do indeed have “lots of rivets” and the
kit is quite accurate in that respect. This is good because I really didn’t want
to sand the whole thing down! There are eleven grey spru’s and one clear and a
point worth mentioning is the beautifully light attachment points of the parts
to the spru’s, especially the clear parts. To me this just adds to the finesse
of the whole model before you even start assembly, particularly as this kit has
a lot of very small parts. I didn’t come across any moulding problems that might
affect the finished build. Two pilot figures are also included with optional
visor positions for those like me who can't get flesh the right colour.
First thing you notice with
this kit is the size! It’s big with a length of 34cm. (13.5”) and a rotor
Diameter of 30cm (12”) it also has in excess of 300 parts so your getting quite
a bit for your money as well. It’s moulded in a crisp light grey plastic with
sharp recessed panel lines and “lots of rivets”. A quick check on some reference
photos I took last year shows that they do indeed have “lots of rivets” and the
kit is quite accurate in that respect. This is good because I really didn’t want
to sand the whole thing down! There are eleven grey spru’s and one clear and a
point worth mentioning is the beautifully light attachment points of the parts
to the spru’s, especially the clear parts. To me this just adds to the finesse
of the whole model before you even start assembly, particularly as this kit has
a lot of very small parts. I didn’t come across any moulding problems that might
affect the finished build. Two pilot figures are also included with optional
visor positions for those like me who can't get flesh the right colour.
| CONSTRUCTION |
Be prepared for an absolute treat here. After careful consideration I can honestly say this is the nicest kit in terms of fit, detail and moulding I have come across in my short time as a “born again modeller“ I don’t say this lightly because Tamiya’s F16CJ in 1:48 is also superb…but I think this is even better.
 The instructions are a bit of
a mess! Made up of one sheet of paper nearly 3ft long with 26 stages of
construction seemingly fitted in where ever they could find a space and with no
clear demarcation between sections. That said, it’s a minor problem because
parts are very nicely drawn and labelled and I expect like me you will choose
your own order of assembly based on spraying. Construction starts with the
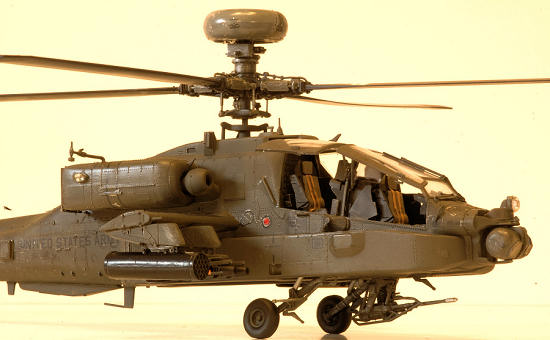
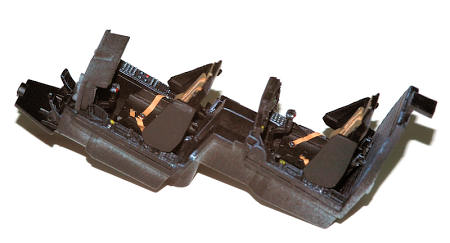
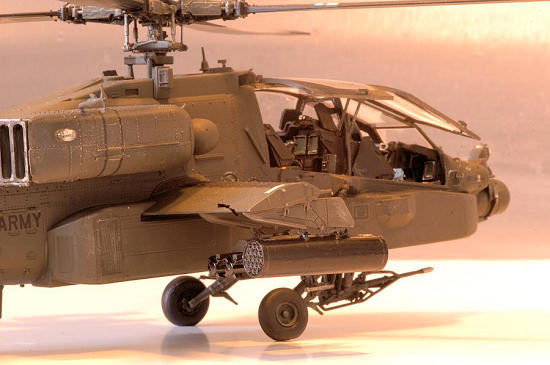
pilot/gunners cockpit tub. This is superbly detailed and very comprehensive with
only a little work needed on the “moulded to the seat” seat belts. These had a
set of painted masking tape belts laid over the top, which solved the problem to
my satisfaction.
The instructions are a bit of
a mess! Made up of one sheet of paper nearly 3ft long with 26 stages of
construction seemingly fitted in where ever they could find a space and with no
clear demarcation between sections. That said, it’s a minor problem because
parts are very nicely drawn and labelled and I expect like me you will choose
your own order of assembly based on spraying. Construction starts with the
pilot/gunners cockpit tub. This is superbly detailed and very comprehensive with
only a little work needed on the “moulded to the seat” seat belts. These had a
set of painted masking tape belts laid over the top, which solved the problem to
my satisfaction.
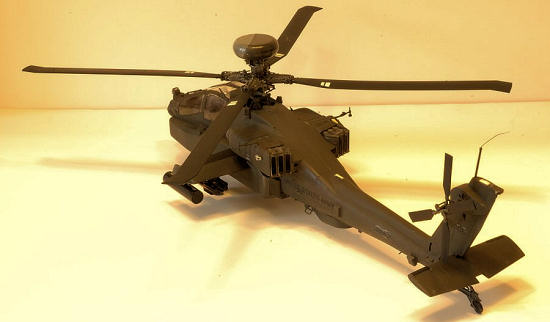
The cockpit tub and the base of the main rotor mechanism are the only things that are sandwiched between the fuselage sides. I chose to go as far as step eleven before spraying the main assembly, which is basically the fuselage with wings and pylons fitted as well as carefully masked glass, engines and tail wing. The under carriage can be left till later on in the build but as its body colour you could fit it without the wheels and spray it in position. The tail rotor, main rotor head, 30mm gun and weapons for the wing pylons are all individual assemblies and very straight forward. They can be added after spraying if you wish.
The kit has no hidden horrors but be very careful to open up all the holes in the fuselage and engine cowlings as marked before assembly, there are 21 (I think) and I used a .8mm drill. It’s easy to miss a few. A full selection of pylon stores is included. This is my first helicopter and one thing I will put right having taken the photos is the lack of droop in the main rotor blades! In fact I have a slight up turn in mine. Eduard do a complete set of etch parts for this model. I would buy the kit first before making your own mind up if you need them.
| COLORS & MARKINGS |
 According to the instruction
the US army Apache’s are painted a Matt very dark Olive drab Green all over. I
tried the recommended 70%/30% Olive drab Green and Black mix but only having
pictures of a British Army Apache in my collection, I wasn’t that convinced by
the colour. I eventually settled on 80% Khaki Drab,10% Olive drab Green and 10%
Black (you could go up a little on the black at the expense of the Khaki if you
wanted, it’s a case of try it and see. (Editor's Note: Testors has US ARMY HELO
DRAB in their ModelMaster enamels line)
According to the instruction
the US army Apache’s are painted a Matt very dark Olive drab Green all over. I
tried the recommended 70%/30% Olive drab Green and Black mix but only having
pictures of a British Army Apache in my collection, I wasn’t that convinced by
the colour. I eventually settled on 80% Khaki Drab,10% Olive drab Green and 10%
Black (you could go up a little on the black at the expense of the Khaki if you
wanted, it’s a case of try it and see. (Editor's Note: Testors has US ARMY HELO
DRAB in their ModelMaster enamels line)
Colours used were Tamiya Acrylic XF-51, XF-62 and X18.
Because of the overall dark
matt finish the decals will show silver so a couple of coats of Future/Klear is
essential. I finished off with a coat of Humbrol Matt coat, which gives a
particularly
flat finish which Apache’s (UK Apache’s anyway) have. Even so I still
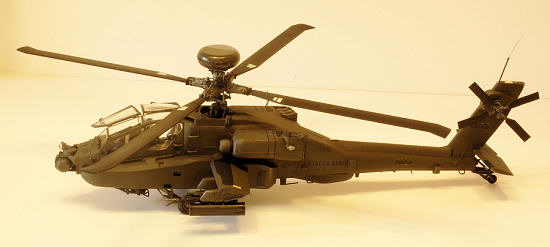 got a little silvering.
Weathering was restricted to a few chip marks on hand/foot holds and a little
dark shading around the exhausts.
got a little silvering.
Weathering was restricted to a few chip marks on hand/foot holds and a little
dark shading around the exhausts.
The decals supplied are pretty good for Hasegawa but on the thick side. They will need to be seated on a coat of Micro set and worked into place with a cotton bud. Once in position I used Micro sol as well because the surface of the kit is covered in rivets making it difficult to get the decals to sit flush. Don’t touch them once you have applied the sol and they will bed down well. A point worth mentioning here as I had not come across it before. The Micro sol turns the Future a milky matt white and makes the decal look like its silvered but don’t panic! Once dry the finish goes back to gloss and all is well. I presume this is normal but I have not noticed it before because I don’t usually work with such a dark finish. I doubt it would show on anything lighter.
Feeling adventurous?? The Israelis fly Apache’s in a two-tone desert camouflage and I will be building one soon. It’s a great excuse to indulge myself in another version of this kit.
| CONCLUSIONS |
 It probably will not come as a
surprise by now to hear that I loved this kit. The superb fit, detail and the
possibility of building a fine model OTB with no extra expense make this a
complete package. Those of you with ten thumbs and a glass eye will struggle
with the amount of very small parts involved in the make up of the front and
rear rotor assemblies as well as the plentiful hand holds and fitting on the
outside of the tail boom and cockpit. The positive side to these parts is the
superb detail you are getting. The Apache is in service in many countries and a
choice of decals would have been nice but at a guess it’s probably only national
insignia that differs. I suspect a beginner will struggle with this kit if only
because the instructions are a little lacking (I never did work out quite where
parts J19/J20 should go exactly) but an experienced modeller will find it hugely
rewarding. Time spent on the cockpit is time well spent as the whole of one side
of the canopy can be left open. If you enjoy armour and aircraft then look on
this as a flying Tank, take the phone off the hook, give the wife the credit
card, put the cat out and settle down to an immensely enjoyable build because
they don’t come much better than this.
It probably will not come as a
surprise by now to hear that I loved this kit. The superb fit, detail and the
possibility of building a fine model OTB with no extra expense make this a
complete package. Those of you with ten thumbs and a glass eye will struggle
with the amount of very small parts involved in the make up of the front and
rear rotor assemblies as well as the plentiful hand holds and fitting on the
outside of the tail boom and cockpit. The positive side to these parts is the
superb detail you are getting. The Apache is in service in many countries and a
choice of decals would have been nice but at a guess it’s probably only national
insignia that differs. I suspect a beginner will struggle with this kit if only
because the instructions are a little lacking (I never did work out quite where
parts J19/J20 should go exactly) but an experienced modeller will find it hugely
rewarding. Time spent on the cockpit is time well spent as the whole of one side
of the canopy can be left open. If you enjoy armour and aircraft then look on
this as a flying Tank, take the phone off the hook, give the wife the credit
card, put the cat out and settle down to an immensely enjoyable build because
they don’t come much better than this.
| REFERENCES |
Personal photo’s taken at UK Army bases. Apache’s can be seen at The AAC stations at Middle Wallop in Hants and Wattisham in Suffolk. A quick search on Google will find what you are looking for and here
March 2008
If you would like your product reviewed fairly and quickly, please contact me or see other details in the Note to Contributors.