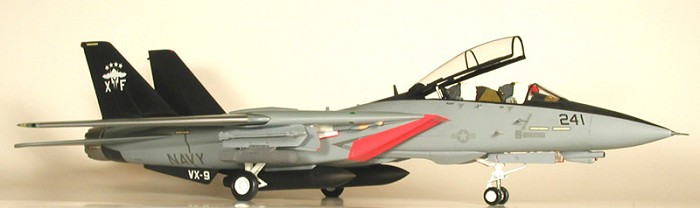
Revell 1/48 F-14D Tomcat
| KIT #: | ? |
| PRICE: | $ |
| DECALS: | One option |
| REVIEWER: | John Bibay |
| NOTES: |
Photo credits:
Chris Baltrinic. Steel Beach bits courtesy of Darren Roberts. |
| HISTORY |
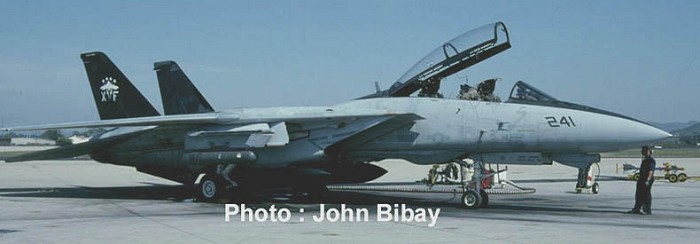
There is little that I can add to the 3 decade history of Grumman’s last fighter except that the F-14 first arrived at Point Mugu in late 1971. The last F-14 at Point Mugu departed after a short ceremony on July 23, 2004. I was fortunate enough to witness the later event.
This project was a gift for someone at VX-9 det Point Mugu who not only escorted me around the flight line to shoot pictures, but also gave me last-minute notice of the departure of the last F-14 at Point Mugu. This kit was intended to represent the Tomcat this particular person was fortunate enough to get a once-in-a-lifetime ride.
| THE KIT |
The editor has done a review of the Revell-Monogram F-14D kit. Please visit this review for a little more information.
| CONSTRUCTION |
Before proceeding, let me state the mantra will be forever associated with this project-
“I was on a deadline and I needed to be finished quickly.” For example, "I didn’t make extensive use of photoetch because ‘I was on a deadline and I needed to be finished quickly’.” or “I didn’t make extensive use of photoetch because of the ‘mantra’.”
The kit is basically the 1/48 Revell F-14D with some minor additions to represent an F-14B (Upgrade). Pre-production test shots of Steel Beach F-14 items from Darren Roberts were the primary conversion parts used. The Hasegawa kit is a much nicer kit and there are aftermarket upgrades made to fit it, but because of the “mantra”, I didn’t want to be slowed by multiple sub-assemblies.
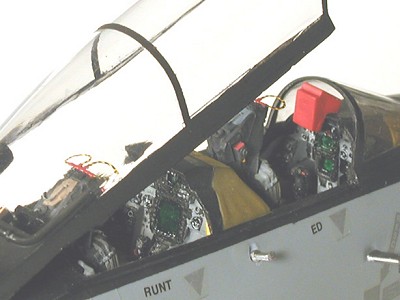 Starting in the rear cockpit, I used
the Steel Beach rear cockpit instrument with the square PTID found in many
F-14s that have been modified to use the LANTIRN pod. I shortened and
removed the thumb switch from a spare F/A-18 control stick and plugged it
into the left side of the rear cockpit. To finish off the rear cockpit, I
filled the prominent slot on top of the instrument panel coaming and glued
a photo-etch sissy bar from the Eduard photo-etch set.
Starting in the rear cockpit, I used
the Steel Beach rear cockpit instrument with the square PTID found in many
F-14s that have been modified to use the LANTIRN pod. I shortened and
removed the thumb switch from a spare F/A-18 control stick and plugged it
into the left side of the rear cockpit. To finish off the rear cockpit, I
filled the prominent slot on top of the instrument panel coaming and glued
a photo-etch sissy bar from the Eduard photo-etch set.
Moving on to the front cockpit, I came up with resin throttles from an incomplete True Details F-14A cockpit set. One of the differences that distinguish F-14B(Upgrade) from the F-14A, F-14A+, and F-14B is that the F-14B(Upgrade) has a HUD with a frame on top of the panel. All of my photos of F-14B(Upgrade)s had a plastic ‘REMOVE BEFORE FLIGHT’ cover over the HUD frame, so I didn’t have an image of the HUD frame. In order to simplify construction, I simply glued some plastic blocks painted red where the HUD would be to represent the ‘REMOVE BEFORE FLIGHT’ cover.
The kit seats with
Verlinden GRU-7 seats that I had already prepared and painted for another
F-14 project. I had already cast resin copies of the Hasegawa drop tanks
and drop tank pylons to hang under the nacelles for another Monogram F-14.
I merely transferred them over to this one.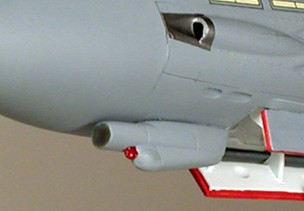
I hacked the wing sweep mechanism off the wings and sawed a slot in the lower wing halves to facilitate sliding the wings into place after the painting and decaling. After gluing the fuselage halves together with gap-filling CA glue, I obliterated much of the raised detail on the forward fuselage and area just forward of the stabilators. I didn’t worry about the inside of the intakes because I planned to cover with FOD covers anyway.
The F-14D dual chin
pod was replaced with a TCS from Steel Beach. The antenna on the starboard
forward nose gear door was sanded flush. The Port nose gear door
 was
replaced with the Steel Beach substitute that represents the new antenna
blister with the repositioned vents. (This feature is found on all late
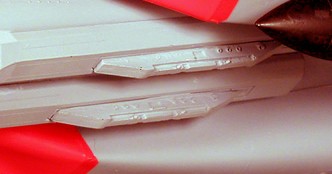
F-14s.) The rear Phoenix pallets were also hacked off and the forward
pallets glued in place along with the Steel Beach bomb racks. The
starboard shoulder station was replaced with the Steel Beach LANTIRN pod
station. It was a one-piece mold that incorporates the pod, lower pylon
adapter and upper pylon that simply replaced the kit part.
was
replaced with the Steel Beach substitute that represents the new antenna
blister with the repositioned vents. (This feature is found on all late
F-14s.) The rear Phoenix pallets were also hacked off and the forward
pallets glued in place along with the Steel Beach bomb racks. The
starboard shoulder station was replaced with the Steel Beach LANTIRN pod
station. It was a one-piece mold that incorporates the pod, lower pylon
adapter and upper pylon that simply replaced the kit part.
The newer BOL rails
appeared on Tomcats from about 1996 onwards, so I made my own copies of the
BOL rails from the Black Box F-14 Bombcat Update set. They replaced the
older AIM-9 rails on both shoulder stations.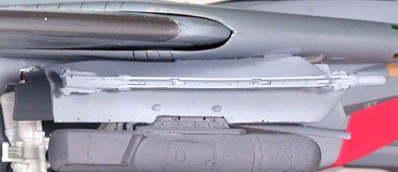
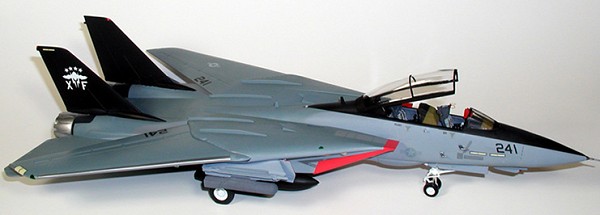
The engine fairing on the rear fuselage of the F-14D is one of the kit shortcomings. The kit still has the shape for the TF-30 engines of the original Monogram F-14A. All F-14A+/B/D/B(Upgrades) have a squared-off fairing for the GE engines. Due to the “mantra”, I simply masked off the areas to represent the shape associated with the GE engines. If I had more time, I would have cut away the stabilators, built up proper shape with putty, and re-attached the stabilators at a drooped angle.
The radome in the Revell F-14D and later F-14A re-releases have a melted appearance at the tip. Using an original release Monogram F-14 radome as a pattern, I sanded and shaped the radome tip until I was satisfied with the shape.
The kit main wheels represent the pattern of hubs found only on F-14As prior to the early-1980s. These were replaced with Cutting Edge F-14 weighted resin wheels with the hub found on late F-14s.
The final the physical modifications made was to remove the first 2 antennas on the fuselage spine. The forward antenna was replaced with a taller one leftover from a Hasegawa kit. The GPS bubble was added from round piece of sprue. Four antennas ahead of the main gear wells were also leftover Hasegawa F-14 parts.
| COLORS & MARKINGS |
I knew that this jet
had the current 3-gray tactical paint scheme. To meet the [mantra] I only
used the middle colors (FS36320) and upper colors (FS35237). The lower
colors that would normally be FS36375 were simply painted the middle color
(FS 36320). This decision would end up not being a time-saver because
properly color stencils simply disappeared against the darker gray. The
canopy area, ventral fins, and vertical fins were all painted gloss black
in anticipation of applying decals later. After many layers of Future to
provide a glossy surface, exactly four white decals from Superscale 48-656
were a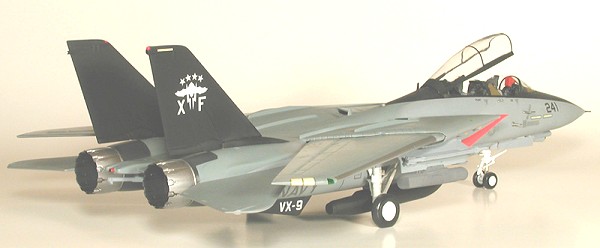 ppropriated applied
to the tail and ventral fins. The 8 white stars came from a scrap F-4
decal sheet. The remainder of the stencils, including the crew call
signs beneath the canopy, came from the kit decals. I briefly
toyed with the idea applying the crew names in white one letter at a time,
but sanity and the “mantra” prevailed. If I had more time, I would’ve
commissioned custom-made decals for the rails.
ppropriated applied
to the tail and ventral fins. The 8 white stars came from a scrap F-4
decal sheet. The remainder of the stencils, including the crew call
signs beneath the canopy, came from the kit decals. I briefly
toyed with the idea applying the crew names in white one letter at a time,
but sanity and the “mantra” prevailed. If I had more time, I would’ve
commissioned custom-made decals for the rails.
At this point I realized that I had forgotten 2 more antennas that belong just aft of the intake lips (crap), but I wasn’t about to repaint the model at this point. If I had time, I would’ve simply added them from sheet styrene and faired them in with putty.
The Steel Beach intake FOD covers were applied and the entire model flat-coated. I used up the last of my Polly S acrylic flat on the fuselage and I had to try other acrylic flat substitutes. I found that I couldn’t get the Tamiya flat with Future mix to go dead flat for me. I also found that the Testors acryl flat and Micro-flat wouldn’t go to the same dead flat as the Polly S.
I painted the wheel wells, gear struts, wheels and doors Tamiya flat white acrylic then gloss white. I hand painted the door edges red. I painted in the navigation lights with Gunze clear red & green and thought I was finished at this point.
| FINAL CONSTRUCTION |
In my all-thumbs attempt to attach the canopy to the canopy brace/raiser, I managed to get CA glue to run over the clear portion. (Crap!!) I pulled the canopy and brace/raiser from another Monogram kit, then masked, painted and attached it. Thinking I was again finished, I slid the wings into place only to hear one side crack along the seam. (CRAP!!!) Due to the “mantra” and late stage of the build, I simply ran a little CA glue over the crack and hand painted over the crack.
| CONCLUSIONS |
 This project was a rush
job. The use of the Steel Beach items greatly sped up the process. They
are a great value and I highly recommend them to anyone building the
Revell-Monogram F-14s. The Revell-Monogram F-14s may have origins dating
back over 20 years, have the typical goofy fit typical of Monogram kits at
the time, and have (oh the horror) raised panel lines, but they accurately
shaped, well-detailed, and are vastly less expensive than the Hasegawa
alternative. If you own a lot of F-14 decal sheets (I admit I do), and
don’t have another lifetime to build enough Hasegawa kits on which apply
them, I highly recommend the Revell-Monogram F-14 with a True Details
cockpit and Steel Beach line of products.
This project was a rush
job. The use of the Steel Beach items greatly sped up the process. They
are a great value and I highly recommend them to anyone building the
Revell-Monogram F-14s. The Revell-Monogram F-14s may have origins dating
back over 20 years, have the typical goofy fit typical of Monogram kits at
the time, and have (oh the horror) raised panel lines, but they accurately
shaped, well-detailed, and are vastly less expensive than the Hasegawa
alternative. If you own a lot of F-14 decal sheets (I admit I do), and
don’t have another lifetime to build enough Hasegawa kits on which apply
them, I highly recommend the Revell-Monogram F-14 with a True Details
cockpit and Steel Beach line of products.
Compared to my normal glacial building pace, this project took 30 days (a few hours a day) to complete. Even with the rush, the person for whom this F-14 was intended had already transferred from Point Mugu to NAS Lemoore. It was delivered and for one day resided in the Admiral’s building.
October 2004
If you would like your product reviewed fairly and fairly quickly , please contact the editor or see other details in the Note to Contributors.