Hasegawa 1/48 F-16A Fighting Falcon
| KIT #: | V1 |
| PRICE: | $ |
| DECALS: | Two options |
| REVIEWER: | Julien Dixon |
| NOTES: | ADF Conversion using Aardvark Model's replacement fin base. |
| HISTORY |
This review will deal with building an F-16 ADF Aircraft. Why the ADF? You may well ask? Well……modeling friends of mine will tell you that I generally ignore modern “Grey” aircraft. I admit I’m defiantly not a fan of the modern tactical schemes.
A while ago I managed to pick up a copy of Hasegawa’s F-16A as part of a trade deal, the original intention being just to sell it on. However when I looked at the kit, I was generally surprised by the quality, as it is now an old kit. Still wary of my thinking of building a “grey” aircraft I remembered an old Superscale sheet I had picked up showing an ANG aircraft with a colourful tail, this will do I thought.
When looking at the sheet I then realized it referred to an “ADF” aircraft, was this an A, C? On looking this up I found it to be the “Air Defense Fighter” version of the F-16. I will not go through the history of the F-16 here, but rather look at the ADF version.
The ADF emerged as a major program in the late 1980’s while the cold war was still thawing, and was essentially billed as a modification of existing block 15 Falcons. This would allow for the Strategic Defense of North America from bombers and cruise missiles. The aircraft were ordered in October of 1985 and designated to replace the F-106’s, F-4’s, and F-15’s in the interceptor role with Air National Guard Squadrons. It is worth noting that the Air Force chose this option after consideration of the F-20 Tigershark for this role.
The ADF aircraft is easily
recognized by four L-shaped antennas “or bird shredders” located just in front
of the cockpit, and four more located under the aircraft on the underside of the
air intake. These are necessary or the Teledyne/E-systems AN/APX-109 Mk XII AIFF
(Advanced Identification, Friend or Foe) system which was unique to the ADF.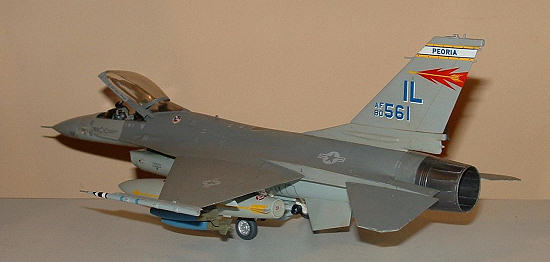
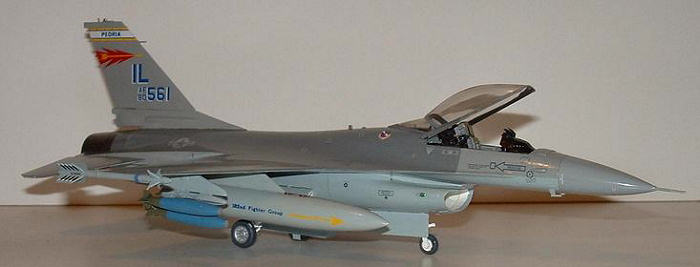
Another prominent (And more noticeable, in my opinion) feature of the ADF, is the distinctive bulge at the base of the fin. A popular reason for this is that it is there to accommodate the installation of the Bendix/King AN/ARC-200 HF single-sideband radio; another system only fitted to ADF aircraft. However the HF radio is not located in this position, it is located in the leading edge of the fin. In order to accommodate this fit a pair of hydraulic actuators for operating the rudder had to be moved thus resulting in the bulge. So while the bulge is not actually the HF radio it is there as a direct result of it being fitted to the ADF aircraft.
A final noticeable feature of the ADF aircraft is the installation of an identification light on the left hand side of the nose. The Grimes ID light (no military designation know) is canted 70° to the left and 10° up. This has been deemed an annoyance by some pilots as the gimbal limit for the AN/APG-66 radar is only 60°, meaning the can not aim both the ID light and the radar at a target simultaneously. To make matters even worse by positioning the ID light on the port side it makes it necessary to carry out an intercept from the from the left side, rather than the right as international rules demand. (Umm. If the light is on the left side of the interceptor, then interceptions are on the right side of the aircraft being intercepted. Look at photos of F-101Bs, both Canadian and US and you'll see the light is also on the left side of those planes. Ed)
Other modifications to ADF aircraft are; a modified radar to improve small target tracking and continuous wave illumination. As well the standard fit of Sidewinders and AMRAAM’s found on most F-16’s the aircraft can carry the AIM-7 Sparrow on wing stations 3 & 7. (Your editor would like to mention that he was told by pilots that the Sparrows had to be fired at the same time as not doing so would provide an asymmetrical yaw tendency that was not only disconcerting, but in certain attitudes could be dangerous. This problem was never fixed.)
Two features which were originally specified in the ADF proposal were never adopted, they were; the fitting of 600 US GAL tanks to replace the 370 US GAL tanks carried as standard; and the fitting of a drag chute.
Testing of the ADF was primarily carried out at Edwards Air Force base using an F-16B Block 15F aircraft which carried a special “ADF” fin flash in yellow.
Originally 270 aircraft were
scheduled for conversion to ADF status. The first was completed in 1988, with
the first aircraft being delivered to the 114th Fighter Training
Squadron at Kingsley Field in 1989. With the end of the cold war and the
perception that the role of the interceptor would be phased out in the 1990’s
(Who could tell what was to come!) the General Accounting Office urged a phase
out of the aircraft. It was overlooked by many, and pointed out by Lt Col. Carl
Nuzzo that the ADF aircraft also had the same general Air to Ground capability
as all other F-16’s, and indeed the ADF airframes were “low time”. To embellish
this point it 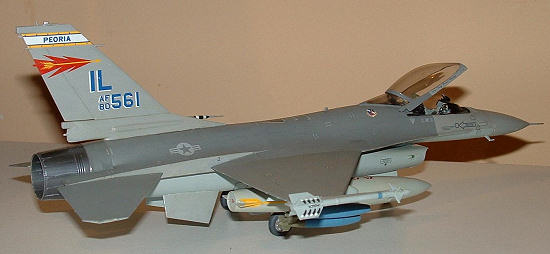 was pointed out that the Illinois ANG, and Puerto Rico ANG
aircraft have a battlefield assignment and were often seen carrying bombs.
was pointed out that the Illinois ANG, and Puerto Rico ANG
aircraft have a battlefield assignment and were often seen carrying bombs.
Finally it was shown that a total of 217 A models and 24 B models were converted, however some may have been partially converted, and some not converted at all as records are patchy.
As these Ex-ADF F-16s are a relatively cheap and quite modern asset there has been interest in them from allied countries, this has been further enhanced by the low flying hours on their airframes. Many have been sold on the second-hand market. Jordan was the first to receive 12 A-models and 4-models under the Peace Falcon program in 1997. In addition, Thailand has acquired another batch of 15 A-models and 1 B-model under the Peace Naresuan IV program. Also the Italian Air Force is receiving 26 A-models and 4 B-models under a 5-year (extendable to 10 years) lease agreement called Peace Caesar. (As another note, the Portugese F-16As are basically ADF variants as well but without some of the capabilities of the US versions. Ed)
Not a very fitting end in my opinion for an Aircraft designed to Protect North American Airspace.
| THE KIT |
Even today with Hasegawa’s “Superkits” the original F-16 has to be in my opinion one of the best designed aircraft kits out there.
The kit has 88 light grey parts, on 5 sprues, plus 6 clear parts on 1 small sprue. Now my kit like most but not all I have seen came with one complete clear sprue and another in a darkened or “smoked” effect. I do wish Hasegawa would box the clear parts separately.
 The main points
of note in the kit are;
The main points
of note in the kit are;
All of the parts were clean, crisp and free from any kind of mould defects or flash of any kind. All parts were packed together, and I wish that Hasegawa would stop trying to stuff all the plastic into one bag.
| CONSTRUCTION |
Well it being an aircraft kit I inevitably started with the cockpit. Now the main tub is not that bad, all the moulded detail looks ok to me. Now I found a cockpit update set from Model Technologies so I thought I would use it.
Looking at the side panels I decided that by the time the seat was in etc you really would not be able to see these parts, so I decided to leave them out. In fact not really being a PE person I looked at most of the parts and decided to give them a miss. To be honest I could not be bothered to sand down perfectly acceptable (in my opinion) kit parts, only to fit fiddly PE back in. The cockpit was painted light grey (don’t ask me the FS Number?), the panels black and then dry brushed with some silver, a few drops of colour being used here and there and the large MFD’s picked out in dark green.
One area which did need the PE I thought was the main canopy sill. This encompassed the area from the front of the cockpit all the way to the rear bulkhead behind the ejector seat. This was replaced by one large PE section and it does look 100% better. This was painted semi gloss back, and when dry I used the back of a knife blade to scrape back to the bare steel. Finally the kit HUD was replaced by the MT one as on reflection the PE HUD was much better.
Now the seat supplied in the kit is not bad if you intend to use the pilot figure. I generally don’t like to put figures in my 1/48th cockpits so I decided to replace the seat. I had some Pavla Models seats in the spares box and at £2.00 each they were a bargain. The horns from the kit seat were added to the resin seat. I looked at various pictures if seats and they all seemed differ so I ended up painting mine black with grey cushions and kaki belts. Don’t know if super accurate but looks good to me.
One problem I did notice (when the kit was finished, don’t you just hate that!) was that I had not added any launching rails to the seat. Now friends have looked at the kit and not noticed this, but I know and it bugs me.
 While the cockpit was drying I
assembled the main wings, tail ,air intake assembly; and Jet nozzle assembly.
All of these went together with no problems. As the aircraft I was modeling has
no outer pylons the outer holes were filled with milliput at this time. Also at
this time I superglued some steel nuts into the nose cone as the instructions
indicated weight was needed here.
While the cockpit was drying I
assembled the main wings, tail ,air intake assembly; and Jet nozzle assembly.
All of these went together with no problems. As the aircraft I was modeling has
no outer pylons the outer holes were filled with milliput at this time. Also at
this time I superglued some steel nuts into the nose cone as the instructions
indicated weight was needed here.
Once the cockpit was dry, it was fitted into the main fuselage along with the main gear well bulkheads. Everything was then closed up. As mentioned before the two main fuselage pieces go together really well with no join to clean up. At this time I decided to add the location plates for the bird shredder IFF antenna for the ADF aircraft. I was lucky as this aircraft only had the mounting plates and not the actual antenna installed. These were made from some very thin evergreen sheet I had to hand. One of the mounting plates is directly in front of the cockpit and the other at the front of the air intake.
Now I had to look at one of the major parts of the conversion to the ADF. As mentioned earlier the base of the fin on ADF aircraft is different. Here it was very easy to razor saw of the base of the kit fin and substitute the resin replacement. This was a straight butt join with superglue. Once this was done it was time to attach it to the fuselage. As there was now no tab on the bottom of the fin it was just a matter of lining up by eye, to attach this I used 2 part epoxy for strength on the butt joint as it gave me about 10 mins to make sure the fin was vertical.
Following this the main wing, tailplanes and ventral fins were attached. I must say the main wing went on with a joint which did not require many cleaning up. The main gear bay was also finished at this point.
I now decided to paint the main airframe while finished off the pylons, tanks etc. I also decided at this time to paint the nozzle assembly while off the aircraft along with the nose cone. The nose was to be FS36320 so I thought it made sense to paint then add, rather than add, mask & paint.
The main tanks go together fairly
well but still need a sanding to remove the seam. For this aircraft I was not
going to use the outer pylons or AMRAMMS so these went into the parts bin. As I
was doing an Illinois ANG aircraft I had seen them in pictures with Triple
Ejection Racks for bombs, I decided to add practice bombs and raided as Hasegawa
weapons set for 2 racks and 4 bombs. These were made up at this time. The tanks
and the racks were painted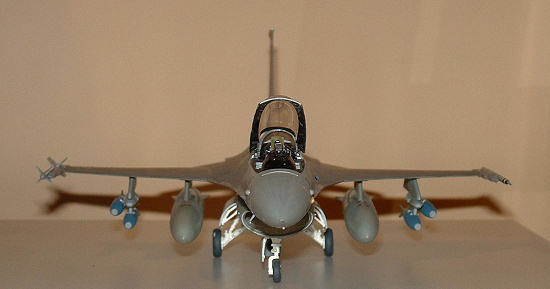 FS36375 while I have found Humbrol WWI Blue to be a
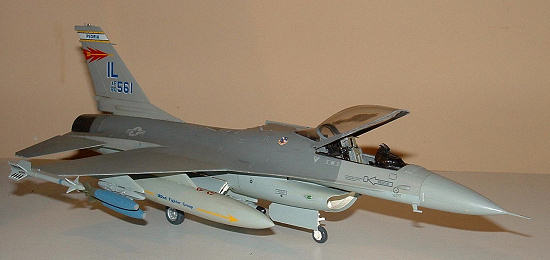
good match for US Practice bomb blue. Specific to this aircraft was an inert
sidewinder on the right pylon and an ACMI pod on the left. The kit winder was
used for the right and my last PP Aeroparts metal ACMI pod was used for the
left.
FS36375 while I have found Humbrol WWI Blue to be a
good match for US Practice bomb blue. Specific to this aircraft was an inert
sidewinder on the right pylon and an ACMI pod on the left. The kit winder was
used for the right and my last PP Aeroparts metal ACMI pod was used for the
left.
With these done and the airframe dry it was time to finish of. The nose wheel was finished and in place. Now I did find trying to get the main gear in place was a bit tricky and the instructions did not really help out. With the landing gear on I decaled the airframe (not many stencils thankfully), then finished of with the tanks, pylons, sidewinder and ACMI pod were added. To finish off the kit one final ADF fit had to be added, this being the searchlight on left side. Here a small hole was drilled out and an appropriate size MV lens from the spares bin was fitted in.
| COLORS & MARKINGS |
There has been some discussion as to whether these Illinois ANG aircraft were painted in the old 3 tone F-16 scheme or the newer 2 tone. The decal instructions called for the old 3 tone scheme and as these were done by Noris Graser who photographed these particular Aircraft and was responsible for the decal sheet I went with this scheme. In a copy photograph I had kindly sent to me from Mr Graser you can clearly see a demarcation line on the nose between the two greys.
This scheme was; undersides of Light Grey FS36375; Main top sides Dark Grey FS36118; and front uppers, Fin, ventral fins Medium Grey FS36270. The radardome was also painted FS36320. All colours used were from the Xtracolor range corresponding to the correct FS numbers.
The decals for this aircraft were from Superscale decals sheet SS480504. As far as I am able to find out the scheme was applied to two aircraft prior to a competition, Gunsmoke? I think, but I have not been able to find out a great deal of information on this. The decals went on fine, however they were not designed for this kit and were a little short for the fin, so were touched up a little with some paint.
| CONCLUSIONS |
The Hasegawa kit is still despite its age a really excellent kit. The conversion to ADF is not taxing either if you can get the right parts. The fin base was from a company called Aardvark models. Unfortunately this is a company I will never use again as they took my money for some goods and I never actually got them!
I really enjoyed this build and I can now say I have Lawn Dart in the collection.
This review as always sponsored by Visa & Mastercard the suppliers of my Stash!
September 2006
If you would like your product reviewed fairly and fairly quickly, please contact the editor or see other details in the Note to Contributors.