| KIT #: | 657 |
| PRICE: | Not currently in catalogues |
| DECALS: | Two options |
| REVIEWER: | Greg Ewald |
| NOTES: | Simple build, good for beginners |
| HISTORY |
I covered most of the competitive program between the F-22 and the F-23 in the preview. Suffice to say that Northrop and McDonnell/Douglas combined to make one of the most beautiful aircraft to never see military production. Arrgh.
| THE KIT |
I would have to say that the mold
makers outdid themselves with the casting of this jet…it is almost flawless. The
parts fit so well together, it is rather eerie, resulting in a small scale craft
that can b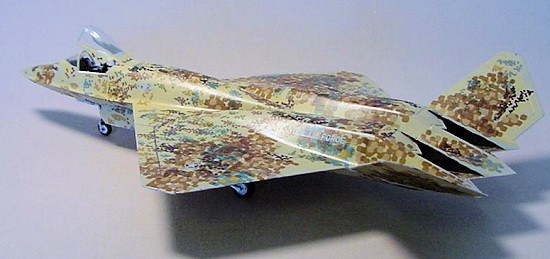 e built up easily,
perfect for people wanting to try out something new, or first time modelers.
The few fixes needed are small, and the putty was barely used.
e built up easily,
perfect for people wanting to try out something new, or first time modelers.
The few fixes needed are small, and the putty was barely used.
One complaint is that in the instructions, they have the landing gear reversed (thanks for pointing that out Shervin!), the wheels should face the inside of the struts, not the outside. Luckily, it is easy to just switch the two main gear struts and supports, no cutting or modification is required. Unfortunately, the mold sprues attach at the edges of the chines on the two fuselage halves, meaning you have to be very, very careful removing these, or you will end up with dents in your leading edges, which is not a good thing on a stealth fighter!
The clear bits, once dipped in Future, were absolutely perfect…you will be impressed by how well this whole thing fits together.
| CONSTRUCTION |
The cockpit is where we start, too
bad there isn’t much to it, but modern jets just don’t have as many cool
knickknacks as the older birds. Assembling the seat is somewhat frustrating,
although the level of detail is good, a solid cast seat would probably
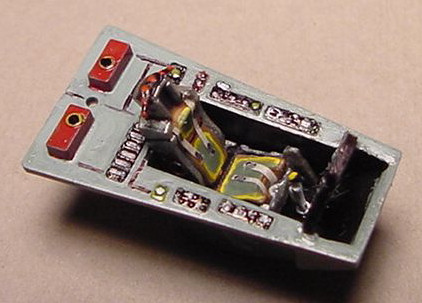 worked
out just as well as the three piece thing you have to trick together. If this
jet had gone into production, someone might have marketed a resin piece. The
control panel decal is adequate, remember, this craft uses flat screen tech, so
no more bright dials and little buttons…mostly just square patches of green and
black. I added some masking tape and foil seatbelts to the thing, and prepainted
the whole canopy.
worked
out just as well as the three piece thing you have to trick together. If this
jet had gone into production, someone might have marketed a resin piece. The
control panel decal is adequate, remember, this craft uses flat screen tech, so
no more bright dials and little buttons…mostly just square patches of green and
black. I added some masking tape and foil seatbelts to the thing, and prepainted
the whole canopy.
In step 2, you assemble the tiled inlets to the bottom fuselage, and pre-painting is a must on this model. I used Testor’s MM gunmetal on all of the inlets and outlets, then overbrushed with tan and brown. In some of the photos, the tiles actually look terra-cotta in colour, with patchy parts of metal and a darker brown.
The output/exhausts for the twin jet engines were painted dark gunmetal, and then drybrushed with silver prior to placement, even though you can barely see them once the fuselage halves go together. The canopy assembly is glued into the upper half, and once this is all dry, you can put the fuselage together…it almost snaps into place, and a few clothspins and some masking tape served as clamps during the dry time.
Perhaps the trickiest part in the assembly of the plane is the attachment of the “ruddervators”, the Y shaped flaperon-tail at the rear of the jet. To get the angle correct, you have to glue one on, and wait for it to dry…those of you with accelerators will be o.k., but if you don’t like using c/a glue, you will need some sort of a jig. Once one it is dry, you can attach the other, then looking head on, match up the angles. Even though the joints look flimsy, they hold up well.
| COLORS & MARKINGS |
 Earlier this year, I saw a conceptual
image in a trade publication of a new fractal camouflage in the test stages, and
thought: “hey, that would be neat to replicate!”, but since I don’t really build
modern jets, the idea just festered in the back of my mind. Along comes
Woodburn Photography with a nice, sealed YF-23 kit for me at a party, and the
two clicked…nice clean lines, disrupted by weird camouflage. Yep, my kind of
build. Onto checking all of the forums to see how many others had already done
this sort of camo, and what technique they used. Hmmm. Advice ranged from “use
a toothpick” to “sheet decals”. Neither would have given the desired effect,
the intense layering of colour that does such a good job of changing the
aircraft’s appearance, so I called up Ardans design, and working with them, made
a series of three decal sheets that would work, although the decaling was going
to be a bit of a nightmare.
Earlier this year, I saw a conceptual
image in a trade publication of a new fractal camouflage in the test stages, and
thought: “hey, that would be neat to replicate!”, but since I don’t really build
modern jets, the idea just festered in the back of my mind. Along comes
Woodburn Photography with a nice, sealed YF-23 kit for me at a party, and the
two clicked…nice clean lines, disrupted by weird camouflage. Yep, my kind of
build. Onto checking all of the forums to see how many others had already done
this sort of camo, and what technique they used. Hmmm. Advice ranged from “use
a toothpick” to “sheet decals”. Neither would have given the desired effect,
the intense layering of colour that does such a good job of changing the
aircraft’s appearance, so I called up Ardans design, and working with them, made
a series of three decal sheets that would work, although the decaling was going
to be a bit of a nightmare.
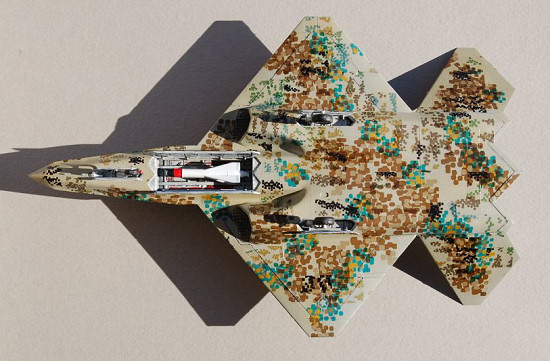
First, I used wet tissue paper to cover the bays and cockpit. Left to sit overnight, it hardens into a perfect clump that spray won’t penetrate, so the next morning, the two tone base colours of MM Desert Sand and Gulf Armor Light were applied. Two days of dry time went by quickly, then it was a light spray of Future to provide a base for the decals, which, having been printed and sealed, were drying away too.
Each section, about ½” square, was
cut out of the sheet, and applied to the craft, starting with the medium browns
and greens. This took about ten hours, then was set aside to dry for a day,
after which the other colours of sky blue and dark brown were
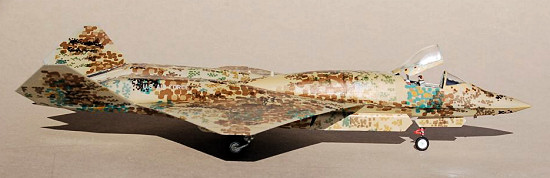 interlaced over
the first layer, resulting in the fractal effect, making the jet change colours
as you move around it. It can result in what one modeler says ,” a headache”.
Another day passes, then it is time to layer on the deep brown and black decals,
these were applied to all of the humps and larger spans of the aircraft, in
order to flatten out the visual image.
interlaced over
the first layer, resulting in the fractal effect, making the jet change colours
as you move around it. It can result in what one modeler says ,” a headache”.
Another day passes, then it is time to layer on the deep brown and black decals,
these were applied to all of the humps and larger spans of the aircraft, in
order to flatten out the visual image.
Now, it’s time to start on the bottom. Repeat all those steps again. Then, after all the decals are fully dried, three coats of gloss were applied (have to hide the lines), wet sanded in between with 1000+ grit paper, and a final satin spray sealed the deal. Yeeeeha!
| FINAL CONSTRUCTION |
 Now that the camouflaged beast was
camo’d (hey, where did it go?) it was time to attach the sundries, such as
landing gear, the bay doors, and of course, my custom bashed AGM/B. The
location pins for the bay doors are sketchy at best, be careful when you glue
them on so that the angles are the same from port to starboard. I decided to
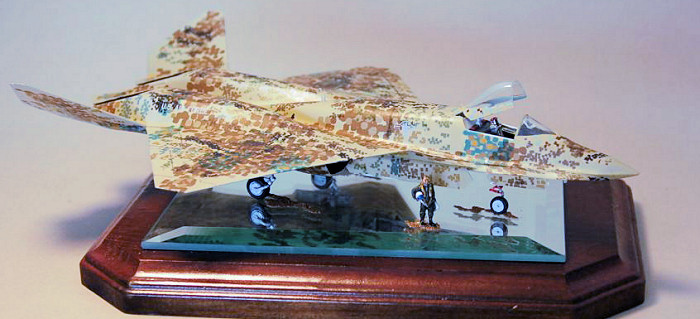
display my new “Sandman” as a landed aircraft, so the canopy was placed in the
open position, with an Italeri Nato Pilot figure standing next to it, for the
scale effect. There was no way I was going to let all of that work on the bottom
go to waste, so placing it on a small mirror (craft store, four bucks) seemed
the way to go…it has the desired effect of being able to see the camouflaged
underside, but with the reflections, it became even more of a headache!
Now that the camouflaged beast was
camo’d (hey, where did it go?) it was time to attach the sundries, such as
landing gear, the bay doors, and of course, my custom bashed AGM/B. The
location pins for the bay doors are sketchy at best, be careful when you glue
them on so that the angles are the same from port to starboard. I decided to
display my new “Sandman” as a landed aircraft, so the canopy was placed in the
open position, with an Italeri Nato Pilot figure standing next to it, for the
scale effect. There was no way I was going to let all of that work on the bottom
go to waste, so placing it on a small mirror (craft store, four bucks) seemed
the way to go…it has the desired effect of being able to see the camouflaged
underside, but with the reflections, it became even more of a headache!
| CONCLUSIONS |
This is a gem of a kit, and highly recommended. The only assembly problem is the attachment of the main landing gear, and that is easily remedied. Even in two tone gray, this sleek jet would be a great addition to any 1/72nd modern air power collection.
| REFERENCES |
Great pics here: http://aircraftwalkaround.hobbyvista.com/yf-23/yf-23.htm
Review kit courtesy of: Woodburn Photography (don’t blame my pics on them…I’m still trying to figure out this digital slr) http://www.rwoodburn2.com/
Greg Ewald
June 2006
If you would like your product reviewed fairly and fairly quickly, please contact the editor or see other details in the Note to Contributors.