Academy 1/48 F-15E Strike Eagle
| KIT #: | 2117 |
| PRICE: | €30.00 |
| DECALS: | One option: 422 TES |
| REVIEWER: | Kyriakos Labropoulos |
| NOTES: | Two Bobs 48-053 decals used (€13.50) |
| HISTORY |
As everyone knows, the F-15E is probably
one of the most successful dual-role fighters. It originates from a superb
air-superiority fighter which evolved into a very capable all-weather,
long-range, deep interdiction aircraft. The F-15E is equipped with a
powerful synthetic aperture radar (AN/APG-70), modern dual-cockpit and
state-of-the-art ECM equipment. With a maximum take-off weight of 81,000lb
it can carry almost 23,000lb of weapons that include air-to-air missiles
such as AMRAAM and Sidewinders, air-to-surface missiles such as Maverick,
HARM and JSOW, and smart bombs such as those of
 the Paveway family or JDAM.
With LANTIRN systems it has an significant night-attack capability which
combined with the inherent capability to successfully defend itself, makes
the F-15E one of the most potent night attack aircraft ever flown.
the Paveway family or JDAM.
With LANTIRN systems it has an significant night-attack capability which
combined with the inherent capability to successfully defend itself, makes
the F-15E one of the most potent night attack aircraft ever flown.
The F-15Es proved their value in the Gulf War. When Operation “Desert Shield” began, F-15Es from the 336th FS of the 4th Wing started arriving at Thumrait, Oman on 12th August 1990, although later they moved to Al Kharj, Saudi Arabia. They carried various missions and they were tasked with finding and destroying Scud missiles. Since then, F-15Es have participated in various Operations including Afghanistan (Enduring Freedom) and again Iraq (Iraqi Freedom).
Of the units flying the F-15E, 336th FS ‘Rocketeers’ was the first operational squadron achieving IOC on 1st October 1989. On 17th January 1991, the 336th launched 24 aircraft against targets in Iraq. By the end of ‘Desert Storm’ it had flown approximately 1,100 sorties, logging 3,200 hours, dropping 6.5 million pounds of ordnance, with the loss of two aircraft. Since then, the squadron participated in Operation “Southern Watch” and “Iraqi Freedom”, where the Rockets flew over 1,700 combat missions and dropped nearly 1.2 million pounds of bombs.
| THE KIT |
Having returned to the hobby only recently and being more of a collector (big-stash of un-built kits) rather than a modeller, I wanted to have a “quick” built. Going to my favourite hobby shop and following the advice of the fellow modeller that runs the shop (I keep reminding him of this occasion every now and then, and I guess that justifies the discount he keeps giving me to all subsequent models!!) I opted for the Academy F-15E with weapons, mainly because it had a nice box-art and weapons.
I tend not to put weapons on my model aircraft since they take away some of the beauty of the aircraft lines (plus they take so much time for painting, attachment etc!!), so in retrospect it seems rather strange why I gave such a large amount of money for an aircraft with weapons and not use them after all!! I should have gone for the Revell F-15E with or without weapons as from what I read is a very good kit. Anyway, I bought it, I should build it.
 The kit contains no
less than 11 sprues, one of them includes the clear parts. The molding is
very crispy, with minimum flash and fine recessed panel lines. In the
cockpit, there are two sets of central consoles, parts # D3 and D4
obviously corresponding to an F-15D. The cockpit side consoles include fine
raised detail which together with the satisfactory representations the
ACES-II ejection seats makes for a positive initial impression.
The kit contains no
less than 11 sprues, one of them includes the clear parts. The molding is
very crispy, with minimum flash and fine recessed panel lines. In the
cockpit, there are two sets of central consoles, parts # D3 and D4
obviously corresponding to an F-15D. The cockpit side consoles include fine
raised detail which together with the satisfactory representations the
ACES-II ejection seats makes for a positive initial impression.
Moving on the fuselage, the dorsal brake can be built in the open-position, although I have not seen many pictures of actual aircraft with the brake open. Well, it’s there, and if you think it looks cool, go ahead and do it! I would rather have separate ailerons instead, which is not a feature of this kit. In fact, when the aircraft is at rest, the ailerons bleed down, while the flaps remain locked in position. Ahhh well, I will model my aircraft as one that has just arrived….
The clear parts have a noticeable molding seam in the middle. I had managed to obtain a spare Revell canopy set with the help of the same guy that sold me the Academy kit (I call it after sales support!!!), but realized that the cross-section of the Academy version is indeed correct, and it is unavoidable that a seam is there if one is to mold the part with the correct shape. Instead, the Revell version is rather flat on the sides; that’s how they manage to mold the part on a different axis, and avoid having a seam in the middle. It’s your choice as to which one is more acceptable.
Weapons include 4 AIM-9L Sidewinders and 4 AIM-7 Sparrow III air-to-air missiles, 2 GBU-12 500lb Paveway LGB, 12 Mk-82 (w/ M904 fuse) LDGP 500lb bombs, 12 CBU-87 CEM, and what looks like an ASM-135 anti-satelite missile! External load includes also one each of LANTIRN AAQ-13 navigation pod and LANTIRN AAQ-14 targeting pod, and three 610 gallon drop tanks. Appropriate pylons and launch rails are provided for all this ordnance…..Too much ordnance, too little time!
 Finally, there
exists the option to assemble the air intake in the take-off drop down
position. In addition, optional ‘turkey feather’ exhausts are provided as
well as the standard (for USAF) ‘featherless’ type. Each of the later type
consists of six parts, plus 17 actuators.
Finally, there
exists the option to assemble the air intake in the take-off drop down
position. In addition, optional ‘turkey feather’ exhausts are provided as
well as the standard (for USAF) ‘featherless’ type. Each of the later type
consists of six parts, plus 17 actuators.
Decals depict an F-15E from Nellis AFB, Nevada (WA tail code). That’s the certain part! It probably belongs to 422nd TES. Regarding the serial number it depends on what you look at. Specifically, in the front box art, the aircraft has the serial number 74-677, however F-15Es start from FY86, so no such aircraft exists. Academy probably based their markings on a photo of an F-15E from the Aerofax book which shows the same aircraft. Unfortunately, the FY is hidden from the horizontal stabilizers! Are we done? Not really, photos on the side of the box show a finished model from Nellis AFB (WA tail code) painted in Compass Ghost, without the yellow and black checkerboard tail stripes, a long standing Nellis tradition. True, F-15C 82-0029 was painted in essentially Compass Ghost during trials to determine the most effective F-15E camouflage, but it was a C model, and it was only for trials. In any case, the 88-387 shown in the photo at the side of the box does not exist either as a serial number. No worries, a different serial number is given in the decals inside, anyway, 82-1677, the aircraft painted in FS36118, but ……this serial number is also wrong. It should be 88-1667, an F-15E-45-MC Lot III aircraft. Academy came that close in trying to depict the aircraft from the Aerofax book……
| CONSTRUCTION |
Surprisingly enough, construction starts from the cockpit! Now, I know that I am not a great modeller, nor I will ever become one, but my (limited) experience with all the lovely details that Monogram provides for cockpits and landing gears have made me expect that other kit manufacturers do so, or at least are rather accurate in those areas. I firmly believe that since we can not convincingly model aircraft in flight, at least we can give it a good shot to model them as accurate as possible when parked, and to this extend it’s always a good idea to have an accurate cockpit and landing gear (thanks Monogram for supporting my ideas J).
Academy’s cockpit is not that bad (at least it’s not like Hasegawa in 1/72 – yes I hate decals in cockpits) and has fine raised detail both on the instrument panels and the side consoles. The rear main instrument panel, although not absolutely correct, it does capture the whole idea and when painted and drybrushed it really looks very convincing. However, the (rear) instruments cover has the wrong shape and is for an F-15D (i.e. without the MFDs). The cover (part D-26) was reshaped appropriately with the addition of a portion made of aluminium foil. That serves to cover the warning/caution/advisory lights panel which was also added and made from plastic. A handle was added above it, made from stretched sprue.
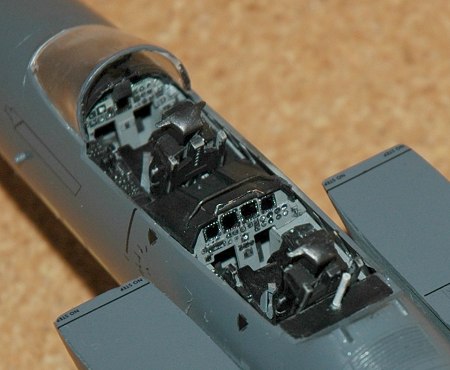 The front main
instrument panel, again not absolutely correct, is convincing with the
exception of the two MPD, which are smaller than what they should be and
have the same size as the MPCD lower in the centre. Small detail? Probably
yes, but it almost made me buy a replacement resin or photo-etched cockpit.
I was only saved by convincing myself that this was supposed to be a
weekend project (hint: it was eventually finished some months afterwards).
Anyway, not being able to replace those MPDs I learned to live with it and
went on with my life. Before I did that, however, I added an upfront
control panel and replaced the HUD frame with one made from sprues and
depicting the wide-angle version (not the one for F-15A/B/C/D as given by
Academy). I also added a few details with stretched sprue and some
structural ribs on the sides.
The front main
instrument panel, again not absolutely correct, is convincing with the
exception of the two MPD, which are smaller than what they should be and
have the same size as the MPCD lower in the centre. Small detail? Probably
yes, but it almost made me buy a replacement resin or photo-etched cockpit.
I was only saved by convincing myself that this was supposed to be a
weekend project (hint: it was eventually finished some months afterwards).
Anyway, not being able to replace those MPDs I learned to live with it and
went on with my life. Before I did that, however, I added an upfront
control panel and replaced the HUD frame with one made from sprues and
depicting the wide-angle version (not the one for F-15A/B/C/D as given by
Academy). I also added a few details with stretched sprue and some
structural ribs on the sides.
The whole cockpit was painted with Pactra A38 Dark Gull Gray (FS 36231) and the appropriate bits (including instrument covers) were painted with Gunmetal (Humbrol 27004) (instead of flat black, as I think it looks better) and with grey, white, red knobs as needed, whereas, the MFDs, and MPCD were painted with Tamiya X-25 clear green. After they dried, the cockpit parts were “rubbed” with a finger to bring out the slightly shined look of the gunmetal paint. The ACES-II ejection seats were painted with gunmetal for the main body (polished as above) and flat black (Humbrol 33) for the cushions, which before they were dry, were “sculpted” with an old brush to give the furred look. Belts were added from painted sanding paper.
The raised intakes were selected and glued. Not a good fit at the bottom side, required the slight use of putty to deal with the seam. The intake ducts (D11-D14) left also a visible seam and a huge gap between the front parts of the intakes. Aligning them with the main fuselage (parts A1,A2) was also difficult. Initially they were painted gloss white, but from photos I have seen they appear to be painted with gunship grey. Luckily this dark color does not leave much to be seen. However, a resin seamless replacement part would be more than welcome.
Now comes the fun part, i.e. bringing together the nose section with the main body. I still haven’t figured out why Academy decided to cut the nose section on an inclined line, and not right on a panel line. In any case, aligning and gluing the parts together was difficult and required the use of putty on hard-to-reach-and-sand areas.
Wings, vertical and horizontal stabilizers were assembled and the dorsal brake was glued in the closed position. Fitting was not satisfactory, again, but I was too lazy to sand it down and tried my best: a step is still visible. I guess a good advice would be to fill the interior of the brake so that the brake itself sits on something and doesn’t sink into the gap. Next time, on another F-15.
Having missed the “weekend project” deadline I was still too lazy (or too frustrated) to drop down the ailerons. All these guys out there please do so. I did, however, take care of the rear fuselage fairing, which needs to be removed (cut) so that it leaves the tail hook exposed. The F-15Es do not have the door covering the tail hook, but not being able to find a spare tail hook, I used the kit part (#D7) (which includes the door) pending future replacement. I also added the two ALQ-135 antennas at the two booms; a square antenna on the right side and a round antenna on the left.
Next was the sad
story of the Conformal Fuel Tanks (CFT). Parts F1 & F2 were big pieces and
unavoidably, due to their complex shape, were slightly warped. This made it
very difficult to attach on the sides of the fuselage, and necessitated the
use of putty. I tried my best (again been rather lazy), but some seam is
still visible at the front ends of the CFTs where they meet the intakes. In
the real aircraft the CFTs don't fit flush and there is a slight gap there
to allow for movement of the front part of the intakes, so it’s up to you
if you want to fill this area with putty.
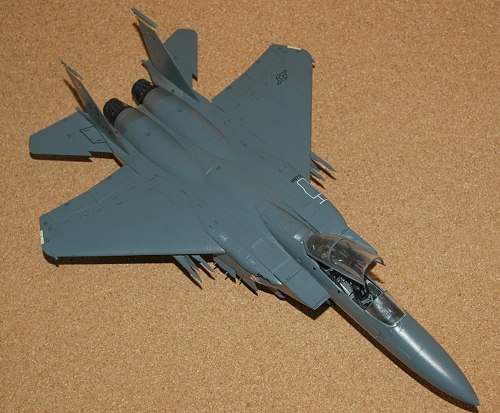
The main problem with the CFTs, is that they are of the wrong type. F-15Es use type-4 CFTs, with three outboard weapon stations each. Academy provides CFTs with only two outboard stations, possibly type-3 (???). Using spare pylons from an Italeri F-16, cut into the appropriate size, I added a third pylon in each CFT in the outboard row (i.e. stations RCT-4/-5/-6 and LCT-4/-5/-6), and kept the interior row with two stations for air-to-air missiles (stations 3C/7C and stations 4C/6C). Finally, I added the appropriate braces from stretched sprue (squashed at the end to become flat) and an exhaust duct (heat exchanger ventral exhaust duct) at the end of each of the CFTs, made from aluminium foil. Nevertheless, I did manage to forget adding two rather large inlets on the side of the CFTs, which, as expected, Academy does not provide too. I wonder, what photos they used to prepare the molding of their CFTs!!!
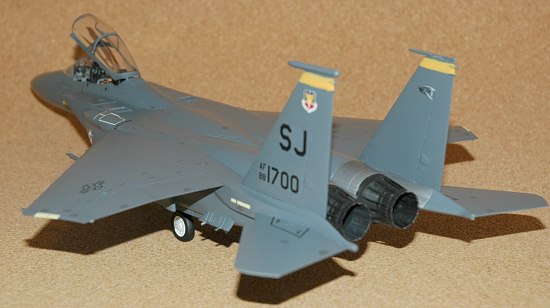
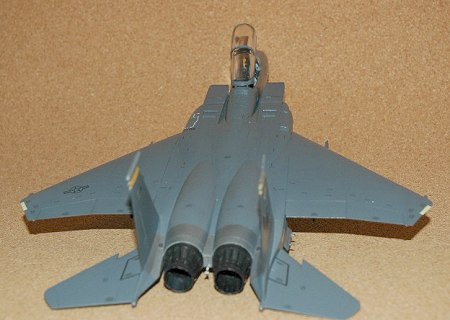
Reaching the end of the assembly process, I prepared the exhaust nozzles. As mentioned above, they consist of a ring (#H2) and five pieces, plus actuators. It was extremely difficult to fit the five pieces together and make a circular cross-section, and I ended having to sand them a little bit to make them fit. I added the actuators (15 in each nozzle, three per one-fifth of the nozzle). Strangely, Aerofax mentions that there existed 17 titanium covers (feathers) that protected the actuators for the nozzle, which were removed by a TCTO since they were a maintenance burden. So how many actuators are there? I counted 15 actuators in actual photos, and that’s the number I ended up using in my model. The nozzles were painted with my trusty Humbrol gunmetal, carefully polished to give the metallic look I wanted. I should have used other colors to depict the ceramic layers in the interior, but I was already frustrated with the difficulties I encountered while assembling the nozzles. That can “easily” be done during the next major overhaul of the model!
Finally, I painted the landing gear, wheels, wells and inside of the doors with Matt White (Humbrol 34), and used graphite from pencil to weather them a little. I attached the wing pylons, the LANTIRN system, and I finished the main construction phase with the canopy and windscreen. As I mentioned, earlier, there is a visible seam. Holding my breath, I used an X-ACTO to cut away as much of the seam as possible. Then I used a series of sanding papers and finally cleaned the canopy and windscreen with toothpaste. It’s not perfect still, but I’ll look for other solutions in the future (and that’s why I did not glue the windscreen on the fuselage).
| COLORS & MARKINGS |
The basic color of F-15Es is FS36118, and I used Humbrol 125 (satin US dark grey) for this purpose. Some aircraft have a slightly darker radome, but it’s not that bad if you use the same color in that area too. Before I sprayed the gunship grey, I painted the rear fuselage (engine area) with a mix of Humbrol 27001 (Matt Aluminum) and Humbrol 27003 (Polished steel) in an attempt to match the color from photos. I masked the area and airbrushed the gunship grey. My first attempt was a disaster, since I did not dilute the paint as needed and pretty much I sprayed small blobs all over the model. No worries, just some quality time with me, the model, paper, thinner and fine sanding paper to remove the initial coating. My next attempts were much better, and I found out that the F-15 is a big model requiring several thin coatings of paint to cover the whole area.
 Next came
weathering. When I modelled the aircraft, some months ago, I had not used
the preshading technique which I have now used on some subsequent models,
instead relying on the old traditional pencil and finger. I dared not use
wash or other weathering techniques, so I started passing the pencil on all
recessed panel lines. The end result looked kind of bizarre, though, and I
took the decision to spray another coating of gunship grey (after I had
unmasked the engine area ^*@^&*%). Surprisingly, at least for me, the first
thin coating of paint did not cover completely the panel lines, but at
least it had toned down their weathering. It certainly looked much better;
not too dirty, not too clean. Since then, I have used this technique on a
couple of F-16s, but noticed that it only looks good on dark greys only.
After the paint was dry, I covered the whole model with Humbrol gloss
varnish, which took too long to dry (I actually wonder if it ever dried!)
Next came
weathering. When I modelled the aircraft, some months ago, I had not used
the preshading technique which I have now used on some subsequent models,
instead relying on the old traditional pencil and finger. I dared not use
wash or other weathering techniques, so I started passing the pencil on all
recessed panel lines. The end result looked kind of bizarre, though, and I
took the decision to spray another coating of gunship grey (after I had
unmasked the engine area ^*@^&*%). Surprisingly, at least for me, the first
thin coating of paint did not cover completely the panel lines, but at
least it had toned down their weathering. It certainly looked much better;
not too dirty, not too clean. Since then, I have used this technique on a
couple of F-16s, but noticed that it only looks good on dark greys only.
After the paint was dry, I covered the whole model with Humbrol gloss
varnish, which took too long to dry (I actually wonder if it ever dried!)
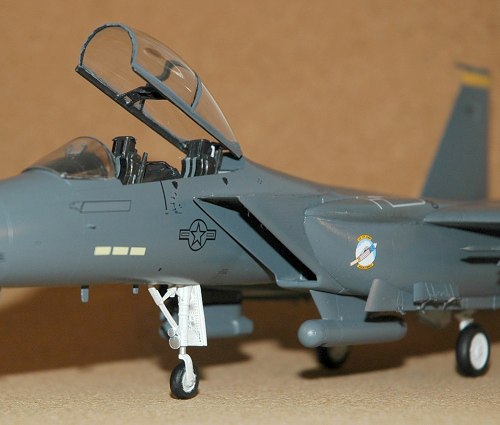
After the painting phase was over, I was eager to put the decals. As I mentioned before, the serial number 82-1677 was wrong, but looking at my spare decals, I found some extra 8s to correct the serial number to 88-1677. I started with the WA tail codes, then stopped and went for a coffee at my favorite hobby shop to tell my friends that I started the decals after so many months of dealing with the kit (as you may have figured out I am a slow builder, mainly because I don’t have that much free time). Coming back and looking forward to complete the process, I was shocked to find out that the decals had curled and would not remain flat. I tried again and again, with other smaller decal too, but it seemed that they would not stick, even after the application of Testors decal solvent.
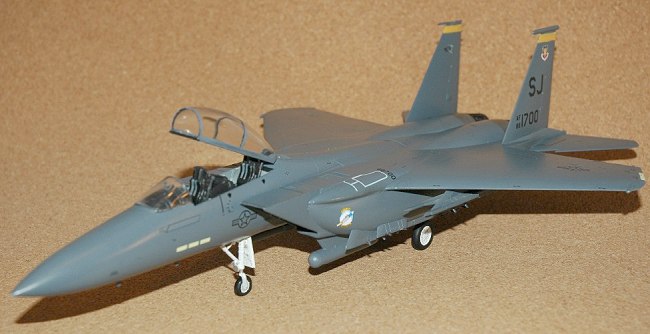
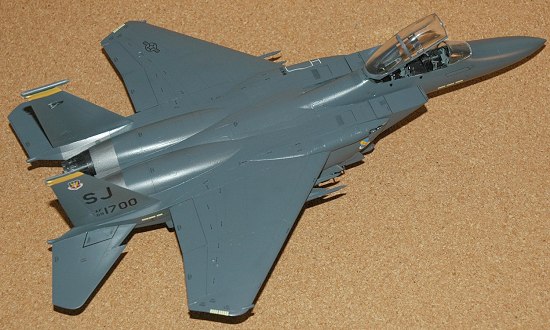
Subsequent to the initial frustration, and having convinced myself that I did not like the markings offered by Academy anyway, I looked for aftermarket decals. I opted for TwoBobs 48-053 F-15E Iraqi Freedom Throwback Nose Art 336th Sqn, since I liked the dragon on 88-1700. The quality of those decals was superb, although I found out that they were slightly sensitive to decal solvents. They did not need much anyway, so that was probably the happiest phase of the whole kit. As you can see in the pictures, I chose not use the yellow-green dragon and the mission markings on the left side of the forward fuselage, as I had certain reservations about the necessity of OIF. I can always come back and add the additional markings if needed. I also did not use the small decal on the left intake (U.S. Air Force F-15E-47-MC / Serial No 88-1700 / service…..), since aircraft 88-1700 is a F-15-46-MC. Actually only 89-0485 belongs to batch -47. Nevertheless, photos of the actual aircraft (88-1700) and most of the F-15Es do not seem to carry that stencil in that area. Also, I could not find any decal for the LANTIRN, so I left them without any until the next major overhaul!
I sealed the decals with Humbrol satin varnish, but it also took too long to dry. In subsequent projects I have used hagiography varnishes and I can assure you that gloss varnish is amazing. Notice, that there is no FUTURE in Athens (OK, the previous phrase sounds rather strange). I mean, I read so much about how useful FUTURE (or KLEAR or whatever its brand name is) is, but unfortunately we cannot find this product here in Greece.
The project was coming to an end. I glued the main landing gear in place and proceeded with the nose gear. I attached the nose gear wheel but it was not vertical. I think I should have opened the whole slightly and shortened the pin. As one might have expected the nose gear wheel broke off during my attempt to remove it from the gear. I had to use a strong CA glue and a metal pin to hold it in place (and vertical), but I lost some of the detail. I finished the model by adding a few more antennas, hand-painting the yellow-orange strip on each of the vertical stabilizers and a few touch-ups here and there. It was over.
| CONCLUSIONS |
So here it is, a nice (to my eyes) model of an F-15E. It is not a show candidate, nor was it meant to be one. So, what is the verdict?
Surprisingly as it may sound, I really enjoyed building this kit. It may not be as accurate as the Revell version, but since I haven’t built that kit, I cannot say for sure how accurate it is, at least compared to the Academy one. Certainly, the Academy kit has some errors. The most important one, according to my opinion, is the wrong type of CFTs with their lack of the third pylon and inlets. However, Academy offers a canopy with the right shape (but with a seam), and better-shaped exhaust nozzles (once you overcome the difficulty of assembling them) than the Revell ones. I also noticed that most Revell models of F-15E have a slight nose-up attitude, perhaps the result of a slightly longer nose gear; the Academy F-15E looks just right instead. Other minor problems were mentioned above and need to be dealt with to improve the accuracy of the kit. Unless it was a problem only with my kit, you will probably need to buy aftermarket decals too.
So why do I feel so good about it? Well, I finished it, and I am now a proud owner of an F-15E in 1/48. But most importantly, I learned a lot about the actual aircraft while I was trying to figure out what was details were wrong with the kit. Modelers that will put all the aftermarket goodies available on their F-15, should consider the Academy kit seriously, as despite its shortcomings it is a very enjoyable kit.
October 2004
| REFERENCES |
McDonnell Douglas F-15 Eagle. Supreme Heavy-Weight Fighter, - Dennis R Jenkins Aerofax (1998)
F-15 Eagle Variants, World Air Power Journal, Vol. 33 Summer 1998, pages 114-137
Strike Eagle Ops in Iraq, Air Forces Monthly, February 2004
The Complete Book of Fighters – William Green, Gordon Swanborough, Barnes & Noble Books (1998)
If you would like your product reviewed fairly and fairly quickly, please contact the editor or see other details in the Note to Contributors.