Testors 1/48 F-19 Stealth Fighter
| KIT #: | 595 |
| PRICE: | $ |
| DECALS: | Two options |
| REVIEWER: | Dan Lee |
| NOTES: | Claimed to be the best selling kit of all time |
| HISTORY |
The Vietnam War and 1973 Yom Kippur War (Israel vs Egypt/Syria) showed the increasing effectiveness of radar guided SAMs and AWACS aircraft. The USAF realized that their current generation of aircraft would have a hard time dealing with Soviet SAMs, AA guns and AWACS if the big one (World War Three) started. They wanted a strike plane that had a low radar cross section (RCS) which could penetrate the most heavily defended airspace in the world, complete its mission and survive.
The Stealth Fighter project was initiated in 1973 to evaluate various potential stealth designs. Eventually, Lockheed’s Skunk Works won the contract to develop a stealth fighter. By the early 80s, many defense “analysts” had heard of the stealth fighter program and there was wild speculation on what a stealth fighter would look like.
When Testors/Italieri released the F-19 model kit, they claimed that their design of the stealth “fighter” based on the literature that was available at the time and the guesses of aviation experts. As politicians have a tendency to do, they got upset at the release of “secret” information and conducted a congressional hearing over a model kit(?). The shape of the F-19 was strikingly similar to the SR-71 which was a reduced, but not low, RCS design (most folks didn’t know about the low RCS flying wings that Northrop developed in the 1940s which was the basis of the B-2.) For most of the 80s when folks talked about a stealth fighter, they imagined the F-19 or something similar to it.
As many of you know, this particular kit was called the best selling model kit of all time and beat the previously declared model, the original Star Trek USS Enterprise, in record time.
In the 1986 novel, Red Storm Rising, Tom Clancy wrote about a two seat stealth fighter that was called the F-19. It could shoot down Mainstay AWACS aircraft and fly strike missions thru EM rich airspace undetected at treetop level. The novel and the hype of many aviation experts gave the ordinary folks (like the reviewer who was a teenager at the time) the impression that the stealth fighter was the ultimate flying killing machine. Of course many of us were kinda disappointed when the real F-117 Nighthawk (should have been an A, not F) was unveiled to the public in 1988.
| THE KIT |
 The F-19 kit is a fairly simple
kit compared to the ones today as it consists of 62 black parts and 4 clear
parts. The detail is pure 1980s with plenty of ejection pin marks on the
insides of the doors and somewhat thick small parts.
The F-19 kit is a fairly simple
kit compared to the ones today as it consists of 62 black parts and 4 clear
parts. The detail is pure 1980s with plenty of ejection pin marks on the
insides of the doors and somewhat thick small parts.
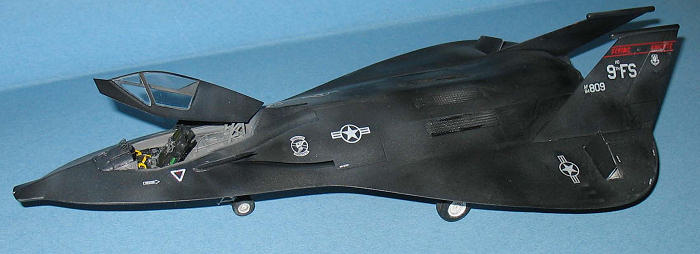
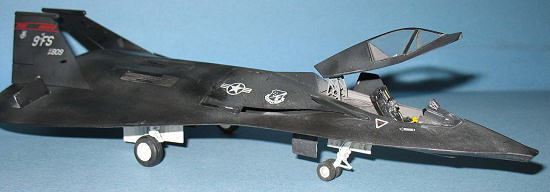
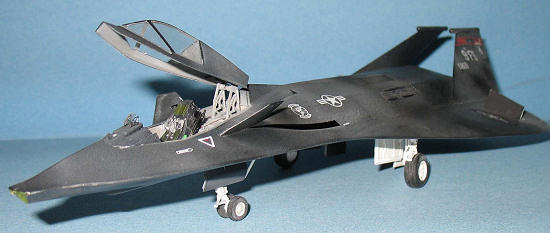
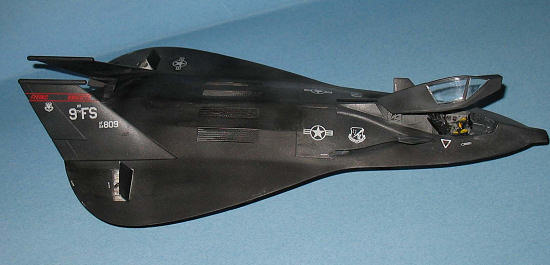
The F-19 comes with two different decal markings, a daylight paint scheme and a night paint scheme as well as two different canopy types (one for training and the other for combat.)
Originally, I wanted to build this kit OOB, but I was inspired by a Hyperscale build article which showed how one could make the basic kit look a lot better.
| CONSTRUCTION |
The cockpit is rather sparse so I opted to do some scratch building. I rummaged thru my spares box looking for bits to use. I found the remains of my Academy F-14 and took the pilot’s console and cut out the console cover from the fuselage as well. The kit console cover was hacked away without too much issue.
I originally wanted to use a new cockpit tub as well, but it wouldn’t fit so I used the original one. The rear of the cockpit had lots of ejector pin marks, but I didn’t do a good job of eliminating them so I covered them up using pre cut 10 thou plastic sheet. It looks okay and covers up the scratches from my attempted hacking. Once done, I glued the cockpit into the fuselage and discovered there were large gaps in the sidewalls. I removed the cockpit and took some trimmed 20 thou plastic sheet and fit them as the sidewalls. Once the glue held the sheets in place, I reglued the cockpit back in place.
I discovered too late that the F-19 is a bit of a tail sitter so I had to do some surgery on the nose to insert two ¼ oz fish weights to get it sit properly so I suggest that anyone who builds this to add weight before gluing the fuselage upper and lower halves together. The last part I added was a triangular piece glued to the deep part of the nose where the laser designator was located—my intent was to add a clear part to represent the laser inside the bay and to provide some interior detail. The fuselage halves went on without fuss (no warping) and I had to do some sanding and filling along the edges.
 The kit’s landing gear are two
piece affairs which I do not like one bit because they are a pain in the rear to
sand and fill (and I don’t know why some manufacturers insist on doing this.)
Again, I opened up the spares box and selected the single piece landing gear
from a ruined F-4 Phantom. I trimmed the landing gear to make the F-19 sit a
bit lower and to make it appear that the gear would fit if they were retracted
into the bays. The forward landing gear was cut and trimmed on a 30 degree
angle.
The kit’s landing gear are two
piece affairs which I do not like one bit because they are a pain in the rear to
sand and fill (and I don’t know why some manufacturers insist on doing this.)
Again, I opened up the spares box and selected the single piece landing gear
from a ruined F-4 Phantom. I trimmed the landing gear to make the F-19 sit a
bit lower and to make it appear that the gear would fit if they were retracted
into the bays. The forward landing gear was cut and trimmed on a 30 degree
angle.
Once I finished trimming the landing gear, I started drilling holes in the landing gear bays and in various places in the gear itself. I then inserted 30 gauge wire into the holes and glued them in place with thin CA glue applied with a pointed toothpick. The wire was used to represent various lines and conduit in the rather bare landing gear bays and landing gear. Once that was done, I superglued the landing gear in place.
The weapons bay was sealed up because I didn’t want the hassle of weaponry. The slanted tails were glued on and the F-19 was ready for the paint shop.
| COLORS & MARKINGS |
Paint
The first thing I did was to paint the landing gear and gear wells flat white.
The F-19 has two different schemes, a Dark Ghost Grey version for daylight operations and a black one for night ops. I decided to paint it black, black as night, black as coal. Er, maybe I confused the camo scheme of my F-19 with a great Rolling Stones song. Either way, a monochromatic scheme is rather boring and it needs some variation.
After I filled in the landing gear wells with wet tissue, I painted the base coat of Gunze Aquaeous H12 Flat Black. Then I sprayed on Gunze steel and RLM66 over top of it in random spots and squiggles. I then loaded up thinned Flat Black and sprayed over top of the squiggles to blend everything in.
 The canopy was assembled at this
stage (using the slab sided mission canopy) and it was masked, painted Dark Gull
Grey first and then Flat Black last.
The canopy was assembled at this
stage (using the slab sided mission canopy) and it was masked, painted Dark Gull
Grey first and then Flat Black last.
Once everything was dry, I sprayed on two thin coats of Future to provide a gloss coat for the decals.
Decals and Wash
I didn’t like the ones that came with the kit, but I was lucky that I had decals from the expensive debacle that was my RM F-117. The decals were among the only things that I’d saved from that mess when I stopped sobbing. I applied some of the decals and they worked well (unlike the rest of the F-117 kit) with Solvaset. The markings were for the 9th TFS, the Black Knights. The red decals were easily trimmed with a sharp knife. Once the decals were dry, I washed off the Solvaset residue in preparation for the flat coat.
With a Black Stealth plane, there is really no need for a thin black watercolor wash except around the white landing gear wells and landing gear. I used a thin wash to bring out some of the detail and that was it.
The F-19 was sprayed with Gunze Flat for the final coat.
| FINAL CONSTRUCTION |
The gear doors were glued in with CA glue and thin plastic rod was added to represent the door actuators as they don’t close themselves. The speed brakes were painted white on the inside and black on the outside while the actuators were painted steel.
The F-4 wheels were hand painted and glued to the landing gear.
I glued (with CA glue) one of my last MV lenses to the landing gear for the forward landing light.
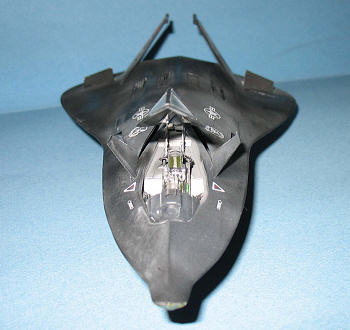
Unlike most planes, I finished with the cockpit last. I hand painted the instrument panel with flat black and then dry brushed the details with silver, white, yellow and red. The CRTs were painted with Clear Green. I used the Eduard F-117 photo etched HUD with a clear piece of acetate and mounted it on top of the F-19 cockpit hood. I also cut a small piece of plastic rod for the throttle, glued it in place and then painted it steel.
I was not impressed with the kit ejection seat and bought a True Details ACES II ejection seat for the kit. I hand painted the seat with the colors suggested in the instructions and when I was done, I super glued it into the Frisbee for the final piece.
| CONCLUSIONS |
The F-19 is a very easy kit to built, but I realized the importance of a spares box if you need or want to do some easy modifications without the headache of scratch building. Overall, it was a fun easy build to do of the “best selling-est” kit of all time.
October 2006
Copyright ModelingMadness.com. All rights reserved. No reproduction in part or in whole without express permission.
If you would like your product reviewed fairly and fairly quickly, please contact the editor or see other details in the Note to Contributors.