| KIT #: | BX 4801 |
| PRICE: | $40.00 SRP |
| DECALS: | Several options |
| REVIEWER: | Pat Earing |
| NOTES: |
New tool kit with resin and brass
parts. Vac canopies. Conversion of T-6A kit. |
| HISTORY |
The
success of the
The
PC-9 looks very much like a PC-7, though it is clearly larger and heavier, and
has a distinctive stepped tandem cockpit with a raised canopy, giving the back-seater
a much better forward view. The canopy hinges open to the right. The PC-9 has
only about 10% commonality with the PC-7. The PC-9 is powered by a PWC PT6A-62
turboprop engine with 860 kW (1,150 SHP), downrated to 710 kW (950 SHP), driving
a four-bladed Hartzell propeller. The cadet and flight instructor sit on
Martin-Baker Mark CH11A ejection seats, ejecting through the canopy. The machine
is fitted with hydraulically-operated landing gear and a hydraulically-operated
ventral airbrake. The PC-9 retains the six underwing hardpoints of the PC-7,
with the inner two being "wet" for carriage
 of 145 liter (41
Following the
introduction of the PC-9 Mark II,
Currently there are
at least six countries using the PC-9M including
The PC-9M was used
as the basis for the Raytheon "T-6A Texan II", the winning candidate for the US
military's "Joint Primary Air Trainer System (JPATS)", intended to provide
flight training for the US Air Force and Navy. JPATS was conceived by the
Pentagon in the late 1980s, leading to a preliminary request in 1990. Beech
Aircraft came to an agreement with 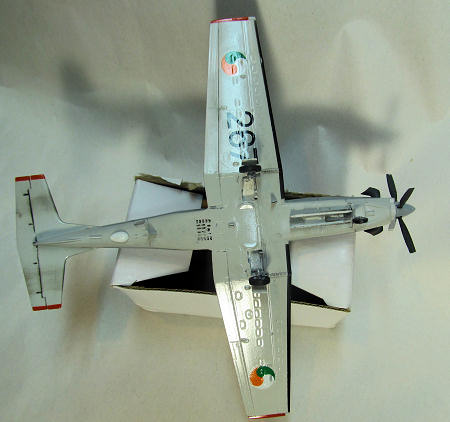 JPATS prototypes. The first flew in December 1992, followed by the
second in July 1993. The second new-build prototype was used in the JPATS
evaluation.
JPATS prototypes. The first flew in December 1992, followed by the
second in July 1993. The second new-build prototype was used in the JPATS
evaluation.
The flight
evaluation was performed from July through October 1994 at Wright-Patterson Air
Force Base in
Manufacture of the T-6A began in February 1997, and the first production
aircraft rolled out at the Raytheon (Beech) plant in
The
T-6A looks like a PC-9M externally, the only immediately visible change being a
separate windscreen, but it is very much different in detail, with only about
30% commonality with the PC-9M. It has a strengthened fuselage; pressurized
cockpit; and state-of-the-art avionics, including
| THE KIT |
I have to say that the release of
the Ibex T-6A got me a little excited.
Generally, I make note of new kit releases and start looking for future
deals. However, with this kit I
threw out all reason and pre-ordered two from Squadron.
While I waited for the kits to arrive I
began collecting information and images in order to see if I could get a PC-9M
from the Ibex offering. Although
the two airframes look similar, they don’t in reality share much in common-but
they look similar, and building
 on that I felt that a decent representation
could be attained.
on that I felt that a decent representation
could be attained.
Eventually, (I was a very impatient
customer) my two kits arrived. My
first impression upon opening the box was positive; however there is not a lot
in that seemingly big box to start with.
The bulk of the kit consists of one large plastic sprue, a small plastic
bag containing the resin parts, vacuformed canopies and a large decal sheet.
Having read a few in box reviews I was anticipating something marvelously
state of the art, with Tamigawa-esque scribed panel lines and fit.
What I got was something more akin to an Aeroclub’s low pressure
injection molded conversion, and some disappointment.
Okay… disappointment may be too strong a word choice. Really, what I opened up was a very decent and buildable looking model kit. No, the molded details are not as crisp as we currently have come to expect; but, they are recessed and the resin bits are fantastic. Clearly I had high expectations, and the reality fell a bit short from a visual perspective. Nevertheless, it does look like a T-6A, and looks buildable.
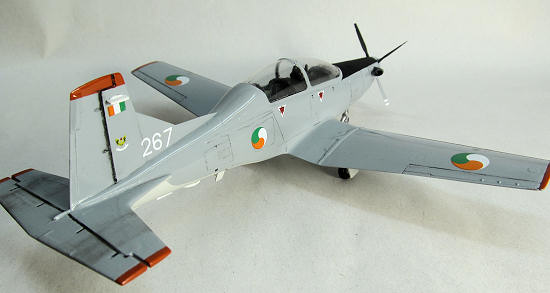
| CONSTRUCTION |
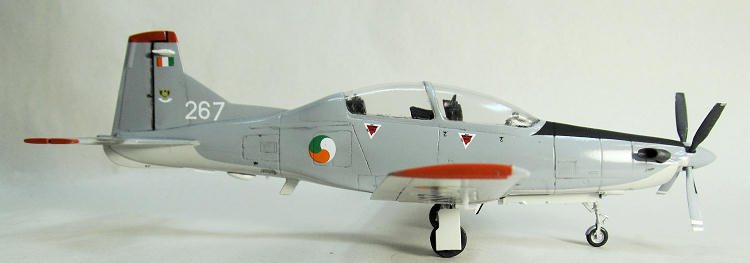
For years I have wanted to build a PC-9M
in Irish Air Corps (IAC) markings-really since I saw an advertisement in SAMI
for Joe Maxwell and Patrick J. Cummins
book The Irish Air Corps: An
Illustrated Guide with a haunting cover image of an IAC PC-9M in flight.
Unfortunately, there is only one rather obscure resin kit currently
available of said aircraft; until now.
 Although the T-6A and the PC-9M do not
share much, from a modeling perspective they share enough and importantly the
right things. Obvious
differences abound between the two aircraft in terms of the cockpit.
However, the airframes are close enough in size and shape to at least
consider a conversion. The canopy
is a major difference, and there are sheet metal differences as well as panel
line discrepancies, but in the end I felt that a convincing PC-9M could be
attained from the Ibex T-6A.
Although the T-6A and the PC-9M do not
share much, from a modeling perspective they share enough and importantly the
right things. Obvious
differences abound between the two aircraft in terms of the cockpit.
However, the airframes are close enough in size and shape to at least
consider a conversion. The canopy
is a major difference, and there are sheet metal differences as well as panel
line discrepancies, but in the end I felt that a convincing PC-9M could be
attained from the Ibex T-6A.
I began construction with the cockpit.
All of the cockpit components and fuselage interiors were painted with
Model Master RAF Interior Green. As
far as I can tell, the biggest cockpit difference between the T-6A and the PC-9M
is the layout of the Instrument panels and the ejection seats.
I fixed neither. Ibex has
cast the ‘glass’ instrument panels very nicely and leaves it to the skill of the
modeler to paint the instrument bezels.
All of the instruments, glass or traditional, are provided in decal form.
I chose to represent the plane shut down, so only used the dial
instrument decals. These are very
small, and tediously difficult to place for both instrument panels.
The placement guide provided in the instruction sheet was excellent.
Side console decals are also provided; however, I found them to be
slightly over sized and a little less than convincing.
Certainly from a time perspective they worked fantastic, but a good paint
session would yield a more realistic outcome.
The IAC PC-9M’s use a Martin Baker Mk !!
ejection seat as opposed to the fancy version supplied in the T-6A.
There are no aftermarket copies of the Mk !! available (or, at least that
I could find) so I simply modified the canopy breakers to more closely
approximate the ones on the Mk !! seats and painted them up.
The resin is well cast and I found no obvious pin holes or flaws.
The seatbelt detail is very petite, but painted up well.
 The only other change made to the cockpit
was the addition of an instrument bezel on the left forward cockpit near the
panel that is obvious on IAC aircraft and missing from the kit and oxygen hoses.
I now installed the cockpit into the left fuselage along with the nose
gear bay and glued the fuselage together.
Fit was great, but there are prominent seams through both cockpit
coamings as well as in the large NACA vent under the nose that required extra
attention to make nice for paint.
At this juncture I also glued the wings together with Tenex.
Again, the fit was excellent, and using care no filler was required.
The only other change made to the cockpit
was the addition of an instrument bezel on the left forward cockpit near the
panel that is obvious on IAC aircraft and missing from the kit and oxygen hoses.
I now installed the cockpit into the left fuselage along with the nose
gear bay and glued the fuselage together.
Fit was great, but there are prominent seams through both cockpit
coamings as well as in the large NACA vent under the nose that required extra
attention to make nice for paint.
At this juncture I also glued the wings together with Tenex.
Again, the fit was excellent, and using care no filler was required.
The instructions remind you twice to put
20oz.of weight in the nose. I don’t
have a scale, but I did fill the whole area over the nose gear bay with fishing
weights. I then carefully
installed the resin nose piece, making sure that I aligned the lower NACA vent
sides with thin CA glue. Now
was as good as any to attach the wing assembly, which I did.
There are some funny gaps at the wing root that required filling, but
overall the fit was not too bad-somewhere between a typical limited run
injection molded kit and what we have come to expect from the name brands.
At this point I began addressing the
exterior differences between a T-6A and a PC-9M.
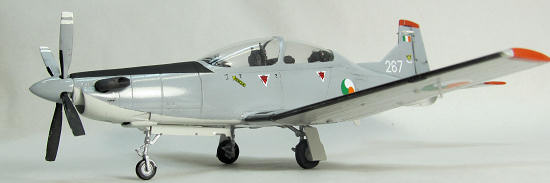
The biggest challenge and most obvious difference is the canopy.
The T-6A has a distinct step
in the profile at the front and a two piece canopy in relation to the flowing
lines of the -9M’s one piece canopy.
Looking at lots of images, it became clear that the Ibex rendition of a
T-6A canopy is a hybrid at best, and very good for my conversion plans.
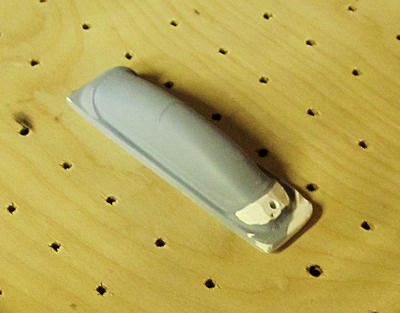
Using one of the kit canopies-which are crystal clear and well formed-I
created a master using Plaster of Paris.
Once the master was dry, I modified it by removing the forward canopy
frame and slightly re-profiling the shape.
I covered the new master with multiple coats of automotive lacquer primer
and final sanded to shape with 600 grit sandpaper. I then dug out my shop-vac
and vacuform box and proceeded to make a new canopy.
For vacuformed canopies I like to use K&S 15 thousandth clear sheets.
Because of the size and shape it took three pulls to get an acceptable
canopy, which I trimmed and checked to the opening.
I found that my canopy came up about 2 mm short in length of filling the
opening as provided by Ibex. So did
the provided Ibex T-6A canopies.
That is not really a problem if I wanted the canopy open; but the lines of the
plane are tied to the shape of the canopy, and I certainly wanted to pose the
plane with the canopy closed.
Hummmm, what
 to do about the gap.
In the end I split the difference and used thin plastic strip to flesh out the
rear canopy frame. Up front, I
filled the difference with bondo and sanded to shape.
Once things were ready I dipped the canopy in Future and painted the
interior canopy framing in black.
The canopy brace, resin part number 47 ended up being too narrow.
Again, not a problem with the canopy open, but for closed I chose to
simply affix it in place between the seat and rear coaming prior to affixing the
canopy. Not wanting a repeat of a
recent canopy dust debacle, I made sure that the entire seam around the canopy
was filled with CA glue, then masked and primed the canopy area.
to do about the gap.
In the end I split the difference and used thin plastic strip to flesh out the
rear canopy frame. Up front, I
filled the difference with bondo and sanded to shape.
Once things were ready I dipped the canopy in Future and painted the
interior canopy framing in black.
The canopy brace, resin part number 47 ended up being too narrow.
Again, not a problem with the canopy open, but for closed I chose to
simply affix it in place between the seat and rear coaming prior to affixing the
canopy. Not wanting a repeat of a
recent canopy dust debacle, I made sure that the entire seam around the canopy
was filled with CA glue, then masked and primed the canopy area.
Next up was the vertical fin fillet.
Using images again, I cut fifteen thousandth plastic card stock and
fitted a fillet panel to the forward part of the vertical fin approximately half
the vertical distance of the fin and half the horizontal distance to the fin on
the existing fillet. Once the glue
was dry I sanded for a better profile and primed the area.
On the bottom, I carved off the T-6A strakes and reshaped the lower
fuselage profile. Then, again using
thin card stock, I created a new lower strake as found on the PC-9M.
Please note that part number 21 fills the hole in the center of the
horizontal tail assembly and represents the actuator for said assembly.
This is not shown in the instructions, but is clear from images of the
real aircraft and closely studying the instructions, which show the part
attached, but neglect to mention it.
The only other real change needed to complete the conversion was sanding and rescribing of panel lines. As I did not have an accurate line drawing, and really feel that there was no positive return to be gained for the work to be invested, chose to ignore the panel line differences (Scribing is the worst form of torture for me…), fixing only what was lost and moving on to the paint shop.
| COLORS & MARKINGS |
Once all the final bits were
attached I pulled out the decals.
The IAC decals for my PC-9M came from Max Decals sheet number 4820: Irish Air
Corps Selection 1990-2010. The
color callouts with the decals are for 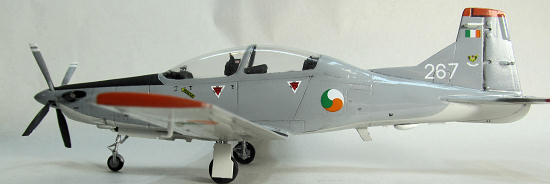 kinds of discussion about what the FS
equivalents for these colors are, or aren’t and found that my two colors are
very contentious. Oh well, I
eventually found a couple of less vocal and more obscure sites that alluded to
actual FS equivalents. For
kinds of discussion about what the FS
equivalents for these colors are, or aren’t and found that my two colors are
very contentious. Oh well, I
eventually found a couple of less vocal and more obscure sites that alluded to
actual FS equivalents. For
Decals went on with no problems, setting
down well with Micro Sol. Once dry
and washed, I top coated the model again with Glosscoat to seal everything and
masked the wing walkway and nose panel for applications of Engine Black and
Dullcoat.
| FINAL CONSTRUCTION |
The landing gear and doors were now
attached. I painted the wheel bays
gloss white and the gear legs with Floquil Old Silver and got it sitting on
three. Please note that you must
cut the nose gear door apart to display them open.
For wha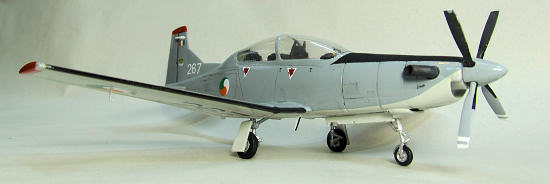 tever reason I struggled with this operation, and as a result my
doors are a bit narrow. Rather than
use the kit supplied landing lights, I drilled the plastic parts out and
installed 1.8 mm MV lenses, painted the backs white and installed them in each
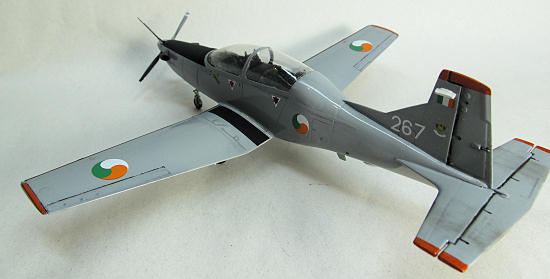
main gear bay. Additionally, I
created four antennas that are specific to IAC aircraft and added them to the
bottom using pictures for position reference.
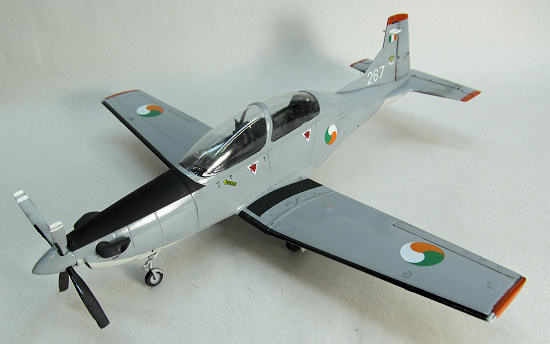
I painted the propeller blades the top color grey on the front and black
behind with white warning stripes on only the front side tips.
I posed them feathered as the plane would look sitting on the ramp.
The resin exhaust stacks are fantastic and are painted up using Model
Master Titanium and shades of blue and brass to represent heat coloration.
I did a light wash with acrylics using a mixture of black and Burnt
Sienna and a light weathering of the tail with pastels for exhaust staining.
tever reason I struggled with this operation, and as a result my
doors are a bit narrow. Rather than
use the kit supplied landing lights, I drilled the plastic parts out and
installed 1.8 mm MV lenses, painted the backs white and installed them in each
main gear bay. Additionally, I
created four antennas that are specific to IAC aircraft and added them to the
bottom using pictures for position reference.
I painted the propeller blades the top color grey on the front and black
behind with white warning stripes on only the front side tips.
I posed them feathered as the plane would look sitting on the ramp.
The resin exhaust stacks are fantastic and are painted up using Model
Master Titanium and shades of blue and brass to represent heat coloration.
I did a light wash with acrylics using a mixture of black and Burnt
Sienna and a light weathering of the tail with pastels for exhaust staining.
| CONCLUSIONS |
Overall a rather pain free conversion
that looks very convincing. I know
that the rivet counters are probably unhappy, but it certainly looks the part!
It is my understanding that a conversion kit will soon be available from
down under, so for the sticklers there is hope on the horizon for an accurate
PC-9.
The Ibex kit builds nicely.
Although there are some problems, most of them being mine; it is a good
kit from which a convincing representation can be achieved. Recommended for all
modelers but beginners due to fit issues with the vacuformed canopy-and an
excellent first build for those wanting to test the water with mixed media
construction.
| REFERENCES |
Pilatus
Turbo-Trainers.
greg
goebel / public domain .
http://www.vectorsite.net/avpc9.html
New Wings for the Irish
Air Corps.
Kevin Wright
http://www.airsceneuk.org.uk/hangar/2008/475iac/iac.htm
Maxwell, Joe and Patrick J. Cummins
The Irish Air Corps: An
Illustrated Guide. W &G Baird,
Ireland. 2009
Google Images
Pat Earing
April 2012
Copyright ModelingMadness.Com. All rights reserved. No reproduction in part or in whole without express permission from the editor.
If you would like your product reviewed fairly and
fairly quickly, please
contact
the editor or see other details in the
Note to
Contributors.