HISTORY
I would like to direct you to a superb historical and walk through of F-14 Tomcat history from Dan Lee’s excellent Hasegawa F-14A kit build summary found in Modeling Madness.
http://modelingmadness.com/review/mod/us/usn/leef14.htm
THE KIT
For an in depth look at the kit, visit this link.
CONSTRUCTION
My first step after looking over the sprues was to read a reference called DACO Publications # 3 Uncovering The Grumman F-14A+B+D Tomcat by Danny Coremans (2006). I would frequently pause and look over the kit instructions making notes on the Tamiya instructions sheet based on some Uncovering The Grumman F-14A+B+D Tomcat photos. The Tamiya assembly instructions are quite good. Occasionally, I would refer to this reference book to facilitate some assembly steps such as the landing gear. I kept this book by my side throughout the building process. I referred to it frequently to really answer how things went together. It is essentially an F-14 builders manual.
 I want to start the
“construction” step with the choice of decal. Why would I do this? There are a
number of visible differences in Tomcats based on when they were constructed.
The decal, or airframe choice affects the kits accuracy. I spent more time than
usual becoming acquainted with the differences between F-14A blocks in order to
have a better model. You should determine if the airframe you want to build
necessitates changes to the base Tamiya kit.
I want to start the
“construction” step with the choice of decal. Why would I do this? There are a
number of visible differences in Tomcats based on when they were constructed.
The decal, or airframe choice affects the kits accuracy. I spent more time than
usual becoming acquainted with the differences between F-14A blocks in order to
have a better model. You should determine if the airframe you want to build
necessitates changes to the base Tamiya kit.
For a complete description of these features that will certainly be a huge help on ANY Tomcat kit, please visit this link.
Once you have the BuNo make an effort to get as many photos of your airframe as possible. Ask and answer these questions: Is my model using the correct gun gas purge vents since there were several types used on the F-14? See page 8 of the Coremans reference book for pictures of the early vents (photos on page 8 consisting of a set of seven gill segments or two gill segments). Late “A” models used the NACA inlets photo on page 9. Are vertical tail stiffeners used? Does your model require it? What beaver tail is used? Pages 40 – 41 of the DACO text has the photos of the beaver tail types used. Does it use a pitot or not? What chin pod does your model require? This is the under nose fairing containing the IR seeker sensor, position light and for some the AN/ALQ-100 ECM antenna and/or the TCS tactical camera system under the nose of the aircraft. At least seven different versions were used by the F-14. Does the airframe have a reinforcement plate around the back seater (RIO) boarding step? Is it an early or late wheel hub style? Are the leading edges of the flying surfaces painted or showing exposed coroguard? Coroguard is a matte gray colored epoxy with aluminum powder mixed in as a pigment. It is a natural metal shade in a matte finish. It provided an additional degree of erosion and corrosion protection to the edges of flying surfaces. The Navy specified that it be "aluminized" by the addition of aluminum powder. It was specified in MIL-C-18263(Aer) dated 23 February 1955 that revised paint and markings, including the introduction of the new gray/white paint scheme. Coroguard on flying surfaces leading edges (wings, horizontal and vertical tail surfaces) was typical of the very early F-14 Tomcat timeframe. With Tomcats in particular, checking the photo references of the specific machine you are making can reveal these important details. I also used the reference "Tomcat Alley" because many of the Tomcats treated in existing decal sheets are portrayed there with the same livery as the decal.
 There have been several
iterations of the gun bay gas purging system vents. I have seen three variations
(four if you count the lack of one in early pre-production prototypes. The
Tamiya kit OOB has a two (2) grill vent layout. There is a seven (7) grill vent
series in very early F-14A airframes and the later airframes had a NACA inlet
port design which was kept in the “B” and “D” series. The prototypes did not
have gun bay gas purging system vents. The gun bay gas purging system vents were
updated as airframes were modified so some early airframes appearing in
photographs with the two or seven vent system will appear with the NACA vents in
later photographs. The early 7-holed gun vent was installed up to BuNo 159611.
Starting somewhere within BuNo 159612 - 159615, the standard 2-holed gun vent,
which is what Tamiya provides in its kit # 61114 appears in use. The first
definitive picture of this is of BuNo 159615.
There have been several
iterations of the gun bay gas purging system vents. I have seen three variations
(four if you count the lack of one in early pre-production prototypes. The
Tamiya kit OOB has a two (2) grill vent layout. There is a seven (7) grill vent
series in very early F-14A airframes and the later airframes had a NACA inlet
port design which was kept in the “B” and “D” series. The prototypes did not
have gun bay gas purging system vents. The gun bay gas purging system vents were
updated as airframes were modified so some early airframes appearing in
photographs with the two or seven vent system will appear with the NACA vents in
later photographs. The early 7-holed gun vent was installed up to BuNo 159611.
Starting somewhere within BuNo 159612 - 159615, the standard 2-holed gun vent,
which is what Tamiya provides in its kit # 61114 appears in use. The first
definitive picture of this is of BuNo 159615.
The chin pod has evolved along with the F-14 variants. In its initial version it contained the Infra-Red Search and Track (IRST) sensor AN/ALR-23 and an anti-collision light. Later a Television Camera Set (TCS) was added. The IRST sensor was replaced by the Northrup AAX-1 TVSU (later called TSU for Television Sight Unit) and sometimes called the TCS in error. TCS is a correct term, just not for the Tomcat. The original TCS was based on the USAF F-4E Phantom II TISEO. It is essentially a 10X telescopic video camera with stabilized optical scope. It evolved into the TSU.
The initial production F-14A’s did not have a nose pitot. That’s how the classic Monogram-Revell was designed and was accurate. The Monogram kit did not have the pitot and thus represented airframes up to BuNo 159825. The first 172 F-14A’s did not have a pitot. My use of “172” units assumes this number that I found in a reference text excluded the YF-14A airframes. Bureau Numbers from 158612 - 159637 which were Block 60 through Block 85 airframes initially had no pitot. BuNo 159825, the first Block 90 aircraft, introduced the small angle of attack probe to the tip of the nose radome. Block 95 (BuNo 159825 – 159874) implemented the nose probe used for angle-of-attack measurements. Thus, BuNo’s before this did not have a pitot tip on the nose.
The Tomcat has a front-windscreen rain removal system using pressurized air. The early models and some “B” airframes had three small round dots for vents in front of the windscreen (BuNos 158978 – 162611). The later Tomcats used a single slit vent. The front-center section of the windscreen has a blue-green tint since it is a bullet-proof laminated glass similar to what we see in financial institutions and armored currency transport trucks. Keep that in mind before you attach the windscreen if you want to add this color to the inside of the front windscreen.
The Tomcat had a retractable wing glove vane that automatically deployed when the aircraft went supersonic and was in the aft position. This improved maximum speeds and supersonic maneuverability. They could be manually deployed at subsonic speeds as well. They were ultimately deactivated and locked shut on the F-14A and completely deleted on the F-14B & D.
Later F-14’s had ochre-colored ECM and Radar Warning antenna fairing (“bumps”) on the airframe. Tamiya has you remove two bumps when building the kit since they were not present on early F-14A models. On the F-14D they were mounted internally and thus deleted from the wing roots making it easier to distinguish a “B” from the “D” variant.
The Tomcat used at least four different beaver tails on the “A” airframe. Variations in di-electric panels, AN/ALR-67 ECM antennas and use or no use of a position light can be factors in an accurate Tomcat. The beaver tail and airbrake were modified starting with BuNo 159241, the first Block 75 airframe. Earlier F-14A’s had their beaver tails cut down with the dielectric fairings removed to replicate the new “standard” beaver tail.
The F-14A was powered by the Pratt & Whitney TF30-P-412 engine and later by the TF30-P-414A. You will notice the engine nozzles usually when static appear to have one in the open position and one in a closed position due to the hydraulic pressure bleeding off the engines as they are shut down. The nozzle of the first engine shut down opens fully and the last engine to be shut down closes completely. Tamiya provides two complete sets of fully open and closed nozzles. When afterburner is selected they fully open. The F-14B and “D” used the General Electric F110-GE-400. In those cases where the pilot shuts down one engine at a time, the nozzle of the first engine shut down opens because the other engine is providing hydraulic pressure and when it, i.e. engine number two shuts down, that nozzle remains closed.
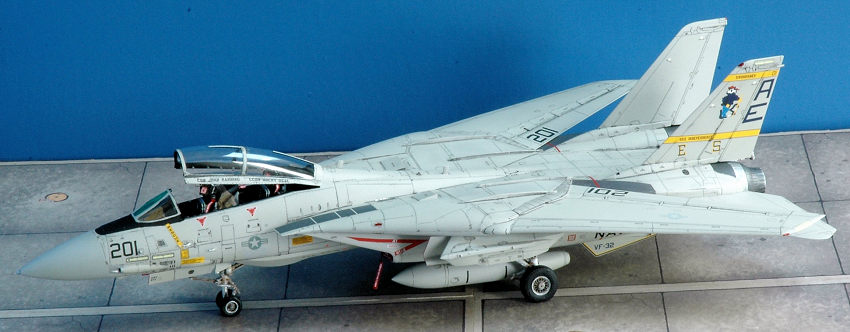
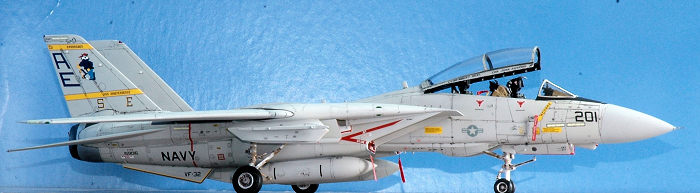
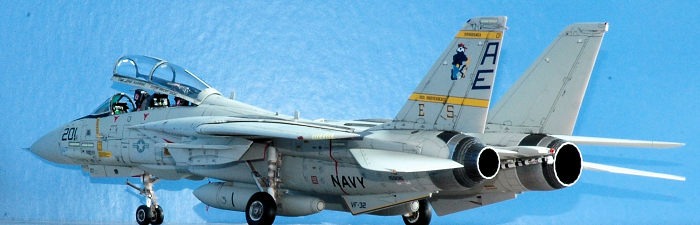
The tail stiffeners are
hard to see sometimes. As a generalization it appears there were no jets flying
without the 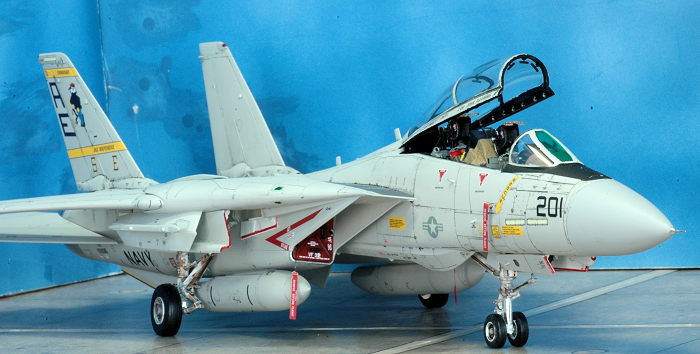 tail stiffeners by the time the TCS pod came about. Tail stiffeners
and standard wheels came out in late 1977. The last F-14’s were modified by
1982. Any F-14 that went thru a depot for an overhaul or technical update and
received the TCS nose sensor addition would've had the tail stiffeners done too.
As a general guide it appears F-14A tail stiffener started from F-14A block 95 (BuNo
160379), around 1978-1979. Thus, I did not add this to my build since my BuNo is
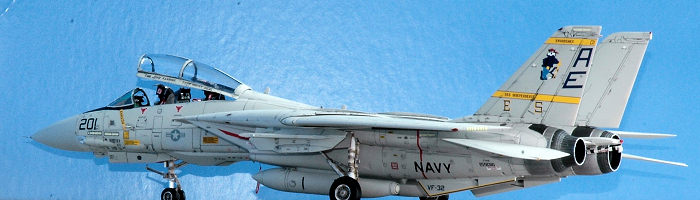
159018. After the build was complete I found a large, clear photo of F-14A
BuNo 159018 AE-201 in Colors & Markings of U.S. Navy F-14 Tomcats, Part 1:
Atlantic Coast Squadrons (Digital Colors & Markings Series) 2016 on page 119.
The picture shows the Tomcat had the tail stiffener by the time it was using the
markings I chose to model.
tail stiffeners by the time the TCS pod came about. Tail stiffeners
and standard wheels came out in late 1977. The last F-14’s were modified by
1982. Any F-14 that went thru a depot for an overhaul or technical update and
received the TCS nose sensor addition would've had the tail stiffeners done too.
As a general guide it appears F-14A tail stiffener started from F-14A block 95 (BuNo
160379), around 1978-1979. Thus, I did not add this to my build since my BuNo is
159018. After the build was complete I found a large, clear photo of F-14A
BuNo 159018 AE-201 in Colors & Markings of U.S. Navy F-14 Tomcats, Part 1:
Atlantic Coast Squadrons (Digital Colors & Markings Series) 2016 on page 119.
The picture shows the Tomcat had the tail stiffener by the time it was using the
markings I chose to model.
The canopy has two thin opaque lines, one above the pilot and one over the RIO’s heads. They represent the canopy lightning strike conduction strips. They are clearly moulded on the Tamiya 1/48th kit but often sanded away or not painted by modelers who think this is just a mould parting line requiring removal. The line drawing on page 50 in F-14 A & B Tomcat In Detail & Scale - D&S Vol. 9 by Bert Kinzey & MDF 15 F-14 Tomcat SAM Publications line drawing clearly shows it is part of the canopy. Danny Coremans uncovering the F-14A/B/D Tomcat DACO Publications #3 has a section on canopies, photos on pages 18 – 19 clearly illustrate the canopy top center strip as does the rear cover photo. MDF 15 F-14 Tomcat SAM Publications 2008, did not have any useful photos of the canopy strips nor explain the variations of gun gas purge vent changes. Maybe you can cut and use the Tamiya “Masking Tape for Curves” to add this component?
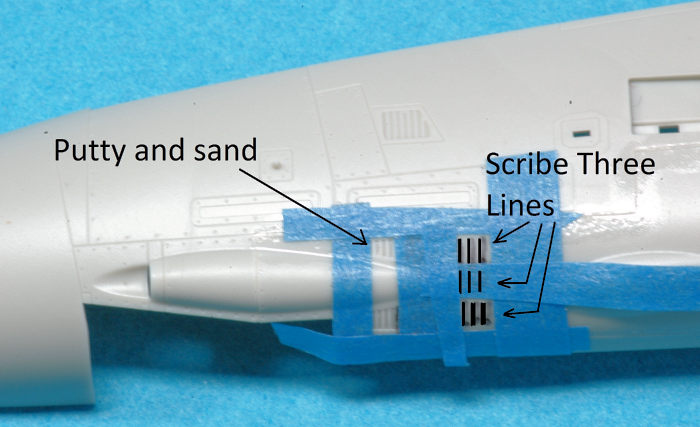
Now that I have the required changes identified I can proceed with construction. I followed the Tamiya instructions just making the following modifications based on my colors and markings (decal) selection. I used Furball 4808 Colors & Markings of USN Tomcats Pt 1, F-14A decal for an F-14A from VF-32, with BuAer 159016 in 1983 markings. It is a block 75 airframe based on the BuNo listing in the reference book Danny Coremans uncovering the F-14A/B/D Tomcat DACO Publications released 2006. The first fold-out drawings section by Willy Peters has the BuNo and block number list. It was never converted to an F-14B or F-14D. It used the seven (7) grill vent series and has the tail stiffeners. I converted the kit part B18 using some Tamiya putty and masking tape. I puttied some sections, sanded them with a tri-stick and using a scriber cut the required extra vents. The kit now had the one big change I wanted to add before continuing in its construction. See photo for the modification process. There are now cast resin conversions available from Steel Beach to address the gun vents you might need if scratch building is not for you.
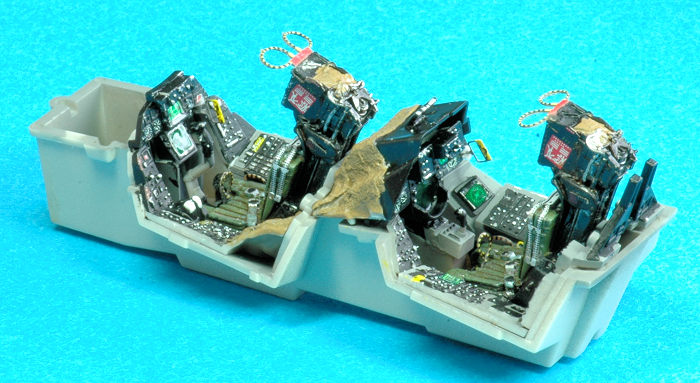
I was also fortunate to have and used the Fightertown Decals 48082 F-14A/B/D Tomcat Data Sheet on this build. It was extremely useful in detailing the cockpit and other parts of the airframe. It was most useful in detailing the displays and dials that I could not paint as well freehand. It really made the cockpit “pop” since it did not obscure any of the existing detail. See Coreman’s F-14 book on pages 92-95 for some clear close-up photos of this cockpit part. I was very happy with this part of the build.
 I incorporated the
following changes to my Tomcat. Suggested Detailing Additions
I incorporated the
following changes to my Tomcat. Suggested Detailing Additions
1. Drilled out the lens, on clear part J4 in step 22, for the front landing gear landing light. Once a concave hole was established I added an MV Lens clear light #29 (Sprue Brothers part # MVP029 0.1015” or 2.6mm clear headlight). After doing this I am of the opinion that a properly painted Part J4 light would look just as good and work just as well. The kit light and Index box are the same part, # J4 (see kit step 22). If you choose to paint the main landing light and the tri-color nose index box as others have successfully done, use this approach. It does look fantastic if you do the following: Mask the clear landing light lens front. Paint the back and sides with Alclad Chrome. Once the Alclad is dry, paint it with gloss black enamel. Once it is dry paint the three index lights (clear green, yellow and red). Place Tamiya Tape on a piece of plastic-card and then punch with punch & die set to get the 0.8 mm circles and 2 mm circle to get the masks. Once dry cover the small Index Lights lenses with the punched-out 0.8 mm circles of tape and the main spotlight with a 2 mm circle masks. Attach it, part J4 to the assembled front landing gear and paint the gear flat white as you would normally do. Once dry and in your final post-painting/post clear coating step remove the masks. Don’t forget to paint or dry brush silver the four fasteners on the landing light. Too much work? Then you can also just use the index box decal from the Fightertown 48082 Data Sheet. There are two of them next to the F-14D RIO instrument dials and below the green seat cushion texture decals.
2. I used bath tissue to provide the tan canvass covers for parts H29 (rear portion), K6 and H10 (Steps 37 & 1). It has a perfect in-scale texture. Use diluted white glue to texture the paper and attach the tissue paper to the plastic parts. While it is still damp with the glue/water composite, paint with a diluted Gunze Aqueous H402 Green Brown (“Kaki”) which is slightly more-brown than H81 Khaki. When it fried you get the texture and faded or weathered fabric look.
3. Remember to prepare and paint the two lighting strike dispersal strips on the top of the main canopy.
4. Use chrome foil on the exposed oleo compression parts.
5. I added AS48DAN Modern Cockpit Data and Warning decals and AS48HAC Modern Jets Cockpit Instrument Decals to the dials in the cockpit and to the Ejection Seat. Also, for the smaller instruments I used some of the 1/72nd sized dials from the same decal sources.
6. I used Fightertown Decals 48082 F-14 Tomcat Data for a variety of detailing items such as the white panel with three-light landing lights, i.e. “the three index lights” on the nose wheel, as well as for some instrument dials.
 7. MB GRU-7A Ejection Seat
colors and additions. Overall Flat Black for the frame, padded seat Cushions
Gunze H36 Dark Green, Top and sides behind cushions Gunze H-319, top of
parachute pack Gunze H-81 Khaki. Seat Belts are custom mixed Tamiya X-14 Sky
Blue + XF-19 Sky Grey + X-11 Chrome Silver mixed to match photo references.
Silver on main wires on top of ejection seat, left side seat belt buckles, dry
brush silver handles, canopy hooks, circuit breakers. Yellow for seat side pull
handles and emergency canopy ejection handle on right side of cockpit panel
using Eduard etched part #12 from Eduard 49227 F-14A Tomcat ejection seat. Red
was applied to some circuit breakers in the RIO area and air combat maneuvering
panel master arming switches per photo references and the front pull-tab near
the crotch area ejection seat handle per Coreman’s book photos. I used the
Eduard pre-painted etch for the Tomcat ejection seat pull-down loops replacing
kit part F7 or in my case the resin loop from the Quickboost QB48223 F-14A/B
Ejection seat with safety belts.
7. MB GRU-7A Ejection Seat
colors and additions. Overall Flat Black for the frame, padded seat Cushions
Gunze H36 Dark Green, Top and sides behind cushions Gunze H-319, top of
parachute pack Gunze H-81 Khaki. Seat Belts are custom mixed Tamiya X-14 Sky
Blue + XF-19 Sky Grey + X-11 Chrome Silver mixed to match photo references.
Silver on main wires on top of ejection seat, left side seat belt buckles, dry
brush silver handles, canopy hooks, circuit breakers. Yellow for seat side pull
handles and emergency canopy ejection handle on right side of cockpit panel
using Eduard etched part #12 from Eduard 49227 F-14A Tomcat ejection seat. Red
was applied to some circuit breakers in the RIO area and air combat maneuvering
panel master arming switches per photo references and the front pull-tab near
the crotch area ejection seat handle per Coreman’s book photos. I used the
Eduard pre-painted etch for the Tomcat ejection seat pull-down loops replacing
kit part F7 or in my case the resin loop from the Quickboost QB48223 F-14A/B
Ejection seat with safety belts.
8. I used Quickboost QB48223 F-14A/B Ejection seat with safety belts. I replaced the headrest face curtain pull-down loop handles with Eduard 49227 F-14A Tomcat ejection seat components using etched part # 9 in order to obtain a more to scale sized loop with better painted black & yellow stripes than I can paint due to their small size. I used the seat side pull handles, part # 12 for the emergency canopy ejection handle which is missing from the Tamiya kit parts and appears on the right side of cockpit panel. I attached a remove before flight banner to this part as well. I also used parts 3, 4, 7, 8, 17, 18, 19 on the ejection seat. Although I had # 49806 F-14A seatbelts in steel on hand I preferred using parts from the Eduard 49227 set to obtain additional details missing from the newer seatbelt only release. I was a bit disappointed to find the cost and benefit for the newer Eduard release # 49806 F-14A seatbelts in steel, to be a step backwards since its price for limited components is not in keeping with Eduard’s history of value for price. If you want to only use the Tamiya kit seat it does add a lot of color and appearance so don’t let me discourage you from using it. I plan on using it in the future in an almost OOB build since it will look nice with the kit plastic.
9. I added the pilot and RIO rear-view mirrors using Eduard 49229 parts 90 & 91. I also used is part # 64, the frame for the front canopy with the bracket to add the pilots hand-grip (page 6 of 7 in Eduard instructions). See pages 72 & 73 of Danny Coremans uncovering the F-14A/B/D Tomcat DACO Publications for the handles.
10. Part B25, the boarding ladder, is simplified unlike most other well detailed parts for this kit. It needs lightening holes on the side rails and a better fold junction. An etched metal or resin replacement would be welcomed. Using the Hasegawa kit etched metal ladder is a good alternative. See page 10, Danny Coremans uncovering the F-14A/B/D Tomcat DACO Publications text.
 11. No dropped slats,
flaps, speed brakes option. The wings are single pieces with retracted slats and
flaps and there’s no option to extend or drop them without some expensive
after-market resin or challenging scratch building. As a plus though it is easy
to paint the wings or use the wing sweep fold mechanism extensions that the
wings slide onto to hold the model during painting. Excellent reference details
for the wing leading edge slats and spoilers are on page 30 -33 of Danny
Coremans uncovering the F-14A/B/D Tomcat DACO Publications. The same applies to
the molded-in upper and lower speed brakes. For the super detail oriented having
this area open and properly done with its intricate thin spars and configuration
see Danny Coremans uncovering the F-14A/B/D Tomcat DACO Publications page 142 –
143.
11. No dropped slats,
flaps, speed brakes option. The wings are single pieces with retracted slats and
flaps and there’s no option to extend or drop them without some expensive
after-market resin or challenging scratch building. As a plus though it is easy
to paint the wings or use the wing sweep fold mechanism extensions that the
wings slide onto to hold the model during painting. Excellent reference details
for the wing leading edge slats and spoilers are on page 30 -33 of Danny
Coremans uncovering the F-14A/B/D Tomcat DACO Publications. The same applies to
the molded-in upper and lower speed brakes. For the super detail oriented having
this area open and properly done with its intricate thin spars and configuration
see Danny Coremans uncovering the F-14A/B/D Tomcat DACO Publications page 142 –
143.
12. The rear cockpit decking, inside the canopy area, is devoid of detail and reference photos such as on page. The Aires resin cockpit provides better detailing for this area.
13. The canopy hooks are there but not properly shown as extended from the canopy frame. This is a good candidate for an etched replacement part. The canopy lightning strike dispersal grounding strip is moulded in the clear canopy (well it is just the mold parting seam) but the kit instructions and masks fail to recognize it. See photos on pages 16 to 19 in the Danny Coremans uncovering the F-14A/B/D Tomcat DACO Publications text.
14. Consider using an aftermarket replacement resin wheel set since there were three types of wheels used by the Tomcat. The detailing is much better and the prices are lower than they used to be for his part. I used the Eduard resin wheel set. See Danny Coremans uncovering the F-14A/B/D Tomcat DACO Publications, page 114. I used the Eduard “late” wheels on my build (Eduard 648290 F-14A wheels late).
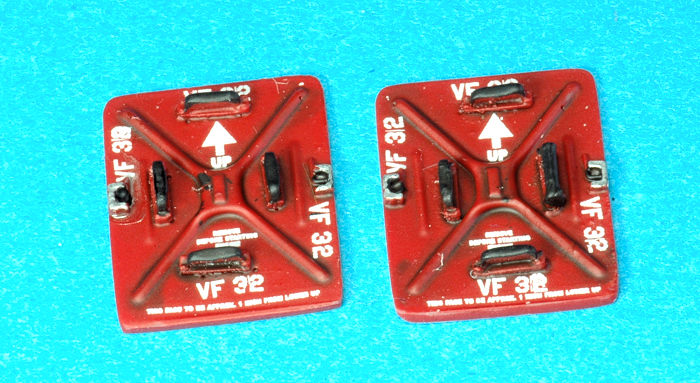 15. The Quickboost QB48434 F-14
Tomcat Air Intake Covers/F.O.D. covers were used. This was an excellent choice
and it includes very tiny “VF” unit codes. See the photo for an idea of the
stencils that come with this resin set. It is easy to use and fit the Tamiya kit
very well despite being sized for the 1/48th
scale Hasegawa F-14. The Tamiya kit intakes “do not require” the F.O.D. covers
to hide the intakes since they were outstanding. So, this was just an appearance
enhancement and not a kit problem cover-up!
15. The Quickboost QB48434 F-14
Tomcat Air Intake Covers/F.O.D. covers were used. This was an excellent choice
and it includes very tiny “VF” unit codes. See the photo for an idea of the
stencils that come with this resin set. It is easy to use and fit the Tamiya kit
very well despite being sized for the 1/48th
scale Hasegawa F-14. The Tamiya kit intakes “do not require” the F.O.D. covers
to hide the intakes since they were outstanding. So, this was just an appearance
enhancement and not a kit problem cover-up!
COLORS & MARKINGS
The overall cockpit paint was Gunze H317 FS 36231 Dark Gull Gray. Parts B13 to 16 are the glove sealing plates/over-wing faring airbag. They are light gray when first installed, becoming dark gray due to dirt and grime from air operations. When they start to wear out the color changes to a khaki/light tan color due to UV sun damage. Since I like to weather my F-14 I used Gunze H-331 Dark Sea Gray for the glove sealing plates/over-wing faring airbag. Tamiya specifies AS-10 Ocean Gray. I weathered it with dry-brushed light gray.
The overall airframe paint is Flat Light Gull Gray FS36440. The paint I used for the overall airframe color was Gunze H-325. Alternatives could be Gunze H-51 (FS 16440) or H-315. The nose tip is Light Ghost Gray FS36375. I chose Gunze H-308 for this area.
Colors and markings came from Furball D&S-4808 Colors & Markings of USN Tomcats Part One. I also used Microscale AC48-0001 F-14 Tomcat for the anti-glare panel, walkway and intake warnings.
The exhaust colors I used were; Testors # 1406 Exhaust Buffing Metalizer Lacquer, and AK Interactive AK458 True Metal Silver, dry brushed highlights were done with Testors # 1790 Chrome Silver Model Master Enamel Paint FS17178. Oleo struts exposed areas were covered with Bare Metal 004 Ultra Bright Chrome Foil for oleo struts. Eduard’s EX026 F-14 Mask was used for the canopy. It is for the Hasegawa kit so the fit was not perfect requiring some added tape. The Eduard mask set for the Tamiya kit was not available when I built the kit. It is now available.
 Furball FWT48-002
Transparent green windscreen tint was used. This is a transparent plastic sheet
representing the bullet proof green glass on the front windscreen. It is applied
with some Future floor wax for a drop-in fit. The alternative is using the
Fightertown F-14 data decal which I used on other builds and turns out very
well.
Furball FWT48-002
Transparent green windscreen tint was used. This is a transparent plastic sheet
representing the bullet proof green glass on the front windscreen. It is applied
with some Future floor wax for a drop-in fit. The alternative is using the
Fightertown F-14 data decal which I used on other builds and turns out very
well.
Some other detailing items were Eduard 49693 Super Fabric F14 Remove Before Flight & 49009 version which was used inside the cockpit and outside as well. Eduard 648290 F-14A resin wheels late version, Airscale AS48 HAC (4813) Modern Cockpit Instruments decal, Airscale AS48 DAN (4813) Modern Cockpit Dataplate and Warning decals were used. Eduard 49227 MB GRU 7A F-14A Seat Details (only parts 3, 4, 7, 8, 9, 12, 14, 18, 19). Eduard 49229 was used for part # 64 which is a frame on the front canopy that includes a bracket for the pilots grab bar (see photo page 70 of Danny Coremans “Uncovering the F-14A/B/D Tomcat”, DACO Publications #3). Perhaps the pilots grab bar would be a good Quickboost or Steel Beach resin enhancement part? This should have been part of the Tamiya front windscreen plastic OOB.
Quickboost QB48434 F-14 Tomcat Air Intake Covers (includes stencil data decal!) were easy to use and looked very nice. I have the Eduard 48433 F-14 Tomcat F.O.D. covers etched as well and have used them. I chose to use my Quickboost resin covers because the Eduard part requires some metal pushing in the form of using a ball-point pen tip or metal tool to push out the cross braces and more importantly it does not have the small detail stencils that come with the Quickboost resin FOD covers. The stencils are a very noticeable detailing step. Perhaps if Eduard made it as a colored etch product with the stencils already painted on it would be a better product? The downside is how do you include all the various “VF-XX” squadron codes that Quickboost has on its decal sheet? On the Quickboost QB48223 F-14A/B Tomcat Ejection Seats with safety belts, I added some Eduard color etched parts to the seat.
I usually bend and break plastic pitot tubes so I now use metal replacements for most builds. In this build I used Master Models AM-48-007 Brass F-14 Alpha nose probe and angle of attack sensor.
CONCLUSIONS
 When the Tamiya
Tomcat was released I was not too interested in getting one because it was
expensive, and I already had several built Tomcats using Monogram and Academy
kits and even some Hasegawa on the shelf along with a large Hasegawa 1/48th
Tomcat stash.
When the Tamiya
Tomcat was released I was not too interested in getting one because it was
expensive, and I already had several built Tomcats using Monogram and Academy
kits and even some Hasegawa on the shelf along with a large Hasegawa 1/48th
Tomcat stash.
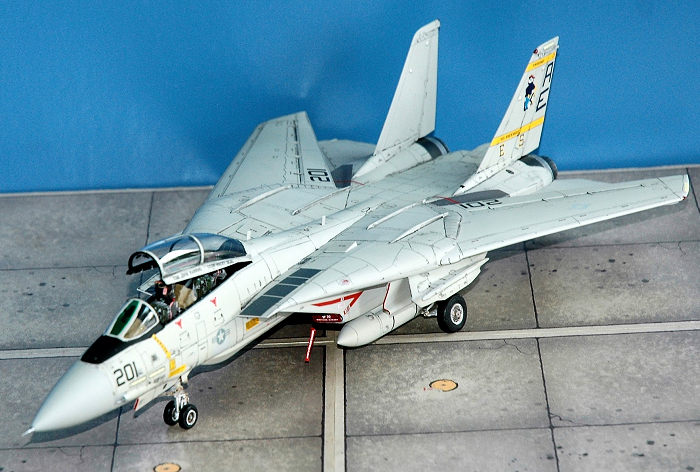
Shortly after some glowing build reviews appeared and special sale prices with significant discounts were offered, I purchased a few and immediately went to work on this kit. It was one of the finest building experiences I have ever had building such a complex airframe. I appreciated the clever engineering that made every hour spent working on it a pleasure. This kit is highly recommended even if you are not a Tomcat nut. With all the aftermarket and variety of decals available you have to go for it and have a superb modeling experience. I can’t wait for the future F-14B/D releases.
REFERENCES
DACO Publications # 3 Uncovering The Grumman F-14A+B+D Tomcat by Danny Coremans (2006)
Colors & Markings (Digital Version) #1 U.S. NAVY F-14 TOMCATS, Part 1 Atlantic Coast Squadrons by Bert Kinzey (2016)
15 September 2017
Copyright ModelingMadness.Com.
Thanks to for the preview kit. You can find this kit at your favorite hobby shop or on-line retailer.
If you would like your product reviewed fairly and fairly quickly, please contact the editor or see other details in the Note to Contributors.
Back to the Main Page Back to the Review Index Page Back to the Previews Index Page