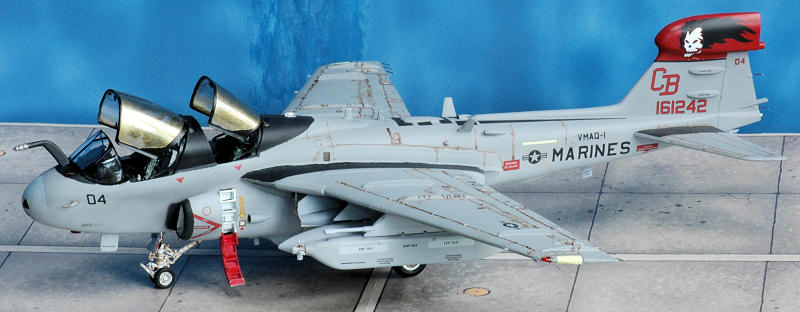
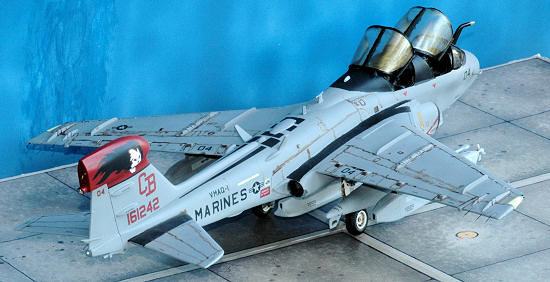
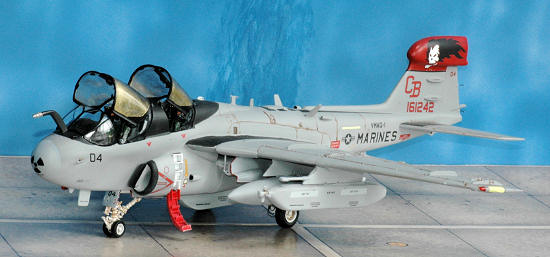
Monogram 1/48 EA-6B Prowler
| KIT #: | 85-5619 |
| PRICE: | $40.00 |
| DECALS: | Two options |
| REVIEWER: | Andrew Garcia |
| NOTES: | Aires 48-4395 ICAP-2 Early resin + Eduard FE-293 etched |
| HISTORY |
The EA-6B Prowler is the United States
Navy and Marine Corps ECM platform. It is soon to be replaced by the EA-18G
Growler. It is an adaptation of Grumman’s A-6 Intruder receiving its baptism
under fire during the closing months of the Vietnam conflict.
 It has served as an Electronics Counter
Measure (ECM) airframe for many years thanks to ongoing upgrades and
modifications that have maintained its warfare capability. Therein lies its
challenge for modelers and plastic kit manufacturers – how to create an accurate
EA-6B.
It has served as an Electronics Counter
Measure (ECM) airframe for many years thanks to ongoing upgrades and
modifications that have maintained its warfare capability. Therein lies its
challenge for modelers and plastic kit manufacturers – how to create an accurate
EA-6B.
n 1964 a design proposal led to a
formal RFP in 1965. Production of new build EA-6B airframes began in 1969. Fleet
deliveries of the EA-6B started in January 1971.
The EA-6B is a different aircraft from the A-6 Intruder. I do not profess to know much about the EA-6B changes over their 30 year operational history. I tried to put together some information so I could attempt a long awaited build of this aircraft. Trying to work through the airframe and electronics changes was a challenge. Starting with the original “standard” airframe, and follow-on configurations, EXCAP (mid-1970’s), ICAP I, ICAP II, Block 86, ADVCAP, ADV/CAP Block 91 a few years ago stalled the build of this aircraft. So, I put together a chronological Matrix with BuNos to try to help me get closer to a good build. My best suggestion is use a good reference photo for your chosen decal.
| THE KIT |
Monogram’s kit is the only EA-6B game
in town in 1/48th scale (the Airfix/MPC version is OOP). It features
raised panel lines, good overall shape and detail, a well appointed OOB cockpit,
sparse wheel wells and well done landing gear. It also has a pair of optional
fuel drop tanks and three inaccurate ALM pods. The kit decal is for an aircraft
from VAQ-131. It is the same decal in both versions (releases 5611 and 5619).
The original Monogram release (# 5611) of 1992 was recently re-released (2008)
through a special program with Stevens International who did some fixes to the
instruction sheet. The plastic and decals remain unchanged from the first
release. The same box art was used and you can tell the difference by finding
the Stevens International logo on the box cover and the model # is now 5619 for
the last release.
 The aircraft
represented by the kit is an EA-6B ICAP 1. The Navy is past ICAP 2, Block
89, so the plastic is for an aircraft configuration of a mid 1980s EA-6B and
requires quite a bit of effort to modernize it to this latest standard. As
has already been mentioned elsewhere on the web, this kit reuses the wings from
the Revell-Monogram A-6 kit; in fact the whole sprue is included. The wing fold
mechanism hinge is wrong and a challenge to fix. Revell-Monogram doesn’t tell
you in the instructions which parts are not used in the build. You should
have left over the A-6 specific parts that you can add to your spares bin, the
dive brakes (12, 13, 22, and 23), the canopy deck (26), Pylons (90, 111) and
sway braces (51) for example. There are some missing items such as the pointed
bare metal probes outside the air intakes where the circular decals go.
The aircraft
represented by the kit is an EA-6B ICAP 1. The Navy is past ICAP 2, Block
89, so the plastic is for an aircraft configuration of a mid 1980s EA-6B and
requires quite a bit of effort to modernize it to this latest standard. As
has already been mentioned elsewhere on the web, this kit reuses the wings from
the Revell-Monogram A-6 kit; in fact the whole sprue is included. The wing fold
mechanism hinge is wrong and a challenge to fix. Revell-Monogram doesn’t tell
you in the instructions which parts are not used in the build. You should
have left over the A-6 specific parts that you can add to your spares bin, the
dive brakes (12, 13, 22, and 23), the canopy deck (26), Pylons (90, 111) and
sway braces (51) for example. There are some missing items such as the pointed
bare metal probes outside the air intakes where the circular decals go.
There are no photo-etch parts with
the kit but you can build a nice OOB build without them. The kit comes with a
limited stencil decal sheet. For an OOB build you will be
looking at a general
outline to model a generic EA-6B with a number of errors.
At the MSRP retail price or even when
purchased for less from discounters’, it is a reasonably priced kit. I have a #
5611 release in the stash with the Paragon wing-fold and Black Box cockpit.
Since I did not get the Cutting Edge correction set before Meteor vanished, the
EA-6B kit, the Monogram # 5611version, remained there awaiting some new resin
makers upgrade or correction set.
Not knowing much about EA-6B’s also
limited my enthusiasm since I did not want to build a model using some expensive
resin set and after-market decals only to find it has the wrong combination of
“corrections” for the decal sheet used. The same airframe of an EA-6B can have a
variety of antenna co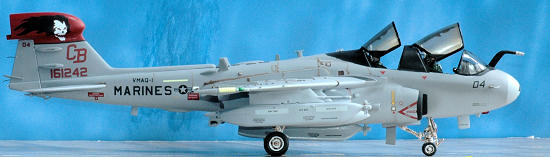 nfigurations and fuselage changes depending on the date you
are modeling the airframe. Knowing this could be the outcome put off a build for
many years. The message boards and build stories I read seemed to require too
much fixing for my liking.
nfigurations and fuselage changes depending on the date you
are modeling the airframe. Knowing this could be the outcome put off a build for
many years. The message boards and build stories I read seemed to require too
much fixing for my liking.
For the fast OOB build I wanted to do, I
did not see any need for an aftermarket resin cockpit. I was awaiting some
Eduard zoom color etch to add some limited detailing given the lack of specifics
regarding a decal and airframe modifications combination to be close to correct.
Then, Aires issued their EA-6B resin cockpit. It looked so good that it prompted
me to get it into this build. At first the Aires resin price, more costly than
the base kit put this thought on hold. After looking at it on the web many times
I liked the detailing so much I purchased it and decided to add it to this
build.
There is a new metal landing gear
available from Scale Aircraft Conversions that has excellent details and may be
better to hold up the heavy weighted nose required to fix the tail sitting
nature of any EA-6B model. The kit plastic landing gear is almost as well
detailed but I worried about its long term ability to hold up a weighted front
nose so the metal gear went into this build. (Editor's note: I've had heavy
kits do very well on the stock landing gear over the decades so this really
isn't a concern)The SAC metal landing gear is excellent. It was a drop fit
replacement. If you polish the oleo before you install it and cover it during
the painting stages you will have a realistic metal oleo when you remove the
paint masking.
| CONSTRUCTION |
This model, as are most Monogram kits,
is very easy to construct. None of the detail is beyond the reach of an average
modeler if you take your time, sand, dry fit and follow the instructions. The
instructions are standard Monogram where the steps are reasonably clear and well
illustrated. I did not find any problems with the assembly sequence. There are a
few errors. For example, in step 5 you are told to add a HUD. Don't do this -
ignore adding the HUD. There is no HUD on the EA-6B. This is left over from the
A-6 Intruder plastic parts. Aires gives you the corrected front coaming that
fixes this error.
Step 6, part # 118, is called a fuel
dump on the instructions.
It is not the fuel dump. It is actually the "inhibitor plate” used to
protect the receiver from signal interference. The actual fuel dump is under the
fuselage near the tail and can be corrected using a piece of square brass tubing
or scratch built. At first I was not going to correct this hoping to avoid a
protracted AMS EA-6B build. After I painted and decaled the model it looked so
good I went back to retrofit improvements. After looking at the reference books
waiting for the paint to dry I felt some additional detailing was needed.
I did find a worthwhile fix to the
installation problem of adding the Aires resin cockpit. Aires produces the best
detailed resin cockpits in my opinion. I also know they require much sanding,
resin grinding, plastic kit grinding, and dry fitting to install. Despite my
best efforts to sand and shape the resin cockpit the fuselage would not close.
There was a big gap between the f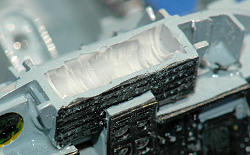 uselage halves. I solved this vexing problem by
routing a groove between the front and rear cockpit areas on top the Aires resin
cockpit tub which allowed me to retain the kit locating pin (see photo). The
fuselage mating after this change fit very well. I used some epoxy and AVES
putty to firmly hold the cockpit and lead nose weights in place before closing
up the fuselage.
uselage halves. I solved this vexing problem by
routing a groove between the front and rear cockpit areas on top the Aires resin
cockpit tub which allowed me to retain the kit locating pin (see photo). The
fuselage mating after this change fit very well. I used some epoxy and AVES
putty to firmly hold the cockpit and lead nose weights in place before closing
up the fuselage.
Don’t forget to add nose weight. There
is no call out in the instructions for nose weight. This should not be
overlooked before you attach the fuselage halves. You can’t do this at a later
step because it is a closed nose aircraft OOB. Monogram gives you a hint you
will need one by supplying, on the clear parts sprue, a clear rod to hold up the
tail.
I also painted the green and red wingtip
formation lights. They were painted with clear Tamiya colors. The lights were
painted Testers chrome silver first followed by the clear red and green coats,
and a final clear epoxy coat.
 Note – the EA-6B has unique red and
green light attachments to the rear of the inner pylons – don’t forget them in
addition to the wing tip lights! The Monogram kit has them correctly molded on
the pylons. The yellow-green slime lights (formation lights) came from the
Fightertown Decals # 48033 EA-6B decal.
Note – the EA-6B has unique red and
green light attachments to the rear of the inner pylons – don’t forget them in
addition to the wing tip lights! The Monogram kit has them correctly molded on
the pylons. The yellow-green slime lights (formation lights) came from the
Fightertown Decals # 48033 EA-6B decal.
I find attaching the “T” handles and
small levers directly to Aires resin is best saved for last. It worked well and
the Aires resin detailing looks great with all the bits finally attached.
The Scale Aircraft Conversions
(SCV48022) metal landing gear was easy to attach. I really enjoy and appreciate
using metal or brass landing gear for its better detailing but in this case the
Monogram plastic had the same level of detail. I had some small assembly
problems with the metal landing gear so be careful with this step. I used the
landing gear placard decals from the Fightertown Decals # 48033, EA-6B. This
decal sheet has excellent color profiles and decal placement information. It has
many small details including markings for the aircrew helmets!
Normally I add changes or do the
scratch building during the assembly before I paint and decal. With this build I
started thinking I would overlook some of the kit flaws like the incorrect wing
hinge and try to limit the adds to only using the Aires resin cockpit. It
started to look so nice after painting and decaling that I thought a few
modifications would be worth the effort. That meant I reworked the boarding
ladder, the nose wheel door lights, the fuel dump vent and the aft turbine
exhaust cooling duct for the electrical equipment.
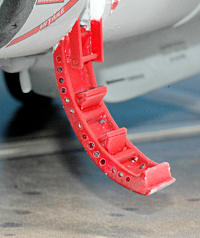 The boarding ladder looked fine until I
saw some photos in one of my references. Then I noticed it needed lightening
holes on the sides, larger steps in locations different than the kit part and
there was a missing trapeze apparatus between the top and bottom segments. I
pulled out the evergreen styrene rod and strip and added those parts. The steps
have black anti-slip surfaces. I painted flat black some flexi-file #600 X-fine
grit and cut it into the correct shape for the anti-slip pads. Before attaching
it I finished it with some flat black (the flexi-file sandpaper is a pink color
before painting) and added some silver wear and tear dry brushing.
The boarding ladder looked fine until I
saw some photos in one of my references. Then I noticed it needed lightening
holes on the sides, larger steps in locations different than the kit part and
there was a missing trapeze apparatus between the top and bottom segments. I
pulled out the evergreen styrene rod and strip and added those parts. The steps
have black anti-slip surfaces. I painted flat black some flexi-file #600 X-fine
grit and cut it into the correct shape for the anti-slip pads. Before attaching
it I finished it with some flat black (the flexi-file sandpaper is a pink color
before painting) and added some silver wear and tear dry brushing.
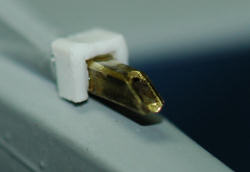 The fuel dump vent was made from square
brass tubing. Using the reference books for a close-up photo I filed the brass
tip to the correct angle, cut off the plastic kit tip which looks nothing like
the real part (the kit plastic part looks like a landing skid) and it was an
easy addition.
The fuel dump vent was made from square
brass tubing. Using the reference books for a close-up photo I filed the brass
tip to the correct angle, cut off the plastic kit tip which looks nothing like
the real part (the kit plastic part looks like a landing skid) and it was an
easy addition.
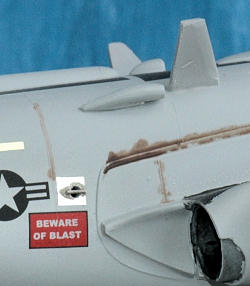 The aft turbine exhaust cooling duct
for the electrical equipment (pg. 26 of the Squadron Walk around text) is
omitted from the kit plastic. There was a nice “Beware of Blast” decal on the
Fightertown decal sheet for this vent. The description of this component in the
reference texts, of the EA-6B having a small bar across the opening to prevent
birds from nesting inside the exhaust made it a must add. Note - It only appears
on the starboard side. I drilled a hole near the wing trailing edge, cut a small
square piece of aluminum foil and glued a small piece of guitar wire across the
vent.
The aft turbine exhaust cooling duct
for the electrical equipment (pg. 26 of the Squadron Walk around text) is
omitted from the kit plastic. There was a nice “Beware of Blast” decal on the
Fightertown decal sheet for this vent. The description of this component in the
reference texts, of the EA-6B having a small bar across the opening to prevent
birds from nesting inside the exhaust made it a must add. Note - It only appears
on the starboard side. I drilled a hole near the wing trailing edge, cut a small
square piece of aluminum foil and glued a small piece of guitar wire across the
vent.
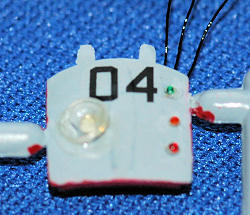 The nose wheel door lights were next.
There is a large main light and three color
landing lights, which are green, amber and red. I used the Eduard
Position Lights etched metal fret to detail this area. If properly finished it
looks nice and offers inexpensive detailing. Those who have seen the finished
model always stop and ask – “How did you do this?”
Squadron has these on sale every few months.
The nose wheel door lights were next.
There is a large main light and three color
landing lights, which are green, amber and red. I used the Eduard
Position Lights etched metal fret to detail this area. If properly finished it
looks nice and offers inexpensive detailing. Those who have seen the finished
model always stop and ask – “How did you do this?”
Squadron has these on sale every few months.
On the fret the Eduard 00 022
Position Lights consists of a variety of round, square or oval shiny etched
metal parts for a variety of scales. By painting a small white dot in the
center, putting a drop of clear epoxy glue and turning it over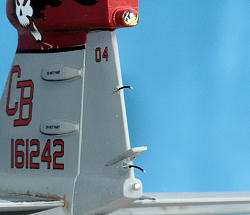 while the glue is
firming you can get a nice domed light. There are several shapes and sizes on
the fret. The smallest I used for the three color landing lights. I painted them
by touching a fine toothpick tip with Tamiya clear red, clear green and clear
amber to just coat the clear epoxy dome.
I attached them with
cyano glue and they sit in the nice depressions found on the kit plastic.
Everyone takes a second look when they notice them.
while the glue is
firming you can get a nice domed light. There are several shapes and sizes on
the fret. The smallest I used for the three color landing lights. I painted them
by touching a fine toothpick tip with Tamiya clear red, clear green and clear
amber to just coat the clear epoxy dome.
I attached them with
cyano glue and they sit in the nice depressions found on the kit plastic.
Everyone takes a second look when they notice them.
My final step was attaching the many static discharge wicks using thin guitar wire. There are two that I omitted because they are on the side of the wing edges and I know they will get damaged at some point so I did not add those two.
| COLORS & MARKINGS |
I used Gunze acrylic paint, H337 & H307
for the upper surfaces and H308 for undersurfaces. I am almost out of Gunze
acrylic and it is no longer produced. That was the only disappointment from this
build – no more Gunze aqueous! Testor’s clear coat and dullcoat were used to
create the pre-decal layer and the final finish. I added some weathering using
oil paints after the first Testors clear coat was applied.
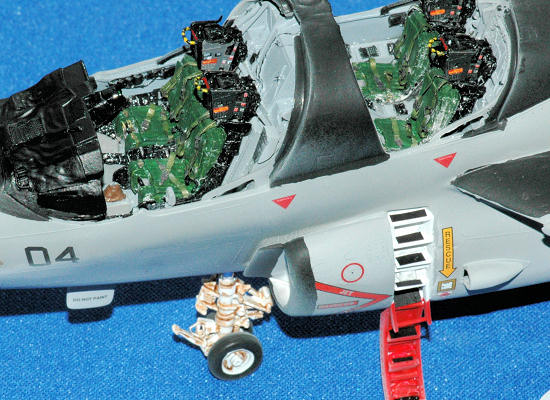
The EA-6B has gold impregnated into the
canopy to protect the aircrew from radiation. I tried to simulate this by using
Future floor wax with some SNJ Gold polishing powder. This was an experiment so
others may have better techniques. I used a toothpick to place small amounts of
SNJ gold polishing powder on a buffing cloth. I gently rubbed the clear crew
canopies with
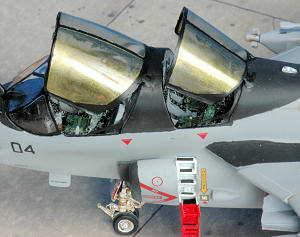 the gold powder. After several applications the canopies took on a
hazy gold color but remained transparent. I misted on very fine coats of Future
floor wax which sealed and kept the gold flecks in place. If you spray too much
Future too fast you will just wash away the gold dust. I like the final look a
lot!
the gold powder. After several applications the canopies took on a
hazy gold color but remained transparent. I misted on very fine coats of Future
floor wax which sealed and kept the gold flecks in place. If you spray too much
Future too fast you will just wash away the gold dust. I like the final look a
lot!
This is not used for the front
windscreen which is clear or slightly smoke or green tinted. I have seen photos
of some Prowler kit canopies painted using clear yellow but I did not like the
final result since it is yellow and not a subtle gold flecked appearance like
the actual aircraft. I hope the photos convey the subtle speckled gold that
results from this treatment. It was not difficult to do and I like how this
turned out.
I used Testors steel enamel polished
with SNJ aluminum powder to get a realistic natural metal finish on the
re-fueling probe and pitot tube’s.
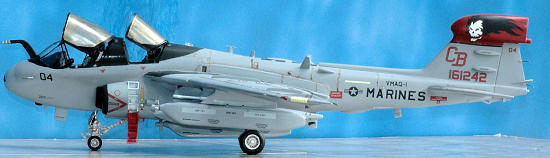
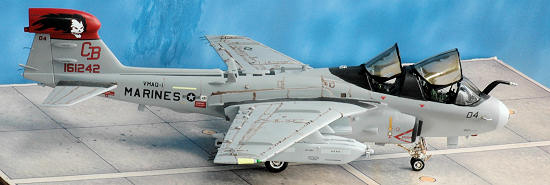
Superscale 48-1126 EA-6B Prowlers VMAQ-1 provided most of the decals used. Superscale included the small fuel tank “banshee” as well – look at the fuel tank fins for them. I added some stencils from the kit decals and Fightertown Decals # 48033 EA-6B decal. Decal makers please add the ejection seat warning signs, landing gear plates and more stencils. Fightertown decals did the best in this area.
| CONCLUSIONS |
It was a very enjoyable project but I
highly recommend having a photo reference for your choice of decal before you
build. With all the modifications and upgrades the EA-6B has gone through,
simple things such as using the correct antennas in the right locations cannot
be overstated.
 This problem put off my building the
EA-6B for a few years. There are a few things I intentionally did not change or
correct such as the wing fold hinge. I hope Quickboost comes out with a low cost
EA-6B wing hinge, boarding ladder and multi-shaped antenna sets so you don’t
have to fold the wings or scratch build a dozen antennas to get an accurate
Prowler.
This problem put off my building the
EA-6B for a few years. There are a few things I intentionally did not change or
correct such as the wing fold hinge. I hope Quickboost comes out with a low cost
EA-6B wing hinge, boarding ladder and multi-shaped antenna sets so you don’t
have to fold the wings or scratch build a dozen antennas to get an accurate
Prowler.
I am going to build some more Prowlers
using the Paragon resin wing fold set. I have been intending to build the EA-6B
for many years. The release of a cockpit by Aires pushed me to put one together
and I am happy I did. I will build a few more of the Revell-Monogram EA-6B
Prowlers using the Blackbox resin sets that are in my stash.
Don’t be put off by the EA-6B build
articles showing large and expensive correction sets are needed for replacement
parts to build an accurate Prowler. The resin used is up to you because some
minor scratch building with evergreen styrene can add a lot to this kit.
Avoiding expensive and no longer available resin should not be a reason
preventing you from building a Prowler. The
 kit and an excellent resin cockpit
are currently available. Get one or you will regret it!!
kit and an excellent resin cockpit
are currently available. Get one or you will regret it!!
Once I listed the corrections and changes, and worked them into the build everything fell into place. They were not very difficult to do. I encourage you to use the great web based articals detailing the fixes to get an idea of the problem areas, pick those you want to fix and just take your time. The good news is it did not take too much time to build this kit and add the fixes. You will wind up with a fine kit without taking out a loan for all the resin parts. You should salt away a few of the EA-6B Prowler decals that are out there on sale too! For the AMS types – don’t worry, I do plan someday to go back and fix the wing hinges I promise!
| REFERENCES |
World Airpower Journal Volume 12 Spring
1993, pages 34 to 95 A-6 and EA-6B.
World Airpower Journal Volume 30
Autumn/Fall 1997, pages 30-45 EA-6B only.
Koku Fan January 1997 Volume 1 pages 1 –
11
A-6 Intruder In Action, Squadron
Signal Publications # 20
by
Lou Drendel 1975
This volume is
helpful with early Prowler airframe photos.
A-6 Intruder In Action, Squadron
Signal Publications # 1138
by
Joe Michaels 1993
This volume has an excellent photo and
description section for the variety of Prowlers variants.
EA-6B Prowler, Volume 46 In Detail and
Scale, Kalmbach Publications by Bert Kinzey 1994. This is the best overall
Prowler reference. You can use the book photos as a detailers check list.
EA-6B Prowler Walk Around, Volume 35
Squadron/Signal Publications by Joe Michaels 2004. I used this for most of the
scratch build additions.
A-6E, KA-6D Intruder, EA-6B Prowler,
Lock On No. 20 Aircraft Photo File Verlinden 798
Grumman A-6 Intruder/Prowler Modern
Combat Aircraft 26 Motorbooks Ian Allen 1987
This volume has
good early EA-6B aircraft information and a BuNo table for most
airframes.
October 2009
If you would like your product reviewed fairly and quickly, please contact me or see other details in the Note to Contributors.