Hasegawa 1/48 F-14D 'VF-31 Tomcatters'
| KIT #: | 09757 |
| PRICE: | $75.00 SRP |
| DECALS: | Two options |
| REVIEWER: | Andrew Garcia |
| NOTES: | Aires 48333 F-14D Cockpit & Eduard 48433 F.O.D. covers, 648290 F-14A wheels, late version |
| HISTORY |
I would like to direct you to a superb historical and walk through of F-14 Tomcat history from Dan Lee’s excellent Hasegawa F-14A kit build summary found in Modeling Madness. http://modelingmadness.com/review/mod/us/usn/leef14.htm
| THE KIT |
Hasegawa provided the best F-14A/B and D Tomcat’s in 1/48 for many years. This re-boxing was released around March 2007. Hasegawa first released their 1/48th scale F-14A Tomcat in 1988, Kit # 7018 Grumman F-14A Tomcat Pacific Fleet Squadrons. I felt their Tomcat kit was the best detailed F-14 in any scale until the recent Hobby Boss and now the best in class Tamiya kits were released. Crisp surface detail, etched metal, white metal parts and well printed decals created a positive impression upon opening the box. This was a high-quality Hasegawa kit with a new higher MSRP price point.
 In the initial 1988 release there was an
unpleasant design problem that discouraged most of us from completing the build.
Many of the parts such as the intakes and wheel bays just did not go together!
My first one built in 1989 went on my shelf of doom for a few years. The design
error prevented the intake trunks from dropping into place on the lower fuselage
half and mating with the upper fuselage and landing wheel bay components. The
landing gear bays were not very detailed and worse they were terrible to put
together with a multi-part loose fit. Great open access idea for painting but
awful for critical or precise alignment and fit. You have not seen any or many
of these kits at modeling events for a reason. The Tomcat is such a modeling
subject favorite that its absence from build reviews and contests was very
unusual but it had a reason.
In the initial 1988 release there was an
unpleasant design problem that discouraged most of us from completing the build.
Many of the parts such as the intakes and wheel bays just did not go together!
My first one built in 1989 went on my shelf of doom for a few years. The design
error prevented the intake trunks from dropping into place on the lower fuselage
half and mating with the upper fuselage and landing wheel bay components. The
landing gear bays were not very detailed and worse they were terrible to put
together with a multi-part loose fit. Great open access idea for painting but
awful for critical or precise alignment and fit. You have not seen any or many
of these kits at modeling events for a reason. The Tomcat is such a modeling
subject favorite that its absence from build reviews and contests was very
unusual but it had a reason.
Hasegawa, so I have read, corrected the intake problem in later releases but I no longer build this kit with its intake trunk in place preferring to use FOD covers because I like that look and due to all the alignment issues with the landing gear bays, fuselage trunks and intake section. Even with FOD covers in the intakes it is still no fun to build. Otherwise, it is a simple build, in general. Other loose fitting and troublesome construction issues prevented the kit from fulfilling my and many other modelers goals of an enjoyable F-14 Tomcat build in 1/48th scale. Its best kit qualities are some releases have quality decals, resin conversion parts and attractive packaging.
The kit is moulded in light gray styrene with nine parts trees, rubber wheels, metal rims, and a small etched metal fret plus a single tree containing the clear parts. In the 09757 release, two special sprues, “Q” and “R” provide the special pylon and BOL rails for the LANTIRN pod. But – there is no LANTIRN pod with this release. This kit set the bar rather high when it was first released based on plastic in-the-box reviews. I was impressed with the quality of its finely scribed detailing. It is now one or two generations behind in molding technology but builds into a nice model with a lot of dry fitting and adjustments.
Additional positive features are the kit provides
clear parts for the position and formation lights. Tamiya’s Tomcat, a much newer
kit does not have separate clear parts for its lights. The Hasegawa clear parts
for the external formation lights and warning beacons require attachment and
sanding and polishing before painting to get them to properly fit. The decal
sheet for this release, kit 09757 was very nice, colorful and of high quality
printed by Cartograf! Even though I had some F-14D aftermarket decals the kit
decal was so nice I used it. The decal was perfect and in some way the highlight
of this build.
by Cartograf! Even though I had some F-14D aftermarket decals the kit
decal was so nice I used it. The decal was perfect and in some way the highlight
of this build.
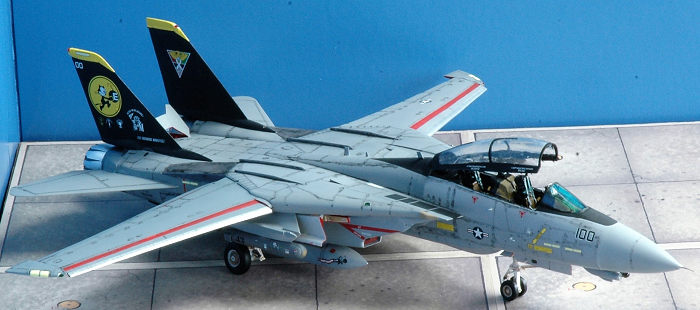
F-14 Tomcat color schemes were quite often very colorful using the entire vertical tail surfaces to show their pride in ownership and squadron colors. It is war paint at its best. This meant the entire tail is often painted. Hasegawa provides the entire vertical tail as a separate unit so you can paint and decal it leaving it off until the final clear flat coat attaching it with some cyano-acrylic glue. The newer Tamiya F-14A has a much better, for alignment purposes, design engineering for the vertical tail assembly, but you must paint and mask it because the tail roots are part of the fuselage. For some the Tamiya approach is favored because it lets you get the correct 5 degree cant to the vertical tail (see the photo on page 39 of Coremans book) and there is no alignment issue. The Hasegawa vertical tail has a loose fit and can incorrectly overlap the wing sealing bag, parts A1/A2 + A10/A11 in step 14 or not be at the 5 degree cant. The Tomcat is not at all like the F-15 Eagle with its perfect 90 degree vertical tails.
Step 10 in the instructions has you add 12 grams of nose weight. Since I used a resin cockpit I did not add any nose weight and none was needed. Hasegawa does not provide the nose weight. I prefer to have it come with the kit as part of the contents. Also, using any ballast with the engineering approach of attaching the weighted front nose section to the rear fuselage component might exacerbate a potentially weak join. While I have not heard of any complaints from attachment failures I recommend using some strip styrene connectors or stiffeners on the inside of the attachment point to help avoid this potential calamity. Due to the weight of the resin cockpit I used three metal pins formed from a paper clip glued into holes drilled into the front fuselage extending into the rear fuselage join in the instruction assembly step 28. No cracks or breaks were experienced with this join.
 Hasegawa has had a problematic fit history with
the intake trunks parts B1 & B9 and the fuselage parts A7 and B6. Also, for
those of us who use small flashlights to look into intake trunks and exhaust
sections there is a noticeable seam in the trunks. My initial bad experience
with a Hasegawa F-14A build years ago with this area led me to use FOD covers
which coming from Eduard or Quickboost look great, especially when adorned with
Eduard Remove Before Flight streamers. This also means the use of the variable
intake ramp parts G7/8, 10/12, 11/13 is avoided. I was told the kit ramp, built
per the instructions may be wrong because it is set for supersonic flight rather
than ground or slower flight intake status. Unfortunately, the intake ducts seam
was the least of my kit assembly problems so fixing the ducts were just lipstick
on the proverbial pig.
Hasegawa has had a problematic fit history with
the intake trunks parts B1 & B9 and the fuselage parts A7 and B6. Also, for
those of us who use small flashlights to look into intake trunks and exhaust
sections there is a noticeable seam in the trunks. My initial bad experience
with a Hasegawa F-14A build years ago with this area led me to use FOD covers
which coming from Eduard or Quickboost look great, especially when adorned with
Eduard Remove Before Flight streamers. This also means the use of the variable
intake ramp parts G7/8, 10/12, 11/13 is avoided. I was told the kit ramp, built
per the instructions may be wrong because it is set for supersonic flight rather
than ground or slower flight intake status. Unfortunately, the intake ducts seam
was the least of my kit assembly problems so fixing the ducts were just lipstick
on the proverbial pig.
Finally there is no, zero, as in none, in the way of armament for this aircraft out-of-the-box! It is an expensive kit in a big box. For those used to building Hasegawa, 1/48th scale kits since the 1980’s F-4 Phantom II series, we are used to the lack of any armament but still grumble. Tamiya’s F-14 Tomcat has a complete weapons load and excellent decal stencil for its weapons. We all like that very much. It is time for Hasegawa to up their game and start to provide well detailed armament with their kits. Also, be cautious of using the box art photo to assume the contents of Hasegawa Tomcat kits include things like a Lantirn pod, etc. since they usually do not OOB. This might now be a moot point since many are now using the well detailed, accurate, CAD 3D printed munitions from Eduard in lieu of kit plastic parts.
What makes this kit recommended for intermediate modelers is the level of detail in the box. There is quite a bit of work here to build this aircraft without imperfections. Someone wanting a simpler Tomcat to start with is better off with the Monogram/Revell or Academy 1/48 F-14A Tomcat or F-14A Bombcat kits. I do like Hasegawa’s attempt to provide dropped flaps and slats. These are the only kits to date that allow the Tomcat to be posed with everything hanging out for take-off or landing that I have built which includes even the recent Tamiya F-14A release. Fortunately, most static display Tomcats have the wings swept back. Most F-14 Tomcat photos also lack armament so a clean Tomcat is common.
The rear engine section looks nice. The TF30
engine parts from the F-14A release are replaced with F110 parts, with a correct
in scale length for the afterburner chambers. The kit comes with engine faces
for viewing down the intakes and turbine fac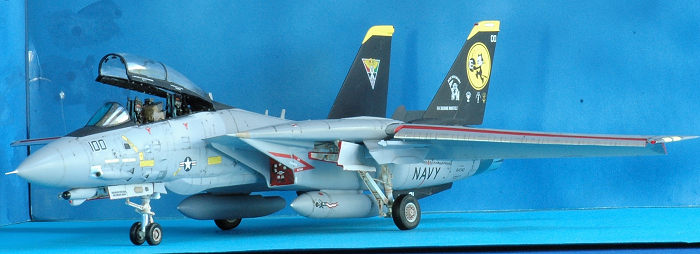 es for viewing down the tailpipes.
You have your choice of open or closed engine nozzles for the GE engine just as
you did with the TF30 nozzles in the Hasegawa F-14A kit. The only detail missing
here are the afterburner spray rings that sit aft of the turbine faces to inject
fuel for the afterburning augmentation. You can add those from an Eduard
photo-etch detail set for this kit.
es for viewing down the tailpipes.
You have your choice of open or closed engine nozzles for the GE engine just as
you did with the TF30 nozzles in the Hasegawa F-14A kit. The only detail missing
here are the afterburner spray rings that sit aft of the turbine faces to inject
fuel for the afterburning augmentation. You can add those from an Eduard
photo-etch detail set for this kit.
The kit has many options such as the wings can be positioned full-forward with dropped flaps and front slats or fully aft (but not in the over swept mode). Along with parts such as the flaps and slats that can be positioned up or down you have the option of the engine nozzles that can be positioned open or closed; the speed brakes can be positioned open or closed; a boarding ladder, open or closed boarding steps and optional crew figures are also included.
The rear section of the fuselage, sometimes called a ‘beavertail or boat-tail”, parts E15 & E30 with a bulkhead separator part (# A13) was hard to align and very hard to clean up. Once attached there is usually a small gap at the join to the fuselage. The F-14 Tomcat has several versions of the beaver tail so ensure you are using the correct one for your colors and markings scheme.
Hasegawa’s use of cast metal rims with the vinyl rubber tires looks like an upgrade from standard plastic wheels. There are no styrene tires on the plastic sprues. The kit only has vinyl rubber tires with white metal wheel hubs. Actual experience with these have been poor. The vinyl tires will deteriorate in a few years, first cracking, and then coming completely apart a few years later. I suggest replacing them when it is first assembled with some of the fine resin wheel replacements that are available.
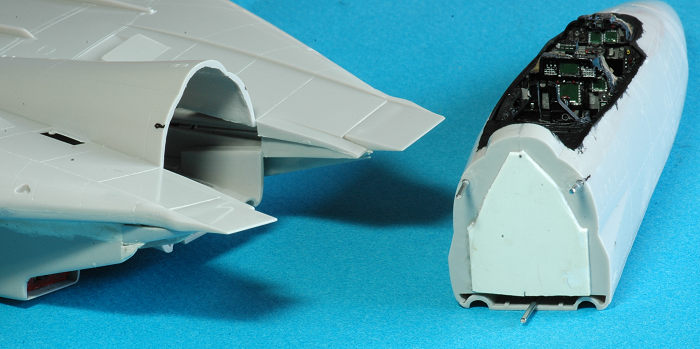
The cockpit is acceptable but simple, actually too simple for comparison to the current new releases from mainstream manufacturers. Hasegawa also did not provide an instrument decal with this release to improve detailing so a resin replacement cockpit is in order unless you close the canopy and maybe use the two figures sitting on the kit ejection seats that come with the kit. I prefer an open canopy build and a detailed cockpit so I used an Aires resin replacement cockpit. More on the Aires cockpit later.
Detail in the main wheel wells is lacking. The
detailing in this area is flat and not at all realistic. The nose wheel well
passed the minimum test for me but the main gear wells were disappointing. I did
not use a resin replacement because I have not heard of any being easy to use or
fitting well. There is a benefit to using a resin wheel well however because it
would eliminate the troublesome assembly of the four part Hase gawa plastic main
(loose fitting) wheel wells side-walls with its correct inclusion with the wing
and fuselage section. This is the point where most of us stop building the kit.
gawa plastic main
(loose fitting) wheel wells side-walls with its correct inclusion with the wing
and fuselage section. This is the point where most of us stop building the kit.
External options for the kit include AIM-56 phoenix missile pallets for the underside of the fuselage, external fuel tanks for under the intake trunks, and a TARPS reconnaissance pod (the TARPS pod is not with every Hasegawa F-14 Tomcat release). This release also includes updated sidewinder BOL pylons for the wing gloves, but that is it. This kit follows the philosophy Hasegawa developed years ago that mandates you purchase separate weapons sets to arm your kit. Now we have better third-party resin replacements as an alternative to Hasegawa’s weapons sets. I had them for this build but opted to save them for another better build.
There are a few nice things to find with this kit. Since Hasegawa designed it to be a series for F-14A/B and D models you will wind up with some good spare parts especially the nose IRST/TCS Infrared seeker/TV optical unit parts G21/22, 29/30/ 33/34 and 37/38. Four different nose sensor packages will be your reward for buying this kit. Nice! I wish Tamiya had done this.
I like the fact Hasegawa provides some etched metal parts such as canopy mirrors, and canopy locking latches which are useful and add to the nice details. They are in a way better than the Tamiya plastic kit canopy part representation. Hasegawa did a nice job with their canopy frame in terms of providing the piping for the air defogging unit compared to Tamiya but Hasegawa creates a potential problematic mating of the clear canopy part with the frame. Since it comes in two parts, and the lower part is flexible, you have to be careful mating them. Tamiya’s single clear front windscreen canopy part with integral frame approach is preferred for ease of assembly and painting. This is especially an issue with attaching and painting the front windscreen – Tamiya’s design approach for the front windscreen should be the industry standard – it is superior in all respects. I have yet to find a Tomcat kit with a 100% easy to attach and when posed open, correctly positioned main canopy.
| CONSTRUCTION |
The perfect start for construction is to read DACO Publications # 3 Uncovering The Grumman F-14A+B+D Tomcat by Danny Coremans (2006) before cutting or joining any plastic parts. It really helped unravel many questions that occurred due to the kit instructions being a bit vague at times. I kept this book by my side throughout the building process. I referred to it frequently to really answer how things went together.
The moulds are starting to show their age and are
in need of some maintenance. That means you have to clean up many parts with
flash and fix sink marks and tooling punch-out holes. Now that the Tamiya kit is
out and AMK indicates they have an F-14D on the way by 2018, perhaps only a
complete refresh tooling would help Hasegawa continue selling F-14 Tomcat’s in
1/48th scale. At its usually premium price point it is serious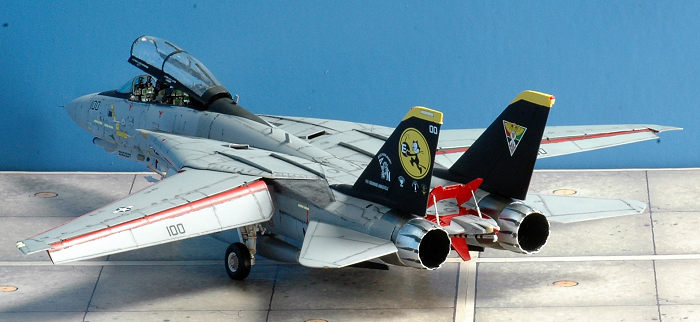 ly
lacking in value. The moulds are over 25 years old. You can see flash starting
to build up on many of the parts trees and misalignment of parts. As you know
this translates into more work and some detail damage when you clean up the
flash on smaller parts. However, that was not the most significant building
issue I faced.
ly
lacking in value. The moulds are over 25 years old. You can see flash starting
to build up on many of the parts trees and misalignment of parts. As you know
this translates into more work and some detail damage when you clean up the
flash on smaller parts. However, that was not the most significant building
issue I faced.
Since I have also built the 2016 released Tamiya F-14A, it was an interesting build working on this Hasegawa “D” version, coming after the Tamiya construction and completion was fresh in my mind. The biggest initial bad impression from this Hasegawa kit was the amount of flash. There was quite a bit and more than any other Hasegawa kit that I have built in recent memory. It is a good sign that they have produced many kits from their molds and it is time to replace or retire them.
Hasegawa’s Tomcat has a definite lack of locating pins and ease of assembly compared to the recent Tamiya F-14A (Tamiya in 1/48th scale). For example, when I was joining the vertical stabilizer tail parts there were no locating pins and that made for a hard effort to avoid a miss-match while gluing them together. Any parts like these, which have a slight warp, causes a mismatch when you use clamps or any device to hold the opposing parts together for gluing. I found the best approach was to not use clamps, just holding the part together with a few sparingly applied drops of glue, quickly aligning them and leaving them until it set. I would then go back and re-glue the entire item, if required for additional strength. Even then, a few parts showed less than good mirror-image halves requiring sanding or fixing with some loss in detail. That was fine in 1988 but not now, almost thirty years later.
The exhaust petals, parts K4/K5, had a nice crisp detail look but were a challenge to assemble – featuring a quite cumbersome design engineering choice for sure of individual petals. The combustion chambers, parts K1/K2, had a sloppy alignment, with no locating pins, resulting in a poor join. The resulting attachment of the combustion chamber with the exhaust petals, step 19, parts E2 & K4/K5 petals was not enjoyable. Perhaps if done today better use of slide molding technology could provide a one-piece unit with crisp inside and outside detail like the after-market resin replacement sets. I chose not to use the Aires resin exhausts only due to my giving up on having a great model based on the underlying kit having so many gaps, holes and mismatches in the plastic. It just did not seem to add a lot of value enhancing the exhaust area with nicely detailed resin bits to a very imperfect model that once into construction I gave up on finessing seams or shape accuracy opting for a just get it done project.
The kit cockpit parts were pretty basic. I was of
the opinion that they would look acceptable with some etched metal upgrades but
chose to use the Aires resin cockpit set # 484333 instead. It is a fantastic replacement. The detailing is quite good
and has to be seen to be believed. The closer I looked the more amazing and
impressed I was with this resin cockpit set. The throttle is stunning. So many
of the cockpit parts were perfectly done and exquisitely detailed. The only
error I found was the ejection sea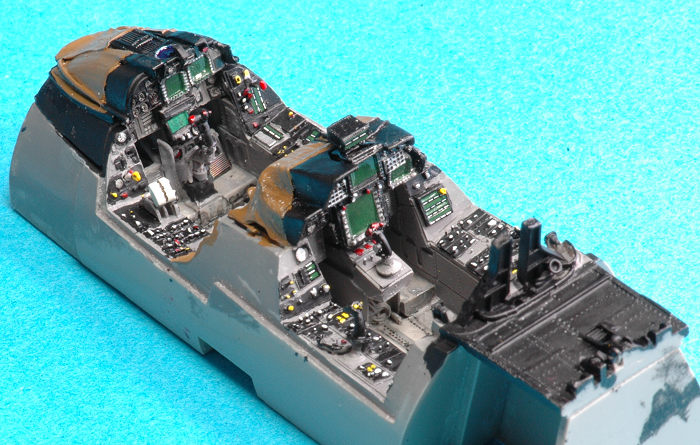 t canopy breaking spikes on top of the seat
should be different for the pilot versus the RIO. Aires has them casted as the
same size – a small but noticeable difference. The pilot has a larger spike on
top of their NACEs ejection seat. I corrected this with some scratch built
plastic replacements.
t canopy breaking spikes on top of the seat
should be different for the pilot versus the RIO. Aires has them casted as the
same size – a small but noticeable difference. The pilot has a larger spike on
top of their NACEs ejection seat. I corrected this with some scratch built
plastic replacements.
There is another problem when using this cockpit and that is how to get the exact correct placement within the plastic fuselage parts with any certainty. Then, the final problem with using it is fit – lots of dry fitting and sanding is required and it was still hard to close the fuselage halves. There is a small square notch in the resin which fits a side-wall part in the kit plastic and that is helpful. The kit plastic front nose gear bay floor, part G9 has two raised round parts which fits into the ”female” component on part B7’s cockpit underside for correct alignment. It would have been good if Aires had incorporated those two openings into its resin component to permit an easier and correct placement of the resin cockpit within the fuselage halves. You are thus left to use your Mark 32 eyeball and we know all of us have a different calibration of this precision instrument. What looks fine to one person is “wonky” or incorrect to another. Some trolls on the internet who only criticize models for flaws and can’t build a model delight offering their expert unwanted opinions based on their superior eyeballs and non-skills.
I was also fortunate to have and use the FIghtertown Decals 48082 F-14A/B/D Tomcat Data Sheet on this build. It was extremely useful in detailing the Aires resin cockpit and other parts of the airframe. It was most useful in detailing the displays and dials that I could not paint as well freehand. It really made the cockpit “pop” since it did not obscure any of the existing detail. One item for example, the small box on top of the RIO console station, just in front of the RIO grab-bar is called the GPS display (I think?). It has six panels of eight green buttons with six rectangular gray buttons on the instrument face. There are decals for this on the Fightertown 48082 data decal sheet. See Coreman’s F-14 book on pages 92-95 for some clear close-up photos of this cockpit part. I was very happy with this part of the build.
The TF30 engine nozzles provided in the kit are another interesting distinction with the Hasegawa Tomcat kits. They provide nozzles for 'open' and 'closed' positions for each engine. This gives you the ability to pose the aircraft for two different power settings, or on the ground in a shut-down pose. When a multi-engine fighter shuts down, the nozzle on the first engine closes down, but the when the second engine is shut down, its nozzle remains open as the hydraulic pressure used to close the nozzle is removed when that engine quits. That is why you often see F-14’ with their nozzles in asymmetrical positions. Despite knowing this I chose to use the two open exhaust parts because I think they expose a distinctive profile for the F-14D that I wanted to have with my model.
 I added a 20mm gun barrel to the inside of the gun
port. Since I had not yet experienced the fit issues that discouraged me from
adding details and correcting problems I added a stainless steel hypodermic
needle tube, .042 O.D. and .0075” wall thickness inside the gun port. It pleased
me as I was thinking this would be a great build and looked forward to a finely
finished model at this point.
I added a 20mm gun barrel to the inside of the gun
port. Since I had not yet experienced the fit issues that discouraged me from
adding details and correcting problems I added a stainless steel hypodermic
needle tube, .042 O.D. and .0075” wall thickness inside the gun port. It pleased
me as I was thinking this would be a great build and looked forward to a finely
finished model at this point.
There are many aftermarket resin and decal sheets made for the Hasegawa Tomcat. You can get resin cockpits, engine exhaust nozzles, and wheel bays for example along with many decal sources. Unfortunately, it is usually a lot of extra work just to get the resin and etched to fit. Sometimes they lead to another problem such as affecting the alignment of kit plastic parts which then throws off some other area. That was a consistent theme throughout my build.
Kit color and markings instructions have a LANTIRN pod with color (Gunze paint H305 Gunship Gray AKA Dark Sea Gray) and decaling information. The kit does not include the LANTIRN pod and makes a small mention of it inside the addendum assembly instructions. I initially thought Hasegawa lacked any understanding that this model with its decal and box markings required a LANTIRN pod and it was missing. They did a good job researching this and it, the LANTIRN pod, was there in the addendum page.
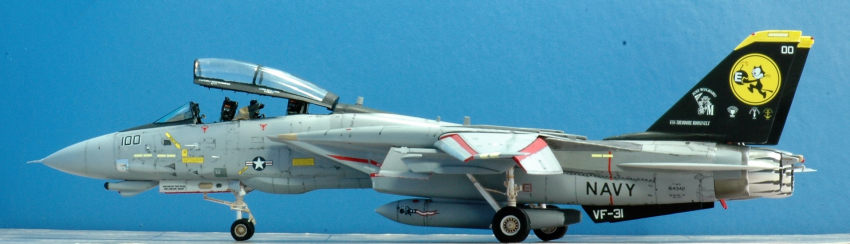
The actual airframe, F-14D BuNo 164342, Modex 100, VF-31 CAG airframe, in the September 2006 scheme, was frequently photographed with its dark gunship gray LANTIRN pod on station #1 which is under the right side pylon. The decal sheet has Lantirn pod decals # 110 for number “43” and decal # 111 for number “60” with a few stencils #105 - 109. I added the LANTIRN pod from a Hasegawa set to the existing pylon. I intentionally did not use the correct parts from sprue “Q” and “R”, the LAU-137 sidewinder launcher introduced in 1997 with its BOL countermeasures dispenser and Sprue “R” which is correct for holding the LANTIRN pod on the F-14. I am saving the sprue “Q” and “R” parts for a better, less error marred build so its omission is not a mistake but a simplification ignoring accuracy issues some may have. It is good enough for my shelf sitter whose objective is just to show the decals and the F-14D nose pod next to other Tomcats. It is not an F-14D showboat or highlight of my modeling experience.
I followed the kit instructions build sequence except I left step 31 where the temperature, AOA and static pressure probes, very tiny parts H10, H17-18 are added for the final finishing step. I painted them, added the nose pitot and called it quits.
| COLORS & MARKINGS |
For paint I used Gunze Aqueous H337 Grayish Blue FS35237 on top and Gunze Aqueous H308 FS36375 Gray on the lower fuselage and bottom in a modified TPS scheme per photos and kit decal instructions. The interior overall was painted Gunze H317 FS36231. The exhaust end petals are painted with Alclad Chrome and the section just in front of it which is some type of carbon-fiber heat insulation device was painted with Testors exhaust and polished with artist’s graphite powder to give it a dull sheen simulating the actual photos I was working from. For the F-14D chin pod I used Gunze H95 Smoke Gray for the IR sensor dome. I also polished it with artist’s graphite to darken it and get the shiny metallic effect I saw from photos on page 49 of Coreman book.
The markings I used are the kit supplied superb Cartograf printed decal. There are three options. Two are the same airframe during different time periods. It is aftermarket quality in all respects. I even used the vertical tail tips yellow decal. Normally I would mask and pant it due to the compound curves. Since it has a stylized tapering flash on the front edge I tried using the kit decal. With an application of Microsol it wrapped around every nuance of a very convoluted tail tip and looked painted on when dry. I did have to apply a bit of paint to touch it up but that was not due to any decal inability to conform to compound shapes.
Thanks to ma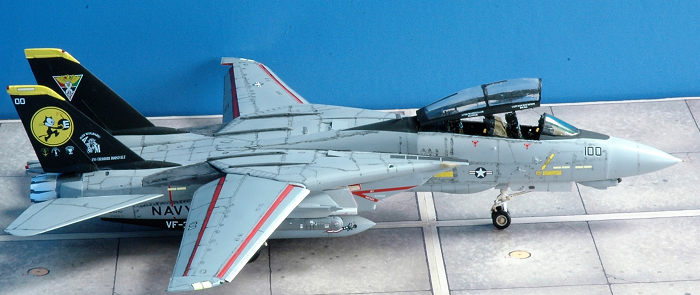 ny hi-resolution photos of this
aircraft, this airframe DEFINITELY has coroguard main wing leading edges – but
not on any other flying surfaces leading edges. I painted it with Alclad
aluminum and gave it a panel wash. The coroguard metallic epoxy paint weathers
to a gray color so a gray metallic color could work as well. I felt the CAG
plane could be better maintained and clear color photos show a metallic sheen to
the wing leading edges so I chose this color for my build.
ny hi-resolution photos of this
aircraft, this airframe DEFINITELY has coroguard main wing leading edges – but
not on any other flying surfaces leading edges. I painted it with Alclad
aluminum and gave it a panel wash. The coroguard metallic epoxy paint weathers
to a gray color so a gray metallic color could work as well. I felt the CAG
plane could be better maintained and clear color photos show a metallic sheen to
the wing leading edges so I chose this color for my build.
I applied a grunge wash and dirtied up the airframe a bit based on photos. Many very clear color photos of this airframe are available on the internet and in Colors & Markings (Digital Version) #1 U.S. NAVY F-14 TOMCATS, Part 1 Atlantic Coast Squadrons by Bert Kinzey (2016). I am not a fan of digital reference books since computers are prone to fail and lose their content. Even if the electronics work forever, operating system changes and intentional plans to force upgrades or product obsolescence via software incompatibility and usability are foisted upon us. I make an exception for the Colors & Markings (Digital Version) #1. I will buy Part 2, F-14 Pacific Squadrons as soon as it comes out. What an inspiring reference work at a fair price. If you enjoy Tomcat photos this reference is modeler’s candy.
Don’t forget to paint the small lightning strike strips on the top of the main canopy. They are seen extending half way forward from the rear of the pilot and RIO’s canopy roof. It seems missed or missing in many Tomcat models that I have seen. Superb detail photos of this feature can be found on page 18-19 of Danny Coremans book. I removed half of the plastic seam in the canopy roof using a tri-stick sanding stick leaving the remaining raised segments intact. After polishing out the sanded area and dipping it in future polish I masked and painted this feature into the canopy. The kit is also missing the GPS antenna transponder that is on top of the fuselage after the canopy area. It is a small bump, appearing during 2000. It is usually unpainted appearing in its gray color so for this model it would be an addition not found in the kit plastic.
The hardest part of any Tomcat build is choosing what colors and markings to use – and ensuring your choice is reflected in the details such as correct beaver tail shape, rear beaver tail light and di-electric panels or not, gun gas port type, ECM bulges, transponder bulge, RIO boarding step reinforcement plate and tail stiffeners and all the F-14 block specific details are there. Tomcat’s have so many incredible colors and colorful marking schemes. You need to build several Tomcats to resolve this issue.
| CONCLUSIONS |
I have a 1/48th scale Hasegawa F-14D Tomcat sitting with my collection of other F-14’s from a variety of manufacturers. That’s about all I can say good about this build. While it looks maybe acceptable from a distance, the effort it took and the multiple problems of gaps, mis-aligned contact points and serious putty and sanding sessions damped my enthusiasm for this kit.
I reached a building decision inflection where I determined it was pointless to invest more time with accuracy concerns, cleaning up seams and performing the normal fixes on seams, intake imperfections, detailing and such and even accuracy on some airframe details. It made memories of the ease of assembly and click-fit perfection of my 1/48th scale Tamiya Tomcat all too vivid. So I do have a very imperfect model that for me is just a placeholder until AMK or Tamiya come out with their versions.
If I were doing it again, or for my next F-14D, I
would consider a resin conversion using the Tamiya kit as the base or donor kit
and even consider scavenging parts from a Hasegawa F-14B/D Tomcat donor kit in
order to build the “B” or “D” version using Tamiya’s Tomcat as the base kit and
avoid the painful problems of a Hasegawa build. Selling the Hasegawa kit may get
you more cash for the resin conversion parts and give you even b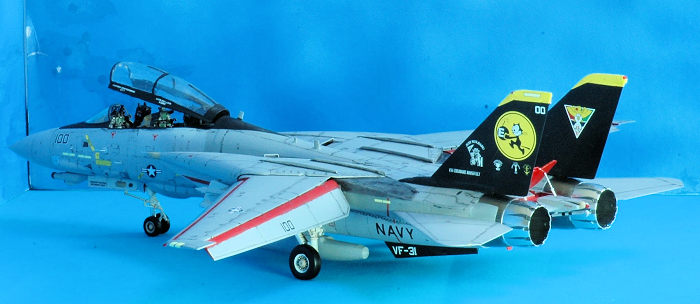 etter detail
parts for the conversion than using the Hasegawa plastic bits. I hope the future
treats us well when the F-14D becomes available from Tamiya and/or AMK. Maybe
Hasegawa can come out with new moulds which would be most welcomed if they can
meet the current standard.
etter detail
parts for the conversion than using the Hasegawa plastic bits. I hope the future
treats us well when the F-14D becomes available from Tamiya and/or AMK. Maybe
Hasegawa can come out with new moulds which would be most welcomed if they can
meet the current standard.
Think about using the Tamiya kit with the right aftermarket resin bits. That could be the best and cheapest alternative at this moment. I feel resin cockpits and other etched parts are needed for the Hasegawa build to bring it up to current standards. Resin after-market products have become quite expensive lessening the economics of salvaging or using the Hasegawa kit. Even if it’s in your stash the time effort and frustration is not worth it to most of us who build for modeling pleasure and a good final result. If you have one never to be finished in the box or on your shelf-of-doom think about it.
That means my stash of other 1/48th scale Hasegawa F-14A/B and “D” Tomcats has been re-valued to be worth about $25.00 per kit in my opinion, and that valuation is based on their underlying nice decals in some releases and F-14B/D conversion bits that are worth salvaging from those attractive boxes. Maybe twenty-five years ago, about when the Hasegawa kits were first released could I have been more positive about what you now get from Hasegawa’s F-14 Tomcat family. I no longer recommend it for 1/48th scale builders – and I am a big fan of Hasegawa plastic in general.
| REFERENCES |
DACO Publications # 3 Uncovering The Grumman F-14A+B+D Tomcat by Danny Coremans (2006)
Colors & Markings (Digital Version) #1 U.S. NAVY F-14 TOMCATS, Part 1 Atlantic Coast Squadrons by Bert Kinzey (2016)
Tomcat Alley A Photographic Roll Call of the Grumman F-14 Tomcat by David F. Brown Schiffer Books 1998. This is a superb book since it is in BuNo order with outstanding photographs but it is incomplete due to F-14A/B/D airframe changes and squadron painting schemes after it was printed in 1998. I hope Dave can update it with new photos and any missing updates.
14
August 2017 Copyright ModelingMadness.com.
If you would like your product reviewed fairly and fairly quickly, please contact the editor or see other details in the
Note to
Contributors. Back to the Main Page
Back to the Review
Index Page
Back to the Previews Index Page