| KIT #: | 00156 |
| PRICE: | $ It was a gift |
| DECALS: | One option |
| REVIEWER: | Jeroen Koen |
| NOTES: | Limited edition boxing with Cartograf decals. CAM decals 72-060 purchased but not used. Used decals from newer Hasegawa VS-29 boxing #00921 |
| HISTORY |
The Lockheed S-3 Viking was developed by Lockheed and Ling-Temco-Vought as a carrier-borne anti-submarine detection and patrol aircraft. Advancements in Soviet submarine technology was forcing the US Navy to keep up, and the S-3 was their way of doing it. It was the replacement of the venerable Grumman S-2 Tracker and first flew in 1972. As early as 1974, the first operational aircraft were delivered to VS-41, the training squadron. Using fuel efficient turbofan engines and a large-span wing it was an efficient aircraft with a long endurance.
Far from pretty, it looks like everything the aircraft needed to contain internally was laid out first, and then someone s kid drew a connect-the-dots kind of line to define the outer looks.
 It has a crew of four; one aircraft commander, one pilot, a tactical
coordinator ( tacco ) and a sensor operator ( senso ). The ASW gear was
developed around a new Univac 1832 computer, that had increased
performance over the existing 1831 units in P-3 Orions. This, by the way, was an
airborne development of the commercially available Univac 1108 mainframe
computer, and also used in other naval applications, such as the Aegis weapons
platform. It must have been quite expensive, as only 296 commercial Univac 1108s
were delivered, which was remarkable in itself, as Univac estimated there was a
demand for slightly more than 40! When purchasing P-3s, the Canadians requested
them with the S-3 ASW equipment, operating them as CP-140 Aurora's.
It has a crew of four; one aircraft commander, one pilot, a tactical
coordinator ( tacco ) and a sensor operator ( senso ). The ASW gear was
developed around a new Univac 1832 computer, that had increased
performance over the existing 1831 units in P-3 Orions. This, by the way, was an
airborne development of the commercially available Univac 1108 mainframe
computer, and also used in other naval applications, such as the Aegis weapons
platform. It must have been quite expensive, as only 296 commercial Univac 1108s
were delivered, which was remarkable in itself, as Univac estimated there was a
demand for slightly more than 40! When purchasing P-3s, the Canadians requested
them with the S-3 ASW equipment, operating them as CP-140 Aurora's.
Apart from detecting submarines and calling their positions in, the S-3 also has some teeth itself. It can carry out its own offensive operations, as in the large internal bomb-bay, mines, torpedo's, depth charges and bombs can be carried. If the range or internal payload is not enough, a pair of hardpoints outboard of the engines are fitted for more weapons, or, more commonly, external fuel tanks for even more range. If, even with external tanks, not enough fuel is available, a retractable refuelling probe is located above the cockpit.
During the 1980s, the A's were upgraded to B standard. This included an upgrade of internal electronics and radar, the fitting of chaff/flare dispensers and the addition of the AGM-84 Harpoon amongst the largest changes. Externally, update changes were minor, other than the fact that S-3 units were among the last to adopt the new tactical paint scheme. Other versions were the extremely expensive, yet short lived, ES-3A Shadow, and the US-3A cargo version for on-ship delivery. This last version did not have the tacco and senso positions, but a loadmaster instead, and could carry 2100kg worth of cargo and/or six passengers. External cargo pods on the wing pylons could also be fitted.
 During Desert Storm, where there was little ASW-ing to be
done, S-3s were used as anti-shipping aircraft, using Harpoons and cluster bombs
to attack Iraqi surface ships at first, and even attacking targets on land with
bombs -despite not being designed as a bomber, it proved very accurate in that
role! After Desert Storm, following the retirement of USS Forrestal as an active
fleet carrier, and the subsequent disestablishment of it's Carrier Air Wing 6,
VS-28 Gamblers was the first S-3 squadron to be disestablished.
During Desert Storm, where there was little ASW-ing to be
done, S-3s were used as anti-shipping aircraft, using Harpoons and cluster bombs
to attack Iraqi surface ships at first, and even attacking targets on land with
bombs -despite not being designed as a bomber, it proved very accurate in that
role! After Desert Storm, following the retirement of USS Forrestal as an active
fleet carrier, and the subsequent disestablishment of it's Carrier Air Wing 6,
VS-28 Gamblers was the first S-3 squadron to be disestablished.
After the release of tension between the superpowers, and the resulting decline in need (and budgets) for submarine detection, S-3s gradually changed into the tanker role, more so with the retirement of the KA-6D Intruder. Using D-704 buddy refuelling pods the S-3 was used almost exclusively as a tanker, reflected by the removal of electronics and most of the sonobuoy launchers later in their careers. Slowly but surely, more and more S-3 squadrons followed VS-28s early example. By 2009, the last remaining S-3 squadrons, by then renamed from Anti-Submarine Warfare squadrons to Sea Control Squadrons, were disestablished, and the S-3's role as an active US Navy type was ended. The ASW role would now be handled by land based P-3 Orions (and their future successor) and on-board helicopters. As the S-3s might someday be needed, they were not scrapped, but stored instead. Unlike the S-2 Tracker, which was in use worldwide, the Viking was not exported, so as of now, the sole operator of the type is NASA, using an S-3B, painted in a pretty airliner-looking scheme of white and blue. Curiously, the Grumman Tracker it was meant to replace, is still in active use in a few places!
| THE KIT |
Being such an old kit, it's not surprising that Scott has already done multiple(!) previews of this aircraft. For the sake of being far less of an expert on this aircraft than Scott is, I'll just give a peek inside what I got in the box. Inside there are 2 grey sprues and one clear. There is the standard Hasegawa fold-out instruction for the regular boxing, with a separate A4 sized leaflet included for painting and marking the VS-41 Bicentennial version in this kit.
Being a rather old kit, it has a few features that you don't really get
any more on more modern Hasegawa kits. Such as raised panel lines, weapons, and
pilot figures to hide the emptiness of the cockpit. Other options include a
separate FLIR pod (if you can call the bit of plastic that looks like a Wesco
trashcan that) with doors, separate flaps (but no slats, or any detailing) a
boarding ladder that, when dep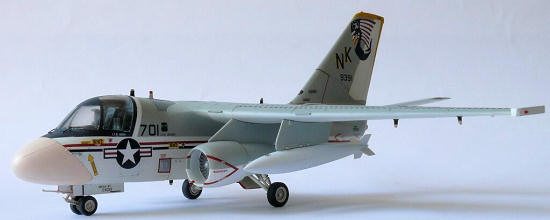 loyed, shows a blank wall, extended refuelling
probe and MAD boom for example.
loyed, shows a blank wall, extended refuelling
probe and MAD boom for example.
One thing that hasn't really changed are ejector pin marks on seats, interior, engines, and the detailed sides of the gear doors -which have nice raised details which you'll be sanding away to get rid of these pin marks. For things under the wings you get 2 drop tanks, and 2 TERs with bombs, seldom carried, except later in it's career, and since fellow MM forum member Rex -the Accidental CAG- needed them, I mailed these off to a better home than my sparesbox where they would undoubtedly be left to rot for eternity.
Clear parts aren't very numerous; one big fish-bowl for the front cockpit, 2 side windows for the backseaters with nice sink areas in them, and 2 small oval windows that go between these two, but that I've only seen on the US-3A COD versions. Older versions of this kit have had the clear parts in smoke coloured plastic, but on this newer issue they are standard clear and it's up to the builder to get the tinting done.
It's age also means out of the box it builds into an S-3A, for a B you'll need to do some small modifications, and there's a bit of flash growing here and there.
Decals for this particular boxing are, somewhat surprisingly, done by Cartograf and look good on the sheet. The white is really white in this case. Except that they are for VS-41's Bicentennial scheme in overall white, which I don't really like, so I ordered CAM 72-060, which has full decals and stencilling for 2 schemes. More on those later...
| CONSTRUCTION |
Unsurprisingly, given the above, construction started by snipping off all parts that had these sometimes nasty pin marks on them, and filling and sanding these. After that, I figured the engines would be the greatest challenge to get seamless, so I started with those. As they are conical in shape, it's quite impossible to fit the fan blades after gluing the outsides and cleaning that up, so I was left with assembling them as per the instructions, and then have the happy task of getting rid of the seams on the inside, while attempting not to damage the fan blade detail. After quite a lot of sanding and filling, both on the outside and inside, I thought them good enough.
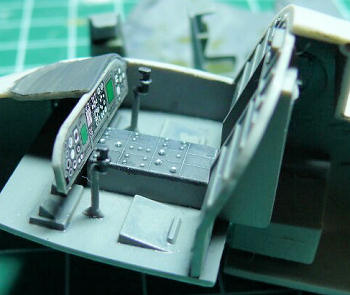 While the filler was drying, I cleaned up and painted the cockpit pieces.
These were airbrushed dark grey and given a rather excessive black wash, in the
hopes that something would be seen after tinting the cockpit glazing. A bit of a
drybrush on the high parts and the application of the instrument panel decal
just about finished up the main cockpit parts. Although it is very bare, I did
not go overboard on detailing, and only added some seatbelts and buckles for the
ejection sofas that go in front. After cleaning up and dry-fitting all main
components I glued the instrument panel and interior to one fuselage half. At
this time the blank insert for the small oval windows was also fitted, as were
the small polarizing windows for the backseaters. Scott suggested I simply paint
these black on the inside, and since there is nothing to see in there except for
Hasegawa grey plastic with my glue smears on it, I followed that piece of sound
advice. These windows not only had a large sink area smack in the middle, but
after assembly also stand proud of the fuselage and have some gaps around them,
so I was forced to sand them down, fill the sides with Vallejo plastic putty,
and polish them shiny again -getting rid of the nasty sink area was a nice
bonus! For the oval windows I used the clear parts, marked not for use in the
instructions, as the plastic parts had huge sink areas on the outside. Although
these did not have a sink area, they nonetheless required filling and sanding as
well.
While the filler was drying, I cleaned up and painted the cockpit pieces.
These were airbrushed dark grey and given a rather excessive black wash, in the
hopes that something would be seen after tinting the cockpit glazing. A bit of a
drybrush on the high parts and the application of the instrument panel decal
just about finished up the main cockpit parts. Although it is very bare, I did
not go overboard on detailing, and only added some seatbelts and buckles for the
ejection sofas that go in front. After cleaning up and dry-fitting all main
components I glued the instrument panel and interior to one fuselage half. At
this time the blank insert for the small oval windows was also fitted, as were
the small polarizing windows for the backseaters. Scott suggested I simply paint
these black on the inside, and since there is nothing to see in there except for
Hasegawa grey plastic with my glue smears on it, I followed that piece of sound
advice. These windows not only had a large sink area smack in the middle, but
after assembly also stand proud of the fuselage and have some gaps around them,
so I was forced to sand them down, fill the sides with Vallejo plastic putty,
and polish them shiny again -getting rid of the nasty sink area was a nice
bonus! For the oval windows I used the clear parts, marked not for use in the
instructions, as the plastic parts had huge sink areas on the outside. Although
these did not have a sink area, they nonetheless required filling and sanding as
well.
At this time I assembled as many sub-assemblies as possible, so the wings and tailplanes were assembled and cleaned up. The wings fit quite well, but if you align the wingtip pods, the wing is skewed, and, you guessed it, if you align the wing, the tip-pods are skewed. I opted to align the wings and file and sand the tip-pods in shape after that, destroying the moulded on details. I did manage to save the wingtip light...
The flaps only fit so-so in the closed position, so I glued some Evergreen strip underneath to help alignment. I also used a small strip of Evergreen to fill the gap between the front part of the engine and it's pylon, so I could paint, decal, and varnish all these parts before final assembly.
 After closing up the fuselage halves, which fit quite well, especially
when glued in sections, I fitted all the separate inserts. Most fit quite well,
needing only some minor sanding if you dry fit a few times and glue carefully. A
touch of filler was only needed on the front one, which has the gear bay moulded
in, the instrument panel coaming, and the cover for the boarding ladder. After
that I dryfitted the surprisingly large-span wings, which showed the only
significant gap of this model; I needed to fit some 0,5mm Evergreen and sand
that back carefully to get rid of gaps on the bottom. The strips were carefully
sanded thinner to about 0,3mm thickness after which everything fitted snugly,
without throwing off the moulded-in dihedral, and was glued and clamped, then
left to dry for a few days. After that I sanded the Evergreen flush and attached
the tailplanes using a small jig of paint tins and tape. In a record time, for
me anyway, I had a nearly complete Viking on my bench!
After closing up the fuselage halves, which fit quite well, especially
when glued in sections, I fitted all the separate inserts. Most fit quite well,
needing only some minor sanding if you dry fit a few times and glue carefully. A
touch of filler was only needed on the front one, which has the gear bay moulded
in, the instrument panel coaming, and the cover for the boarding ladder. After
that I dryfitted the surprisingly large-span wings, which showed the only
significant gap of this model; I needed to fit some 0,5mm Evergreen and sand
that back carefully to get rid of gaps on the bottom. The strips were carefully
sanded thinner to about 0,3mm thickness after which everything fitted snugly,
without throwing off the moulded-in dihedral, and was glued and clamped, then
left to dry for a few days. After that I sanded the Evergreen flush and attached
the tailplanes using a small jig of paint tins and tape. In a record time, for
me anyway, I had a nearly complete Viking on my bench!
Of course, handling, the bit of filling, and the sanding and rescribing, combined with my clumsiness, resulted in all the moulded on antennae being broken off, so I saved these for later.
 There's a bit more to this kit, like the poorly fitting (and shaped) fuel
tanks, the wheels with nice tire profile you'll be sanding away to get rid of
mould lines, and cleaning up mould seams on all gear parts, not to mention the
ever present pin marks on these delicate parts. At this stage I also dry-fitted
the engines, and while looking at it, something just looked off, one way or the
other. Removing the engines again, the Viking itself wasn't the problem, but
somehow the engines looked weird... After googling for pictures of Viking
engines, I found what looked off -the Hasegawa engines have a ridge/step moulded
in the intake side, but the original has straight intakes, making the model's
engine openings too small. Quite easy to fix, using a round file and sandpaper
wrapped around a ballpoint. Half an hour later, I was satisfied with how they
looked, but still had to sand the mating surface of the engine pylon to the wing
to get a gapless fit, to help assembly after painting. The same was done for the
weapon pylons.
There's a bit more to this kit, like the poorly fitting (and shaped) fuel
tanks, the wheels with nice tire profile you'll be sanding away to get rid of
mould lines, and cleaning up mould seams on all gear parts, not to mention the
ever present pin marks on these delicate parts. At this stage I also dry-fitted
the engines, and while looking at it, something just looked off, one way or the
other. Removing the engines again, the Viking itself wasn't the problem, but
somehow the engines looked weird... After googling for pictures of Viking
engines, I found what looked off -the Hasegawa engines have a ridge/step moulded
in the intake side, but the original has straight intakes, making the model's
engine openings too small. Quite easy to fix, using a round file and sandpaper
wrapped around a ballpoint. Half an hour later, I was satisfied with how they
looked, but still had to sand the mating surface of the engine pylon to the wing
to get a gapless fit, to help assembly after painting. The same was done for the
weapon pylons.
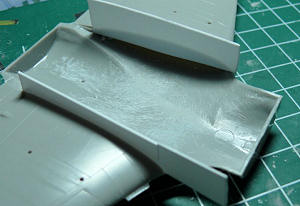
All in all, nothing really difficult, actually, but quite a relaxing build so far! I then tinted the forward clear part; I tried this using Tamiya Smoke airbrushed on the inside, but my baboon-brain was unable to get this advanced technique to work, so after stripping this I resorted to the proven technique of mixing the aforementioned Smoke with Dutch-equivalent Future and dipping the part in a few times. Much better! After letting this dry, I attached this part in 2 sessions, letting one side harden a few days after glueing it, then squeezing it a bit while glueing the other side, to improve the fit and reduce sanding. After masking it off, and preparing all parts to be primed, I heard a rattling sound when picking up the kit box -I'd forgotten to install the seats!
Prying the clear part off, re-attaching, re-blending, and re-masking, it was ready for primer. The fuselage part needed a little more sanding around the forward wing joint, nose, and gear bay insert, but apart from a swipe here and there, that was pretty much it. The engines were worse, especially the rear part with the pylon moulded on. The bottom needed some serious yet careful (cross-section, baby!) sanding and re-priming, repeated a few times until I was happy. Then it was ready for....
| COLORS AND MARKINGS |
The paint scheme may look simple, but masking it is quite time consuming. I started out with Revell 5 flat white, which was followed by Xtracolor Gloss White, because the flat white is a bit yellowish, and the gloss is not. After letting that cure, I had to add some more, because I forgot the area around the nose, and the white bit behind the cockpit that was only on the original (early) factory paint scheme. Since the bottom view on the CAM instructions is not clear on where the grey/white demarcation is on the underside of the wings, I used the Hasegawa instructions for the VS-28 version, which does not have these bits in white at all -oops! Thanks a lot to Scott for helping out with all these painting details and by providing pictures on the forum to show the differences, or unclear areas, and taking the time to answer all my questions regarding the S-3.
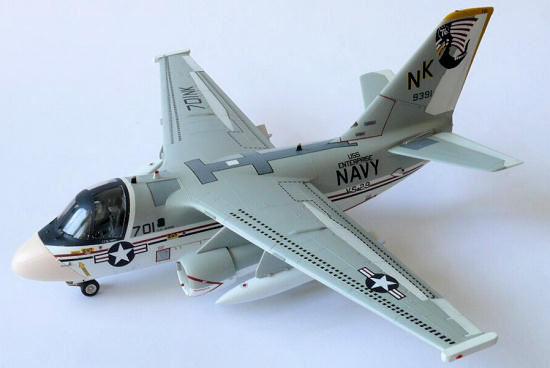 After masking everything off, especially the ailerons and spoilers were
fun, I sprayed the rudder fin flash a yellow mix, matching the decal colour,
opting not to use the provided decal. I then masked that off and re-shot the
rudder white, then masked that off and added the topside grey, for which I used
slightly lightened Xtracolor Light Gull Grey. Since the Xtracolor is gloss, I
let that cure for a few weeks, and then had the fun of masking the black area
around the cockpit, but not before using the only acrylics on this build, by
spraying the nose with a mixture of Revell Aqua skin colour with white, and a
drop of Afrikabraun. Of course I could have bought Radome Tan, too, but being a
Dutchman, this was quicker, and cheaper as well... After using Parafilm to mask
the nose I sprayed the black cockpit surround, also with Revell aqua. The black
was slightly lightened with white to make the contrast less stark. Not really
satisfied with the nose, too dark, I re-mixed that using more white and re-shot
that area, using the quick dry time of acrylics to full advantage.
After masking everything off, especially the ailerons and spoilers were
fun, I sprayed the rudder fin flash a yellow mix, matching the decal colour,
opting not to use the provided decal. I then masked that off and re-shot the
rudder white, then masked that off and added the topside grey, for which I used
slightly lightened Xtracolor Light Gull Grey. Since the Xtracolor is gloss, I
let that cure for a few weeks, and then had the fun of masking the black area
around the cockpit, but not before using the only acrylics on this build, by
spraying the nose with a mixture of Revell Aqua skin colour with white, and a
drop of Afrikabraun. Of course I could have bought Radome Tan, too, but being a
Dutchman, this was quicker, and cheaper as well... After using Parafilm to mask
the nose I sprayed the black cockpit surround, also with Revell aqua. The black
was slightly lightened with white to make the contrast less stark. Not really
satisfied with the nose, too dark, I re-mixed that using more white and re-shot
that area, using the quick dry time of acrylics to full advantage.
After messing up the enamel gloss coat, and subsequent polishing, and re-doing the gloss 2 times, it was time for decals. As you may know by now if you've read any one of my previous reviews, I don't like doing decals, but it's something that is needed. I'd rather mask Ju88 canopies, but alas, I wanted the Viking done, so I got on with it.
Yuck! Not my fault this time. I matched the yellow fin flash paint near
exact to the decals, only to find that the CAM decals are very translucent, so I
had a pretty large colour shift resulting in a mis-match between the colour of
my painted fin flash and the yellow of the Viking ship decal. I thought the best
course of action would be to use the decal for the flash -which does not fit
very well, (like that's any news with rudder decals...) being too long in length
vertically, yet too short horizontally on the top. Like the VS-29 Viking ship,
the tail fin decal applied over the yellow is also translucent, but because of
the yellow underneath, does not bleed any colour, so it was still different than
the ship decal... Yuck again. The ship decal was also much larger than indicated
in the 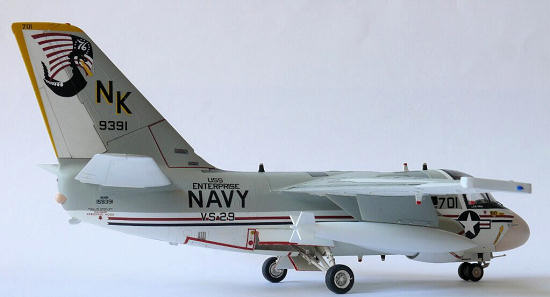 instructions, but I eventually got both items on. After that, I tried
fitting the NE tail codes and the four-digit Bu.No. No luck, all these decals
simply do not fit at all in the indicated positions, being far to large. After
finally cramming everything on and applying Daco Medium decal softer, I left to
set and dry.
instructions, but I eventually got both items on. After that, I tried
fitting the NE tail codes and the four-digit Bu.No. No luck, all these decals
simply do not fit at all in the indicated positions, being far to large. After
finally cramming everything on and applying Daco Medium decal softer, I left to
set and dry.
A few days later I took a good look and wasn't happy... because they had snuggled down perfectly, the bleeding was even worse. Bleeding over Light Gull Grey..., it's not like there's black or dark grey underneath there! Their size made me even more unhappy. Then I discovered that CAM gives you all stencils -except for the prominent red APU exhaust square and the even more prominent red stripes that go around the sonobuoy launchers. Fortunately my kit sheet had these items in an entirely different red colour, but not much else, thanks to being an all-white Bicentennial aircraft that had the entire topsides, including most markings, overpainted.
Knowing the results already, but just to be sure, I took my calipers and measured the striped wing walkways. Too large. Yuck! I took some Tamiya tape, ripped off the already applied tail markings, put the CAM sheet back in it's ziplock bag and put it away. I then went to the bar and got thoroughly drunk. When I was sober again, I was surprised to see I didn't pull any paint along with the decals!
Sorry, I don't really like to do this, but I honestly can't recommend this CAM sheet. It looks beautiful on the sheet, but the scaling is wrong (and no, the Airfix kit isn't recommended in the instructions), items are missing, and, worst of all, they bleed.
The same can pretty much be said for the Superscale partial sheet (I only got the VS-29 part) that was my backup. The sheet reviewed here
http://modelingmadness.com/scotts/decals/super/72/ss72836.htm has the Viking ship and NK tail code on the tail far too large, misses the yellow fin flash, and has the small Bu.No. numbers wrong compared to the tail decal. The last is easily fixable by re-organizing the numbers, though. The scaling is harder to fix!Disappointed, the Dutch forum for which I built this aircraft came to the
rescue -or more specifically, member Weust, who kindly offered me the Hasegawa
sheet from his VS-29 boxing. Suspicious of Hasegawa kit decals, I have to take
back my words: the scaling and fit is superb, the stencilling (apart from some
really, really small items) complete, no ivory whites, and very responsive to Mr
Mark decal solvent. Even the intake warning triangles fit and settle, even
wrapping around the intake, though I somehow goofed either painting or applying
them, as I think they should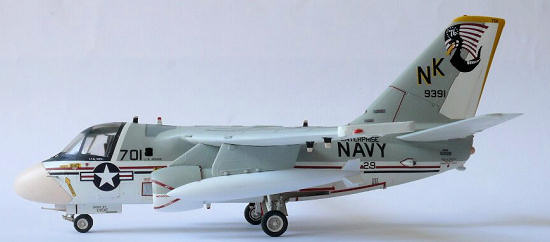 be a bit more higher up.
When using hot water the thick layer of glue dissolves pretty well, so they are only slightly thicker than true aftermarket decals. My compliments to Hasegawa for these!
The only thing I could find wrong, would be that the sheet is missing the overwing modex, which I combined by mixing the numbers from both CAM schemes (one is 700, the other 711), and the NK letters from the Superscale partial sheet. Their size is slightly different, but I had no others, so this will have to do. Another curiosity is that both the front and backseaters are twins or brothers, as you get 2 crew names for 4 seats -I guess the decal artist was used to doing F-14 reissues! :-)
All in all, I spent quite a few hours doing decal work, as the S-3 is a very busy plane. Looking a bit bland before decalling, it now looks properly busy!
The recessed areas were then given a light grey wash on the bottom, and slightly darker grey wash on top, to give some more depth. The panel lines are raised on this kit, so I could not give the rest a wash. I did try to accent them using an aquarel-pencil, though that works very good, it looked a bit out of place, so it was removed. As I wanted my antennae to have the same sheen as the rest of the model I painted and added them as well. As Scott pointed out in his preview, and as evidenced on the boxart photo, one kind should be larger and more squarish than the other, but I left them alone. Masking and painting their coloured tips wasn't quite fun, after a lot of touch-ups they're still not quite perfect in some cases, but will have to do. Finally a mix of 1/3 flat and 2/3 gloss Revell Aqua varnish was airbrushed for a finish that is between flat and satin, and one which I'm happy with.
| FINAL BITS |
As the Aqua is an acrylic, it dries very quickly. I
then added the last remaining bits and pieces; such as gear legs, wheels, gear
doors and the MAD-boom (in the stowed position). When looking at the boxart
picture, as well
 as some others, I think the nose gear might be a bit too
compressed, as I had to trim a bit of the forward gear doors to prevent the
wheels from hitting them. It also seems to have a bit too much nose-sit?
as some others, I think the nose gear might be a bit too
compressed, as I had to trim a bit of the forward gear doors to prevent the
wheels from hitting them. It also seems to have a bit too much nose-sit?
I also painted the navigation lights with gloss paints, and added stretched sprue for the windscreen wiper arms, after removing the masking. The wipers themselves are already moulded on the windows, so adding them is not that hard. Painting them is, though! ;-)
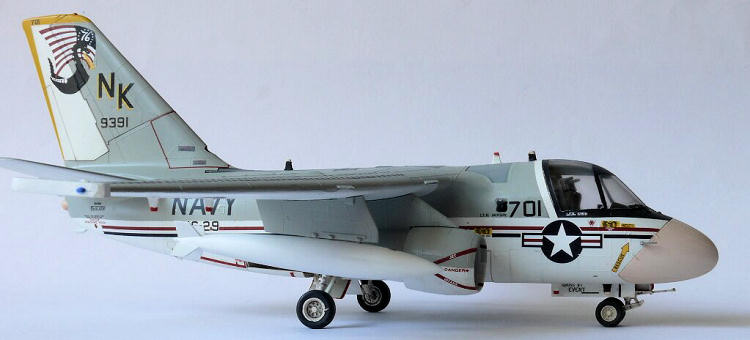
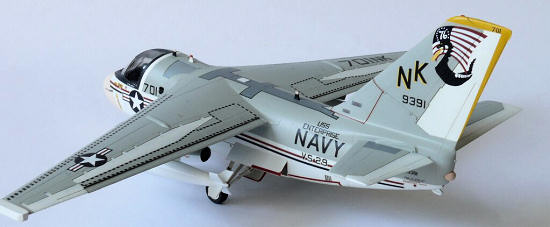
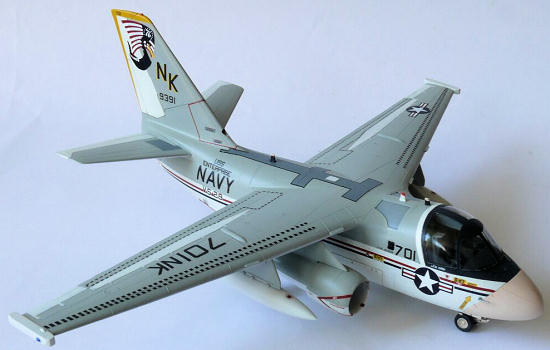
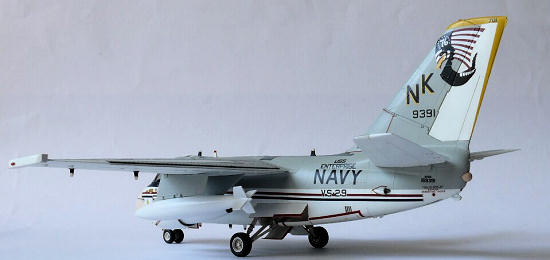
Finally, the engine pods, outboard weapon pylons and fuel tanks were added. I then took these pictures, thanked Scott again, wrote this review, took a nice cool beer and called her all done!
| CONCLUSIONS |
 Though Hasegawa's S-3 is by no means a modern kit, the fact that it has
not been reissued as frequently as, say, their F-14, apparently means the moulds
are in pretty good shape.
Though Hasegawa's S-3 is by no means a modern kit, the fact that it has
not been reissued as frequently as, say, their F-14, apparently means the moulds
are in pretty good shape.
Some may be put off by the raised panel lines or lack of finesse, however. I just would not bet on a new mould Viking, given how few of these kits you see built up, how infrequently it is reissued, and by how many are shelf sitters in hobby stores!
Apart from the engines, aftermarket decal misery, and my goofs with painting and polishing, I found this an enjoyable build, of an aircraft I've grown to like. It is surprisingly large, especially the wing span!
Find one with decals you like, and have fun building!
| REFERENCES |
Did I mention Scott answered a lot of my questions, and provided some very useful pictures already?
U.S. Navy & Marine Corps: Air Power Directory by David Donald and Jon Lake
May 2012
Copyright ModelingMadness.com. All rights reserved. No reproduction in any form without express permission from the editor.
If you would like your product reviewed fairly and fairly quickly, please contact the editor or see other details in the Note to Contributors.