| KIT #: | 60313 |
| PRICE: | $220.00 SRP - $45 for conversion |
| DECALS: | Two options |
| REVIEWER: | Lee Kolosna |
| NOTES: | Wolfpack Design F-14D Conversion, Black Box F-14D resin cockpit, Wheelliant F-14D resin wheels, Crossdelta decals. |
| HISTORY |
 The D model of the F-14 Tomcat represented the end of
the line for this favorite of modelers and aviation enthusiasts around the
world. In addition to new General Electric F110 engines that replaced the
problematic Pratt & Whitney TF30, the F-14D had more advanced cockpit
instrumentation, a better radar, and more varied ordnance capability. The
easiest way to spot an F-14D at a glance is by noting the dual chin pod, which
housed both TV and Infrared sensors. It entered fleet service in 1992 with a
total of 55 aircraft being manufactured or converted from earlier F-14As. They
served in three squadrons until 2006 when the Tomcat was officially retired,
replaced by the F/A-18D and E Super Hornet. Initially given the task of fleet
defense, the D model saw most of it service in the attack role, delivering
laser-guided bombs to targets in the Iraq and Afghanistan wars.
The D model of the F-14 Tomcat represented the end of
the line for this favorite of modelers and aviation enthusiasts around the
world. In addition to new General Electric F110 engines that replaced the
problematic Pratt & Whitney TF30, the F-14D had more advanced cockpit
instrumentation, a better radar, and more varied ordnance capability. The
easiest way to spot an F-14D at a glance is by noting the dual chin pod, which
housed both TV and Infrared sensors. It entered fleet service in 1992 with a
total of 55 aircraft being manufactured or converted from earlier F-14As. They
served in three squadrons until 2006 when the Tomcat was officially retired,
replaced by the F/A-18D and E Super Hornet. Initially given the task of fleet
defense, the D model saw most of it service in the attack role, delivering
laser-guided bombs to targets in the Iraq and Afghanistan wars.
| THE KIT |
The F-14A model is one of Tamiya's earliest forays into the world of modern jet kits in 1/32 scale, dating from the 1980s. It has been updated with new decals and extra ordnance a couple of times. There are a number of areas of the kit that require the modeler's attention, mostly due to the age of the kit.
Cockpit. The kit parts are devoid of detail for the
instrument consoles, being completely flat. Tamiya provides decals for these,
which of course are only two dimensional. There is no HUD, which is a curious
 omission on a modern fighter jet. The ejection seats have no harnesses, as Tamiya intends for the two crew figures to be installed. The canopy interior has
no retraction hooks, rear-view mirrors, or any detail at all. While these
omissions were not unusual for a kit thirty years ago, nowadays modelers will
mostly likely look to the aftermarket for a resin replacement of the entire
cockpit.
omission on a modern fighter jet. The ejection seats have no harnesses, as Tamiya intends for the two crew figures to be installed. The canopy interior has
no retraction hooks, rear-view mirrors, or any detail at all. While these
omissions were not unusual for a kit thirty years ago, nowadays modelers will
mostly likely look to the aftermarket for a resin replacement of the entire
cockpit.
Panel lines. In a very unusual configuration, the forward fuselage and wings have recessed panel lines, but the two very large upper and lower rear fuselage pieces have raised panel lines. In reading reviews of the kit from other modelers, there are also reports that the panel lines on the fuselage do not correspond very well with the lines on the real aircraft. For my model, I chose to re-scribe all the fuselage panel lines to have them match the wings and nose area.
Air intakes. These are not seamless, but aren't too bad if built as instructed. Tamiya allows for three different configurations: in-flight, take-off, and static.
Wheel wells: There is some amount of detail in the nose and main landing gear wells, but there is a lot of room for improvement through aftermarket solutions or scratch-building. There are a number of prominent mold ejector pin marks that will need to be cleaned up. The landing struts are quite robust with metal inserts, but they lack the numerous hydraulic and electrical lines seen on the actual aircraft.
Wheels. The kit provides synthetic rubber wheels. For some modelers, this is an issue and there are a number of aftermarket solutions available.
 Ordnance. There's a pretty good selection and it's
reasonably well done. For the air-to-air mission, there are AIM-9 Sidewinder,
AIM-7 Sparrow, and AIM-54 Phoenix missiles. For the air-to-ground mission there
are with two GBU-24 and two GBU-16 laser guided bombs, six Mk 82 gravity bombs,
and a LANTIRN pod. Note that the Tomcat was usually seen carrying the smaller
GBU-12 laser guided bomb towards the end of it operational service, which is not
provided in the kit.
Ordnance. There's a pretty good selection and it's
reasonably well done. For the air-to-air mission, there are AIM-9 Sidewinder,
AIM-7 Sparrow, and AIM-54 Phoenix missiles. For the air-to-ground mission there
are with two GBU-24 and two GBU-16 laser guided bombs, six Mk 82 gravity bombs,
and a LANTIRN pod. Note that the Tomcat was usually seen carrying the smaller
GBU-12 laser guided bomb towards the end of it operational service, which is not
provided in the kit.
Wings. The wings are connected together inside the
fuselage with a plastic gear mechanism attached to a metal plate that allows
both wings to move in unison. There are two sets of air bladders provided, one
for the wings swept forward configuration and one for wings swept back. There
are no separate flaps or slats, a configuration only seen when the airplane is
taking off or landing but modelers who want to do a catapult diorama will need
to consider alternatives. Note that the more modern Trumpeter kits do provide
separate control surfaces.
All told, this is a dated kit that still builds up quite impressively. It has an
accurate shape and has an advantage over Trumpeter's offerings which suffer from
the fact that the air intakes that are really whacked. The most glaring issue on
the Tamiya kit is the lack of detail in the cockpit, which is quite visible in
1/32 scale. The strange combination of raised and recessed panel lines can be
dealt with through re-scribing. At a minimum, I would recommend looking for a
resin cockpit replacement, or at least some resin ejection seats. There are lots
of decal options still available owing to the enormous popularity of the F-14.
I purchased this kit from a friend who intended to make an F-14D but never got around to it before realizing he didn't have the time for such an involved project nor the space to display such a large model. Included in the deal was a Black Box F-14D resin cockpit, a Wolfpack Design F-14D resin conversion set that includes new F110 engine faces, exhausts, rear fuselage pieces, TACAN blade antenna, and a dual chin pod. I purchased some Wheelliant resin wheels and a decal sheet from Crossdelta to complement the project.
| CONSTRUCTION |
The first order of business was to re-scribe the large upper and lower fuselage pieces. I used a sewing pin chucked into a pin vise to make my initial set of lines, using a piece of Dymo label tape as a guide. When these lines were completely scribed, I sanded off the kit's raised lines and cleaned out the resulting sanding dust from the lines that I just scribed. I confess this is one of my least favorite tasks in modeling and my efforts are merely adequate.
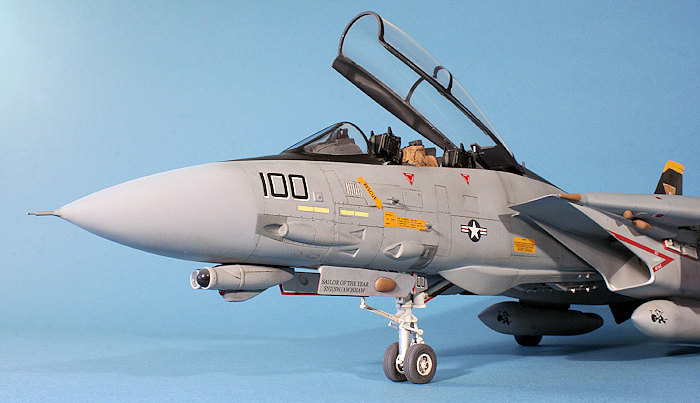
 The Black Box resin cockpit was installed next in the
forward fuselage section. As resin cockpits go, this one fit pretty well. I had
to grind off kit detail first and do quite a bit of dry-fitting before I was
happy with the alignment of the huge resin cockpit tub pieces. The overall
cockpit was painted Dark Gull Gray FS36231 with black consoles that were
dry-brushed with a light gray to highlight the raised details. The MFD panels
were painted a dark gray and given a coat of Future to make them appear like a
darkened TV screen. The ejection seats were painted flat black with Medium Green
cushions and dark green and gray harnesses. These were weathered with a dark
gray wash and dry-brushing with a light gray. The ejection handles were painted
yellow and the black stripes applied with a fine point Sharpie marker. The nose
gear well was assembled and the two forward fuselage half glued together.
The Black Box resin cockpit was installed next in the
forward fuselage section. As resin cockpits go, this one fit pretty well. I had
to grind off kit detail first and do quite a bit of dry-fitting before I was
happy with the alignment of the huge resin cockpit tub pieces. The overall
cockpit was painted Dark Gull Gray FS36231 with black consoles that were
dry-brushed with a light gray to highlight the raised details. The MFD panels
were painted a dark gray and given a coat of Future to make them appear like a
darkened TV screen. The ejection seats were painted flat black with Medium Green
cushions and dark green and gray harnesses. These were weathered with a dark
gray wash and dry-brushing with a light gray. The ejection handles were painted
yellow and the black stripes applied with a fine point Sharpie marker. The nose
gear well was assembled and the two forward fuselage half glued together.
I left out the radar, refueling boom, and boarding ladder and glued the nose cone and access panels closed. This required a bit of filler to blend into the surrounding fuselage area. I also did the same with the windscreen, fairing in the transition to the fuselage with CA glue and Mr. Surfacer 1000.
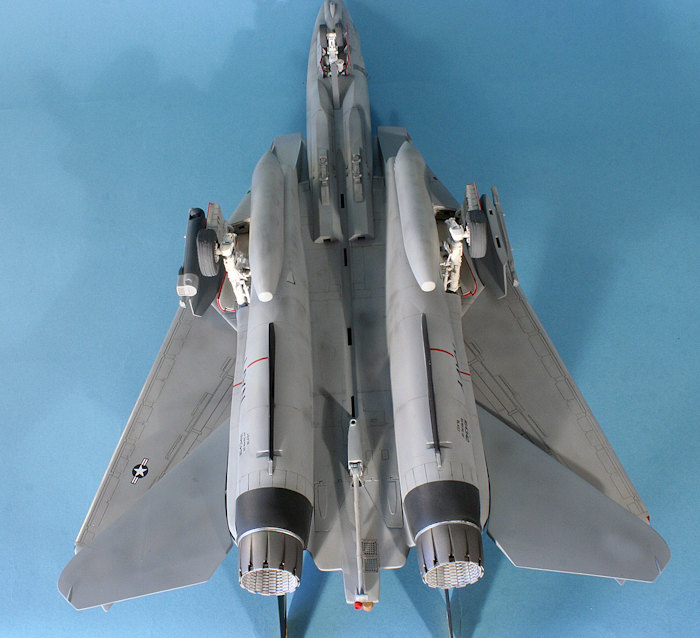
The Wolfpack Design conversion kit provides new intake fans for the GE F110 engines, so I painted and installed them in the kit air intake pieces. The variable intake ramps were glued in the at-rest position and everything was painted flat white. I then carefully masked the transition line between the white and the underside color Light Ghost Gray FS36375, which extends back from the lower lip of the intake at a 60-degree angle. The Ghost Gray was painted and the masking removed, with a few touchups required.
 The next task was to assemble the swing wing mechanism
in the main fuselage. Tamiya provides the wing glove vanes common to all F-14As
which were wired shut pretty soon after the aircraft reached operational status
as they were determined to be more trouble than they were worth. On the F-14D
they were eliminated entirely. I glued them in the closed position and filled
the resulting seams. The rear fuselage sections around each exhaust is
differently-shaped on the F-14D so the kit pieces were cut out according to the
Wolfpack Design instructions and the resin pieces installed. As usual with
aftermarket parts, the fit wasn't very good and I had large gaps to fill which I
did with CA glue.
The next task was to assemble the swing wing mechanism
in the main fuselage. Tamiya provides the wing glove vanes common to all F-14As
which were wired shut pretty soon after the aircraft reached operational status
as they were determined to be more trouble than they were worth. On the F-14D
they were eliminated entirely. I glued them in the closed position and filled
the resulting seams. The rear fuselage sections around each exhaust is
differently-shaped on the F-14D so the kit pieces were cut out according to the
Wolfpack Design instructions and the resin pieces installed. As usual with
aftermarket parts, the fit wasn't very good and I had large gaps to fill which I
did with CA glue.
The wings were glued together and attached to the swing mechanism. I assembled the main gear wells and installed them in the fuselage. The two top fuselage pieces were glued together and mated with the bottom piece, which meant more seams needed to be filled. Screws were used to augment the bond, but the kit does not provide a plug to cover the screw heads. I filled the hole with CA glue and sanded it flush. This may be a Tamiya kit, but the magic of their engineering back then was not as good as it is today and the seams were substantial. I chose the air bladder pieces that allow the wings to be displayed in their swept configuration as this is how Tomcats are seen when parked 99% of the time.
The landing gear pieces were assembled and painted
flat white. There are a number of ejector pin marks on the landing gear doors
and in the wells themselves that had to be scraped off and filled. There are a
number of retraction struts that also have be cleaned up and painted. I painted
the red surround to each gear door very carefully by hand using a 000
paintbrush. A coat of Future floor polish brought the white to suitable gloss,
after which I dirtied everything up using a wash of MIG Pigments Dark Wash and
judicious dusting with chalk pastels.
The front fuselage was glued onto the rear. There was a very large gap to be
filled that I bridged with small pieces of sheet styrene and CA glue. I glued on
the intakes and filled those seams as well. The vertical stabilizers were
assembled and added to the top of the fuselage, with more seams that required
filling. Do you see a pattern here? Lots and lots of seam filling is required
for this model.
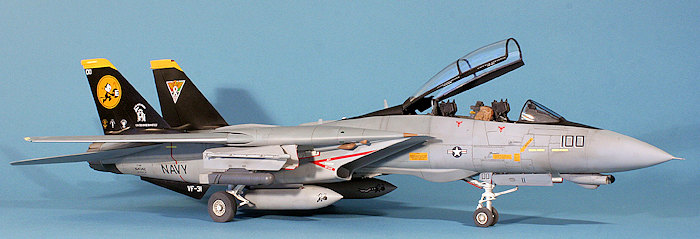
 The VF-31 airplane I was depicting had the front bomb
pallets attached, but not the rear ones so I glued them onto the underside and
・yep ・filled those seams. The wing pylons were assembled for the configuration
of just a LANTIRN pod on the starboard side and nothing on the port side. The
fit of the pylons to the wing was not as flush as it should be so I added shim
strips of sheet styrene and filled the gap with Mr. Surfacer 1000.
The VF-31 airplane I was depicting had the front bomb
pallets attached, but not the rear ones so I glued them onto the underside and
・yep ・filled those seams. The wing pylons were assembled for the configuration
of just a LANTIRN pod on the starboard side and nothing on the port side. The
fit of the pylons to the wing was not as flush as it should be so I added shim
strips of sheet styrene and filled the gap with Mr. Surfacer 1000.
I cut out the position lights on each wingtip and replaced them with clear green resin on the starboard wing and clear red on the port wing. The beacon in the top of the port stabilizer also got clear red resin. These were filled, sanded to shape, and polished back to clarity using a tri-grit file.
Like most modern jet kits, the canopy has a mold seam running down the middle that has to be sanded off. I did this with progressively finer grits of sandpaper, followed up by a polishing with Novus Plastic Polish #2. The clear canopy attaches to a frame that required more seam work. The clear parts were masked for painting using drafting tape that I applied in small strips.
The two large fuel tanks were glued together, the seams filled, and then glued securely to the undersides of each air intake.
With all the seam filling, I obliterated a number of the carefully re-scribed panel lines I had painstakingly done at the start of the project, so those all had to be restored. All stray sanding marks were smoothed out, and the model was washed with warm, soapy water before moving to the paint barn for the painting phase.
| COLORS & MARKINGS |
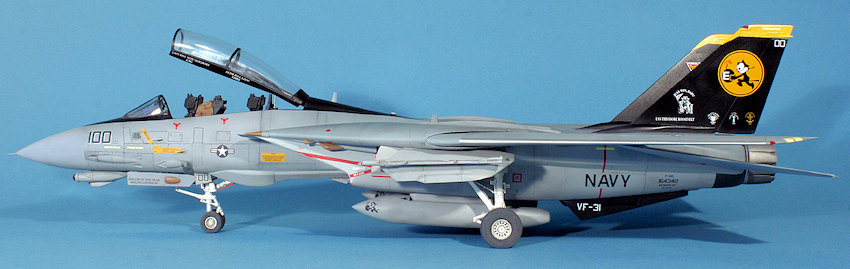
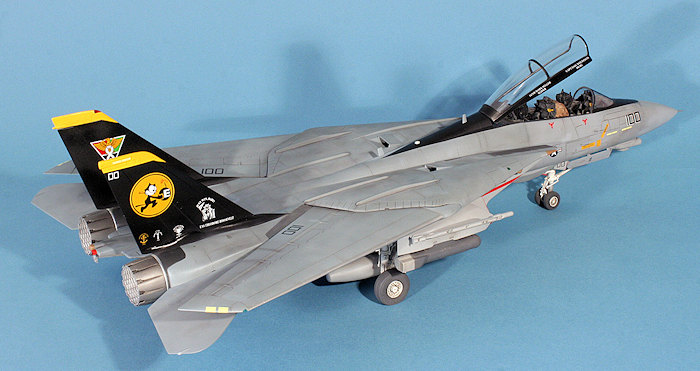
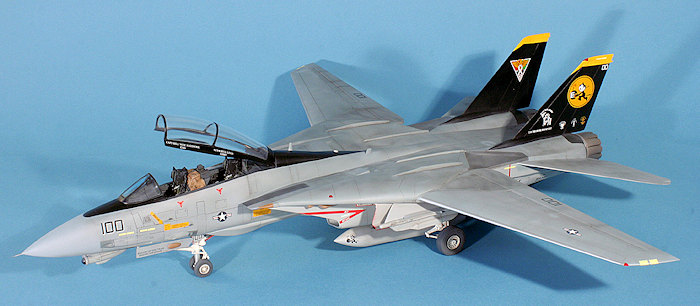
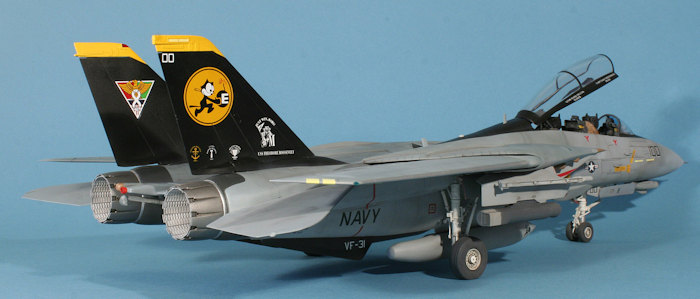
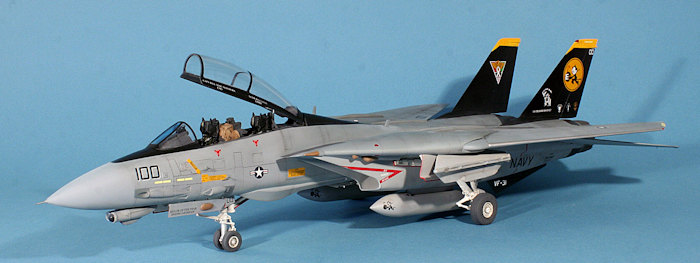
 The VF-31 CAG aircraft depicted in the Crossdelta
decal sheet was present at the Tomcat retirement ceremony an NAS Oceana in
Virginia Beach in 2006. It was very well-photographed so I had lots of reference
material to use in order to make my model match that airplane on that day as
best as I could. It sported a three-gray scheme of Light Ghost Gray FS36375
undersides, a Dark Ghost Gray FS36320 nose and forward fuselage section, and
Medium Gray FS35237 on the topside. Note that the Crossdelta instruction sheet
mixes up the Dark Ghost Gray and Medium Gray. The canopy, anti-glare panels, and
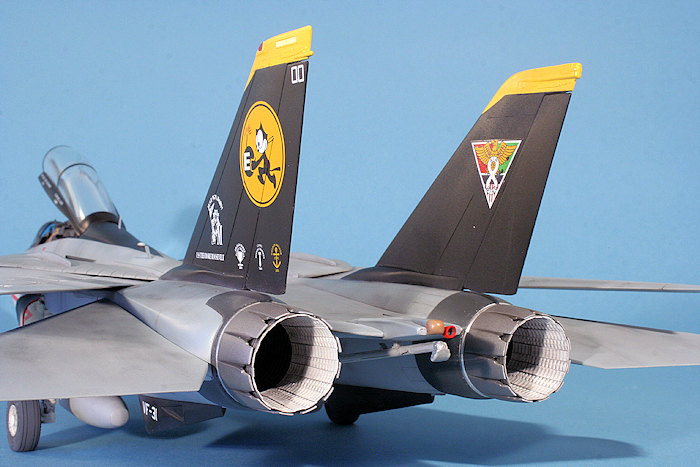
vertical stabilizers are semi-gloss black with yellow accents on the fin tips.
The main camouflage scheme was sprayed using paints from the Testors Model
Master Acryl line. The rear fuselage sections around each engine were masked and
painted with Polly Scale Grimy Black. The resin exhausts pieces were painted
with Alclad II lacquer Dark Aluminum. I then carefully masked the area between
each exhaust petal and sprayed that with Alclad II Jet Exhaust. The interior of
each exhaust was painted flat white and then heavily weathered with dark gray
and black chalk pastels. The wing bladders were masked and painted with Gunship
Gray FS36118.
The VF-31 CAG aircraft depicted in the Crossdelta
decal sheet was present at the Tomcat retirement ceremony an NAS Oceana in
Virginia Beach in 2006. It was very well-photographed so I had lots of reference
material to use in order to make my model match that airplane on that day as
best as I could. It sported a three-gray scheme of Light Ghost Gray FS36375
undersides, a Dark Ghost Gray FS36320 nose and forward fuselage section, and
Medium Gray FS35237 on the topside. Note that the Crossdelta instruction sheet
mixes up the Dark Ghost Gray and Medium Gray. The canopy, anti-glare panels, and
vertical stabilizers are semi-gloss black with yellow accents on the fin tips.
The main camouflage scheme was sprayed using paints from the Testors Model
Master Acryl line. The rear fuselage sections around each engine were masked and
painted with Polly Scale Grimy Black. The resin exhausts pieces were painted
with Alclad II lacquer Dark Aluminum. I then carefully masked the area between
each exhaust petal and sprayed that with Alclad II Jet Exhaust. The interior of
each exhaust was painted flat white and then heavily weathered with dark gray
and black chalk pastels. The wing bladders were masked and painted with Gunship
Gray FS36118.
The leading edge of each wing was painted with Alclad II White Aluminum. The entire model was rubbed down with a cotton t-shirt to knock off the paint fuzz and given about ten light coats of Future Floor Polish in preparation for decals.
The Crossdelta decals are beautifully printed, opaque, and laid down on the model with no fuss. To avoid silvering, I put a small puddle of Future floor polish on the model underneath any decal that had clear areas like stencils and nose art. I find that this fills all the air gaps and greatly reduces the need for the use of solvents afterwards. After the decals were dry I washed off dried setting solution stains and added another coat of Future in preparation for the weathering phase.
 The VF-31 CAG bird was in pretty good shape as Navy
airplanes returning from a cruise go, but it still was fairly grungy in
appearance. I first diffused the topside paint by spraying random patterns of
highly thinned lighter and darker grays on each panel. I then added a dark wash
to all the panel lines and wiped it backward in areas that had notable leaks
such as from the flap actuators. Then chalk pastels were dabbed on to mimic the
grimy hand and boot prints left by the deck crew. When I was satisfied with the
initial application, I sealed the model with Testor Acryl Clear Flat. Then I
added more grime on top of that with chalk pastels again until I was satisfied
with the effect.
The VF-31 CAG bird was in pretty good shape as Navy
airplanes returning from a cruise go, but it still was fairly grungy in
appearance. I first diffused the topside paint by spraying random patterns of
highly thinned lighter and darker grays on each panel. I then added a dark wash
to all the panel lines and wiped it backward in areas that had notable leaks
such as from the flap actuators. Then chalk pastels were dabbed on to mimic the
grimy hand and boot prints left by the deck crew. When I was satisfied with the
initial application, I sealed the model with Testor Acryl Clear Flat. Then I
added more grime on top of that with chalk pastels again until I was satisfied
with the effect.
The canopy masking was removed and I did a very light spray of Testors Acryl Clear Blue to mimic the anti-reflective coating on the windscreen. The LANTIRN pod was painted with Light Ghost Gray on the rear section, with Gunship Gray on the forward part. I unfortunately didn't have any decals for this pod in my decal stash. One day sometime in the future I may come across a kit with warning placards.
| FINAL CONSTRUCTION |
On a large modern jet model, there are so many little things that have to be done to complete the project that it takes me many hours of work to complete, all the time gripped with great trepidation that I'd break something or mess up the paint and weathering. The landing gear were glued into the wells and aligned. The resin wheels were painted, assembled, and weathered before being glued onto the model with very careful attention given to getting them aligned properly. I had mixed feelings about the Wheelliant resin wheels. While beautifully detailed, the wheels were slightly smaller than the openings in the wheels themselves and the rims of the wheels were so thin that they broke with the slightest bit of handling, leaving a demarcation that was not as crisp as I had hoped.
 Tamiya provides really nice and secure attachment
hinges for the landing gear doors, which I really appreciate. All the little
retraction struts fit well. It was while doing this work that I accidentally
dropped the model about six inches onto my work table, resulting in a cracked
nose and windscreen seam. Drat! I spent a couple of hours gluing those parts
back together, filling the seams, re-masking the anti-glare panel, and repairing
the paint and weathering in the surrounding nose section.
Tamiya provides really nice and secure attachment
hinges for the landing gear doors, which I really appreciate. All the little
retraction struts fit well. It was while doing this work that I accidentally
dropped the model about six inches onto my work table, resulting in a cracked
nose and windscreen seam. Drat! I spent a couple of hours gluing those parts
back together, filling the seams, re-masking the anti-glare panel, and repairing
the paint and weathering in the surrounding nose section.
I then turned my attention to completing the cockpit. The HUD was fashioned from clear styrene pieces I had in my spares box and the resin frames provided by Black Box. This was carefully attached to the coaming. The rear control panel and hood was wrestled into the resin tub and weathered accordingly, followed by the control sticks, throttle, and ejection seats.
I added the pitot tubes but wasn't happy with the look of the one on the tip of the nose, so I elected to fill the seam and replaced the kit piece with a more secure arrangement of stainless steel tubing and brass wire. I had to fabricate a canopy retraction strut from a cut piece of paper clip. A few more paint touchups were necessary and with that I was done. It took me five months and 106 hours of effort to bring this one onto the deck safely.
| CONCLUSIONS |
Tamiya's F-14A Tomcat model is an aging classic that still has a lot going for it in regards to accuracy and solidity of structure. The primitively detailed cockpit really calls for an aftermarket solution, and one should be prepared for a re-scribing job on the large fuselage pieces in order to match the recessed lines on the nose section and wings. I certainly set myself up for more work by converting the model to a D, but that was expected and for all the potential angst of using aftermarket resin sets, it wasn't as awful as I'd experienced in the past with other conversion sets.
 The question for a modeler starting from scratch with
a desire to build a Tomcat in 1/32 scale is whether to purchase this kit and the
almost mandatory resin cockpit set, or instead purchase the Trumpeter offerings.
Trumpeter gives you a much more detailed cockpit and wheel wells, recessed panel
lines all around, and separate control surfaces. But there's always that issue
of the messed up air intakes (the opening isn't even close to being correct in
shape), which can be overcome with some clever modeling solutions. If I didn't
have this opportunity from my friend for this kit, I would probably have gone
the Trumpeter route instead.
The question for a modeler starting from scratch with
a desire to build a Tomcat in 1/32 scale is whether to purchase this kit and the
almost mandatory resin cockpit set, or instead purchase the Trumpeter offerings.
Trumpeter gives you a much more detailed cockpit and wheel wells, recessed panel
lines all around, and separate control surfaces. But there's always that issue
of the messed up air intakes (the opening isn't even close to being correct in
shape), which can be overcome with some clever modeling solutions. If I didn't
have this opportunity from my friend for this kit, I would probably have gone
the Trumpeter route instead.
Still, the model turned out fairly well and is quite impressive when seen in person due to its size, and it's a Tomcat ・one of the greatest Navy fighters ever flown!
| REFERENCES |
Kinzey, Bert and Roszack, Rock: Colors & Markings of US Navy F-14 Tomcats, Part 1: Atlantic Coast Squadrons
28 June 2016
Copyright ModelingMadness.com Thanks to
for the review kit. You can find this one at your favorite hobby shop
or on-line retailer. If you would like your product reviewed fairly and fairly quickly, please
contact
the editor or see other details in the
Note to
Contributors.