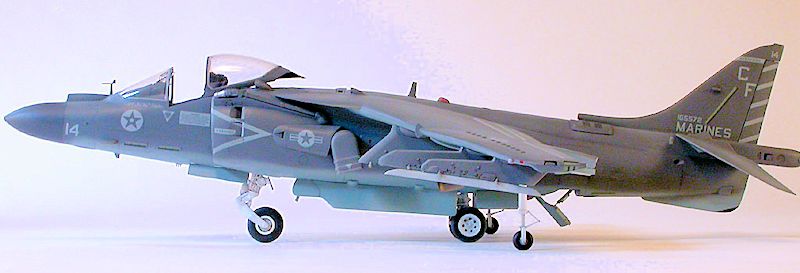
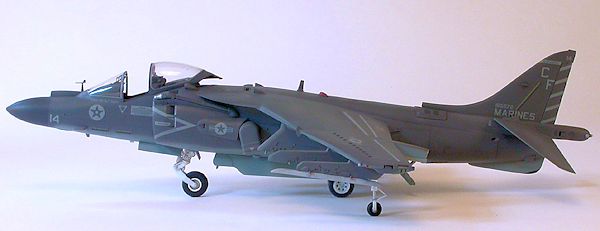
Trumpeter 1/32 AV-8B Plus
|
KIT #: |
02286 |
|
PRICE: |
$154.00 SRP |
|
DECALS: |
Three options |
|
REVIEWER: |
Lee Kolosna |
|
NOTES: |
Wolfpack Design air scoops and ejection
seat. CH Aero decals |
The United States Marine Corps recognized the
unique capabilities of the Hawker Siddeley Harrier vertical/short take-off
and landing (V/STOL) aircraft in service with the RAF and procured 102 from
British Aerospace in 1969. Despite
numerous roadblocks from within the military and the US defense industry,
the AV-8A Harrier became operational in 1971 and performed its role of close
air support quite well, being deployed in locations very close to the front
line in areas that could not support traditional attack aircraft. In
mock dogfight exercises with the frontline fighter of the day, the F-4
Phantom, the Harrier proved to be a very formidable opponent in short range
engagements due to the high maneuverability
 enabled
by rotating the four jet exhausts into a turn in a tactic called VIFFing. But
the limitations of the Harrier’s design, being short range and limited
ordnance load, were always an impediment to combat effectiveness. This
led to a partnership between McDonnell Douglas and BAe to design the Harrier
II, which entered service in 1985. The
new larger model brought numerous improvements such as a larger wing with
additional hard points, more ordnance capability, greater combat range, a
more powerful engine, and an improved cockpit with better pilot visibility. The
Night Attack and Plus variants of the AV-8B added FLIR capability and a more
powerful radar.
enabled
by rotating the four jet exhausts into a turn in a tactic called VIFFing. But
the limitations of the Harrier’s design, being short range and limited
ordnance load, were always an impediment to combat effectiveness. This
led to a partnership between McDonnell Douglas and BAe to design the Harrier
II, which entered service in 1985. The
new larger model brought numerous improvements such as a larger wing with
additional hard points, more ordnance capability, greater combat range, a
more powerful engine, and an improved cockpit with better pilot visibility. The
Night Attack and Plus variants of the AV-8B added FLIR capability and a more
powerful radar.
Marine Corps Harriers have been deployed to the
conflicts in Iraq and Afghanistan and continue to support combat operations
there. The Harrier is a demanding aircraft to fly and intensive training is
required of all its pilots. The
accident rate for the aircraft remains the highest of any US military
aircraft, but that is certainly due to the challenges of vertical flight and
the transition to and from forward thrust. All
AV-8Bs are slated to be replaced by the F-35B V/STOL variant of the Lockheed
Joint Strike Fighter in the coming decade.
Consisting of 521 pieces in styrene, photo-etch, and rubber, the Plus
version is one of four Harrier kits that Trumpter offers in this scale
(AV-8B Early Version, Night Attack, and a RAF GR Mk 7 being the others in
the series). As
with all Trumpeter kits, one has to expect there will be accuracy issues –
some significant and some not worth bothering about. In
this kit, the good outweighs the bad and a pretty nice model can be made
with a few aftermarket pieces that I consider necessary, namely obtaining
the four air scoops on top of the fuselage spine and a replacement ejection
seat.
Overall shape. Harrier
subject matter experts will be able to show you how the nose geometry is not
quite right. When
compared to photographs of the real aircraft you can see how the nose cone
hinge line is too far rearward (3 scale inches), but you have to look pretty
hard to notice it without a reference to compare it to. This
is more noticeable in the first AV-8B kit, but the later Night Attack and
Plus kits with their longer noses make it less obvious. There
are a few panel line inaccuracies and vents here and there are wrong too. Again,
if you want to correct these you’ll have to obtain a decent reference to
guide you. But
the overall dimensions and shape of the model is fairly good, details
described below
 excepted. Also
good news: the Trumpeter Mad Riveter was on holiday when this kit was
designed! Panel
lines are recessed with only a few recessed divots apparent.
excepted. Also
good news: the Trumpeter Mad Riveter was on holiday when this kit was
designed! Panel
lines are recessed with only a few recessed divots apparent.
Wings. Harrier
wings have a slight reduction in anhedral on the outer wing, which modelers
have dubbed “the kink”. Trumpeter
doesn’t do a very good job here, instead molding a slight pinch in the wing
leading edge around the stall fence and making no provision for the slight
bend upwards of the outer third of the wing. Modelers
have posted various suggested fixes to this issue on several modeling forums
which involve scoring the inside of the wing pieces and bending upwards
slightly and filling in the pinched leading edge with a sliver of sheet
styrene.
Control surfaces. The
flaps, ailerons, rudder, and elevons are all separate pieces. On
the ground, the aircraft’s wing control surfaces and rudder are seen in a
neutral position. The
elevons do tilt up a bit with the leading edge higher than the trailing
edge. All
of these pieces fit reasonably well into their respective slots, although I
did have to remove the attachment pins and do a little sanding and trimming
for them to be snug against the wing and vertical stabilizer.
Navigation lights. These
should be flush with the wing tips, rather than raised as depicted in the
kit. There
is a raised area around the puffer vent that should be sanded flush as well.
Air scoops. On
top of the fuselage of all Harrier II Plus aircraft are four prominent air
scoops that Trumpeter does not provide, instead including scoops of the
earlier AV-8B version. Wolfpack
Design offers a set of resin replacements and are highly recommended because
this is such an obvious feature of the Plus aircraft.
Leading Edge Extensions. The
100% LERX pieces in the kit do not have a bottom, which is a pretty
inexcusable error. I
filled this in with a piece of sheet styrene, but this is a task that one
really shouldn’t have to in a kit at this price level.
Landing gear. The
complex landing gear pieces are reproduced fairly well. I
did notice that the angle of the nose gear strut is raked more forward than
it should be, but that could have been an
 assembly
error on my part. The
main wheels are dished inwards, which is incorrect. All
tires are synthetic rubber which some modelers have an objection to, but I
didn’t have any major issues with them and they fit on the wheels easily.
assembly
error on my part. The
main wheels are dished inwards, which is incorrect. All
tires are synthetic rubber which some modelers have an objection to, but I
didn’t have any major issues with them and they fit on the wheels easily.
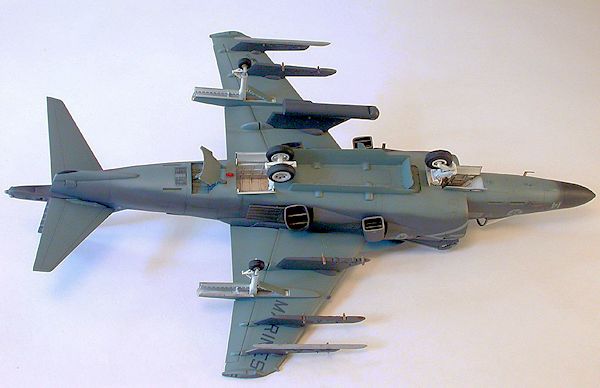
Pylons. The
inboard pylons have cutouts on the rear lower section not present on the
real aircraft. I
filled these in with sheet styrene. The
outer pylons are a scale foot too short, but that is relatively difficult to
correct since the problem can’t be fixed by adding a plug as the error is
present throughout the entire length of the piece. The
kit is designed for the anti-sway braces to be mounted in the notches in
each pylon, but in reality these should be mounted inside the space between
the two notches.
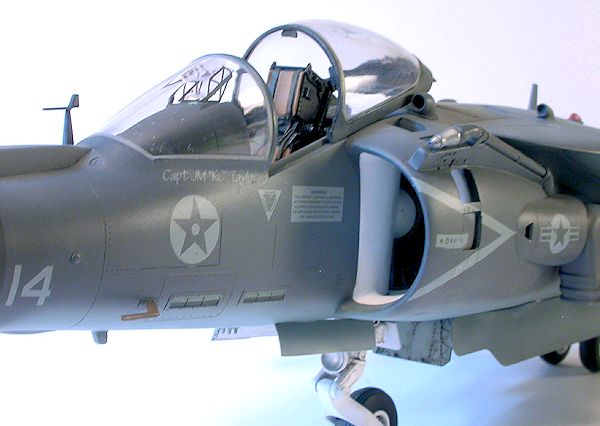
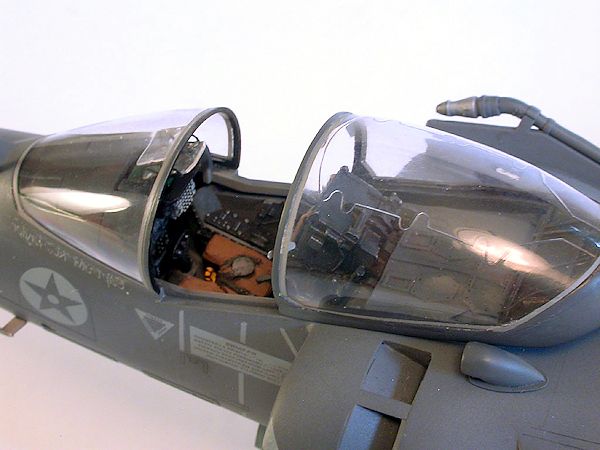
Cockpit. The
cockpit has a reasonable amount of detail and is mostly accurate for a Night
Attack or a Plus aircraft. The ejection seat is quite plain and lifeless,
with photo-etch harnesses provided. I
elected to use a Wolfpack Design resin seat instead, owing to the very
prominent visibility of this area of the model. The
HUD is a combination of photo-etch frames with clear plastic display panels
and is finicky to assemble and fit on top of the coaming. I
found the HUD a little too tall and couldn’t be mounted far enough forward
because of interference with the windscreen.
Canopy. This
traditional Trumpeter trouble spot is thankfully well done with a justified
complaint about the shape of the detonation cord molded into the canopy,
which does not faithfully capture the shape of the real thing. This
can be fixed, but it will take quite a bit of work. The
pieces are nicely thin and crystal clear. A
mold seam will have to be sanded off and polished out. Photo-etch
rearview mirrors are included.
25mm Gun Pack. This
Plus kit corrected one big error of the AV-8B Early Version kit, which
featured guns in both pods whereas in reality it exists only on the left
side, with ammunition stored in the right. Unfortunately,
they didn’t correct the other mistake, which is that the gun itself in a
five barrel Gatling type weapon, instead of the single barrel provided in
the kit. The belt feed bridge piece between the two pods is just plain wrong
and will need to be replaced with a scratch-built piece for accuracy.
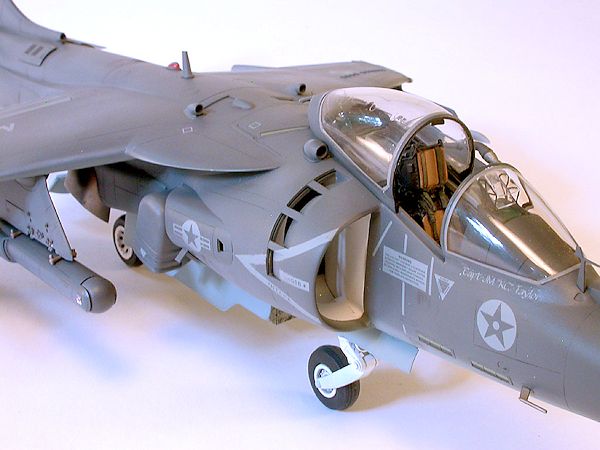
Air Intakes. The
intakes are fairly well done, although a lot of work is needed to make them
seamless using the kit parts. Four
large ejector pin marks have to be filled on the intake cone. I
found the fit of the little blow-in doors to be poor – they are smaller than
the opening -- and required some filler to bridge the gaps. There
is a raised ridge on the fuselage just inside the intakes that is not
appropriate and should be sanded flush.
Pegasus Jet engine. I
always marvel at why Trumpeter includes complete engines for assembly and
then doesn’t provide any way of seeing it once the model is built. But
they obviously think of this as a
 feature
and I do find myself enjoying gluing these pieces together without any
concern for sloppiness or painting. It’s
actually kind of fun. You
will need to assemble and install the engine as the four thrust vector
nozzles attach to it.
feature
and I do find myself enjoying gluing these pieces together without any
concern for sloppiness or painting. It’s
actually kind of fun. You
will need to assemble and install the engine as the four thrust vector
nozzles attach to it.
Ordnance. Another
traditional Trumpeter weak spot, this kit is no exception. Using
sprues recycled from other kits, there are a number of items that simply
aren’t used on Harriers. Trying
to be a simple as possible, here is a guide. Never
used on a Harrier: the MERs, the BLU-49 bombs, the M-117 bombs, and the
AIM-120 missiles. Shouldn’t
be used because of shape issues: the Mk 82 “slick” bombs and perhaps the
TERs (they are much too skinny). Passable:
GBU-12 laser guided bombs, AIM-9L Sidewinders, AGM-65 Mavericks, Mk 82
Snakeye bombs, and the AN/AAQ-25 FLIR pod. Unlike
the first Trumpeter AV-8B kit, the Plus and Night Attack kits have the
launchers for the Mavericks and Sidewinders included. I
have read that the large fuel tanks have some shape issues, being a bit too
pointy and the fin shape is a bit off as well.
Decals. Markings
for two US Marine Corps and a Spanish Navy aircraft are included. I’ve
found that recent Trumpeter decals are pretty good overall in quality, with
suspect artwork. I
don’t see any glaring issues with the kit markings. The
colors chosen for the formation “slime” lights are a little too stark so I
elected to paint mine instead.
I started by assembling the engine as it is
required in order to properly mount the vectoring nozzles. Since
I didn’t have to worry about seams or sprue attachment marks, this was a fun
little task that went quickly. The nozzles themselves have seams inside and
out that have to be filled and sanded smooth. The
front nozzles are camouflage color (Gunship Gray) while the rear nozzles
were painted Testors Metalizer Burnt Metal. After filling four nasty
ejector pin marks I painted the inside of the air intake cone white with
dark metallic fan blades. The
main wheel well assembly was painted white and received a wash of dark gray
and inserted in the fuselage halves along with the engine. There
are some holes that need to be drilled to accept the topside flare
dispensers before gluing the two halves together. I
now use thick CA glue for mating all my major pieces together in order to
avoid ghost seams that inevitable form weeks later. Fit
was reasonably good.
My attention was then focused on the wings. I
scored the inside of each wing upper and lower piece where the reduction in
anhedral begins and bent the outer wing panel accordingly. The
wings were glued together as were the flaps, ailerons, and rudder pieces. The
leading edge extension (LERX) pieces are open underneath, so I cut out a
piece of sheet styrene to fit and filled the surrounding seams. I
 sanded
the raised navigation light flush with the wing tip contour and cut out a
notch for inserting a piece of clear green resin on the starboard wing and
clear red resin on the port wing. Both
were blended in and polished back to clarity. The
inaccurately raised area around the puffer vent was sanded flush.
sanded
the raised navigation light flush with the wing tip contour and cut out a
notch for inserting a piece of clear green resin on the starboard wing and
clear red resin on the port wing. Both
were blended in and polished back to clarity. The
inaccurately raised area around the puffer vent was sanded flush.
The cockpit was up next. Dark
Gull Gray FS26231 was used as the overall color, with a dark gray wash and
dry-brushing with a light gray to highlight the details. I
put together the kit supplied ejection seat with the photo-etch seat belts,
but it was simply too plain for such a visible part of the model. I
decided to ditch the seat and use a resin replacement from Wolfpack Design. Before
I get angry e-mails from Harrier fans about using the British Martin-Baker
seats instead of the proper Stencel SJU-4 seat – I know. The
correct seat was out of stock and I didn’t know if one would ever become
available, so I went with the British Harrier seat instead. While
it is technically wrong, it still looks significantly better than the kit
seat. The seat was painted black and the cushions a medium brown. The
harnesses were painted dark green and a dark gray wash and dry-brushing of
light gray gave some depth to the nicely sculpted details on the Wolfpack
Design seat.
After inserting the cockpit and nose wheel well
assembly into the front fuselage halves, they were glued together and the
raised panel on either side of the nose as well as the ridge inside both air
intakes was sanded flush. The
front of the air intakes were attached and I spent a lot of time filling and
sanding the resultant seams to make the intakes as smooth as possible
because this, like the cockpit, is the first place an observer is
immediately drawn to. Each
blow-in door was individually glued to its respective opening. After
studying many photos of Harriers at rest, I decided to progressively close
the upper four doors with the lower three doors completely shut. I
glued the front fuselage to the rear fuselage assembly. I
found the blow-in doors to be slightly smaller than the opening, so filler
was required to make them flush with the surrounding fuselage, which was
later re-scribed to insure that the outline of the door was properly
delineated.
The windscreen was glued on and I carefully
filled the seam and sanded it smooth with the surrounding fuselage. The
main canopy was glued to its frame and this seam was also filled. It
took about six attempts to get both of the seams filled to my satisfaction. The
clear parts were polished with Novus Plastic Polish #2 and masked for
painting.
The wings were were glued on and more seam
filling was required at the root, which is par for a Trumpeter kit. The
control surfaces were glued in after some sanding and removal of the
attachment points, which made them easier to slide into place. Because
I had altered the outer wing panels, the ailerons required a bit of sanding
to get to fit.
The pylons have issues as described above, so I
filled the incorrect notches on the innermost set with scrap plastic. Cleaning
up the tiny sway braces and painting them was a tedious affair. Since
the gun pods have a couple of issues, I elected to just use the strakes and
glued them on the belly instead.
Whenever making a model of a modern attack jet,
the question of what ordnance to equip it with always becomes a major
decision involving a bit of research. Harriers
can carry a variety of combinations, but I looked for typical patterns in
photographs of operational AV-8B Plus aircraft. I
determined that this meant that air-to-air missiles weren’t really carried
much after 2006, but the launcher is frequently seen attached to the outer
pylons. The
middle pylons often have the huge external fuel tanks hung underneath, so I
assembled those pieces. In
the end, I decided not to use these as I wasn’t too happy with how Trumpeter
engineered the attachment points and also how they obscured the sleek lines
of the jet. On
the inner starboard pylon one often sees the FLIR targeting pod attached,
with a laser guided 500 pound bomb under the port wing. So
I assembled both of those but later elected to leave the bomb off and just
use the FLIR pod.
 The
landing gear pieces are complicated and require parts cleanup before
assembly. There
a bunch of doors, actuators, scissor links, and wheels to attend to. All
were painted flat white and given a dark gray wash to highlight the details
and introduce a grungy appearance seen in photographs. I
noticed that the nose wheel strut is not perpendicular to the fuselage,
which makes the landing gear light paint slightly upward, which is obviously
incorrect. It
could have been an error that I made in assembly, so I encourage others
building this kit to watch this area and see if it can be avoided.
The
landing gear pieces are complicated and require parts cleanup before
assembly. There
a bunch of doors, actuators, scissor links, and wheels to attend to. All
were painted flat white and given a dark gray wash to highlight the details
and introduce a grungy appearance seen in photographs. I
noticed that the nose wheel strut is not perpendicular to the fuselage,
which makes the landing gear light paint slightly upward, which is obviously
incorrect. It
could have been an error that I made in assembly, so I encourage others
building this kit to watch this area and see if it can be avoided.
Lots of little things went on the model before
painting commenced. There
are flare ejector racks, blade antennae, air scoops, refueling probe, and
various other doo-dads that I guarantee that you will break off several
times before the model is finished. As
I stated above, the four unique air scoops on an AV-8B Plus on top of the
spine are not included in the kit. I
used the Wolfpack Design replacements and they fit in well with a little Mr.
Surfacer required in the surrounding seams to blend in. A
photo-etch panel immediately aft of the cockpit opening was glued down
securely with CA glue.
The elevons were glued on at the tilted angle
as seen in photos of Harriers at rest. The
rudder was glued on after snipping off the attachment pegs which are a
little too visible.
I re-scribed the seams that were lost in the seam filling process
and the entire model was washed in warm soapy water to remove any sanding
dust and fingerprints before proceeding to apply the exterior paint.
USMC Harriers recently underwent a
paint scheme change, with FS 35237 Intermediate Blue undersides and FS 36118
Gunship Gray on top. CH
Aero issued an excellent decal sheet featuring two VMA-211 Harriers in the
new scheme, and I selected the less colorful line jet option because that is
what I usually prefer to have in my collection. Slight
editorial: decal makers make way too many CAG aircraft for their sheets in
my opinion, but I do understand why they do this because modelers like them
so. I
carefully masked off the interior of the air intakes and the wheel wells and
sprayed the underside and then topside camouflage colors, using Testors
Acryl paints. There
was the inevitable bleeding of paint under the intake masking, so several
corrections were necessary before I was happy with a sharp transition
 between
the Gunship Gray and the stark white interior.
between
the Gunship Gray and the stark white interior.
I wasn’t happy with the decals
Trumpeter provides for the slime lights, so I painted them instead with
British Interior Green for the lower half and scale black for the upper
portion. The
tires were sprayed with a light brownish gray filter to knock off the
shininess of the rubber and give some variation. The radar warning receiver
bumps were painted medium gray, and the nose cone got a slightly darkened
version of Gunship Gray.
A coat of Future Floor polish was
applied in preparation for decals. The
CH Aero decals went on just fine, with some silvering under clear areas. The
silvering was dealt with by repeated pricking the clear layer with a knife
blade tip followed by a healthy application of Mirco Sol. In
a few stubborn areas I masked and sprayed the camouflage color over the
decal.
I applied a dark gray wash of
Payne’s Gray oil paint thinned with Turpenoid to highlight all the panel
lines. Every
Harrier I’ve ever been able to inspect in person has been filthy on the rear
fuselage from the exhaust, so I sprayed a thinned black/brown mixture all
along that section to match photographs. These
jets are still relatively clean owing to their new paint scheme so I used a
light hand weathering, doing a little diffusion of the topside camouflage by
lightly spraying a lighter gray in random areas and adding some grunge in
places that the ground crew would touch the airplane using dark gray chalk
pastels.
I sprayed a medium gray on a clear sheet of decal paper
and cut very thin strips to apply to the outlines of the canopy and
windscreen to simulate the fiberglass reinforcing tape used to seal the
joint. Everything was sealed with a coat of Testors Acryl Flat Clear.
The rubber tires fit on the wheels
easily and were glued to the struts. The
outriggers as designed incorrectly attach perpendicular to the wing, whereas
they should be raked backwards instead so that the angle with the ground is
close to 90 degrees. Getting
the nose wheel, the two outrigger wheels and the
 two
main wheels to contact the ground all uniformly took a little bit of
adjustment to the outrigger oleo struts, which I shortened and cut a
slightly longer notch in the rear to fit further upwards into the main
strut. All
the landing gear doors were glued on with their corresponding retraction
struts.
two
main wheels to contact the ground all uniformly took a little bit of
adjustment to the outrigger oleo struts, which I shortened and cut a
slightly longer notch in the rear to fit further upwards into the main
strut. All
the landing gear doors were glued on with their corresponding retraction
struts.
The shape and size of the
photo-etched rearview mirrors was off, so I made some new ones out of thin
plastic sheet and carefully attached them inside the canopy frame using
clear watch crystal cement. The
wind indicator went on the nose, the pitot tubes were glued on, and I
attached the fuel tanks, Sidewinder launcher rails, and FLIR pod under the
pylons. As
mentioned previously, I didn’t care for how the large fuel tanks overwhelmed
the model and decided to remove them. The
last step was to glue the canopy on in the open position and I was done with
a project that I spent 85 hours working on over ten months.
This is a challenging kit to build
and paint, particularly with the huge canopy and windscreen, very open and
visible cockpit, and gaping air intakes. Accuracy
issues continue to be something to watch for in all Trumpeter kits, with
this particular kit’s main problems being the lack of the four dorsal air
scoops, incorrect gun pods, misshapen pylons, lack of a wing outer panel
kink, and ordnance selections that have to be carefully chosen. I
recommend that the ejection seat be replaced with an aftermarket item in
addition to the Wolfpack Design resin air scoops, which are a must-have. The
gun pods, pylons, and wing kink issues are all correctable.
For me, this project was for the
most part an enjoyable build. I
spent an awful lot of time on the air intakes, from filling mold ejector
marks and seams inside to attaching each individual door one-by-one. Then
the masking and painting of the intake required even more time and attention
before I was satisfied with the result. On
the positive side, the kit builds up to an impressive model and only Harrier
aficionados will notice the minor issues. These
are the only Harrier kits available in 1/32 scale and that will likely be
the case for a very long time. If
you like the lines of this unique and interesting aircraft, then the
Trumpeter kits are definitely worth considering purchasing and building. One
doesn’t see too many of these made, either in person or on any of the
modeling websites or forums, so you could very well be the only person on
your block to own one.
The
question of course is whether the relatively high cost of the kit and the
two recommended aftermarket items are worth it. I
was able to take advantage of a Squadron Black Friday sale when I bought my
kit, so I don’t feel that my total outlay of funds was disproportionate to
the amount of time I spent building it or the enjoyment I received from the
experience.
Jenkins, Dennis R.: U.S.
Naval Aviation -- A Military Photo Logbook, Volume 1
Lee Kolosna
August 2013
If you would like your product reviewed fairly and fairly quickly, please
contact
the editor
or see other details in the
Note to
Contributors.
Back to the Main Page
Back to the Review
Index Page