Hasegawa 1/48 F/A-18A+ “Silver Eagles”
| KIT #: | 09920 |
| PRICE: | $89.95 SRP |
| DECALS: | Two options |
| REVIEWER: | Dan Lee |
| NOTES: |
Aires
cockpit and exhausts, Quickboost Seat, Eduard F/A-18 Placcards, Royal
Resin F/A-18 Wheels and Leading Edge Decals “D-Day 50th Anniversary” |
| HISTORY |
By the late 1970s
it was obvious that the Canadian Armed Forces needed a replacement for the
CF-104, CF-116 (F-5A) and CF-101 as both were showing their age as well as
caused them some bad PR thanks to accidents caused by wear and age.
The government at the time looked at the latest warbirds from US and NATO
allies including the F-14, F-15, F-16, F-18, and the Tornado among others.
The plane’s missions would include long range interception over the
arctic as part of its commitment to NORAD and low level strike plus it would
have the right capability/cost balance for the perennially cash poor Canadian
Armed Forces. Immediately crossed
off the list were the Tornado, F-14 and F-15 as all three were not cheap to buy
or fly. The F-16 was rejected
because it did not have two engines (a necessary requirement for the long range
interception mission over the arctic.)
This left the McDonnell Douglas F-18 as the winning plane.
Oddly enough, the Canadian government nearly ended up purch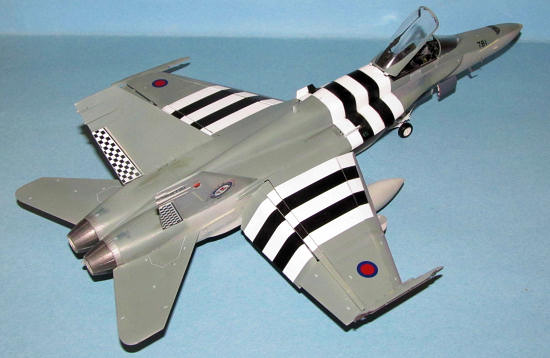 asing
asing
Since 1982, the
CF-18 has been the backbone of the Canadian Armed Forces Air Command.
This despite having the same very public teething problems that the
Due to austerity
and spending cuts caused by a previous unpopular government’s spending habits,
almost half the CF-18 fleet was put in storage during the mid 1990s as part of
the Dept of National Defense’s austerity program.
As of right now,
the active fleet of CF-18’s are being upgraded to the same standard of the C/D
models to extend their life till 2020 or whenever the extremely expensive F-35
Lightning II becomes operational.
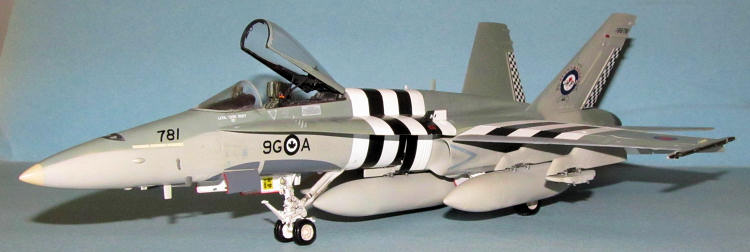
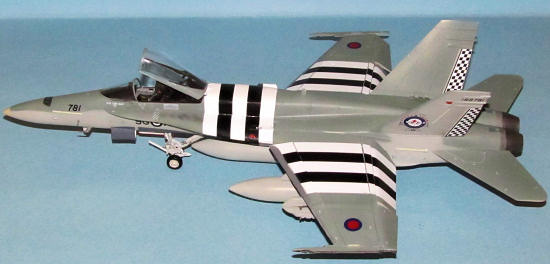
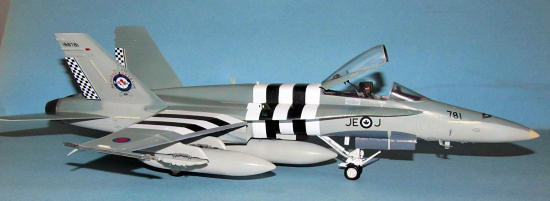
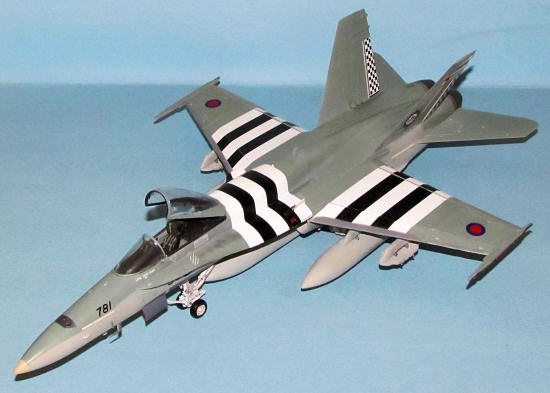
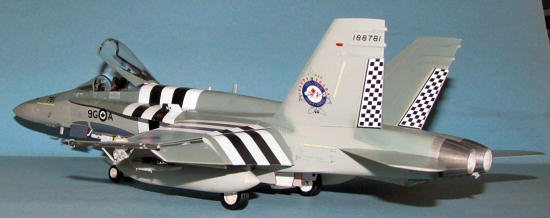
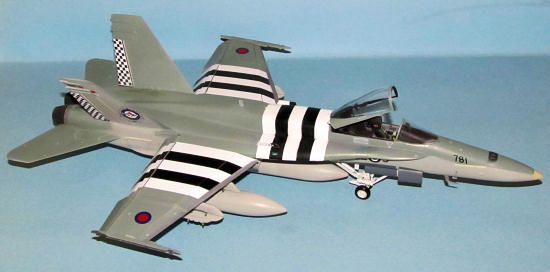
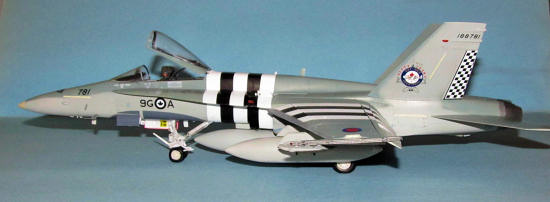
The markings used for this model are from one of two Hornets with the D-Day 50 year anniversary markings of 441 Squadron (Silver Foxes) as seen in 1994. It includes the D-Day invasion stripes and the ID Codes of 441 Squadron in WW2 plus that of Wing Commander Johnnie Johnson who flew as the Wing Commander of 127 Wing stationed at RAF Kenley.
| THE KIT |
 I am
actually not a fan of the Hornet, but a friend of mine kept bothering me to
build one with Canadian markings for a few years.
It does bother me that I don’t have many Canadian planes on the shelf so
a couple of years ago I finally relented, searched for a CF-18 or F/A-18A kit
and found lots of E/F kit and the odd C kit, but no As.
It was just one of those bad timing moments when I wanted a kit and none
were to be had. I wasn’t going on
eBay to look for an out of production kit (again) so I waited till Hasegawa
re-released their A kit and purchased it from Lucky Models at a much cheaper
price than $89.95 US MRSP (yikes) even with shipping it was such that I could
afford to get all the aftermarket bits (on sale.)
I am
actually not a fan of the Hornet, but a friend of mine kept bothering me to
build one with Canadian markings for a few years.
It does bother me that I don’t have many Canadian planes on the shelf so
a couple of years ago I finally relented, searched for a CF-18 or F/A-18A kit
and found lots of E/F kit and the odd C kit, but no As.
It was just one of those bad timing moments when I wanted a kit and none
were to be had. I wasn’t going on
eBay to look for an out of production kit (again) so I waited till Hasegawa
re-released their A kit and purchased it from Lucky Models at a much cheaper
price than $89.95 US MRSP (yikes) even with shipping it was such that I could
afford to get all the aftermarket bits (on sale.)
The Hasegawa kit is still in pretty good shape as the 350 or so parts are free of flash, well detailed with nice engrave panel lines. One of the reasons why this kit is a bit pricey is because it comes with a lot of parts and white metal landing gear instead of plastic ones as well as a small PE fret that includes a boarding ladder and HUD. There is enough options to build out an A or early C model Hornet.
| CONSTRUCTION |
Hasegawa’s Family
of Teen Fighter models have roughly the same layout.
Fuselage, wings and separate nose.
The separate nose can make things rather difficult especially if you use
an aftermarket cockpit which doesn’t fit as well as it should... more on that
later.
 I started on
the nose by drilling out the portside searchlight that CF-188s (the official
designation) are equipped with. I
was thought for a moment to flesh out the interior detail of the light section,
but I decided against it and instead used Micro Foil Glue to stick some tinfoil
to the clear piece to represent the light reflector instead of doing a lot of
work for such a minor detail.
I started on
the nose by drilling out the portside searchlight that CF-188s (the official
designation) are equipped with. I
was thought for a moment to flesh out the interior detail of the light section,
but I decided against it and instead used Micro Foil Glue to stick some tinfoil
to the clear piece to represent the light reflector instead of doing a lot of
work for such a minor detail.
The kit cockpit was
replaced with the Aires cockpit which is nicer looking, but I had some fit
issues that would not appear until I added the nose.
I hacked out the console coaming and sanded things down.
I left off most of the cockpit interior detail till after main
construction. It was then I mated
the upper and lower halves of the fuselage.
For the most part it went well together, but the tail did not fit as well
as it could have. It took a fair
amount of careful sanding/filling to get everything smooth.
The rear slime lights were sanded flat and replaced with a measured
length of 1/16” plastic strip. The
other area that needed a lot of work was the underside of the Leading Edge
Extension (LERX) as there were seams that needed some serious filling plus the
fit wasn’t the best.
Next I mated on the
nose to the main fuselage and discovered that there was a 0.5mm step at the
join. Commence swearing, sanding
and filling. I had to be extra
careful not to scratch the portside searchlight.
It went well till I put the plane on a counter and then promptly knocked
the model off said counter. The
nose went one way and the rest of the plane went the other.
Grrrrrrr. Round two
consisted of grumbling, swearing, sanding, filling and replacing the replaced
detail.
 I worked on
the metal landing gear. Cleaned up
the mold marks, added some brake lines using 30 gauge wire and attached the
plastic parts. Details were added
to the landing gear wells. The
landing gear and the wells were painted flat white.
There is an interior seam in the rear landing gear wells, but instead of
doing something about it or going full on insane with aftermarket landing gear
wells, I ignored it.
I worked on
the metal landing gear. Cleaned up
the mold marks, added some brake lines using 30 gauge wire and attached the
plastic parts. Details were added
to the landing gear wells. The
landing gear and the wells were painted flat white.
There is an interior seam in the rear landing gear wells, but instead of
doing something about it or going full on insane with aftermarket landing gear
wells, I ignored it.
The Hornet’s flaps
and slats can be positioned up or down.
I opted to put them down so this meant I left these off till final
assembly because of the decals.
As it seems to be my current habit, I used Aires’ seamless exhausts to replace the Hasegawa parts. Unfortunately, I had ordered the C model exhaust nozzles which are different than the A model ones and meant that I had to use the kit exhaust nozzles. The combined assembly fit without drama into the engine openings. The exhausts were painted burnt metal, flat black and flat white and the interiors were weathered using graphite dust to represent the scoring from the heat.
| COLORS & MARKINGS |
Painting
Unlike most of the
Hornet, the 1994 Commemorative paint scheme is fairly straight forward.
Light Ghost Grey on the bottom and Blue Grey up top.
I didn’t have the exact match for the Blue Grey or Light Ghost Grey so I
used Tamiya XF-25 Light Sea Grey for the blue grey and XF-80 Royal Grey for the
Light Ghost Grey instead. Much of
the scheme was done freehand except around the twin tails and the nose where
there were fairly sharp demarcation lines.
I next worked on the tailhook.
It was painted XF-80 Grey.
 When
the paint was dry, every other section of the tailhook was masked off and
painted XF-25 Light Sea Grey.
When
the paint was dry, every other section of the tailhook was masked off and
painted XF-25 Light Sea Grey.
The nose cone was
masked off and painted radome tan.
One thing that I
forgot to do was paint the walkway stripes after I had added some of the decals.
Using Post-It Notes, I masked off the walkways on the LERXs and sprayed
on Dark Sea Grey.
The canopy has a
center seam that needed to sanded away.
It took a hour or so of careful sanding using fine grit sanding sticks,
polishing pads and Novus 2 to get something that looked fine.
It was dipped in Future and left to dry overnight.
The windscreen and canopy were masked and the interior color (flat black)
was sprayed on. I sprayed on XF-80
Light grey to prevent the interior color from bleeding through.
When it was dry I sprayed on XF-25.
A small section of the rear of the canopy was masked and painted flat
white to match the invasion stripes.
The one paint task
that gave me the most grief were the leading edge markings.
I made a mess of the decals and had to spray them on (Tamiya Dark Sea
Grey) using post-it note masks. If
I were to do this again, I’d avoid those particular decals.
Next the rear of
the Hornet was masked off and painted XF-56 metal grey as part of the engine
nozzle assembly.
Once the paint was
dry, I sprayed on two light coats of Tamiya Clear Coat as the gloss coat medium
for the decals.
Decals
For a while I
thought about painting this scheme instead due to my distaste for decal stripes,
but Leading Edge decals haven’t disappointed me in the past and masking/painting
all those D-Day stripes would be just as big a pain as the decals which is why I
ended up using the decals.
Patience is the
name of the game when doing this scheme.
If you don’t have any then this will not go well.
I started with the various non stripe decals on the tail fins and rudders
and at the rear of the Hornet where they would not slide off from handling.
 I worked on
the fuselage stripes first. Each
section was done in over a few days (no sense in rushing this.)
Watch out for the piece that goes between the intakes.
You are going to have to cut the decal to get it in between the little
strut that is between the intake lip and the fuselage.
The fuselage stripes proved to be the biggest headache of them all due to
the complex curves of the Hornet’s fuselage (as I learned later would make
painting the stripes as big a headache.)
I ended up ripping the markings on the starboard side.
Fortunately, Leading Edge provides two sets of fuselage stripes, but
unfortunately the rips were still noticeable through the 2nd decal.
I was forced to mask and paint them anyway which was made more
complicated by the fact I could not use tape.
I was forced to use Post-It notes as there was no other way.
It took three attempts to fix it as I had to deal with overspray (lot of
swearing there.)
I worked on
the fuselage stripes first. Each
section was done in over a few days (no sense in rushing this.)
Watch out for the piece that goes between the intakes.
You are going to have to cut the decal to get it in between the little
strut that is between the intake lip and the fuselage.
The fuselage stripes proved to be the biggest headache of them all due to
the complex curves of the Hornet’s fuselage (as I learned later would make
painting the stripes as big a headache.)
I ended up ripping the markings on the starboard side.
Fortunately, Leading Edge provides two sets of fuselage stripes, but
unfortunately the rips were still noticeable through the 2nd decal.
I was forced to mask and paint them anyway which was made more
complicated by the fact I could not use tape.
I was forced to use Post-It notes as there was no other way.
It took three attempts to fix it as I had to deal with overspray (lot of
swearing there.)
Next up were the
wing stripes. This task was made
bit more difficult thanks to all the flaps and slats.
Here I had to cut the decals as well.
I screwed up the starboard stripes as they are slightly out of alignment.
I was not really happy when I noticed this, but who’s happy when they
realized they screwed up?
The rest of the
decals went without incident and I only used a couple of the Hasegawa decals.
Wash and Final Coat
I used the Tamiya Weathering set as the photos showed very little grime. The only areas I used a bit of charcoal dust were the walkway areas where maintenance types needed to go. Plus I did a thing watercolor wash of the landing gear and wheel wells. Once dry, the excess was removed and two thin coats of Xtracrylix Satin and one coat of Xtracrylix Flat were sprayed on for the final details.
| FINAL CONSTRUCTION |
 The first
thing I added were the slats, flaps and flap hinges.
The flap hinges were prepainted before installation.
I found them to be very delicate and a pain to install and normally they
would have been installed before painting, but due to the scheme had to be added
after the fact.
The first
thing I added were the slats, flaps and flap hinges.
The flap hinges were prepainted before installation.
I found them to be very delicate and a pain to install and normally they
would have been installed before painting, but due to the scheme had to be added
after the fact.
Next, the cockpit
was finished. I had a hell of a
time working with the Aires ejection seat’s PE harnesses and ended up getting a
Quickboost replacement with the harnesses molded on after I ruined several
straps following the instructions.
I did not use much of the PE for the canopy as the night before I unknowingly
knocked over a CA glue bottle that opened up and leaked CA glue over the PE fret
and ruined a bunch of delicate parts.
I used what I could though.
The plastic canopy deck was painted flat black and glued it to the cockpit with
CA glue. Once the glue dried, I
added the prepainted rear canopy clear piece to it using white glue.
Unfortunately, the
windscreen was a touch more stubborn.
One thing I forgot to test fit was the windscreen and if I did I might
have noticed that the forward fuselage was a bit too wide.
I did not and was left to deal with it.
If I had a vaccuform windscreen, I might have been able to get away with
it but I did not. I ended up having
to glue one side with Tamiya Clear let it dry and then carefully glue and gently
squish the windscreen so that it would mate with the other side.
It sort of worked but not as well I hoped.
Hasegawa did not
provide any weapons but for once that did not cause me any grief as this
particular Hornet is unarmed. I
assembled, sanded/filled and painted the fuel tanks and pylons.
These glued into the pre drilled holes in the wing.
 The
prepainted antennas, LERX fences, PE chaff dispensers, pitot tubes, landing
gear, landing gear doors (the red edging done with a red Sharpie), struts and
wheels (from Royal Resin) were added using CA glue before the final clear coats
was sprayed on the Hornet. Next I
added Eduard F/A-18 Placards. I
normally wouldn’t add them but the Hornet has some very prominent ones on the
landing gear, cockpit and wheel wells so I added them using well located dots of
CA glue using a toothpick.
The
prepainted antennas, LERX fences, PE chaff dispensers, pitot tubes, landing
gear, landing gear doors (the red edging done with a red Sharpie), struts and
wheels (from Royal Resin) were added using CA glue before the final clear coats
was sprayed on the Hornet. Next I
added Eduard F/A-18 Placards. I
normally wouldn’t add them but the Hornet has some very prominent ones on the
landing gear, cockpit and wheel wells so I added them using well located dots of
CA glue using a toothpick.
Finally, the last step was to remove the paint mask from the portside searchlight.
| CONCLUSIONS |
Sometimes one
builds a model that flows together so well that the experience of building it is
so enjoyable. This is what I call a
rarity. In most cases like this
one, I sometimes have to fight a bit with the model, paint, decals, spilled glue
and my moment of clumsiness (shakes fist at gravity.)
The 1/48 Hasegawa
F/A-18 family makes for a fine model on its own and in the hands of a skilled
modeler with a some aftermarket tweaks, it turns into an impressive one (not in
this case.) I’m happy I have
finally built a Canadian plane that is still in service.
Next time, I think if I ever do build another Hornet, I will make it easy
for myself and build an operational bird.
| REFERENCES |
Wikipedia and Joebaugher.com
September 2011
If you would like your product reviewed fairly and quickly, please contact me or see other details in the Note to Contributors.