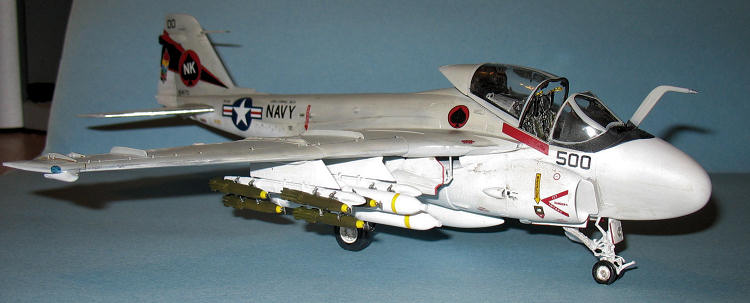
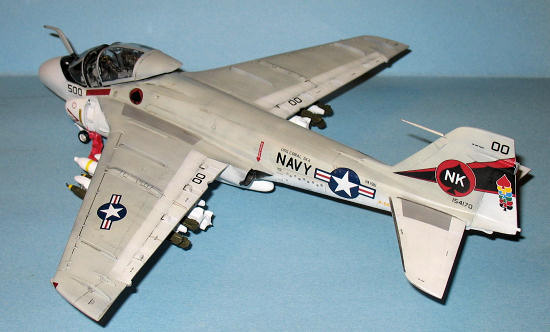
Revell-Monogram 1/48 A-6E Intruder
| KIT #: | 4578 |
| PRICE: | Around $30 when it was last available |
| DECALS: | Two options |
| REVIEWER: | Dan Lee |
| NOTES: | 2004 Reboxing, used Verlinden Update Set, Cutting Edge Resin Intakes, Royale Resin Wheels, SAC white metal landing gear and Terry Dean Noseweight |
| HISTORY |
Introduction
“Fighter pilots
make movies. Attack pilots make
history.”
 The A-6
Intruder was designed by Grumman in 1957 as an all-weather medium attack jet
replacement for the A-1 Skyraider.
Originally designated A2F-1, the Intruder entered the fleet in 1963 as the A-6A
thanks to SecDef McNamara’s unified naming system.
The airframe was later spun off into the A-6B (anti-radar), the EA-6
Prowler and the KA-6D tanker. Only
the EA-6B Prowler still flying today till it is replaced by the EA-18G Growler.
The A-6
Intruder was designed by Grumman in 1957 as an all-weather medium attack jet
replacement for the A-1 Skyraider.
Originally designated A2F-1, the Intruder entered the fleet in 1963 as the A-6A
thanks to SecDef McNamara’s unified naming system.
The airframe was later spun off into the A-6B (anti-radar), the EA-6
Prowler and the KA-6D tanker. Only
the EA-6B Prowler still flying today till it is replaced by the EA-18G Growler.
It saw action in
The A-6E was
introduced in 1970 with a brand new integrated circuit electronics suite which
provided to much more reliable. In
the early 80s, the A-6E were refitted with the TRAM (Target Recognition and
Attack Multi-Sensor) turret which contained a
The Intruder would
serve with the
By the late 1980s,
it was discovered that the Intruder airframes and wings were starting to crack
due to the stresses caused by controlled crashes known as carrier landings
endured over some 20+ years of service so the Navy decided to fund a stealth
version (aka the A-12 Avenger II/Flying Dorito) and develop two interim versions
known as the A-6F and A-6G.
Unfortunately, this happened at the same time the Bush Administration and Navy
discovered that the United States could not afford a 600 ship navy, SDI and
several major aircraft programs while the primary enemy, the Soviet Union,
collapsed from internal pressures, exhaustion and environmental and financial
collapse caused in large part by military spending.
 The A-12
proved to be a costly failure and was cancelled by SecDef Dick Cheney along with
the A-6F and, later, the cheaper A-6G.
This left the Navy without any real medium attack capability going into
the 21st Century. Despite what
McDonnell Douglas salesmen claimed, the new E/F Super Hornet would not carry the
payloads or have range the Intruder did.
The A-12
proved to be a costly failure and was cancelled by SecDef Dick Cheney along with
the A-6F and, later, the cheaper A-6G.
This left the Navy without any real medium attack capability going into
the 21st Century. Despite what
McDonnell Douglas salesmen claimed, the new E/F Super Hornet would not carry the
payloads or have range the Intruder did.
Anyway, the
Intruder was soon phased out of service and flew its last missions in late 1996.
The last Pacific Fleet Intruder squadron was VA-196, whose early 1980s
markings were used for this Intruder.
Unfortunately, the
A-6 was not lionized successfully on film like its fellow Grumman Product, the
F-14. The movie version of the
Flight of the Intruder is just awful so one would be better off to just skip it
and read the Stephen Coonts novel it is based on and it’s sequel, the Intruders,
instead.
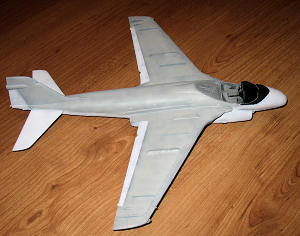
| THE KIT |
 This is the
only 1/48 A-6E kit available (assuming Trumpeter doesn’t make one in the next
few weeks after this has been written.)
The parts have raised panel lines (doesn’t bother me) and simplified
detail plus a noticeable amount of flash that needs to be cleaned up.
It makes an okay model out of the box, but I happen to really like this
double ugly bird and so I wanted to go the extra marathon on this one.
This is the
only 1/48 A-6E kit available (assuming Trumpeter doesn’t make one in the next
few weeks after this has been written.)
The parts have raised panel lines (doesn’t bother me) and simplified
detail plus a noticeable amount of flash that needs to be cleaned up.
It makes an okay model out of the box, but I happen to really like this
double ugly bird and so I wanted to go the extra marathon on this one.
I originally bought
this kit when I became more “serious” about the hobby (hint:
the
| CONSTRUCTION |
Construction
actually started several years before when I removed all the resin pieces from
the mold blocks and hand painted the ejection seats, adding hand painted copper
wire ejection looks.
I started on the
plastic side by hacking out the port side crew ladder and kit intakes as I was
going to replace it with the Verlinden resin piece and Cutting Edge Intakes
which are much deeper than the kit ones.
I thought about doing the starboard side ladder as well, but decided
against it (that was a smart choice, looking back.)
At this time, I also removed the refueling probe because I suspected
(later confirmed) that if I left it on that it would be a pain in the butt when
filling/sanding the nose seams.
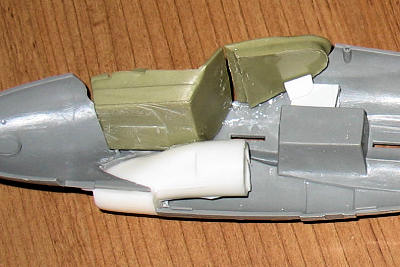 The Cutting
Edge intakes had their mold plugs removed and the intake fans were hand painted
silver and when dry, hand painted silver.
I then spent a lot of time adjusting, trimming, sanding and fiddling with
the intakes till they fit. I only
glued the starboard one in place while leaving the port side one alone till I
could fit the ladder well in.
The Cutting
Edge intakes had their mold plugs removed and the intake fans were hand painted
silver and when dry, hand painted silver.
I then spent a lot of time adjusting, trimming, sanding and fiddling with
the intakes till they fit. I only
glued the starboard one in place while leaving the port side one alone till I
could fit the ladder well in.
One of the problems
I immediately discovered was that there is such thing as too much aftermarket.
as the Verlinden crew ladder did not line up with the Cutting Edge intake as
both were too thick--the Verlinden set was based on using the kit intakes while
the Cutting Edge Intake walls were rather thick.
It took a lot of careful hacks with an Exacto knife, wood carving tools
and a bit of sandpaper to thin everything down to fit and just barely.
Of course that was before I added the PE walls and they were too deep for
the ladder well. I tried leaving
them in and sanding them down which worked till one of the PE walls broke off.
I went to plan B and cut/bent them to size.
It is at moments like this when one wonders about adding aftermarket, but
I was committed to do this because I didn’t have much of a choice.
It’s not perfect, but most folks aren’t going to notice the flaws (except
here of course.) There were also
obvious gaps that were covered up using plastic card.
The cockpit was
next. Unfortunately, the Verlinden
cockpit isn’t an exact fit and there were noticeable gaps between the tub, the
rear deck and the fuselage. I
filled in those areas the best I could using plastic card and CA glue to fill
the gaps between the rear deck and fuselage which was then carefully sanded
down. It didn’t occur to me till
later that I didn’t need to be so fine as that portion of the rear deck could
only be barely seen through the rear canopy.
I glued several strips of thick plastic card to add
 some
structural support for the tub.
some
structural support for the tub.
At this point, I
added a Terry Dean noseweight as the Intruder is a definite tail sitter.
This one didn’t fit as well as the other ones I’ve used, but I suspect
that has more to do with the ejection pin marks and flash in the interior.
Anyway, Terry’s noseweights are an excellent value and I do recommend
them if you need weight for a complex shape/tight fit.
When I test fitted
the arrestor hook, I realized that it does not fit very well and there were
massive gaps all along the interior.
I used 40 and 10 thou thick plastic card and
Next, I glued the
wings parts together. No major
issues. I only did a rough fill and
sand job on the turbo jet exhausts which would later come back to haunt me.
The fuselage halves
were glued together, but I had to remove the nose gear doors were removed as I
needed the space to fill and sand the gaps around the intakes.
It took some careful work to remove and then add them back in when I was
done. I left the midsection
interior piece off till that work was done.
Once I was satisfied with the results, I glued it into place.
I glued on the
stabs last and then began the painful job of sanding/filling the many seams
several times. At this point, I
left the project alone because I had other matters that needed to be dealt with.
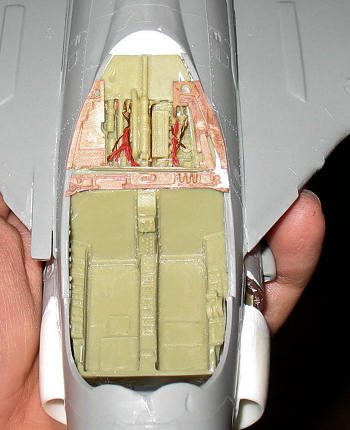
When I returned to
the plane, I worked on the cockpit rear deck.
This area is very prominent whether or not the cockpit is open or closed.
I followed the Verlinden suggestions and used the PE, wire and other bits
provided to make the necessary cockpit details.
I made my own cable harnesses and glued everything into place with PE.
This didn’t take as long as I thought.
Unfortunately, the PE ejector seat supports were more of a headache and
required to be redone several times as I screwed up the alignment.
 I test fit
the unpainted control panel to the shroud.
It did not have the best fit.
I used 10 Thou thick plastic card and plastic putty to fill in the gaps
before I glued the control panel into place on the shroud.
I test fit
the unpainted control panel to the shroud.
It did not have the best fit.
I used 10 Thou thick plastic card and plastic putty to fill in the gaps
before I glued the control panel into place on the shroud.
The interior and
control panel were sprayed with Gunze Dark Gull Grey and once dry, I hand
painted the cockpit details using Tamiya and Citadel paints.
The instrument panel used several PE parts, but kept most of the detail.
This required very careful painting and I’m proud of the result.
I then masked off the console and sprayed the shroud flat black.
The console
assembly doesn’t have the greatest support, so I made a tab/support from 30 thou
plastic card that was glued to the underside of upper nose coaming.
I needed to adjust it when I dry fitted the console assembly in place.
When I was satisfied with the positioning, I glued the console into place
and masked off the interior bits.
Finally, I added the old style perforated speed brakes. I just glued them in place rather than positioning them open as I didn’t want to do all the extra required work. I filled in the gaps using Vallejo plastic putty.
| COLORS & MARKINGS |
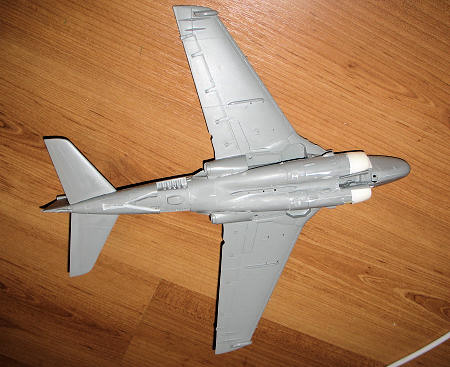
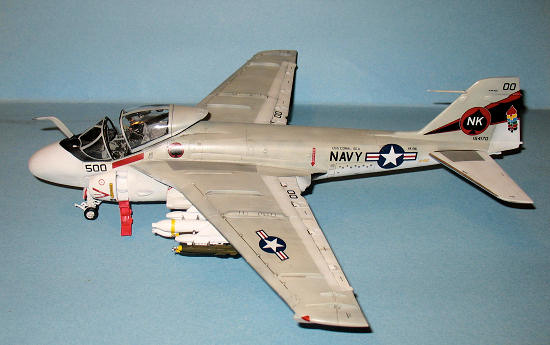
Paint
The 1960s-70s light
gull grey and insignia white navy planes is the most colorful era for Navy jets.
I must admit that I prefer this look over the grey/grey/grey/grey
versions which are more practical.
The Intruder
cockpit was masked and the plane was preshaded with various colors from other
builds.
I saw from the
photos that even 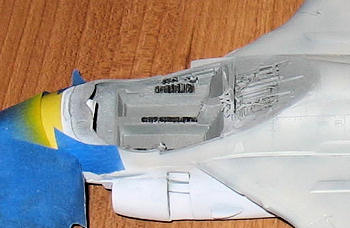 randomly
filling in areas. This generates a
rather multi toned coat that represents muted stressed/dirty paint that isn’t
entirely focused around on panel lines.
randomly
filling in areas. This generates a
rather multi toned coat that represents muted stressed/dirty paint that isn’t
entirely focused around on panel lines.
Once the paint was
dry, I masked off various areas that needed to remain white and sprayed on Gunze
Light Gull Grey in the same way as described above.
One of the problems
with the RM paint guide is that it doesn’t cover everything.
The “Sea gull” painted Intruders had walkways marked out in Dark Gull
Grey. A quick look through Google
Images showed most if not all had at least walkways marked out on the base of
the wings and stabs and centerline.
I opted to do the walkways on the wings and stabs.
This required some careful masking, but the walk ways were done (and some
retouching was required as it turned out that my tape placement wasn’t as good
as I thought.)
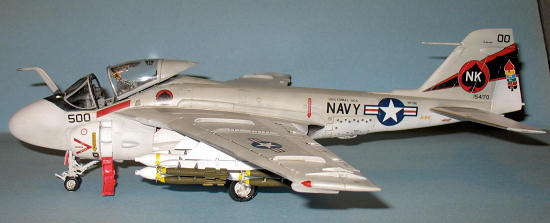
Also, there is a
noticeable black band in front of the cockpit.
It took several attempts to cut masks, paint and then repaint till I got
the thing right. At the same time,
I also painted the refueling probe.
 A big model
like the Intruder sucked up a lot of paint and required a lot of touchups
especially around the nose to get the dividing line between the white, light
gull grey and black band correct.
It was during the decaling stage when I noticed that my exhausts were not as
well sanded as I would like and that blast deflectors needed to be painted
steel. I used some CA glue, let it
harden then took a rolled up sandpaper and sanded it the best I could without
destroying any of the detail or decals.
Once it was done, I masked the area off using Tamiya tape and
Post-It-Notes to keep from destroying the decals and painted the interior flat
black and the exhausts/blast deflectors burnt steel.
A big model
like the Intruder sucked up a lot of paint and required a lot of touchups
especially around the nose to get the dividing line between the white, light
gull grey and black band correct.
It was during the decaling stage when I noticed that my exhausts were not as
well sanded as I would like and that blast deflectors needed to be painted
steel. I used some CA glue, let it
harden then took a rolled up sandpaper and sanded it the best I could without
destroying any of the detail or decals.
Once it was done, I masked the area off using Tamiya tape and
Post-It-Notes to keep from destroying the decals and painted the interior flat
black and the exhausts/blast deflectors burnt steel.
I added the
metallic leading edges using aluminum foil and Micro Metal Foil Adhesive.
This was actually easier than masking them.
Once done, I
sprayed on two coats of Tamiya clear acrylic gloss for the decals.
Decals
I opted to use the
kit decals for the hi-viz Light Gull Grey over Insignia White
The RM decals went
on okay using MicroSet, but some were stubborn and required cutting with a knife
and some Solvaset.
 One error
found by a forum member was the wing/fuselage insignia.
The RM instructions is that the larger
One error
found by a forum member was the wing/fuselage insignia.
The RM instructions is that the larger
Weathering
Intruders, even
Once that was done,
I glued in the landing gear doors and weathered them (with the same watercolor
wash) and the underside. Next the
topside using the same said wash. I
kept the hydraulic fluid and oil stains down to a minimum as the
Next I removed the excess wash and decal solution using slightly damp Q-Tips. After it all dried, I sprayed down two final coats of Tamiya Clear Gloss for the final coat.
| FINAL CONSTRUCTION |
In between painting
stages, I glued on the SAC landing gear using CA glue which provides more detail
and strength than the kit landing gear.
I did have to trim the mounting peg of one leg, but otherwise it wasn’t a
big deal to add. The only prep work
that I did on the landing gear was bend them back into shape and add various
tiny bits to them before painting and adding a wash.
The refuelling
probe’s base was sanded flat and then glued back on using CA glue.
Next added were the
ejection seats using CA glue at the base.
I also added the HUD to the console using white glue.
 I used the
resin rear canopy deck instead of the kit supplied one.
However the fit is rather poor as there is a step between canopy and rear
resin piece. I filled it in white
white glue and left it as is (in keeping with my mantra of “it’s not a contest
model!”) The canopies were masked
and painted at the same time as the plane.
The rougher resin portions of the rear canopy deck that weren’t supposed
to be seen were exposed so I adjusted by masking the canopy more shallow in the
rear so the paint could hide those areas.
I used the PE parts which were all painted flat black to spruce up the
interior and these parts definitely do with the mirrors and grab handles.
Plus they proved to be the all too common side effect of
I used the
resin rear canopy deck instead of the kit supplied one.
However the fit is rather poor as there is a step between canopy and rear
resin piece. I filled it in white
white glue and left it as is (in keeping with my mantra of “it’s not a contest
model!”) The canopies were masked
and painted at the same time as the plane.
The rougher resin portions of the rear canopy deck that weren’t supposed
to be seen were exposed so I adjusted by masking the canopy more shallow in the
rear so the paint could hide those areas.
I used the PE parts which were all painted flat black to spruce up the
interior and these parts definitely do with the mirrors and grab handles.
Plus they proved to be the all too common side effect of
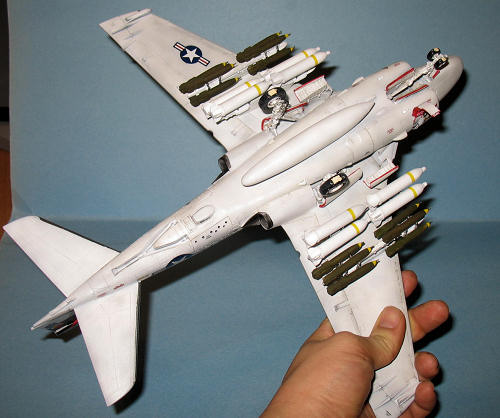
I’ve said this
before, but I really dislike doing ordinance, especially those on “modern”
aircraft as they have complex shapes and there is a lot of it (it seems like
more when you have to fill and sand everything.)
Having selected the non-TRAM A-6E, I opted to use the kit non TRAM
warload of eight Mk20 Rockeye Cluster bombs and 12 Snake-eye Retarded 500
pounders. Yay... 20 times the
“fun.” It took several sessions to
finish the necessary sanding and filling as I got bored very quickly.
Painting was
quicker as I used flat white on the Rockeyes and Tamiya Olive Drab on the Snake
Eyes. Once the base coats were dry,
I masked off the areas that weren’t supposed to be yellow.
I sprayed flat white on the noses of the Snake Eyes so that the yellow
would be brighter. Once done, I
added the sway braces, painted them steel and then glued them to the racks which
were glued to the wings.
 I did not
have fun building the all PE port crew ladder.
If I had half a brain and a soldering iron, I would have used the
soldering skills I picked up engineering school to solder it together but
instead I used CA glue and it took a couple of frustrating nights to get it sort
of right. The easy and fun part was
bending the PE into shape. The hard
part was keeping everything together with CA glue.
I finally figured out how everything was supposed to stay together.
I build the ladder without the actual door and gluing the steps in first.
It was messy with CA glue residue, but it was covered up by the paint.
The part was primed with flat white and once dry, I masked off the
exterior portions and painted the rest red.
Once dry, I did a water color wash for the interior and glued it in place
using CA glue.
I did not
have fun building the all PE port crew ladder.
If I had half a brain and a soldering iron, I would have used the
soldering skills I picked up engineering school to solder it together but
instead I used CA glue and it took a couple of frustrating nights to get it sort
of right. The easy and fun part was
bending the PE into shape. The hard
part was keeping everything together with CA glue.
I finally figured out how everything was supposed to stay together.
I build the ladder without the actual door and gluing the steps in first.
It was messy with CA glue residue, but it was covered up by the paint.
The part was primed with flat white and once dry, I masked off the
exterior portions and painted the rest red.
Once dry, I did a water color wash for the interior and glued it in place
using CA glue.
Finally, I added
flattened resin tires from Royal Resin.
These just needed to be removed, cleaned, drilled out, painted, weathered
and then glued in place using CA glue.
| CONCLUSIONS |
The RM 1/48 A-6E
Intruder is the only game in town (at present) for those who like building 1/48
jets. The basic kit is a nice build
OOB, but one will need to use a lot of aftermarket details to improve things
such as the simplified cockpit and intakes if one wants to make a more detailed
model than what the kit provides.
Unlike what has typically happened in my misadventures in super detailing, I am very happy that this did not turn into a frustrating rage inducing mess and happy with the result.
| REFERENCES |
F-111 by Bill
Gunston
Wikipedia
Flight of the Intruder by Stephen Coonts
May 2010
If you would like your product reviewed fairly and quickly, please contact me or see other details in the Note to Contributors.