Revell 1/48 F-14D Tomcat
| KIT #: | 5527 |
| PRICE: | $30.00 |
| DECALS: | Two options |
| REVIEWER: | Dale Rannals |
| NOTES: | S |
| HISTORY |
 Nothing looked better than a Tomcat waiting to launch from a carrier.
Nothing looked better in the air.
The “A” models airframes were limited by a quirky engine.
The “D” models were not limited at all.
But they are no more….political knee-jerking destroyed those in American
inventory. You’d think they could
have kept just one for air shows at least!
Perhaps American and
Nothing looked better than a Tomcat waiting to launch from a carrier.
Nothing looked better in the air.
The “A” models airframes were limited by a quirky engine.
The “D” models were not limited at all.
But they are no more….political knee-jerking destroyed those in American
inventory. You’d think they could
have kept just one for air shows at least!
Perhaps American and
| THE KIT |
Revell’s F-14D Tomcat is a reissue of
Monogram’s venerable F-14A from the early Eighties (I believe 1981).
You get a sea of plastic (it’s a big bird) with raised panels lines and
Monograms knack of getting the character of the subject just right.
Fit of the parts is okay; most fit well, but a few barely fit.
Clear parts are nice and, well, clear.
There are two versions done here….the first
 one (kit
#4729) which has a new sprue containing the different exhausts for the “D”,
newer gun vent panels and a different under-chin TCS pod.
Everything else is the same as the “A” version of yore.
The newer “D” kit is more substantial.
It has the above mentioned sprue but also contains another version of the
TCS pod, different ejection seats, different instrument panels, weighted tires,
external fuel tanks, a TARPS pod, a LANTRIN pod, newer Sidewinder launch rails,
and an AN/ALQ-167 ECM “Bullwinkle” pod.
But that’s not all, for in addition to the
standard weapons load-out of the original kit
(4
one (kit
#4729) which has a new sprue containing the different exhausts for the “D”,
newer gun vent panels and a different under-chin TCS pod.
Everything else is the same as the “A” version of yore.
The newer “D” kit is more substantial.
It has the above mentioned sprue but also contains another version of the
TCS pod, different ejection seats, different instrument panels, weighted tires,
external fuel tanks, a TARPS pod, a LANTRIN pod, newer Sidewinder launch rails,
and an AN/ALQ-167 ECM “Bullwinkle” pod.
But that’s not all, for in addition to the
standard weapons load-out of the original kit
(4
| CONSTRUCTION |
 Construction
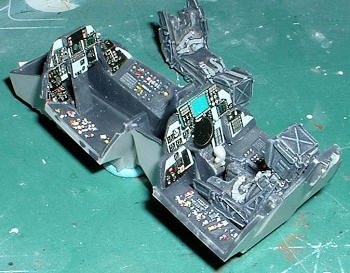
starts with the cockpit. Here I
deviated in the form of an Eduard F-14D color PE detail set.
A slight problem was the set was for the Hasegawa kit, so it wasn’t going
to fit perfectly. First step was to
grind down and smooth out the kits parts.
The kit contains instrument panel for both the “A” and “D” versions, so I
took the “A” versions parts and smoothed them out.
I figured this way if fitting the Eduard set turned out poorly, I could
always fall back on the kits’ “D” instrument panels and proceed normally.
(Always….have a “plan B”) I
had to do a bit of cutting on the cockpit tub to get everything to fit, but it
turned out well though. I then
painted various knobs and switches on the cockpit tub with dots of red, yellow
and white on the end of a toothpick and soon I had an office that looked like a
station from the Starship Enterprise….yes, a bit flamboyant and overdone
compared to the real (and quite dull) thing but it gets ones attention and says
“hey, look…there’s something down here.”
Next I painted, highlighted, and added a set of resin seats.
They looked very nice but I was mystified that they did not include the
upper ejection rings. I was all set
to make some out of wire when I looked thru my references and realized these
seats don’t have handles there.
DOH! It’s a good thing to
have good references…..it’s a better thing to actually check them.
Construction
starts with the cockpit. Here I
deviated in the form of an Eduard F-14D color PE detail set.
A slight problem was the set was for the Hasegawa kit, so it wasn’t going
to fit perfectly. First step was to
grind down and smooth out the kits parts.
The kit contains instrument panel for both the “A” and “D” versions, so I
took the “A” versions parts and smoothed them out.
I figured this way if fitting the Eduard set turned out poorly, I could
always fall back on the kits’ “D” instrument panels and proceed normally.
(Always….have a “plan B”) I
had to do a bit of cutting on the cockpit tub to get everything to fit, but it
turned out well though. I then
painted various knobs and switches on the cockpit tub with dots of red, yellow
and white on the end of a toothpick and soon I had an office that looked like a
station from the Starship Enterprise….yes, a bit flamboyant and overdone
compared to the real (and quite dull) thing but it gets ones attention and says
“hey, look…there’s something down here.”
Next I painted, highlighted, and added a set of resin seats.
They looked very nice but I was mystified that they did not include the
upper ejection rings. I was all set
to make some out of wire when I looked thru my references and realized these
seats don’t have handles there.
DOH! It’s a good thing to
have good references…..it’s a better thing to actually check them.
 Next on the
agenda are the intakes. Supplied
are two compressor faces….another nice touch but a moot point here.
These, and the intake area, were painted flat black as I saw little point
in detailing an area that was never going to be seen (nobody with a penlight is
ever going to look at my models).
The intakes cover over these and that completes the fuselage bottom.
The wings are as easy as it gets….a top and bottom for each side and,
since nothing hangs off of these, no holes to open or pylons to add.
At this point the wings and fuselage top and bottom are joined to make an
almost complete airframe. The fit
of the fuselage pieces is tricky in the area of the intakes.
Careful assembly here will minimize the putty and sanding, along with the
loss of the raised detail in the area.
I didn’t do so well, and quality time was spent here smoothing things
out.
Next on the
agenda are the intakes. Supplied
are two compressor faces….another nice touch but a moot point here.
These, and the intake area, were painted flat black as I saw little point
in detailing an area that was never going to be seen (nobody with a penlight is
ever going to look at my models).
The intakes cover over these and that completes the fuselage bottom.
The wings are as easy as it gets….a top and bottom for each side and,
since nothing hangs off of these, no holes to open or pylons to add.
At this point the wings and fuselage top and bottom are joined to make an
almost complete airframe. The fit
of the fuselage pieces is tricky in the area of the intakes.
Careful assembly here will minimize the putty and sanding, along with the
loss of the raised detail in the area.
I didn’t do so well, and quality time was spent here smoothing things
out.
| COLORS & MARKINGS |
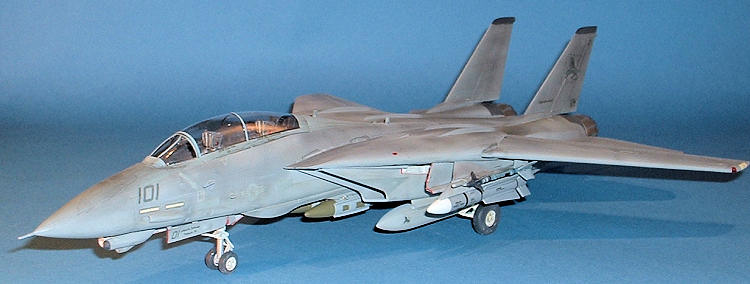
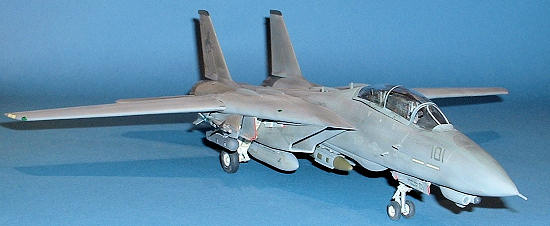
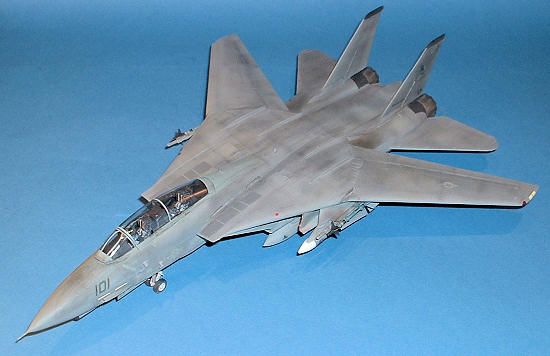
My inspiration for this build was a
book I bought: “Tomcat:
Bye Bye Baby!”
It is an awesome pictorial history and a great read.
It shows to good effect how hard the late Tomcats were used and abused.
Very dirty, very scruffy, and with loads of “character”.
I thought it would be fun to try to replicate “the look”.
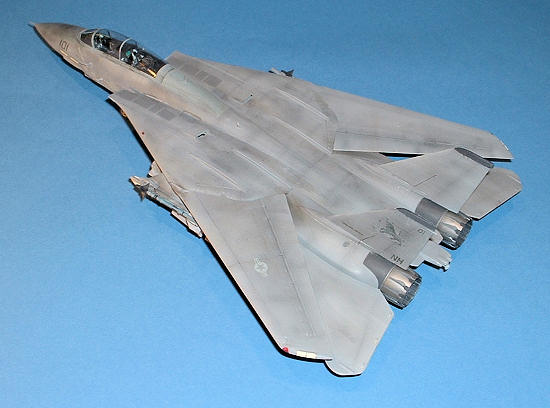
First up were coats of Light Ghost Gray on the underside and Dark Ghost
Gray on top. I didn’t lighten these
up much as I normally do as the pictures I used as references definitely show
these aircraft on the dark side. I
went back and highlighted panels and panel lines with lighter and darker shades
respectively. I went a bit more
heavy handed with this, as this is one airframe you really can’t weather too
much.
| FINAL CONSTRUCTION |
 The
canopy was added and here was a disappointment.
It doesn’t fit well. There
is a big gap in the starboard side.
I glued it in place as best I could and I’ll just live with the gap……I was not
going to putty and sand at this point.
Call me lazy. The main
landing gear were next and these are very sturdy.
Unfortunately, the wheel attachment is rather whimpy and both main wheels
broke off within days. I drilled
holes in the wheels and gear, added a small metal rod (pieces of paper clip),
and affixed them again with super glue.
Much better. The exhaust and
bombs and missiles were glued in place and she was done.
The
canopy was added and here was a disappointment.
It doesn’t fit well. There
is a big gap in the starboard side.
I glued it in place as best I could and I’ll just live with the gap……I was not
going to putty and sand at this point.
Call me lazy. The main
landing gear were next and these are very sturdy.
Unfortunately, the wheel attachment is rather whimpy and both main wheels
broke off within days. I drilled
holes in the wheels and gear, added a small metal rod (pieces of paper clip),
and affixed them again with super glue.
Much better. The exhaust and
bombs and missiles were glued in place and she was done.
| CONCLUSIONS |
 I’ve
always liked this kit. I built one
of these kits (original “A” version of course) when I was a teenager back in the
early eighties and I had fun with it.
Fast forward a few decades and here I am having a blast with basically
the same kit. It’s an old kit,
sure. It has raised panel
lines….doesn’t bother me. The
Academy kit is nice but I think it has an odd nose profile.
The Hasegawa uber kit is, well, uber.
Alas, the uber kit is also expensive.
That’s a big bummer. My
suggestion: Grab one of these and one of the earlier “D” boxings and have some
fun. Build one like this to
practice some of those weathering skills. You can’t really overdo it here!
You can then use the TARPS and Bullwinkle pods from this kit with the
other boxing and make a nice TARPS equipped F-14B.
You’ll still have weapons left for other kits and you’ll still have some
green in your wallet compared to the price of one Hasegawa kit.
That’s always a good thing.
I’ve
always liked this kit. I built one
of these kits (original “A” version of course) when I was a teenager back in the
early eighties and I had fun with it.
Fast forward a few decades and here I am having a blast with basically
the same kit. It’s an old kit,
sure. It has raised panel
lines….doesn’t bother me. The
Academy kit is nice but I think it has an odd nose profile.
The Hasegawa uber kit is, well, uber.
Alas, the uber kit is also expensive.
That’s a big bummer. My
suggestion: Grab one of these and one of the earlier “D” boxings and have some
fun. Build one like this to
practice some of those weathering skills. You can’t really overdo it here!
You can then use the TARPS and Bullwinkle pods from this kit with the
other boxing and make a nice TARPS equipped F-14B.
You’ll still have weapons left for other kits and you’ll still have some
green in your wallet compared to the price of one Hasegawa kit.
That’s always a good thing.
| REFERENCES |
Kit and decals
courtesy of my wallet.
July 2010 If you would like your product reviewed fairly and quickly, please
contact
me or see other details in the
Note to
Contributors.