Italeri 1/72 T-45 Goshawk
|
KIT #: |
173 |
|
PRICE: |
$15.00
|
|
DECALS: |
One option |
|
REVIEWER: |
Gordon Zammit |
|
NOTES: |
Same basic molds as Italeri Hawks, with
some added and modified T-45 bits. |
After the success of the British BAe Hawk, both
in the UK and export versions, the design was further improved to perform other
roles, such as the Mk.100 atta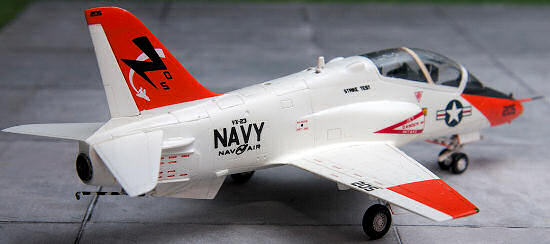 ck version, the not so successful Mk.200 single seater and finally as a carrier based basic trainer for the US Navy. This was in
response to the
US
Navy VTXTS advanced trainer program in 1978, with the contract awarded to MDD in
1981 as the T-45. To meet the rigors of carrier based operations, the Hawk had
to go through a considerable change, which might not be so obvious from the
outside. First of all the airframe was strengthened. Obviously the undercarriage
was upgraded for carrier operations, including the twin nose wheels and a
catapult attachment together with an arrestor hook. To improve the slow speed
handling of the aircraft, the wings were given leading edge slats and larger
flaps. A new larger ventral fin was also added, and a complete new cockpit to US
Navy specifications was also part of the modifications. At present, the T-45C is
the standard model with a revised cockpit and all Goshawk are, or were, upgraded
to T-45C standards.
ck version, the not so successful Mk.200 single seater and finally as a carrier based basic trainer for the US Navy. This was in
response to the
US
Navy VTXTS advanced trainer program in 1978, with the contract awarded to MDD in
1981 as the T-45. To meet the rigors of carrier based operations, the Hawk had
to go through a considerable change, which might not be so obvious from the
outside. First of all the airframe was strengthened. Obviously the undercarriage
was upgraded for carrier operations, including the twin nose wheels and a
catapult attachment together with an arrestor hook. To improve the slow speed
handling of the aircraft, the wings were given leading edge slats and larger
flaps. A new larger ventral fin was also added, and a complete new cockpit to US
Navy specifications was also part of the modifications. At present, the T-45C is
the standard model with a revised cockpit and all Goshawk are, or were, upgraded
to T-45C standards.
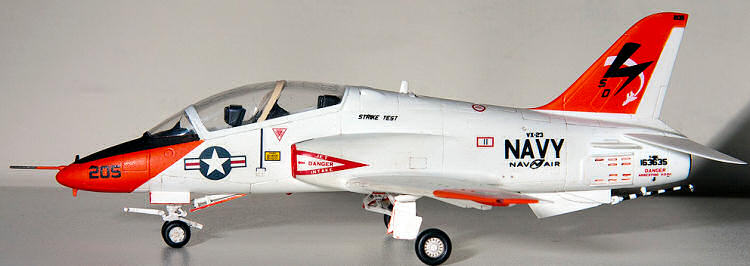
The Italeri T-45 is the same basic
mold as the BAe Hawk, which is not bad as the kit is quite good, although the
surface detail is not as crisply molded as we have come to expect nowadays. This
means that there are several errors to correct in the wings and other areas.
Also the decals supplied are for the first prototype and are not the most
comprehensive.
There is another review here on modeling madness and you can see the
parts of the unbuilt kit and the excellent completed model by Joel Hamm at
this link.
Construction starts at the cockpit,
and here I nearly built everything according to the instructions and following
some online and Model Alliance decal sheet cockpit photos of real Goshawks. As
i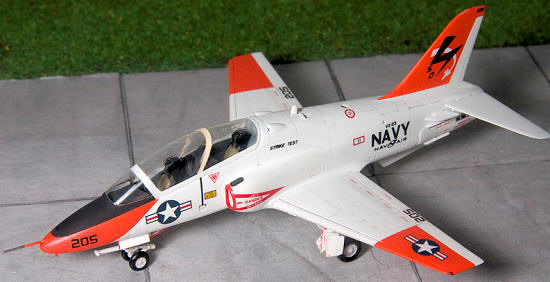 s usual for me, I finish my models in a clean parked configuration with the
canopy closed as I like to see the smooth streamlined shape of the aircraft in
the model representing it. After completing the cockpit, some weight was placed
in the nose and the fuselage halves were cemented together as per instructions.
The intakes were next, and a little filler especially on the lower sides is need
but nothing too serious. The wings were modified to represent those of the T-45.
The wingtips were modified to the more squarish form of the Goshawk with wingtip
navigation lights, and the leading edges at the wing roots sanded to a straight
line right up to the intakes. After smoothing everything out, the leading edge
slats were scribed. The fences that are present on Hawks and all gone on the
T-45 wings and the leading edge is a perfect straight line with a small straight
top at around a third of the wingspan which was made from small pieces of
styrene. The ventral fin was made from sheet styrene according to the photos
online. The tailplanes complete the basic airframe, and I also glued all the
undercarriage and doors since these are all finished in white, so one might as
well spray everything as one complete piece. Antennas were replaced or added as
per T-45C and it was off for painting.
s usual for me, I finish my models in a clean parked configuration with the
canopy closed as I like to see the smooth streamlined shape of the aircraft in
the model representing it. After completing the cockpit, some weight was placed
in the nose and the fuselage halves were cemented together as per instructions.
The intakes were next, and a little filler especially on the lower sides is need
but nothing too serious. The wings were modified to represent those of the T-45.
The wingtips were modified to the more squarish form of the Goshawk with wingtip
navigation lights, and the leading edges at the wing roots sanded to a straight
line right up to the intakes. After smoothing everything out, the leading edge
slats were scribed. The fences that are present on Hawks and all gone on the
T-45 wings and the leading edge is a perfect straight line with a small straight
top at around a third of the wingspan which was made from small pieces of
styrene. The ventral fin was made from sheet styrene according to the photos
online. The tailplanes complete the basic airframe, and I also glued all the
undercarriage and doors since these are all finished in white, so one might as
well spray everything as one complete piece. Antennas were replaced or added as
per T-45C and it was off for painting.
 The cockpit centre frame was first
masked and airbrushed a light cream colour. The cockpit was then masked and a
coat of automotive white spray airbrushed over the whole aircraft. This is a
really nice white finish, but it does not adhere too well to the plastic, and I
had two spots were it came off with the masking and had to be sanded and sprayed
again. The masking for the orange panels was then applied, and Model Master (Testors)
International orange airbrushed over these parts. The jet intakes and antiglare
panels were masked and airbrushed in red and matt black respectively. With all
the airbrushing completed, a coat of Klear was applied overall, and it was time
for decals. These came from Model
Alliance
sheet no
MAS-729031
and some from the kit decals as well. The intake warning triangles had some of
the clear film removed to help them settled around the compound curves of the
intake and they settled in finely. The decals from the Model
Alliance
sheet were of good quality and went on trouble free. After all the decals were
applied the model was given another coat of Klear, and a grey wash added to the
panel lines, while the undercarriage doors and airbrake were given red edges
with a small 00 brush using enamel paint so that any mistakes could be easily
wiped off the Klear coating. Another coating of Klear was applied and the
masking removed from the canopy. The tail hook and wheels which were already
painted were glued and its done.
The cockpit centre frame was first
masked and airbrushed a light cream colour. The cockpit was then masked and a
coat of automotive white spray airbrushed over the whole aircraft. This is a
really nice white finish, but it does not adhere too well to the plastic, and I
had two spots were it came off with the masking and had to be sanded and sprayed
again. The masking for the orange panels was then applied, and Model Master (Testors)
International orange airbrushed over these parts. The jet intakes and antiglare
panels were masked and airbrushed in red and matt black respectively. With all
the airbrushing completed, a coat of Klear was applied overall, and it was time
for decals. These came from Model
Alliance
sheet no
MAS-729031
and some from the kit decals as well. The intake warning triangles had some of
the clear film removed to help them settled around the compound curves of the
intake and they settled in finely. The decals from the Model
Alliance
sheet were of good quality and went on trouble free. After all the decals were
applied the model was given another coat of Klear, and a grey wash added to the
panel lines, while the undercarriage doors and airbrake were given red edges
with a small 00 brush using enamel paint so that any mistakes could be easily
wiped off the Klear coating. Another coating of Klear was applied and the
masking removed from the canopy. The tail hook and wheels which were already
painted were glued and its done.
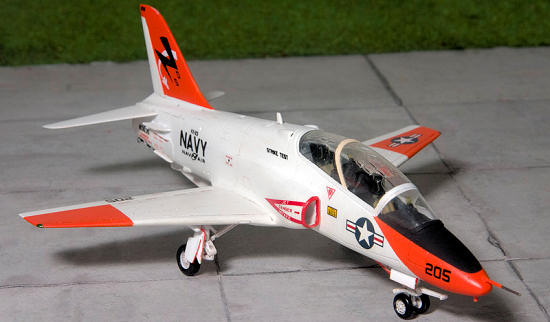
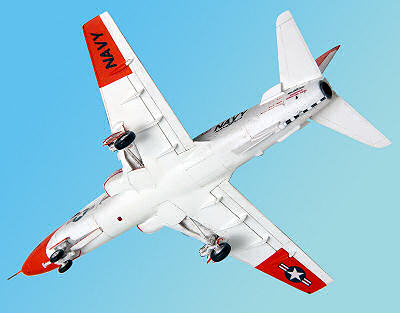
While not really a correct
rendering of the T-45C, the Italeri kit is a good starting point for the latest
US Navy trainer, and with little modifications can be improved a lot. One thing
that I did not correct, is the wider track of the main undercarriage, but
according to photos of real aircraft it is not really visible and I can live
with it as it is!
 Model
Alliance
instruction sheet.
Model
Alliance
instruction sheet.
www.airliners.net
www.jetphotos.net
Online references.
Gordon Zammit
Thanks to
If you would like your product reviewed fairly and
fairly quickly, please
contact
the editor or see other details in the
Note to
Contributors.
Back to the Main Page
Back to the Review
Index Page