Hasegawa 1/72 F-16K
| KIT #: | 1621 |
| PRICE: | $ |
| DECALS: | One option |
| REVIEWER: | Zac Yates |
| NOTES: | Flying Kiwi's A-4 decals used |
| HISTORY |
 After the
assassination of Prime Minister Helen Clark on December 11 2001, her deputy
Stephanie Lewis made clear the Labour Government's stance on defence: that New
Zealand should strive to have an up-to-date combat force to be reckoned with.
Clark's plans to retire the A-4K Skyhawk fleet was carried out, but not before
an order was placed with Lockheed-Martin for 30 F-16K Fighting Falcons -
something with the late leader had vetoed three years before.
After the
assassination of Prime Minister Helen Clark on December 11 2001, her deputy
Stephanie Lewis made clear the Labour Government's stance on defence: that New
Zealand should strive to have an up-to-date combat force to be reckoned with.
Clark's plans to retire the A-4K Skyhawk fleet was carried out, but not before
an order was placed with Lockheed-Martin for 30 F-16K Fighting Falcons -
something with the late leader had vetoed three years before.
The F-16K, developed from the YF-16CCV prototype, was ideal for the Kiwis due to its superb manouevrability and payload capacity. The Royal New Zealand Air Force would use the aircraft primarily as fighters, with a secondary ground-attack capacity. 75 Sqn would be re-equipped with the aircraft (18 examples), and 2 Sqn (based primarily at Nowra in Australia) would receive 12 examples. Rather than have the aircraft arrive by sea or air ferry, it was decided that Pacific Aerospace at Hamilton would licence-build the new aircraft.
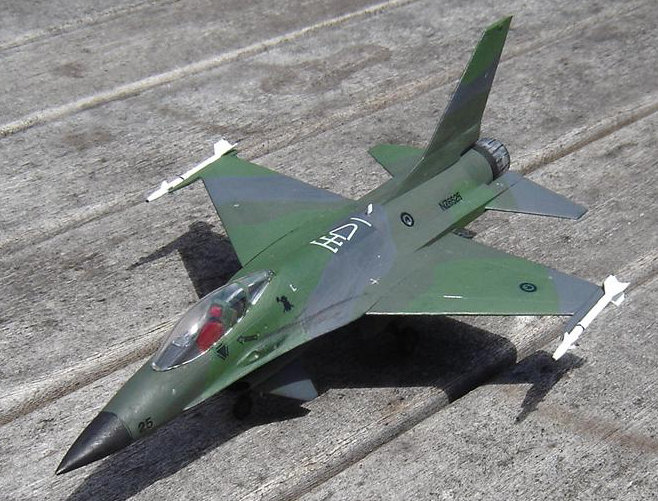
The first five aircraft (serials NZ6500-04) were completed in March of 2002, and a ceremony was held at RNZAF Ohakea to retire the A-4Ks* and welcome in the F-16Ks. Prime Minister Lewis christened the type "Weta", after the well-known giant native cricket (although since then it has received the unoffical nickname of "Catfish" and "Shark"). The remainder of the F-16K order was produced in batches of five airframes, the final examples concluding their test programme in early 2003.
 The aircraft
pictured here, NZ6525, took part in the Timor Campaign and also saw action in
during the Fijian Emergency earlier this year, where her pilot (Flt. Lt. George
Rawiri) claimed two Republic of Fiji Air Force F-5s destroyed. Today used
primarily for CAPs around the sensitive Chatham Islands group, '25 is part of an
operational detachment at RNZAF Woodbourne (along with five other F-16Ks).
The aircraft
pictured here, NZ6525, took part in the Timor Campaign and also saw action in
during the Fijian Emergency earlier this year, where her pilot (Flt. Lt. George
Rawiri) claimed two Republic of Fiji Air Force F-5s destroyed. Today used
primarily for CAPs around the sensitive Chatham Islands group, '25 is part of an
operational detachment at RNZAF Woodbourne (along with five other F-16Ks).
Weta '25 has seen some recent time over the frigid southern ocean patrolling a group of icebergs that have made their way up from Antarctica. Fearing Australian territorial claims, '25 and NZ6508 have made overflights of the icy flotilla, and thus far the Aussies have stayed away. The Weta has proven to be a fine replacement for the workhorse Skyhawk, and combat experience has proven its excellence. Long may the F-16K continue to safeguard our southern skies!
*14 Sqn's Aermacchi MB.339CB trainers were also retired, replaced with British Aerospace Hawk 100 aircraft. The surviving A-4 and Macchi fleet was sold to the Republic of Andorra Air Force, where they continue to serve today.
| THE KIT |
 Hasegawa’s fine
kit of the purely experimental YF-16/CCV (likely the only kit of this intriguing
type produced) was moulded in soft, flash-free white plastic, with very lightly
engraved detailing and a small selection of external stores. A pilot figure was
also on the sprue, but he was retained for another project. Decals were included
for the (sole?) YF-16/CCV trials aircraft, and in my kit were rather yellowed.
Mind you, the copyright on the instruction sheet was dated 1984.
Hasegawa’s fine
kit of the purely experimental YF-16/CCV (likely the only kit of this intriguing
type produced) was moulded in soft, flash-free white plastic, with very lightly
engraved detailing and a small selection of external stores. A pilot figure was
also on the sprue, but he was retained for another project. Decals were included
for the (sole?) YF-16/CCV trials aircraft, and in my kit were rather yellowed.
Mind you, the copyright on the instruction sheet was dated 1984.
| CONSTRUCTION |
 The cockpit was
the first to receive my attention on this, my very first F-16 kit. The lot was
painted Tamiya Dark Grey, with the seat being given two coats of JA Green. The
cushion and headrest were also painted with four coats of Red. Whilst on the
sprue, the top fuselage half received some Flat Black (immediately for and aft
of the cockpit opening). The instrument panel was painted Flat Black, and the
rudder pedals (moulded onto the cockpit floor) were painted Chrome Aluminium.
Once dry, the cockpit floor and seat were cut from the sprue and cemented
together. This was set aside, and the two fuselage halves separated from the
sprue. The cockpit subassembly was finally cemented in place on the lower fuse
half, which was then cemented to its counterpart. Easy as that!
The cockpit was
the first to receive my attention on this, my very first F-16 kit. The lot was
painted Tamiya Dark Grey, with the seat being given two coats of JA Green. The
cushion and headrest were also painted with four coats of Red. Whilst on the
sprue, the top fuselage half received some Flat Black (immediately for and aft
of the cockpit opening). The instrument panel was painted Flat Black, and the
rudder pedals (moulded onto the cockpit floor) were painted Chrome Aluminium.
Once dry, the cockpit floor and seat were cut from the sprue and cemented
together. This was set aside, and the two fuselage halves separated from the
sprue. The cockpit subassembly was finally cemented in place on the lower fuse
half, which was then cemented to its counterpart. Easy as that!
The two single-piece wings were now separated from the sprue, cleaned up and cyanoacrylate used to fasten them to the fuselage. The same was done for the horizontal stabilisers and the vertical fin. The lot was put away to dry (kinda silly, as it was done with CA!) and I turned my attention to the afterburner can. This received two overall coats (and touchups) of Flat Black, and then a drybrush run with Chrome Aluminium. When dry, this was firmly attached to the tail.
As I was intending to represent an in-service RNZAF aircraft, I cut the pitot tube from the extreme nose and this was then attached to the nosecone. Some more CA saw the new nose attached to the forward fuselage, and was then painted three coats of Flat Black.
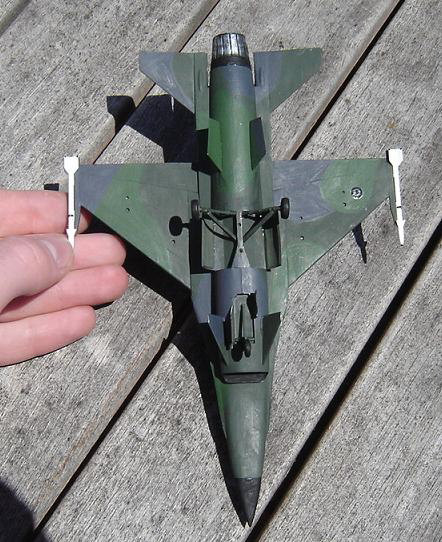
I took some time at this point to look at the undercarriage. The legs, supports and wheels were all painted two or three coats JA Green, and the tyres two coats Flat Black. The three undercarriage doors were also painted JA Green both inside and out, and when dry cut from the sprue.
The distinctive chin intake that makes the Fighting Falcon so instantly recognizable , in this kit consisting of three parts, had their interiors painted Flat Black (the instructions suggested H316 White, but I figured camouflaged aircraft would not follow this) and set aside to dry. When this had come to pass, the parts were separated from the sprue, the two rear parts cemented together and to the lower fuselage, and then the intake itself attached. The underside rear strakes and the canards also found themselves miraculously freed of their sprues and cemented in place on the airframe.
| COLORS & MARKINGS |
As the airframe
was now essentially complete, time came to ponder the camouflage scheme. At the
time the National government announced the F-16 deal in 1998 publicity images
showed “artist’s impressions” of Vipers in the USAF-standard Hill 2 scheme with
NZ roundels. I, however, am no real fan of Air Superiority Gray, and decided
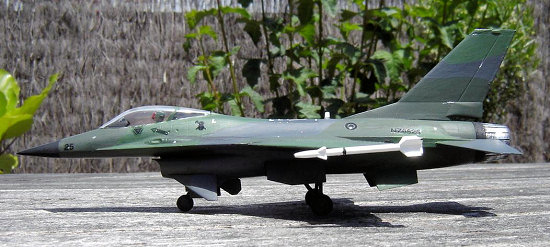
instead that the F-16Ks would real istically wear the “Kahu” scheme of Dark
Green, Medium Green and Dark Grey. This was brushed onto my model with two coats
each of JA Green, followed with Flat Green and finally German Grey. The
inevitable touchups followed, and then (once more) set aside to dry.
istically wear the “Kahu” scheme of Dark
Green, Medium Green and Dark Grey. This was brushed onto my model with two coats
each of JA Green, followed with Flat Green and finally German Grey. The
inevitable touchups followed, and then (once more) set aside to dry.
The undercarriage was then cemented in place, soon followed by the wheelwell covers. The two AIM-9 Sidewinders included in the kit were painted overall White with Flat Black rings and directional fins. When dry, these were carefully cemented into position. As I write this review I have knocked the port one from its mounting – another job for tomorrow!
The end was now in sight – I attached the clear single-piece canopy, which received some JA Green framing, and then I saw to the decals. Some time ago I purchased an Italeri 1:72 A-4E/F, which had included a small sheet of low visibility RNZAF markings. The “RESCUE” warning marks were applied to the F-16, as were the four-position Kiwis, and the serial crafted from those included. The silhouetted 75 Sqn emblem behind the cockpit made clear the aircraft’s allegiance, and finally the aerial refuelling guide on the upper fuselage completed the two-day build.
| FINAL CONSTRUCTION |
I intend to give the F-16K a pair of external fuel tanks and possibly some more missiles for her CAP role, perhaps AMRAAM or AIM-120, however this has to wait as I do not yet have these in my possession.
| CONCLUSIONS |
By this point I’m hoping you will have become aware that New Zealand did not actually get any F-16s and in fact had its strike wing disbanded in 2001! So, unfortunately, this build is of a sadly fictional aircraft. But it was tantalisingly close to becoming a reality, albeit in the form of 28 Block 15s rather than the hypothetical “K” variant depicted here.
This was my very first F-16 build, and I’m pleased with the end result on my shelf. It was a real fluke that I did this kit at all, as a friend in the US sent my girlfriend and I a box of seven kits, one of which was this. I am not really a fan of modern jets, and the F-16 is far from a favourite – however, I thought it may be cool to do a Kiwi one. Would I do it again? Not by choice! But, as I write this, ANOTHER F-16 kit is winging its way to me, this time from the UK. Sigh…….
Kit courtesy Tony “RotorheadTX”
January 2007
Copyright ModelingMadness.com. All rights reserved. No reproduction in part or in whole without express permission.
If you would like your product reviewed fairly and fairly quickly, please contact the editor or see other details in the Note to Contributors.