Heller/Fujimi 1/72 E-2C Hawkeye
| KIT #: | 80349 |
| PRICE: | around €12.00 |
| DECALS: | One Option |
| REVIEWER: | Gordon Zammitt |
| NOTES: | Reboxed Fujimi kit with a small extra sprue for some French specific antennae. |
| HISTORY |
The E-2 started its development in the mid
1950’s as a replacement to the E-1 Tracer (which was adapted from the S2F
Tracker airframe). It has been under continuous development ever since, and is
still the only AEW aircraft in operation with the
| THE KIT |
 This is a
reboxed Fujimi kit and is not one of their best! Detail is a mixture of raised
detail (especially rivets) and recessed lines. The panel lines are a mixture of
both, and both types are a little overdone. The overall shape seems quite good
though, and since it was the only 1/72 E-2 for a long time until the issue of
the recent Hasegawa offerings, most of us had at least one in their stash. This
issue from Heller has only French Navy decals and finding a decal sheet which
contained a
This is a
reboxed Fujimi kit and is not one of their best! Detail is a mixture of raised
detail (especially rivets) and recessed lines. The panel lines are a mixture of
both, and both types are a little overdone. The overall shape seems quite good
though, and since it was the only 1/72 E-2 for a long time until the issue of
the recent Hasegawa offerings, most of us had at least one in their stash. This
issue from Heller has only French Navy decals and finding a decal sheet which
contained a
| CONSTRUCTION |
Construction starts at the cockpit. The
instrument panels are provided by Heller as decals and are adequate for the
scale, since the airliner style cockpit of the E-2C doesn’t reveal much of
what’s inside. Moreover, the transparencies area little thick and distort quite
a lot, and replacing them would require you to make your own which I was not
prepared to do. So, with the cockpit painted and assembled, the two fuselage
halves were closed. Heller suggests placing 20g of weight in order to have your
E-2C standing
 on its
undercarriage and I did so although I did not measure the exact weight. I
omitted the small windows on the starboard side which I would later do with
Krystal Klear. Somewhat strange is that Heller suggest to paint the parts and
apply decals to the fuselage at this and every stage which I am sure will not
provide a good end result!
on its
undercarriage and I did so although I did not measure the exact weight. I
omitted the small windows on the starboard side which I would later do with
Krystal Klear. Somewhat strange is that Heller suggest to paint the parts and
apply decals to the fuselage at this and every stage which I am sure will not
provide a good end result!
Next up are the engine nacelles and main
undercarriage. These are complete void of any detail, and not even boxed. I
decided to at least provide the top with plastic card and make an enclosure for
the bays. These also serve to keep from see through the intakes and exhaust of
the engines as they are not blanked. The undercarriage traps in between the
nacelle halves and is very sturdy just as in the real aircraft. I did not follow
the instructions and left the props off at this point as I suppose every grown
up modeler will do at this stage for obvious reasons. When these dried, I sanded
down the engine intakes which are very rough and not even round. I made two
intake rings from left over parts of a Heller CL-415, which I sprayed with
polished aluminum and left off until the final construction.
The wing is a full span upper and lower parts
and these were glued together and later to the fuselage. The tail plane was also
glued to the fuselage and fit of the parts was not bad here, and only a slight
amount of filler was required on the main wings. The same cannot be said on the
front part of the aircraft though, and fit here is very bad. The canopy is split
into left and right halves, and the nose is a separate part
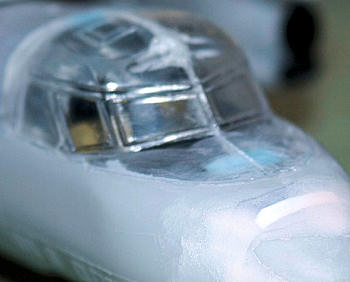 as Fujimi
also makes an E-2A version of the Hawkeye. The canopy was glued together with
clear type adhesive (if I recall correctly from Humbrol) but since it’s an end
to end affair, it is not very strong. I later decided to reinforce it by gluing
two pieces of decal backing film on the concealed part of the canopy (as can be
seen in the photo). The nose cone was next glued and some plastic card pieces
glued on to fill the step. After several sessions of sanding and filling, I was
satisfied (or even bored!).
as Fujimi
also makes an E-2A version of the Hawkeye. The canopy was glued together with
clear type adhesive (if I recall correctly from Humbrol) but since it’s an end
to end affair, it is not very strong. I later decided to reinforce it by gluing
two pieces of decal backing film on the concealed part of the canopy (as can be
seen in the photo). The nose cone was next glued and some plastic card pieces
glued on to fill the step. After several sessions of sanding and filling, I was
satisfied (or even bored!).
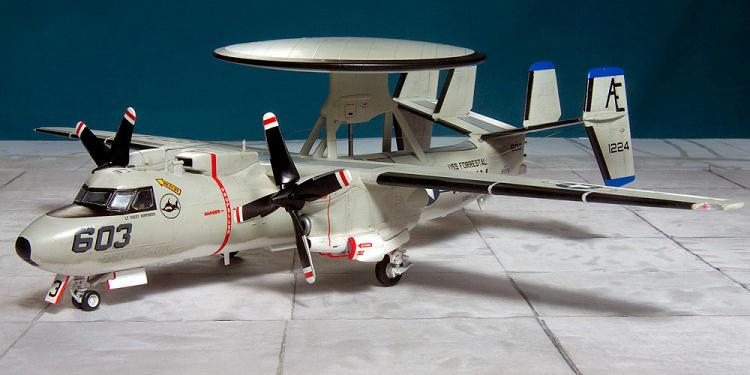
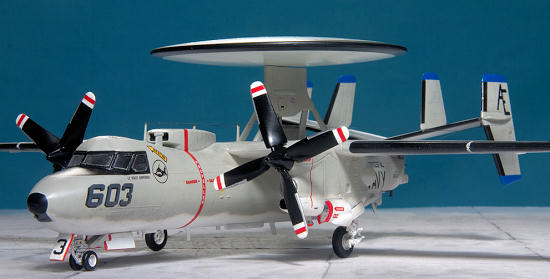
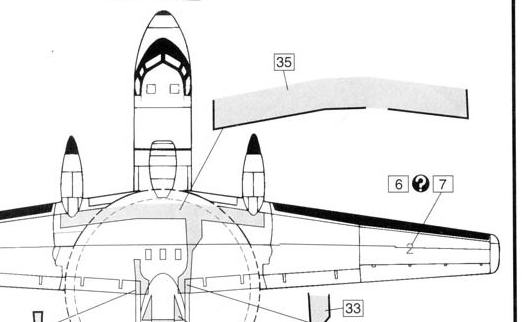
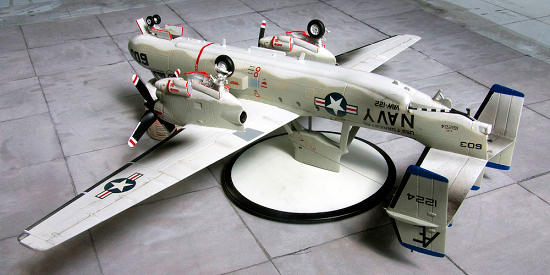
Construction then went to the other end by gluing the vertical stabilizers, of which the Hawkeye has four: a design must as it has to be kept low to go into the carrier hanger, and still retain good directional stability with the 24-foot (7.3m) rotodome on its back (This also lowers for storage and the kit represent it in the extended position). The fins fit without any major problem. The engine nacelles were installed next, and these again were without any real problems. Next came the coolers and intakes. I discarded the antennae masts as they seem different to the real ones, and made replacements from sheet styrene. I also added some antennae on the lower fuselage according to photos of real E-2C’s, however I may be wrong with the actual configuration on this particular airframe as there seem to be a lot of variations even within the same squadron and the same time period, and I did not manage to find a photo of the actual one covered in this decal sheet in that color scheme. The rotodome was glued together, and its mounting structure was glued to the aircraft. The shaft that drives it was replaced with a piece of evergreen rod as the one provided with the kit is very crude and not round at all. The tail hook is meant to be left movable but I left it off to paint separately, and fixed the part that holds it in place to the lower fuselage end. Since the lower side of the aircraft was to be finished in white, I attached all the undercarriage doors in place, and also glued the front strut. I then cleaned the windscreens and masked them off with Tamiya masking tape, and it was ready for the paint shop.
| COLORS & MARKINGS |
 It has
always been a problem for me to find a nice white paint that remains white with
time. Yellowing was always a problem and I decided to try use thinner based
automotive paint for this one, and also for a Fujimi A-4E which I was building
in parallel with the Hawkeye. I thought that spraying this paint with an
airbrush would be easy as it is to spray it with a spray gun. But I soon found
out that I was wrong, very wrong. I first tried to use it with the no. 1 (fine)
nozzle on my Paasche
It has
always been a problem for me to find a nice white paint that remains white with
time. Yellowing was always a problem and I decided to try use thinner based
automotive paint for this one, and also for a Fujimi A-4E which I was building
in parallel with the Hawkeye. I thought that spraying this paint with an
airbrush would be easy as it is to spray it with a spray gun. But I soon found
out that I was wrong, very wrong. I first tried to use it with the no. 1 (fine)
nozzle on my Paasche 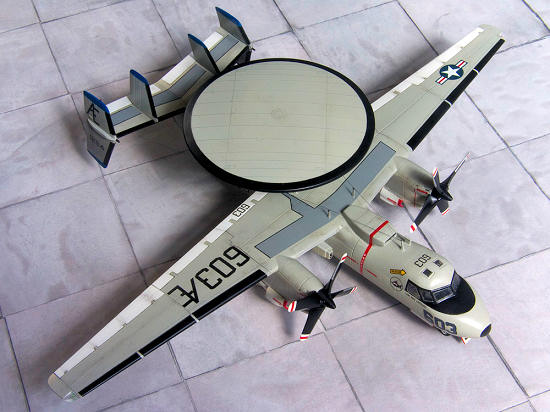 Gull Grey
from Model Master freehand. After several days drying, I masked off the de-icing
boots on the leading edges, and the edge of the rotodome (masked with sections
of tape cut around a saucer of the right diameter) and sprayed these with
Humbrol satin black. On removing the masking, several area of white paint came
off again with the tape, and I had to sand the area and touch it up. I masked
the fin upper and lower tips and sprayed them with MM semi-gloss blue as I could
not find the correct FS25102 blue locally and I did not want to order from
abroad and wait. I can still paint the correct FS color in the future as there
are no decals over the areas, although it is unlikely to happen.
Gull Grey
from Model Master freehand. After several days drying, I masked off the de-icing
boots on the leading edges, and the edge of the rotodome (masked with sections
of tape cut around a saucer of the right diameter) and sprayed these with
Humbrol satin black. On removing the masking, several area of white paint came
off again with the tape, and I had to sand the area and touch it up. I masked
the fin upper and lower tips and sprayed them with MM semi-gloss blue as I could
not find the correct FS25102 blue locally and I did not want to order from
abroad and wait. I can still paint the correct FS color in the future as there
are no decals over the areas, although it is unlikely to happen.
The Carpena Decal sheet contains only the basic
markings and you have to source the insignias and stenciling yourself. There is
(was?) a mistake on the sheet instructions as it tells you to use the Hasegawa
decals, and this sheet is several years old, much older than the Hasegawa kit of
this year (2009), when the Fujimi was the only 1/72 E-2 available. So stencils
and other walkways and warning came from the Heller sheet, which fortunately
enough has these in English and not in French as we would have believed. The
Heller decals performed flawlessly and adhered very well without any signs of
silvering (as they usually do). The
 After
the decal was placed and dried, I masked the leading edges of the propellers and
sprayed these with aluminum. I was checking reference photos to see what should
be used and what not on this particular plane when I noticed that I had wrongly
followed the Heller instructions on placing the walkways on the wings as there
is a mistake. The walkways should be placed further aft of the masts on the
wings, and the Heller ones are printed and meant to be placed right where the
engine nacelles are faired into the wings. It was too late now and it’s a lesson
that I seam to never learn: check references as often as you can as instructions
tend to be mistaken! As I said their dimensions and angles agree with the view
of the instructions which does not lead you to think that
After
the decal was placed and dried, I masked the leading edges of the propellers and
sprayed these with aluminum. I was checking reference photos to see what should
be used and what not on this particular plane when I noticed that I had wrongly
followed the Heller instructions on placing the walkways on the wings as there
is a mistake. The walkways should be placed further aft of the masts on the
wings, and the Heller ones are printed and meant to be placed right where the
engine nacelles are faired into the wings. It was too late now and it’s a lesson
that I seam to never learn: check references as often as you can as instructions
tend to be mistaken! As I said their dimensions and angles agree with the view
of the instructions which does not lead you to think that
 you’re
messing things up. The number 3 on the front undercarriage door is not provided
by Carpena but seems to be present on every aircraft so I found one from a
Fujimi F7U Cutlass and used it.
Missing also from the Heller sheet are the warning signs on the inside of the
main undercarriage doors, but I left these without them: at least they are not
that obvious there. The white cross on the nose cone black doesn't seem to be
present on these squadron aircraft of the era so I left it off.
you’re
messing things up. The number 3 on the front undercarriage door is not provided
by Carpena but seems to be present on every aircraft so I found one from a
Fujimi F7U Cutlass and used it.
Missing also from the Heller sheet are the warning signs on the inside of the
main undercarriage doors, but I left these without them: at least they are not
that obvious there. The white cross on the nose cone black doesn't seem to be
present on these squadron aircraft of the era so I left it off.
After finishing off the decals, I applied some
weathering. Pastels were used and applied by a dry cotton bud (I think Q-tip in
the
| FINAL BITS |
Heller suggests to paint the navigation lights
covers, provide as transparencies, with green and red transparent paint. In
reality only the inner cover of the lamps are coloured and the other cover
forming the tip on the wing is transparent. I drilled a small hole from the
inside about 2 mm deep and painted this with tra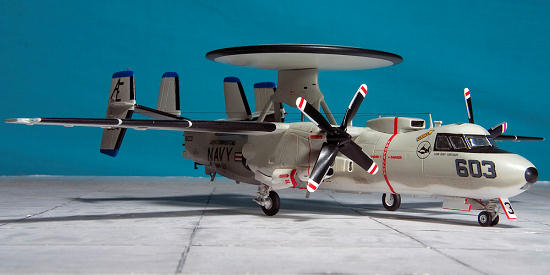 nsparent
paint the result is quite convincing. I blanked the inside of the spot lights
position below the nose cone, and cut 2 small round pieces from evergreen rods
to simulate the spot lights. I painted the inside dark gull grey and the lights
with chrome silver. I made some rigging from 0.14mm (3lb) fishing line fixed
with CA glue. When I tried to tighten these I broke the front mast and fixing it
back was not easy at all. In fact it is not perfectly straight now as it was
before. I then painted the fishing line with MM metalizer paint which I find
best as it is extremely thin and that not form blobs as normal paint usually
does. What is missing: the stencils on
the props but I can't find from where to source them yet; there is also a small
antenna just above the tail hook on the port side which has a red tip which I
haven't put on. It could also do with a pair of windscreen wipers!
nsparent
paint the result is quite convincing. I blanked the inside of the spot lights
position below the nose cone, and cut 2 small round pieces from evergreen rods
to simulate the spot lights. I painted the inside dark gull grey and the lights
with chrome silver. I made some rigging from 0.14mm (3lb) fishing line fixed
with CA glue. When I tried to tighten these I broke the front mast and fixing it
back was not easy at all. In fact it is not perfectly straight now as it was
before. I then painted the fishing line with MM metalizer paint which I find
best as it is extremely thin and that not form blobs as normal paint usually
does. What is missing: the stencils on
the props but I can't find from where to source them yet; there is also a small
antenna just above the tail hook on the port side which has a red tip which I
haven't put on. It could also do with a pair of windscreen wipers!
| CONCLUSIONS |
After 3 years it is finished! I cannot say that I am really pleased with the result, but that falls mostly upon my mistakes and experimenting. When I started this kit it was the only E-2C available, and it is not a bad replica either, but today I would suggest to skip this one and go for the Hasegawa example which I am sure is much better as other modelers have already experienced. Still, if you’re on a tight budget (Hasegawa costs at least 4 times as much), this can provide you with a satisfactory end result. The problem is that if you buy the Heller version and not the Fujimi (which is readily available) you will have to buy a decal sheet as well to get a US Navy example.
| REFERENCES |
Squadron/Signal 5553 E-2 Hawkeye - Walk Around.
Check list No. 3 Grumman E-2 Hawkeye
(French/English Publication).
The Complete Encyclopedia of Aircraft
Photos on www.airliners.net.
September 2009
If you would like your product reviewed fairly and fairly quickly , please contact the editor or see other details in the Note to Contributors.