Academy 1/72 T-6 'Zero Replica'
| KIT #: | 1662 |
| PRICE: | NZ $11.99 |
| DECALS: | Three options |
| REVIEWER: | Zac Yates |
| NOTES: | mild conversion |
| HISTORY |
The North American T-6 Texan was one of the most numerous trainers used during (and after) World War 2. Not only used by the United States, the type also “made” pilots in Canada, the United Kingdom, New Zealand, and post-war Germany and Japan. It served in Korea as artillery spotter, and in Algeria as a light attacker, but most serving T-6s saw out their days performing as they were designed to: pupil in front, instructor in back. The last military examples of the series (those of the South African Air Force) were not retired until 1996.
 But the Texan
also served another very important post-war “role”: that of the infamous
Japanese A6M “Zero” fighter in the epic 20th Century Fox film “Tora,
Tora, Tora”. 25 surplus Texans were purchased by Fox and converted to resemble
the attackers of Pearl Harbor, with smaller canopies, three-bladed props,
built-up wheelwells, pointed tails and relocated oil coolers. Several BT-13
Valiants were also acquired to be converted into D3A Val divebombers (and the
two types were combined to create very convincing B6N Kate torpedo bombers).
But the Texan
also served another very important post-war “role”: that of the infamous
Japanese A6M “Zero” fighter in the epic 20th Century Fox film “Tora,
Tora, Tora”. 25 surplus Texans were purchased by Fox and converted to resemble
the attackers of Pearl Harbor, with smaller canopies, three-bladed props,
built-up wheelwells, pointed tails and relocated oil coolers. Several BT-13
Valiants were also acquired to be converted into D3A Val divebombers (and the
two types were combined to create very convincing B6N Kate torpedo bombers).
The film, although a box-office flop, created the benchmark for all aerial combat films that followed, and several battle scenes would be recycled for other major Hollywood films set in the Pacific. Thanks to the folks at the Confederate (now Commemorative) Air Force, the vast majority of the Tora, Tora fleet continue to serve today at their annual Airsho.
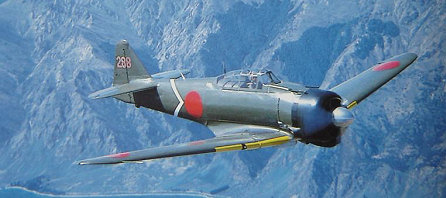
Very few of the “Zero Replicas” exist outside of the US, and one example became resident in New Zealand after previously operating in the UK. This aircraft, painted as one of the defenders of Rabaul, was a major part of Sir Tim Wallis’ Alpine Fighter Collection at Wanaka from 1993 until its sale to Randal MacFarlane of Australia in 2001. As a result of growing up obsessed with all things Wanaka, it was inevitable that I would one day build a model of ZK-ZRO. I knew it wouldn’t be easy, and I was unsure as to whether anyone else had attempted a conversion project, but I thought I’d just give it a go anyway!
| THE KIT |
For a really good look at the box contents, have a gander at Scott’s preview here (http://modelingmadness.com/scotts/korean/t6gpreview.htm).
| CONSTRUCTION |
I’d previously built Academy’s fine T-6 kit as a stock RNZAF example, so I knew what to expect. It builds up into a (in my opinion) very nice, accurate T-6. Unfortunately this build will result in anything BUT a nice, accurate T-6. So Academy’s efforts are much appreciated, but a lot of their work ends up going out the door on this project!
Subassemblies are the place I started at. Firstly the wheel wells were painted Tamiya Flat Black, and the cockpit interior Flat Green. The instrument panel was painted Flat Black and then drybrushed Chrome Aluminium once dry to bring out the individual dials. The cockpit side consoles were also painted Flat Green and the floor Sky Grey. Once all this was dry, the various cockpit parts were glued into position (except the control stick and seat – this will be discussed later) and set aside to dry.
Speaking of dry, by now the wheel wells were no longer wet to the touch, so the three-piece wing was separated from the sprue and cemented together. The semi-rectangular part which goes between the upper wings and effectively closes the wheel wells (which was painted Flat Black whilst on the sprue) was cemented into position. Again, the whole assembly was put to one side to allow me to continue.
 MAJOR MOD #1: The
cockpit. As we’re all very much aware, the North American Texan is a
tandem-two-seat trainer. However, the Mitsubishi A6M Zero is equally very
clearly not. Fox, in their infinite wisdom, realised this and decided to cover
up the rear cockpits on their “Zeros” and add an armoured headrest for the
pilot. Replicating this in 1:72 wasn’t terribly difficult. As mentioned above,
the entire cockpit assembly sequence is followed to the letter, except that you
don’t paint the rear half or add the instructor’s seat or the stick. Well you
could, but it would be a waste of potentially valuable parts. Firstly the
turnover truss was cut from the side consoles and put in the bits box, and
remnants of its legs sanded away. I located a piece of spare sheet styrene from
a recent vacform build, cut it roughly to shape, and test-fitted it immediately
behind the locating area for the front seat. After some fine-tuning, the square
of plastic was cemented in place with cyanoacrylate to effectively block off the
(unused) rear half.
MAJOR MOD #1: The
cockpit. As we’re all very much aware, the North American Texan is a
tandem-two-seat trainer. However, the Mitsubishi A6M Zero is equally very
clearly not. Fox, in their infinite wisdom, realised this and decided to cover
up the rear cockpits on their “Zeros” and add an armoured headrest for the
pilot. Replicating this in 1:72 wasn’t terribly difficult. As mentioned above,
the entire cockpit assembly sequence is followed to the letter, except that you
don’t paint the rear half or add the instructor’s seat or the stick. Well you
could, but it would be a waste of potentially valuable parts. Firstly the
turnover truss was cut from the side consoles and put in the bits box, and
remnants of its legs sanded away. I located a piece of spare sheet styrene from
a recent vacform build, cut it roughly to shape, and test-fitted it immediately
behind the locating area for the front seat. After some fine-tuning, the square
of plastic was cemented in place with cyanoacrylate to effectively block off the
(unused) rear half.
Another, more
rectangular piece of styrene was cut to shape and cemented on top of the rear of
the cockpit, closing it up very nicely thank-you. This was set aside (when I
remembered it was CA!) and the fuselage halves separated from the sprues. After
removing what sprue roots I could, the instrument panel was desprued and
 cemented into the right
fuselage half, followed by the cockpit, after which came the left fuselage half.
A clothes peg was utilised to keep the rear fuse in check, whilst my able hand
was clamped around the firewall. This was about the time when I realised my time
could be spent organising the next bit.
cemented into the right
fuselage half, followed by the cockpit, after which came the left fuselage half.
A clothes peg was utilised to keep the rear fuse in check, whilst my able hand
was clamped around the firewall. This was about the time when I realised my time
could be spent organising the next bit.
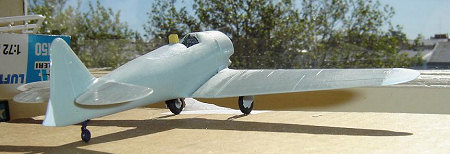
MAJOR MOD #2: The wingtips. For “Tora, Tora, Tora” the Texans had about 40in of wingspan added with the fabrication of rounded wingtips. Before setting about doing my own I sanded away the clipped yet still-kinda-round original tips, and scouring my bits box for a suitable donor pair. No luck. So, again it was sheet styrene to the rescue. I cut out a semicircle from the sheet, trimmed it to fit, and then traced it in order to get four identical tips. Two tips were made by CA’ing two semicircles together, which were then attached to the wing. Much sanding and puttying ensued, the end result being sort-of rounded, streamlined, natural-looking units. Once more, the now-complete mainplane was put aside.
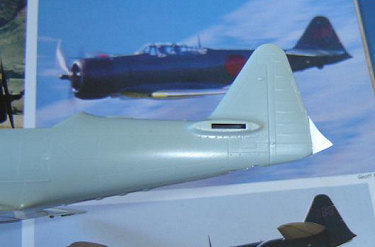 MAJOR MOD #3: The
tail. To gain the characteristic pointed tail of the Texan/Zero I sanded away
the gentle curve of the Texan’s lower rudder until it was nice and vertical, and
cut even more sheet styrene to shape. I then CA’d the triangle to the rudder,
and proceeded to ever-so-gently sand away the sharp edges to result in the nice,
sweeping upper curve between Texan rudder and Zero point. Unfortunately due to
some heavy-handed sanding the point came off twice and had to be reglued, but
she ended up being on there nice and solid.
MAJOR MOD #3: The
tail. To gain the characteristic pointed tail of the Texan/Zero I sanded away
the gentle curve of the Texan’s lower rudder until it was nice and vertical, and
cut even more sheet styrene to shape. I then CA’d the triangle to the rudder,
and proceeded to ever-so-gently sand away the sharp edges to result in the nice,
sweeping upper curve between Texan rudder and Zero point. Unfortunately due to
some heavy-handed sanding the point came off twice and had to be reglued, but
she ended up being on there nice and solid.
As I now had some spare time, I painted the engine and inner cowl Flat Black (two coats), and then drybrushed with Chrome Aluminium to bring out the cylinder heads etc. Following this I took to the fuselage with my sandpaper to rid it of the underfuse lights (I think that’s what they are), the placement area for the dorsal radio/radar bump, and the access step for the rear cockpit. I also sanded the windscreen-cowl area to make it more rounded, and the windscreen mounting area to make it vertical.
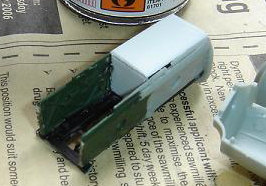
MAJOR MOD #1 EPISODE II: And it was here that my trusty filler returned to the game. I piled in the stuff into the recess where the rear part of the glasshouse canopy connects to the fuselage, and to make up the rounded deck behind the pilot. Many, many minutes of sanding, more putty and more sanding followed. I don’t remember how long it took to get looking good, and it’s probably best it stays that way! Putty-sand-repeat is certainly not my favourite part of this grand hobby.
 The tailplanes
were cut from the sprue and cemented in place (at nice 90-degree angles too!)
and at long last the mainplane and fuselage joined as one. Small triangles of
styrene were attached between wingroot and outer-inner join, replicating the
kink seen in the TTT Zeros. This was fleshed out with some more filler, and
sanded til good and smooth.
The tailplanes
were cut from the sprue and cemented in place (at nice 90-degree angles too!)
and at long last the mainplane and fuselage joined as one. Small triangles of
styrene were attached between wingroot and outer-inner join, replicating the
kink seen in the TTT Zeros. This was fleshed out with some more filler, and
sanded til good and smooth.
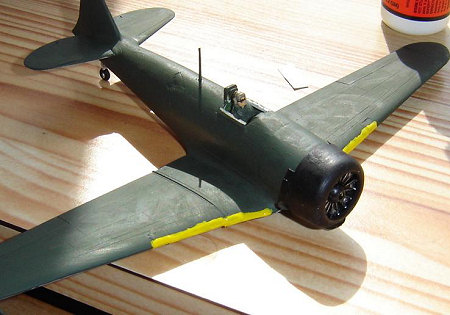
| COLORS & MARKINGS |
Due to a temporary lack of parts to allow me to continue, I decided to put construction on hold and concentrate for the time being on paint. The entire underside was given three coats of Sky Grey, and the topside gained its plumage too – my ever-trusty JA Green (two coats with touch-ups). Lemon Yellow leading-edge ID stripes were brushed onto the wing freehand (five coats) and the aircraft set aside once more.
| FINAL CONSTRUCTION |
Another lull in
construction? Why not do some smaller components? I painted the undercarriage
legs and wheels Chrome Silver, and once dry applied some Flat Black to the
tires. Here I deviated from the instructions once more as I sent the oleo covers
and tailwheel to the bits box, and delved in to find some TTT Zero-like
replacements. I trimmed a Matchbox F4U4 tailwheel unit to make a perfect match
for ZRO’s retractable one, and found that Bf109F wheelcovers look almost exactly
l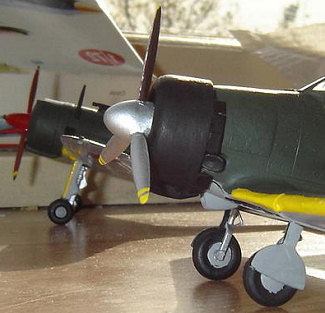 ike those on the Zero/Texans. Thus the oleos and wheels were de-sprued,
cemented together, and set aside whilst I tended to their covers. These had
their exteriors painted Sky Grey, and their insides done Flat Black. They were
then cemented to the U/C and repeatedly test-fitted.
ike those on the Zero/Texans. Thus the oleos and wheels were de-sprued,
cemented together, and set aside whilst I tended to their covers. These had
their exteriors painted Sky Grey, and their insides done Flat Black. They were
then cemented to the U/C and repeatedly test-fitted.
At this point (more than a fortnight after finishing the paint on the airframe) my new Hasegawa A6M3 kit arrived from the States (cheers Phil!) which provided me with a much needed oil cooler and canopy. The oil cooler was attached to the underside of the cowl (which had the engine installed some time before) and the whole lot painted with two coats of Flat Black. My replacement prop, that from Airfix’s Arado floatplane, was painted with Chrome Aluminium (the rear of each blade done in Flat Brown and tips in Lemon Yellow) and dryfitted to ensure free movement.
The moment had
finally arrived where everything came together: the power-egg was installed on
the front of the fuselage, the tailwheel installed, and a radio mast cemented to
the rear deck. One last-minute modification was adding cowl flaps to the back
edge of the cowling. To make these I guesstimated and cut some small squares
from the trailing edge of a Heller Super Frelon rotor blade and CA’d them onto
the cowl individually using tweezers. I delved into the bits box once more to
find a suitable pilot figure (which was painted to resemble
 Simon Spencer-Bower, ZRO’s regular pilot) and seat, both of which were cemented in the cockpit.
Finally the Hasegawa Zero canopy was cemented on and its framing painted with JA
Green.
Simon Spencer-Bower, ZRO’s regular pilot) and seat, both of which were cemented in the cockpit.
Finally the Hasegawa Zero canopy was cemented on and its framing painted with JA
Green.
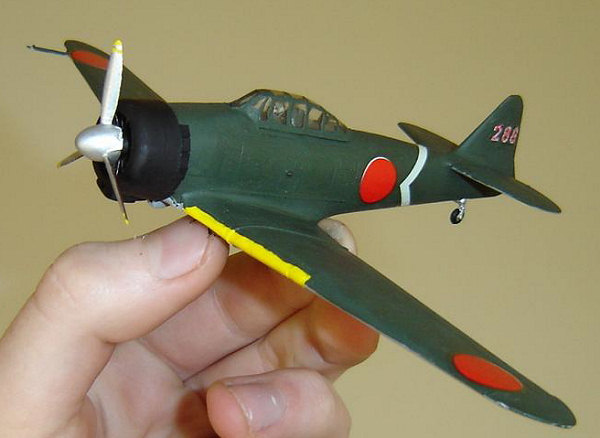
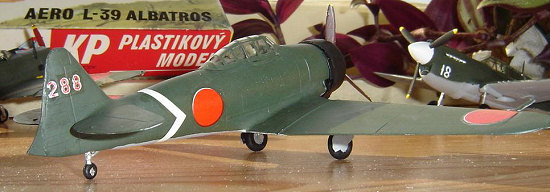
Fortunately ZK-ZRO’s paint scheme, that of “288” based at Rabaul in 1944, is very simple to replicate: the normal six Hinomarus, a white chevron either side of the fuselage, and the red number 288 on the tail edged in white. The Hasegawa A6M3 fortunately came with all of these except the number 2, which I found in my decal box. They went on very nicely with a minimum of movement, but are rather glossy and thick. But I don’t mind too much. As the 288 was in white already, and I’m not quite confident enough to handpaint the red insides, I decided to instead write it in with my girlfriend’s red Sudoku pen. The result isn’t a perfect match colour-wise and is far from perfect, but it’ll do until I can find a suitable replacement. The prop was placed in its shaft and voila! One Texan converted into a Zero!
| CONCLUSIONS |
I’d be extremely keen to find out if anyone else has carried out this conversion (I know of one modeller who used a A6M fuselage with T-6 wings), but until then I feel very proud to have undertaken this. Fun? Very! Satisfying? Unbelievably so. I’m thinking that if I can track down a couple of 1:72 BT-13s I may attempt a companion pair of Val and Kate for ZRO, so if anyone knows of a couple of Valiants lying around someplace please let me know! It may have taken me more than a decade to get around to it, but now that I’ve finally built my own Zero/Texan I feel a tremendous amount of relief and satisfaction. Would I do it again? Probably not. Perhaps someone could do a conversion kit for the fine Academy T-6 and then everyone can add this very significant aircraft to their collection.
This build is aircraft #4 of Project AFC, my ambitious 1-man group build of all of the Alpine Fighter Collection’s aircraft as it stood on January 1 1996.
Review kit courtesy of Brian Perri (donated as he also wanted to see this conversion done, thanks a million!)
| REFERENCES |
http://www.toratoratora.com/we_are/articles/history_rebuilt/default.htm - Commemorative Air Force
MORRIS, Gerard S and RUSSELL, Warren P: Wanaka Warbirds: Sir Tim Wallis’s Alpine Fighter Collection - Reed Publishing 1998
WALLIS, Prue: Warbirds Over Wanaka ’94 – Shoal Bay Press 1994
Warbirds Over Wanaka – Classic Wings Downunder/Warbirds Over Wanaka 1996
December 2006
If you would like your product reviewed fairly and fairly quickly, please contact the editor or see other details in the Note to Contributors.