Heller 1/72 Saab Viggen
| KIT #: | 80325 |
| PRICE: | About $12.00 |
| DECALS: | Three options |
| REVIEWER: | Gordon Zammit |
| NOTES: | Makes one of three types: AJ/SK/SF 37 |
| HISTORY |
The Saab Viggen needs no introduction to the aviation enthusiast. It was an all Swedish design which was the first production canard configuration, which nowadays seems to be favored by many design teams around the world (40 years later). The aircraft was designed around a modified P&W JT8D-22 (Boeing 707, 727, etc.) engine with an afterburner, which was the most powerful fighter engine installed at the time. The design proved very successful and had quite remarkable short take off performance in its days.
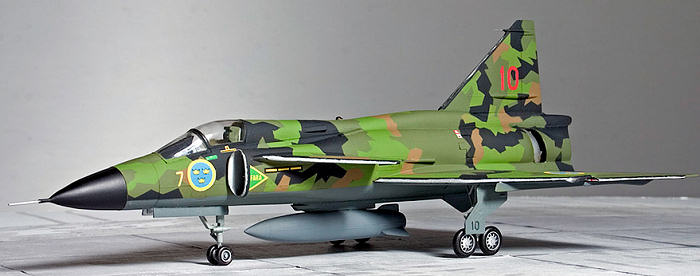
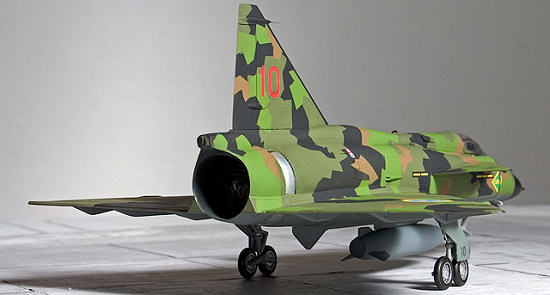
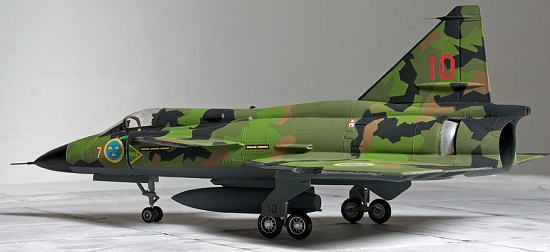
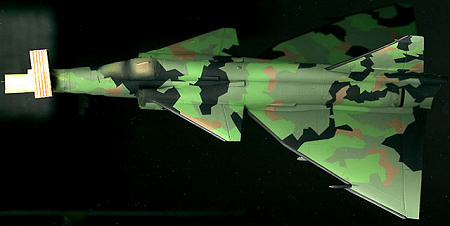
While being quite different from other designs from the same decade, it was made even more attractive in its unusual 4-tone splinter camouflage scheme, which is exactly the same on each aircraft.
| THE KIT |
 I was very pleased when I
finished the model, but I was even more satisfied when I won the “It’s the
weather” contest here on Modeling Madness.
I was very pleased when I
finished the model, but I was even more satisfied when I won the “It’s the
weather” contest here on Modeling Madness.
The Heller kit is not one that seems to be favored by many hobbyists, and seldom shows up in reviews. It is quite an old mould and has fine raised panel lines. There is a choice of 3 versions, the AJ37 fighter, SK37 trainer and the SF37 reconnaissance. You get different parts for all 3 versions. The AJ is the standard single seater fighter model with radar and standard fin, the SF is the recce nosed with standard tail while the SK is the tall-finned 2-seat trainer model. All three versions wear the standard 4-colour splinter camouflage pattern. The instructions still refer to both Humbrol and Heller colour numbers in my issue.
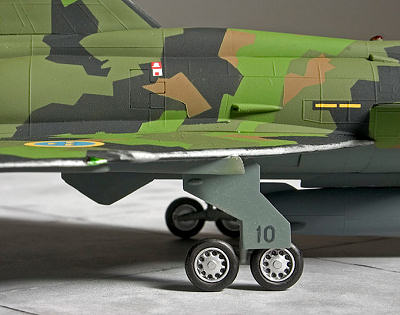
The cockpit is quite basic with a tub, seat (2 for the twin seater) and control column(s). The undercarriage bays are completely plain but the undercarriage and wheels are quite nicely done. As with most Heller kits, no armament is included but there is a centre line fuel tank. There are 3 options for 3 versions of the Viggen
| CONSTRUCTION |
 Construction starts as usual
with the cockpit after you chose which version you want to make. Fit of the
parts is good, but some trouble rises when fitting the intakes which is the norm
for such jets, but only small amounts of filler are required. Some attention is
also required in the join between the tail and the spine but nothing too
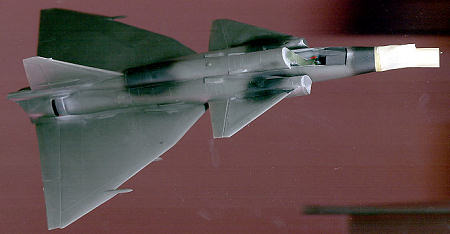
serious. There is a step where the trailing edge of the wings meet the nozzle. I
cut small pieces of styrene and smoothed it out with filler as can be seen from
the scan of the bottom view (The images of the uncompleted model are all scans
from a flatbed scanner with 3D scanning, before I bought my digital camera). The
points where filler was applied and sanding performed where airbrushed to check
for the final finish. The canopy was masked and glued in place and the Viggen
was now nearing its most tedious task: painting.
Construction starts as usual
with the cockpit after you chose which version you want to make. Fit of the
parts is good, but some trouble rises when fitting the intakes which is the norm
for such jets, but only small amounts of filler are required. Some attention is
also required in the join between the tail and the spine but nothing too
serious. There is a step where the trailing edge of the wings meet the nozzle. I
cut small pieces of styrene and smoothed it out with filler as can be seen from
the scan of the bottom view (The images of the uncompleted model are all scans
from a flatbed scanner with 3D scanning, before I bought my digital camera). The
points where filler was applied and sanding performed where airbrushed to check
for the final finish. The canopy was masked and glued in place and the Viggen
was now nearing its most tedious task: painting.
| COLORS & MARKINGS |
I first airbrushed the intakes and
wheel wells with ModelMaster Aluminium, and masked them off with wet tissues.
Next was the nose cone which got a coat of Humbrol 85, satin black, and was
masked off. I then started the camouflage by first applying a coat
 of Humbrol 29, dark earth. I made
a photocopy of the instruction sheet and scaled it to match the 1/72 model. I
then used the copy to cut masking tape. The method I used was to place a wide
piece of masking tape on a piece of non-reflective glass, place the photocopy on
it and cut both at the same time using a straight edge and hobby knife.
of Humbrol 29, dark earth. I made
a photocopy of the instruction sheet and scaled it to match the 1/72 model. I
then used the copy to cut masking tape. The method I used was to place a wide
piece of masking tape on a piece of non-reflective glass, place the photocopy on
it and cut both at the same time using a straight edge and hobby knife.
The cut sections were placed on the appropriate places, and the second color, Humbrol 80 grass green was airbrushed. Then back to more tape masks (The masks on the fuselage have to be taken care of, and cut slightly larger to allow for the curvature which is not as much of a problem as one would imagine). The same procedure was repeated again for the army green, Humbrol 102 and black.
 After about a week of cutting
and applying tape, followed by five minute airbrushing sessions, the camouflage
was ready and masked to spray the grey Humbrol 27 undersides. After the grey
undersides, the leading edges of all flying surfaces were masked and painted
black. Next the model was given a coat of ModelMaster gloss varnish and it was
ready for decals. I used the kit decals which went on without any problem as
usual with Heller decals. The kit was then given a coat of ModelMaster flat
finish. I dry brushed some aluminium onto the leading edges of the Viggen as it
is very rare to find a photograph of one with them still black!
After about a week of cutting
and applying tape, followed by five minute airbrushing sessions, the camouflage
was ready and masked to spray the grey Humbrol 27 undersides. After the grey
undersides, the leading edges of all flying surfaces were masked and painted
black. Next the model was given a coat of ModelMaster gloss varnish and it was
ready for decals. I used the kit decals which went on without any problem as
usual with Heller decals. The kit was then given a coat of ModelMaster flat
finish. I dry brushed some aluminium onto the leading edges of the Viggen as it
is very rare to find a photograph of one with them still black!
The undercarriage was painted next. I used flat aluminium for the struts, and Metalizer aluminium for the wheel hubs. The wheels got a light wash of grey pastels to bring out some detail. The undercarriage was attached and the canopy masking removed.
| CONCLUSIONS |
 The finished kits looks looks
quite different from the other aircraft which I think is mostly attributed to
the paint scheme rather than the shape of the aircraft. The Heller kit seems to
capture the overall shape of the Viggen correctly, and is said to be more
accurate than the Hasegawa kit which I do not have. It is also better than the
Airfix and Matchbox kits, although the latter might be a source for the RB04
Anti-shipping missiles. I think that it not a difficult kit to build and should
be adequate to all skills except the very beginner due to some fit problems.
Heller also issued the same kit as the JA37 Viggen which in reality is slightly
longer than the AJ37, with an air superiority grey scheme.
The finished kits looks looks
quite different from the other aircraft which I think is mostly attributed to
the paint scheme rather than the shape of the aircraft. The Heller kit seems to
capture the overall shape of the Viggen correctly, and is said to be more
accurate than the Hasegawa kit which I do not have. It is also better than the
Airfix and Matchbox kits, although the latter might be a source for the RB04
Anti-shipping missiles. I think that it not a difficult kit to build and should
be adequate to all skills except the very beginner due to some fit problems.
Heller also issued the same kit as the JA37 Viggen which in reality is slightly
longer than the AJ37, with an air superiority grey scheme.
| REFERENCES |
The Complete Encyclopedia of Aircraft
Other sources on the internet through search engines.
October 2006
Copyright ModelingMadness.com. All rights reserved. No reproduction in any form without express permission from the editor.
If you would like your product reviewed fairly and fairly quickly, please contact the editor or see other details in the Note to Contributors.