|
KIT: |
Condor 1/48 He-178v1 |
|
KIT # |
48002 |
|
PRICE: |
$10.00 |
|
DECALS: |
None: Prototype carried no markings |
|
REVIEW BY: |
|
|
NOTES: |
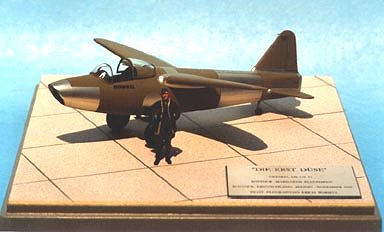
DIE ERST DÜSE"
HEINKEL HE-178V1 -- ROSTOCK-MARIENEHE FLUGHAVEN
ROSTOCK, DEUTSCHLAND -- AUGUST - NOVEMBER 1939
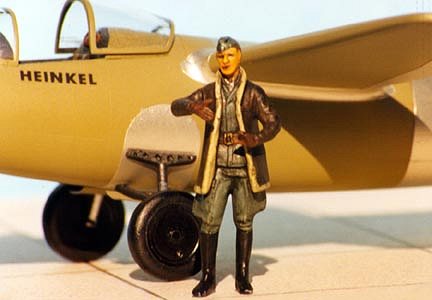
FLUGKAPITAN ERICH WARSITZ
|
HISTORY |
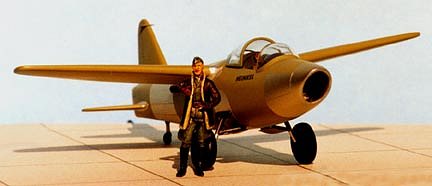
The only reason more recognition has not been shown toward this historic little airplane is because the victors write history. Flown nearly two years before Gloster's E.28/39, the Heinkel He-178 V1 was the world's first airplane propelled by jet engine propulsion alone.
The aircraft was designed as a research instrument only and was a private venture undertaken by Ernst Heinkel to be used for testing Dr. Hans Joachim Pabst Von Ohain's newly developed turbojet engine, the He S1, which was designed in March 1936 and first bench tested in September 1937. Bench tested engines were fueled with hydrogen, but a more powerful unit (the He S3b) designed for the airplane was fueled first with gasoline and later during most test flights, the engine used J2 fuel, a diesel derivative.
The He-178 V1 utilized a flush-riveted, metal monocoque fuselage, wooden wings with ailerons and flaps skinned in metal, and was designed for a retractable main undercarriage, although for all tests the aircraft used a fixed undercarriage with the wheel wells faired over with metal. Cockpit instrumentation was rudimentary and included only flight gauges with no provisions for all weather flying. Despite its small size, being nearly six feet shorter than Gloster's E.28/39 in span and one foot shorter in length, the He-178 V1 at 3,572 pounds empty weighed some 700 pounds more than its Gloster rival. Estimated top speed for the He-178 was listed at 435 mph, but the highest speed reached during testing was only 362 mph, as the engine was never tested to its limits.
Taxiing trials were undertaken on August 24, 1939 and on August 27 the airplane made its first flight. Altogether, the He-178 V1 made 12 flights between August 1939 and December 1939. Flugkapitan Erich Warsitz, Heinkel's chief test pilot, did all flight tests. The He-178 V2, a high-altitude version with a pressurized cockpit and longer wing span was being prepared when Hitler told Heinkel to direct his attention to the twin jet-engine fighter He-280 and all testing of the He-178 V1 was suspended. The airplane was taken to Berlin for permanent display at the Berlin Air Museum. Sadly it was destroyed during Allied bombing raids during 1943 and the only example we will likely see are in model form such as mine. The plaque's title simply says: "THE FIRST JET".
|
CONSTRUCTION |
Interior:
CONDOR's cockpit was quite complete with photoetched belts and harnesses, instruments panel, side consoles, and rudder pedals to compliment injected molded pieces for the control stick, seat, floorboard, and front and rear bulkheads. As usual quite a bit of cleanup and dry fitting was required to get everything to look right, as no location keys are indicated anywhere. I found that the ledge molded into each fuselage half for the floorboard key allowed this said piece to fit too high. I cut both ledges out with a Dremel cutting bit and followed with sandpaper, letting the floorboard fit where its sides touched the fuselage sides. Once the look was to my liking, I cemented the floorboard to the rear bulkhead, this already having been sanded to fit. The front bulkhead took quite a bit of sand, fit, and cuss before it allowed the fuselage halves to join. Once it was to my liking, I cemented it to the floorboard/rear bulkhead and cut the lower portion of the front bulkhead at the floorboard joint to show an opening for air to be fed to the engine. Various pipes and feeds were done with small gauge solder, but not much can be seen. The headrest was scratch-built from a sprue stub, painted red-brown, and attached in the final assembly. I thinned the instrument panel combing on the leading edge by sanding. Small gauge wire was used for the throttle and fuel controls instead of the tiny photoetched fiddly bits. These were dipped in epoxy for the knobs and painted red, yellow, and blue, as per reference on a He-162's interior.
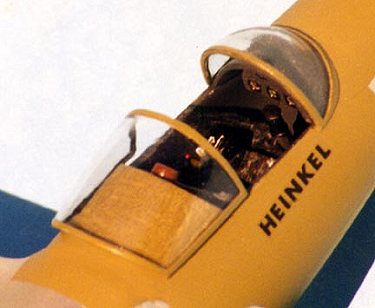
The interior was painted Polly Scale RLM 66 Scale Black. Seat belts were painted olive drab with the buckles and latches picked out in aluminum. The clear acetate panel for the instruments was painted red and yellow behind fuel and oil instruments, whereas the tachometer was painted green and red in safe and unsafe areas as per reference on the He-162. Once dried, the two fuselage halves and the upper cockpit assembly were masked and the lower areas of each painted Polly Scale bright Silver. The lower portion of the rear bulkhead below the cockpit was painted flat black.
After being satisfied that all interior painting was done, I enclosed the cockpit and cemented the two fuselage halves together. I used super glue exclusively for this, as the two fuselage halves were slightly warped and I wanted a strong bond. Once I was satisfied with the bonding, I ran a hair dryer on high setting over the fuselage assembly to lessen the stress of the warped plastic on the glue joints. This works quite well on warped pieces, but beware! Some plastics are softer than others and will distort under a hot hair dryer, test first or otherwise use warm water.
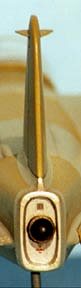
The upper wing and lower wing pieces are rather thick and I had to tape a large sheet of sandpaper on the workbench and wet sand each until I was satisfied with the fit. Once assembled, the wing assembly fit like a charm to the fuselage assembly, with only a little filling needed at the leading and trailing edge of the upper fuselage junctures. The fit between the lower wing roots and fuselage was the best I have encountered with a Czech kit. The horizontal stabilizers were cleaned up and I constructed some attachment pegs from wire to be attached to predrilled holes at their location on the fuselage in the final assembly. The photoetched rudder balance was cemented into place after cutting a slot for it using a razor saw. All control surface recesses were scribed a little deeper before painting.
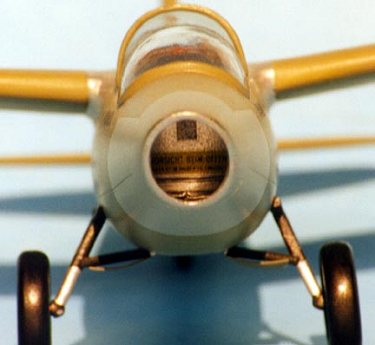
The kit gives one some photoetched pieces for the main gear attachment struts, but I thought them oversized and preferred to sand the injection molded pieces to a more proper angle and use them. The kit would have one cement the photoetched strut cover doors to the fuselage, but in the three reference photos of the He-178 that I could find, plus two line drawings, these doors were attached to the fixed reinforcement arms as shown on the model. The wheels were painted TAMIYA Semi-Gloss Black with the tires brushed Gunze Tire Black. The struts and reinforcement arms were painted Gunze Metal Black with the oleos brushed Model Masters Chrome Silver. The rear wheel was cleaned up, painted and set aside until final assembly.
I did not like the exhaust nozzle piece in the kit and replaced it with a bulkhead of sheet styrene and an exhaust nozzle constructed from aluminum tubing. I backed the tubing with sheet styrene and drilled a hole to accept a piece of styrene rod for the exhaust spike. The rod was turned in my Dremel tool and sanded to get the rounded point. The exhaust was painted Gunze Burnt Iron with the interior painted flat black. The exhaust nozzle bulkhead was cemented to the rear of the fuselage, but attachment of the nozzle was held off until later.
The canopy was injection molded, but did not fit well at all. I cut the windshield from the sliding rear section with a razor saw and was able to sand the windshield for a better fit. It was still too wide, but much more easy to live with. The windshield and sliding section were masked with Bare-metal foil before attaching the windshield to the fuselage. The sliding section was masked on the interior with masking tape and painted separate. Both canopy sections received a coat of RLM 66 before receiving a coat of Polly Scale RLM 02 Gray-Green.
The pilot figure came from a Preiser Figure Set, number 67001. After attaching the arms and cleaning up any seams, I primed the figure in medium gray and painted it with acrylics using an ink wash for shadowing.
The base was cut from scrap purchased at a cabinet shop. It was primed in KILZ, sanded and given two coats of KRYLON Satin Gray. The top was done using English Stone Matte Board and drawing pencils lines for the caulking. It was attached to the base with 3M Artist's Adhesive. A piece of self-adhesive felt was attached to the underside of the base to keep it from sliding or scratching.
|
PAINT & DECALS |
After masking the cockpit opening with masking tape and the air intake with card stock, I airbrushed two coats of Polly Scale RLM 02 Gray-Green on the main assembly and horizontal stabilizers. After sanding a few flaws and touching up with RLM 02 I gave the model two coats of Polly Scale Clear Gloss. I covered all exposed metal areas called out for in the instructions with Bare-metal foil. This took a full day at the workbench, but the result was well worth it. I hated to give it a flat finish in the final coating, as the shiny metal looked great, but in the three photos I could find of the actual plane, these areas had a flat metal appearance.
No decals were present in the kit. The only markings I could see on the photos were the name HEINKEL applied to both sides of the cockpit. No swastika was seen in any of the photos and indeed this was probably correct as the He-178 was a private venture by Heinkel and received no state support money. I used several data placards from Reheat Models decals, as German aircraft had them for just about every part, I also applied a few stencils from a SuperScale sheet to the air intake, flaps, and elevators. For the record "VORSICHT BEIM OFFEN" means "CAUTION WHEN OPEN", "VORSICHT" = "CAUTION", "NICHT ANFESSELN" = "DO NOT UNFASTEN", AND "NICHT DRUCKEN" = "DO NOT PRESS" (literally "DO NOT APPLY PRESSURE").
Once all decals had dried, I gave the model a sealing coat of clear gloss. All control surface and engine access recesses were given a wash of India ink and the model was given a finish coat of Poly Scale Clear Flat, which was rubbed out with a cotton rag the next day. The Bare-metal masking was removed from the canopy sections and the clear areas were polished with Meguire's Mirror Glaze #3 before receiving a coat of FUTURE. All subassemblies were attached using super glue gel for the landing gear, Elmers for the exhaust nozzle, and Model Masters Clear Parts Cement for the horizontal stabilizers. No radio or lights were on the He-178, so aerial wiring and navigation lights did not have to be added.