Classic Airframes 1/48 A5M4 Claude
|
KIT # |
427 |
|
PRICE: |
$29.98 |
|
DECALS: |
Two Aircraft |
|
REVIEW: |
|
|
NOTES: |
|
INTRODUCTION |
I first became aware this airplane existed when I read Saburo Sakai's famous book, "Samurai." I remember at the time wishing there was a model of it, as I always liked to build models of the airplanes I read about. When I was in Japan with the Navy several years later, I found a plastic kit of the A5M4 in a department store in Tokyo, bought it and made it; as I recall, it was as crude as plastic kits were in those days and was 1/50 scale to boot. There was an early Nichimo kit in 1/72 in the early 70s, which was better but still required a scratchbuilt cockpit.
In the early 90s, I bought a Fine Molds kit and built it, but it was the early A5M2, and I really wanted the "classic" of the series, the A5M4; that model was one of three that bit the dust during "The Big One" here in southern California in 1994 - I salvaged what I could to the parts box and counted myself lucky the damage was a minimal overall as it was. I later did the Eagles Talon vacuform, but it wasn't that great and the one I had bought at a swap meet didn't have the decals. Thus, when I heard Classic Airframes was going to release the A5M4, I was looking forward to it.
|
CONSTRUCTION |

"Catch No. 1" is mating the vertical fin to the fuselage. The design here is very strange, with a separate vertical fin and rudder; I can only conclude someone may be thinking of releasing the two-seat trainer conversion, which had a larger fin. At any rate, the problem here is that the fin is narrower than that portion of the fuselage it is to mate to, requiring a lot of putty and re-scribing, unless you do the following:
Before gluing the fuselage halves together, test-fit the fin-to-fuselage fit. Narrow the fuselage at that point by sanding along the centerline, a bit at a time and checking, until you have the same thickness as the fin. Whether the fin is in actuality "too thin" or the fuselage "too thick" based on the original drawings is irrelevant - you want it to fit right, and doing it this way means you will only need some Mr. Surfacer on the join line.
"Catch No. 2" isn't so much of a surprise. When you test-fit the horizontal stabilizers to the fuselage, you will see that the fuselage fairing is thicker in section than the stabilizer. A short session with a rat-tail file solves this one easily.
"Catch No. 3" is that as designed, the resin sidewalls of the cockpit will position the instrument panel too far forward in the cockpit. I cut these back to the first vertical rib, and the instrument panel then fit about 1/16" in under the upper decking, which to me looks more correct.
"Catch No. 4" is one of those that can bite you if you aren't aware of it. The problem is that, when the assembled wing is attached to the assembled fuselage, there is no real "joining surface" along the area where the trailing edge of the lower half of the wing meets the lower fuselage. The resulting joint is thin enough that just a bit of pressure with a thumb while handling the model to work on other things will break the joint. I had to break the model apart at this time to solve the problem, with a resulting use of putty on the upper wing-to-fuselage join that had not been necessary originally.
The solution here is, before you attach wing to fuselage, glue a sheet styrene tab to the inside of the lower wing, so that it will fit across the opening in the lower fuselage. Once that is dry, make the attachment. With more surface for the glue to adhere to, you will have a strong join. If you test-fitted everything (de rigeur in a limited-run kit) you should only need Mr. Surfacer to fill the seams of the fuselage-wing joints.
Beyond these glitches, the model assembles well. There are no locating pins or tabs, so be sure of where you position things like landing gear, etc.
I built up the resin engine and it was very nice. However, before proceeding, I discovered the white metal engine and prop from the old Fine Molds kit in one of the parts boxes, and decided to use those. However, the resin parts would have been more than acceptable had I not been so fortunate. The propeller as assembled will be delicate, however, and subject to breakage with anything other than gentle handling.
|
PAINT & DECALS |
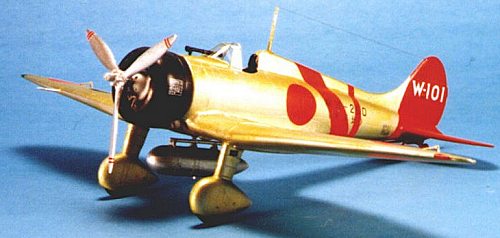
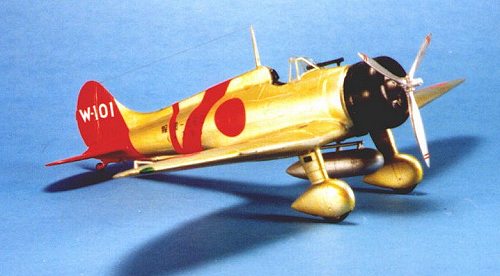
It turns out the A5M4 is one of those Japanese airplanes that looks much different that we had been led to believe over the years. The airplane was the first all-metal airplane the Imperial Navy took to sea, and they quickly learned what happens to unprotected aluminum in a saltwater environment. The solution was to paint the airplanes with a protective coat called "Ame Iro," one of those clear Japanese colors like the interior blues and greens. In this case, the paint is a clear lacquer with a yellowish tinge.
I painted the red tail first, then masked it off. I then painted the rest of the airplane with SnJ aluminum with my airbrush.
My first "Ame Iro" coat was a disaster. I mixed Gunze-Sanyo "Clear Yellow" - which has a nice amber hue - 50-50 with Future and shot it. Waaaaaay tooooo yelllow!!!!
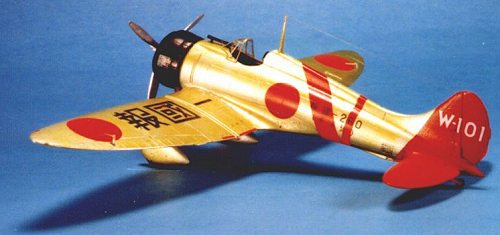
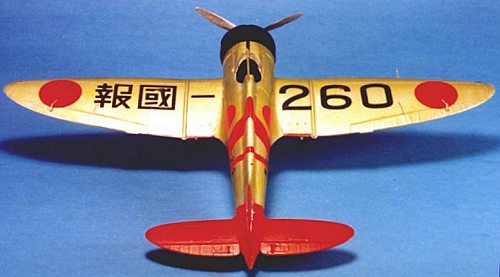
Thank God for Strip-A-Kit. With the model soon back to clean plastic, I re-shot the tail, masked off, re-shot the SnJ, and then shot an "Ame Iro" mixture that was 20 percent Gunze, 80 percent Future. This looked much better! However, if I was to do this again, I think I would use a mixture of 10 percent Gunze, 40 percent Future, and 50 percent alcohol. It's supposed to be a very thin paint, and the airplane should look "gold" from some angles and "silver" from others, depending on the light. I wasn't up for a second session with the Strip-A-Kit, and decided this was OK. The kit provides three different markings options. I decided not to do the airplane in the boxart, but rather the alternative "gold" airplane. Both were aboard IJN "Soryu" operating off southern China in 1938-39. Classic Airframes now uses Micro-Scale decals, so there were no problems in using them.
I shot the engine cowling glass black with a mit of midnight blue in it for the very dark blue-tinge (which didn't turn up in the photos), and gave the rest of the airframe another coat of Future. I also Futured the white metal prop, then before it was fully dry covered it with SnJ polishing powder and polished it out. A final very thin coat of "flat Future" to dull things down due to saltwater exposure gave me my final result.
|
CONCLUSIONS |
The end result is nice, and unlikely to show up as a Tamigawa kit in the forseeable future. If you want a model of this important Japanese fighter - the first domestic Japanese design to outperform its foreign contemporaries - this is the kit for you. Follow my recommendations on how to deal with the "catches" and you will have a successful build.
Copyright ModelingMadness.com.
Thanks to Classic Airframes for providing the review copy.
Back to Reviews Page 2019