Classic Airframes 1/48 Hawk II, BFC-2 & F11C
|
KIT # |
431 and 432 |
|
PRICE: |
$29.95 |
|
DECALS: |
See Review |
|
REVIEW : |
|
|
NOTES: |
Short run injected |
THE GOSHAWK: BUILDING CLASSIC AIRFRAMES 1/48 HAWKS
|
HISTORY |
The series of Curtiss fighters known as "Hawk," which were produced for both the Army and Navy, as well as for export to foreign air forces were one of the two most important lines of single-seat fighting biplanes produced in the United States during the 1920s and 1930s. Unfortunately for Curtiss, they allowed the slow pace of aeronautical development between 1925-33 to lull them into continuing to develop a line of airplanes that had become obsolete, rather than moving on as Boeing had with the P-26. This same problem would later plague the company with the P-36/P-40 series, which should have been dropped from production after the P-40C. Ultimately, this failure to stay at the cutting edge of design and development meant that Curtiss would no longer be making airplanes after 1945.
The Hawk was a good airplane in its day, and saw more combat in obscure wars than many of its contemporaries, fighting in South America, China and Thailand, with good records against difficult opponents.
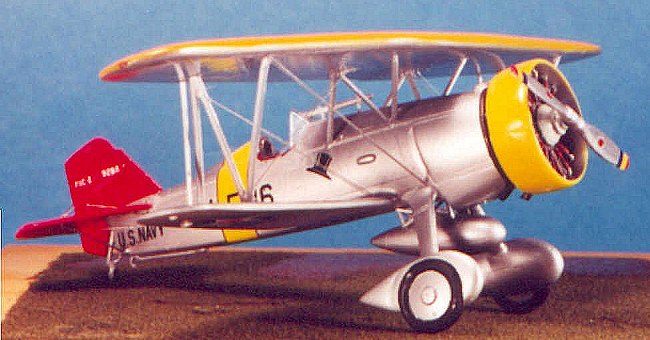
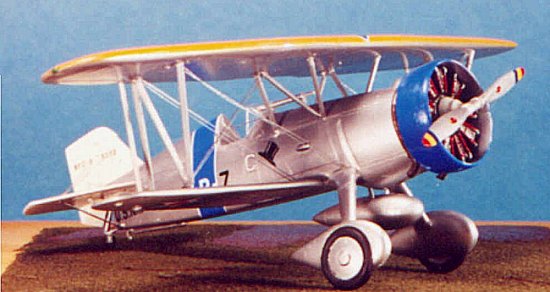
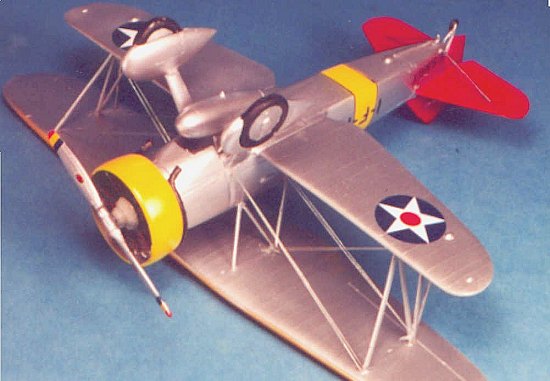
The name "Hawk" was never officially adopted by either the Army or Navy, though it was used for publicity purposes by Curtiss from the introduction of the P-1 in 1925, then carried on into the P-36 and P-40 series. The last of the series was the "Goshawk," which saw service in the U.S. Navy as the F-11C-2 and BFC-2, and in South America, China and Thailand as the Hawk II export fighter. The Goshawk was a retrograde step in the development of the series, inasmuch as the design reverted to wooden wings and tail after Curtiss had moved to metal construction with the Sparrowhawk.
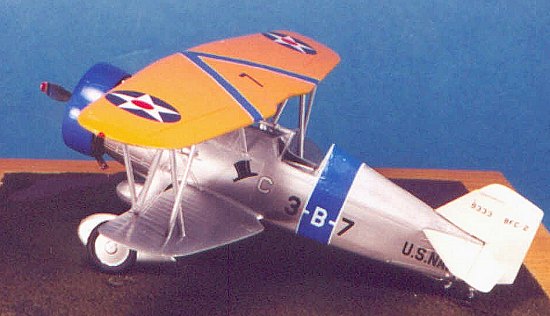
 28 F-11C-2 Goshawks
were delivered to the Navy, commencing in March 1933. The Goshawks served with
the "High Hats," at the time VF-1B, aboard the U.S.S.
"Saratoga." At first, the unit flew a mixed group of six Boeing F4B-3s
and twelve Curtiss F-11C-2s. In spite of their increased weight, power and
speed, compared to the earlier F6C series of Hawks, these Goshawks retained the
same pleasant handling characteristics of their predecessors. The High Hats flew
their Goshawks for five years and through three squadron designations - a record
for an airplane of the interwar period. In 1934, the airplane was modified with
a higher turtleback supplied as a field modification, and the designation
changed to BFC-2 - reflecting a primary assignment as a bomber and the squadron
designator changed to VB-2B; following the fleet reorganization of 1937, in
which squadrons operating from carriers took the same number as the ship, VB-2B
became VB-3 and continued to use the Goshawk until it was replaced by the SB2U-1
"Vindicator" in 1938. The airplane was the first vertical dive bomber
used by the Navy, and was instrumental in developing tactics that would be used
to great effect in the coming conflict.
28 F-11C-2 Goshawks
were delivered to the Navy, commencing in March 1933. The Goshawks served with
the "High Hats," at the time VF-1B, aboard the U.S.S.
"Saratoga." At first, the unit flew a mixed group of six Boeing F4B-3s
and twelve Curtiss F-11C-2s. In spite of their increased weight, power and
speed, compared to the earlier F6C series of Hawks, these Goshawks retained the
same pleasant handling characteristics of their predecessors. The High Hats flew
their Goshawks for five years and through three squadron designations - a record
for an airplane of the interwar period. In 1934, the airplane was modified with
a higher turtleback supplied as a field modification, and the designation
changed to BFC-2 - reflecting a primary assignment as a bomber and the squadron
designator changed to VB-2B; following the fleet reorganization of 1937, in
which squadrons operating from carriers took the same number as the ship, VB-2B
became VB-3 and continued to use the Goshawk until it was replaced by the SB2U-1
"Vindicator" in 1938. The airplane was the first vertical dive bomber
used by the Navy, and was instrumental in developing tactics that would be used
to great effect in the coming conflict.
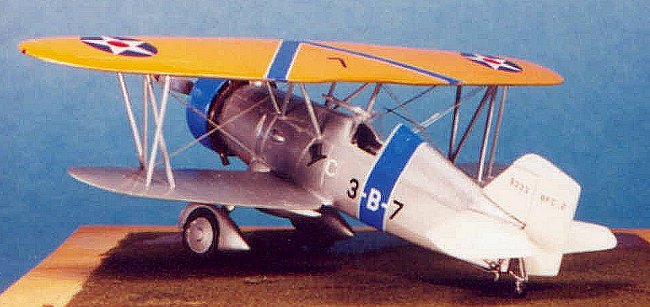
125 Hawk IIs were delivered to nine countries between 1932 and 1935. The Hawk first saw combat in Bolivia, where it formed the Bolivian Air Force's fighter arm in the Chaco War with Paraguay, Latin America's last major international war. Though used primarily for ground support, some of the 9 Hawk IIs also scored aerial victories in the hands of British and American mercenary pilots; only three were left when the war finally ended in 1935. 50 were purchased by China in 1933, and flew in combat during the "Manchurian Incident" in 1934-36. Their performance edge over the Japanese Army's Ki.10 and the Navy's A4N was directly responsible for the two services developing the next generation of Japanese fighters, the Ki.27 and A5M monoplanes. The 12 sold to Thailand in 1934 would see combat alongside Hawk IIIs in the war against the Vichy French in 1940.
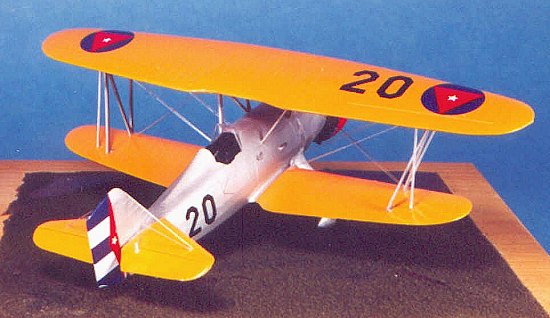
4 Hawk IIs were purchased by Cuba in 1934. In 1936, Len Povey - at that time the American commander of the Cuban Air Force - demonstrated a daring aerobatic maneuver at that year's Miami Air Races that became known as the "Cuban Eight" and has been a staple of airshow performers ever since.
Two Hawk IIs were purchased by the German government at the behest of Ernst Udet; they were used for development of dive bombing tactics for the then-secret Luftwaffe that would result in the development of the Ju-87 Stuka, which changed the face of warfare when used over Poland, France and the Low Countries in 1939-40.
|
THE KITS |

The only F-11C-2 models previously available were a very inaccurate model from Lindberg that is so old I can remember making it when I was in junior high school, and a still quite nice 1/72 kit released by Monogram in the early 1970s that has been long out of production and available only through collectors.
As regards the contents of the kits, I refer the reader to the Preview here at Modeling Madness.
One interesting thing I discovered while working on these kits is that the Hawk II had an overall length of 22 ft., 4 inches, while the F-11C-2/BFC-2 had an overall length of 25 feet. The kit designer at MPM who did this for Classic Airframes appears to have split the difference at a length of 23 ft., 6 inches. For those who worry about such things, I can say that had someone else not pointed out the length of the Navy Hawks, I would never have noticed the problem.
|
CONSTRUCTION |
On first examination, the kits appear to be the same, with only small detail differences such as the exhaust system of the Hawk II compared to that of the Navy Goshawk. This is true, but some of those differences are really crucial.
The two one-piece lower wings of each kit were well-molded - unlike the warped versions in the earlier BF2C-1 and Hawk III kits, and all parts were easily cleaned up. I assembled the upper wing halves and set it aside, then assembled the landing gear spats and gear leg, and set those aside. I also glued the Townend ring halves together and set them aside. I finished the preliminary assembly by cutting the rear control surfaces and posing the elevators and rudders in a deflected position.
The cockpit parts are all resin and had to be cut free of their molding blocks. I cut off the injection-molded fuselage frames and cleaned them up. Note that the instructions continue to tell you to install them in the cockpit upside down - place them so the straight bar runs right even to the upper edge of the fuselage sides. Also, they should be sanded so they are thinner, so that the seat will be able to fit when installed. Once everything was cleaned up, I painted the interior with Model Master Aluminum metalizer and sealed it. The instrument panel was painted semi-gloss black; when it was dry, I used decals from a ProModeler instrument panel decal sheet to finish the panel.
The floor and rear cockpit bulkhead need to be prefitted and sanded to fit. There is a separate rear bulkhead to use in the Navy Goshawk kit, depending on whether you are doing the F-11C-2 or the BFC-2, but you aren't going to have to worry about that (read on) and can get away with using either one.
 While the cockpit
parts were drying, I turned to the fuselage. The forward area of the lower
fuselage is completely wrong, though it will look "right" in side
profile. It wasn't until I got to the third kit that I was able to discover a
photo that showed this area in any detail. Fixing it included cutting most of it
away and substituting various sections of what had been cut away, as well as
some sheet styrene. The result is a "cut away" section between and
just ahead of the landing gear. While the Hawk II and BFC-2 models look just
fine with a bit of sanding to give a general impression of the area, you get a
better-looking model if you go to the effort I did with the F-11C-2 kit.
While the cockpit
parts were drying, I turned to the fuselage. The forward area of the lower
fuselage is completely wrong, though it will look "right" in side
profile. It wasn't until I got to the third kit that I was able to discover a
photo that showed this area in any detail. Fixing it included cutting most of it
away and substituting various sections of what had been cut away, as well as
some sheet styrene. The result is a "cut away" section between and
just ahead of the landing gear. While the Hawk II and BFC-2 models look just
fine with a bit of sanding to give a general impression of the area, you get a
better-looking model if you go to the effort I did with the F-11C-2 kit.
With that area fixed as well as it was going to be, I glued the cockpit into position and glued the fuselage halves together. If you do this carefully, the upper rear fuselage part will fit to the fuselage closely enough that you won't have to putty over the seam and lose detail. I used putty on the Hawk II, and was able to get away with Mr. Surfacer 500 for the other two, having learned my lesson.
Once I had the fuselage of the BFC-2 together, I realized that the turtleback is too low in profile. In the kit, it is no higher than the headrest part of the F-11C-2, while it should be as high as the windscreen. I solved this problem by cutting a piece of plastic to give the proper profile, then using some 10 thou plastic card stock, bending it to form the turtledeck. I glued it into position, sanded down the join area, and was able to get a smooth, properly sized turtleback with some Mr. Surfacer 500 to smooth everything. This also meant making a revised rear cockpit bulkhead to fit the new shape - which is what I meant when I said it wouldn't matter which kit part you use as you're going to cut off the upper part and replace it.
After the fuselage was finished by covering the seams with Mr. Surfacer and sanding them down, I attached the lower wings and the landing gear. Be particularly careful when doing this, as the only alignment information is an engraved panel where the gear leg is supposed to attach; if you get it wrong, the gear will not be aligned. On the Hawk II, I discovered this the hard way toward the end of construction when I noticed the model didn't sit straight - the solution was to cut off the wheel spat, trim the gear leg the necessary amount, and reattach it to get the proper sit.
 At this point, beware
that only the Hawk II has the resin intake part on the lower fuselage nose; the
Navy Goshawk did not have this item. While the instructions in the Goshawk kit
are wrong here, the decal placement drawing is correct. Depending on which one
you're doing, attach the resin intake and fill in the gap with Mr. Surfacer.
At this point, beware
that only the Hawk II has the resin intake part on the lower fuselage nose; the
Navy Goshawk did not have this item. While the instructions in the Goshawk kit
are wrong here, the decal placement drawing is correct. Depending on which one
you're doing, attach the resin intake and fill in the gap with Mr. Surfacer.
Having had previous experience with the BF2C-1 kit, I knew I wanted to attach the upper wing before painting the model. This is different from how a biplane is usually done - with the upper wing attached after painting, but the assembly here is fiddly enough that doing it before painting means you won't have to ruin the paint job.
UPPER WING ALIGNMENT:
There's always something with a Classic Airframes kit that is a mystery to be solved in order to successfully complete the model, and with these Hawks that is the alignment of the upper wing. It took me till the third model to get it right, so follow closely here and you can get it right the first time.
The cabane strut assembly is going to be the central bit of work needed to be done right in order to get the wing properly aligned. This suffers from both poor design and unclear instructions. If you follow how it looks it should be, you are going to be wrong.
The "N" strut comes in two parts, a "V" for the forward section, and the separate upright strut. Be sure to enlarge the holes in the lower surface of the upper wing. The upright sections of the strut will go from the fuselage to these holes. Carefully check the drawings (the profile drawings, not the instruction drawings) and you will see where to drill holes in the fuselage for placement of the struts. Cut 1/16 inch off the cross piece of the N strut (the rear strut of the "V"). Be sure that, when you test fit the "V" part to the upper wing, that the rear part touches the wing about the thickness of the strut ahead of the rear alignment hole; trim to fit till you get this.
 Attach the V strut to
the fuselage so that the forward upright is at about a 35 degree angle to the
vertical - you can eyeball the profile drawing, since it's correct. (I suggest
using super glue here.) Hold the model upside down over the upper wing (which is
also upside down), to see that you have the strut spread wide enough. After you
have the "V" attached correctly, glue in the rear strut so that there
is about 1/32" between it and the rear of the "V" strut where
they'll attach to the wing.
Attach the V strut to
the fuselage so that the forward upright is at about a 35 degree angle to the
vertical - you can eyeball the profile drawing, since it's correct. (I suggest
using super glue here.) Hold the model upside down over the upper wing (which is
also upside down), to see that you have the strut spread wide enough. After you
have the "V" attached correctly, glue in the rear strut so that there
is about 1/32" between it and the rear of the "V" strut where
they'll attach to the wing.
Once you have both sets of cabane struts glued in position and you've hit the cyanoacrylate with accelerator to get the joint solid, glue the upper wing on. Check your alignment - use the center rib of the upper wing and align that with the center seam of the fuselage (another reason why you don't want it painted yet - you want to see that seam that's going to disappear under the paint). Hit the joints with accelerator, and you have the wing in position.
The next thing to deal with is the interplane struts. If you test fit them, you'll see that they aren't the proper lengths to fit from the alignment holes of the lower wing to the upper wing. This is because, as designed, the "N" strut leans too far forward. The cross piece should be directly vertical in side elevation when it is properly positioned. What I did was use a steel ruler, set the strut so the crossbar was perpendicular to the straightedge, then cut the upper end of the forward strut and the lower end of the rear strut to get them to properly fit.
Test fit your trimmed strut in its position between the wings. You may have to trim away a bit more to get a good fit. Once you have the good fit, and that crossbar strut is vertical when viewed from the side, glue it in position. I used Ambroid Super Weld here, and once it had set up I strengthened all the attachment points with a drop of cyanoacrylate.
Congratulations, you have the wing right, and everything else past this is easy!
|
PAINT |
I first painted the upper wing surface with Gunze-Sanyo "Orange-Yellow." In the case of the Cuban Hawk, I painted all the wings and horizontal stabilizers this color. I attached the vertical fin and rudder of the Cuban Hawk, since it would be the same color as the fuselage, though I left the tails off the two Navy Goshawks. After painting the wings of the Navy Goshawks, I painted their tail surfaces - white in the case of the BFC-2 and red for the F-11C-2, using Gunze-Sanyo gloss paints for this. I also painted the Townend ring of the Cuban Hawk red, while I painted the cowling and the area of the fuselage where the belly band would be the yellow on the F-11C-2. I didn't have to do any other painting on the BFC-2 since I was going to use a Blue decal sheet for the various stripes on that model.
 Once the yellow wings
were dry, I masked them with drafting tape. I then shot the rest of the model
with SnJ Aluminum. After abut 20 minutes, I applied the aluminum polishing
powder with a cotton swab to the forward areas of the fuselage and the struts -
which were painted with aluminum lacquer on the real thing - and polished this
lightly with the other end of the swab. I did not want to get a "polished
natural metal effect" here, because this was painted, but I wanted a
different tonal quality from the fabric areas, since they were painted with
aluminum dope on the real thing.
Once the yellow wings
were dry, I masked them with drafting tape. I then shot the rest of the model
with SnJ Aluminum. After abut 20 minutes, I applied the aluminum polishing
powder with a cotton swab to the forward areas of the fuselage and the struts -
which were painted with aluminum lacquer on the real thing - and polished this
lightly with the other end of the swab. I did not want to get a "polished
natural metal effect" here, because this was painted, but I wanted a
different tonal quality from the fabric areas, since they were painted with
aluminum dope on the real thing.
I painted inside of the Townend cowls aluminum (and also the exterior for the BFC-2), then painted the engines and resin exhausts.
I painted the props with SnJ, then covered that with polishing powder, and polished out the prop blades, since they were natural metal finish. I did not add any sealer, which would have reduced the shininess I achieved by polishing. If you apply the powder to the paint about 20 minutes after painting, the powder will combine with the paint and - once dry - will not come off so long as you don't handle that part or area very much.
Once the SnJ had set up, I unmasked the models, and gave everything a light coat of Future to seal it.
FINAL ASSEMBLY:
I glued on the tail surfaces of the Navy airplanes. The Goshawk had a trim system that allowed the horizontal stabilizer to be adjusted up or down, so for the F-11C-2, I had carved out the opening in the forward area where the horizontal stabilizers were to go, so that I could place them in the "full down" position they would have been left in after landing.
I glued the exhausts into position on the engines; be very careful you don't break these, they're resin. Also note that, on the Navy Goshawks, trim off the excess of the exhaust ring on top, so that they fit to the air intake on the fuselage immediately aft of the engine. I glued the engines inside their cowlings and attached the sub-assembly to the model.
I also painted the tires at this point and attached them.
|
DECALS |
 I used the kit decals,
following the well-detailed profile, and they went on with no problems.
I used the kit decals,
following the well-detailed profile, and they went on with no problems.
For the BFC-2, I used blue decal for the fuselage belly band, the cowling band, and the upper wing chevron. I do not understand why the instructions show the chevron reversed (i.e., splayed outwards), since there are two photos of BFC-2s during the VB-3 period in "Curtiss Navy Hawks In Action" that clearly show the standard chevron. So far as I know, only VS-2 used the reverse-splay stripes on the upper wings for their aircraft.
Once the decals were dry, I washed each model to get rid of dried solvent, and sprayed them with another light coat of Future.
RIGGING:
The kit instructions show the fairly simple rigging, which I did with .008 stainless steel wire.
|
CONCLUSIONS |
Like any Classic Airframes kit, these are not Tamigawa throw-togethers. I would recommend you have experience with a few other biplane models before trying these Hawks. If you follow my instructions for getting the wing alignment right, the air over your workbench won't get as purple as the air over mine did as I found those solutions through trial and error.
For those modelers who enjoy the airplanes of the inter-war "Golden Age," these Curtiss Hawks are a welcome addition to the limited number of kits available of airplanes from this period. The F-11C-2 and the BFC-2 is guaranteed to look good sitting next to the Classic Airframes Boeing F4B-4 and the Accurate Miniatures F3F-1 and F3F-2. To me, they were worth the extra effort it took to create them.
Copyright ModelingMadness.com. All rights reserved. No reproduction in part or in whole without express permission.
If you would like your product reviewed fairly and fairly quickly, please contact the editor or see other details in the Note to Contributors.
Back to Reviews Page 2020