Classic Airframes 1/48 P-12E
|
KIT # |
416 |
|
PRICE: |
$24.98 |
|
DECALS: |
26 Pursuit Group, 303 Observation Group |
|
REVIEW : |
|
|
NOTES: |
|
|
HISTORY |
While Boeing is today known as the world's premiere designer, builder and manufacturer of very large commercial airplanes, the company got its start in the 1920s by beating out Thomas Morse for the contract to produce the MB-3 fighter. With what they had learned from this, the first mass-produced American
fighter plane, Boeing designed the XPW-8, a better airplane, which would serve as the basis for a series of fighters designed and built in the mid-1920s for both the Army and the Navy, the first of which would be the PW-9 for the Army. Boeing became locked in a struggle with Curtiss throughout the 1920s and early 1930s to be the Army's premiere fighter design and production source.
After delivering the PW-9 series in 1925-26, Boeing delivered the last of 16 uprated PW-9Ds in 1928; while the Boeing fighters were generally considered more maneuverable, the company lost momentum to Curtiss' contemporary Hawk, while it concentrated on producing the F2B and F3B series for the Navy.
 Faced by
strong competition from the P-6 Hawk with the new 600 h.p. Curtiss Conqueror
engine, Boeing came up with the Model 83, powered by the brand-new 500 h.p.
Pratt & Whitney R-1340B, which was first flown June 25, 1928. Ordered by the
Navy as the F4B-1 and the Army as the P-12, it was the last time the two
services would operate the same fighter equipment until the arrival of the North
America F-86/FJ-2/3/4 series 20 years later.
Faced by
strong competition from the P-6 Hawk with the new 600 h.p. Curtiss Conqueror
engine, Boeing came up with the Model 83, powered by the brand-new 500 h.p.
Pratt & Whitney R-1340B, which was first flown June 25, 1928. Ordered by the
Navy as the F4B-1 and the Army as the P-12, it was the last time the two
services would operate the same fighter equipment until the arrival of the North
America F-86/FJ-2/3/4 series 20 years later.
In December 1930, Boeing offered the Model 218, which was the Model 89 with an all-metal fuselage. The P-12E prototype - designated XP-225A - flew with an R-1340F in August 1931; it was sent to China for demonstration. Flown by American mercenary pilot Robert Short, the airplane entered combat over Shangai on February 22, 1932, when he interecepted bombers from the carrier Kaga and shot down the lead airplane, this becoming the first Japanese warplane to fall victim to an American warplane. Minutes later, Short fell victim to three escort fighters. Shot down in flames, he was the first JNAF victory claim of the China Wars.
135 P-12Es were ordered by the U.S. Army Air Corps at a unit price of US$9,100 each, in March 1931. The first of these was flown October 15, 1931, and the last - delivered as a P-12F with the R-1340-19 engine - entered USAAC service on May 17, 1932. P-12Es served until both they and the P-26 - the last Boeing fighter - were replaced by the Seversky P-35 and Curtiss P-36 all-metal monoplanes in 1937-38.
|
THE KIT |
The model comes on two sprues of light grey plastic with a four part resin cockpit, and the tail surfaces and ailerons are recreated with the corrugated surface that is correct. The injection moldings are thick, but have nice petite scribed surface detail.
The kit provides decals for two airplanes, a P-12E serving with the 26th Pursuit Group in Panama in 1932, and a P-12E of the 308th Observation Squadron of the organized reserve in 1939. I wish there would be further aftermarket decals for the many suqadrons that flew these airplanes, but such is unlikely. A modeler could use the unit markings in Aeromaster's P-26 sheet, since these units almost all flew P12s prior to converting on to the P-26. This was what I ended up doing with this model, creating a P-12E flown by the Group staff of the 17th Pursuit Group in 1932, just prior to re-equipment with the first P-26s.
|
CONSTRUCTION |
This is a biplane model for an experienced biplane modeler, and is a challenge even there. The kit does not have locating pins for the landing gear or wing struts - which are also too long and need shortening if the upper wing is not to end up sitting too high above the fuselage.
As I said in my article on the companion F4B-4, construction begins with sanding out the fuselage halves in the vicinity of the cockpit to allow the cockpit interior to be seen. What is provided is simple, but given that one looks at it through a small cockpit opening, what is there is effective. Remember when making seat belts that at this time American military airplanes did not use shoulder harnesses, only lap belts. After the fuselage halves were glued together and the resulting seam sanded smooth, I attached the horizontal stabilizer and the lower wings. So far, so good, the easy part is over.
 The
landing gear is where things begin to get difficult. You need to have
photographs of the real airplane, and will need to test-fit the landing gear as
you cut it and sand it and shape it to fit. It's a good idea at this point to
attach the drop tank. I covered over the forward part of the top of the tank
with 15-mil sheet styrene, since the hole can be seen when the tank is properly
attached otherwise. When I finally got the
The
landing gear is where things begin to get difficult. You need to have
photographs of the real airplane, and will need to test-fit the landing gear as
you cut it and sand it and shape it to fit. It's a good idea at this point to
attach the drop tank. I covered over the forward part of the top of the tank
with 15-mil sheet styrene, since the hole can be seen when the tank is properly
attached otherwise. When I finally got the
landing gear to look right, I attached it with cyanoacrylate. The kit comes with a resin tailwheel, the same as for the F4B-4. This is incorrect for the P-12E, which flew mostly from grass strips and in consequence used a tailskid. I scratchbuilt a tailskid with Evergreen rod, eyeballed from photos in the Squadron book.
The cabane and interplane struts are more difficult to get right. I shortened the interplane struts 3/32" on either end, then sanded them to give the proper outward-splayed angle when attached to the wings.
I then glued the struts to the lower wing. When they were set up, I attached the upper wing by tacking it to the interplane struts with a drop of C-A, and then measured and cut the cabane struts to fit properly, and glued them to the fuselage in the proper positions. When they had set up, I detached the upper wing.
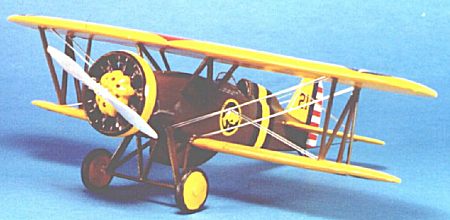
The engine is all resin, with separate cylinders and crankcase. Cut the separate cylinders off right at their base, and attach them to the crankcase. I use .020 Evergreen rod to finish the magnetos and glued them in position. I then glued the two halves of the cowling together. When it was dry and the join seam smoothed away, I test fitted the engine inside the cowling and sanded off a bit of the cylinder heads to allow the engine to slip inside smoothly.
The kit provides the original individual exhaust stacks, which can be used of you are making the Panama airplane. However, if you are making the later airplane, or airplanes of other units during the period, you need to examine the photographs of these airplanes in the Squadron book, and see how the exhausts were changed. These can be scratchbuilt with Evergreen rod, which is what I did. As an alternative, if you have an "extra" Hobbycraft P-26 - or are going to make it as an early version with the individual exhaust stacks - you can use the late version exhausts from this kit, as both the P-12E and the P-26 used the same engine. I ended up using the early exhausts on an airplane done as a 95th Pursuit Squadron, 17th Pursuit Group, airplane based at March Field in 1932.
|
PAINT & DECALS |
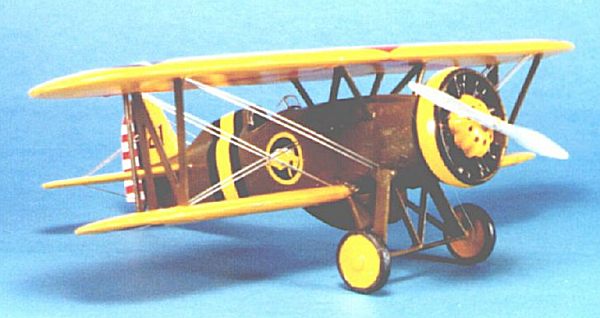
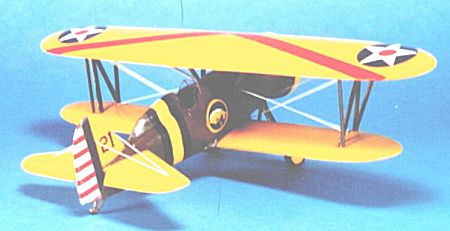
 At the
time the P-12E was in front line service, the wings and tail surfaces were
painted Insignia Yellow, while the fuselage, interplane struts and landing gear
were painted Olive Drab. You should note that this is not Shade 41 Olive
Drab of World War II, but the more green-based Olive Drab used on military
vehicles of the period. I painted the yellow of the fuselage and cowling stripes
when I painted the wings, then masked them and painted the black stripes before
painting the fuselage overall Olive Drab.
At the
time the P-12E was in front line service, the wings and tail surfaces were
painted Insignia Yellow, while the fuselage, interplane struts and landing gear
were painted Olive Drab. You should note that this is not Shade 41 Olive
Drab of World War II, but the more green-based Olive Drab used on military
vehicles of the period. I painted the yellow of the fuselage and cowling stripes
when I painted the wings, then masked them and painted the black stripes before
painting the fuselage overall Olive Drab.
I painted the propeller with Future, and when it was dry to the touch but not fully set up, I rubbed in SnJ polishing powder and polished out the prop to a high gloss.
When all this was fully dry, I gave everything a coat of Future. When it was dry, we were ready for the decals.
Classic Airframes now uses Micro-Scale decals, which makes everything easy. The decals went on with no trouble. The "Kicking Mule" of the 95th Pursuit Squadron came from the old Micro-Scale 1/32 P-12 sheet, where it is too small in 1/32 and perfect for 1/48 (a common MicroScale/SuperScale mistake you should watch for whenever you used markings from this manufacturer).
|
CONSTRUCTION CONTINUES |
Final assembly included attaching the vacuformed windscreen and telescopic gunsight, and attaching the upper wing. Having pre-fitted the wing, it went on easily. I then glued the engine inside the cowling with cyanoacrylate and glued it into position on the front of the fuselage.
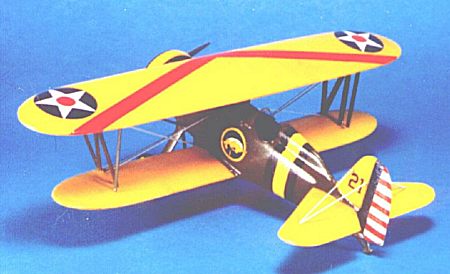
Rigging:
The great bugbear of biplane models: the rigging. You can't get away from it, though, because this is where the model "comes alive." Fortunately, the Boeing P-12E/F4B-4 has a very simple rigging system. I used Evergreen .010 x .020 strip, painted silver, to create the flat-section "raf wires" used on the airplane. These attached easily with white glue and all was done.
|
CONCLUSIONS |
As you can see from the accompanying photos, this is a good-looking model when completed. and I can tell you it looks good sitting next to a Hobbycraft P-26 "Peashooter."
Copyright ModelingMadness.com
Thanks to Classic Airframes for providing the review kit.
Review copy courtesy of me and my wallet! If you would like your product reviewed fairly and fairly quickly, please contact the editor or see other details in the Note to Contributors.
Back to Reviews Page 2016