|
KIT: |
Tamiya 1/48 Swordfish on Floats |
|
KIT # |
61071 |
|
PRICE: |
$68 |
|
DECALS: |
See review |
|
REVIEW & |
|
|
NOTES: |
Aeromaster sheet 48-488 used on this kit |
|
HISTORY |
The Fairey Swordfish first saw the light of day as a private venture designed in 1932, with its first flight the following year. In 1935, it was presented to their lordships of the Admiralty and Air Ministry as Fairey's response to a specification for a torpedo-spotter-reconnaissance aircraft for operation from the Royal Navy's aircraft carriers and battleships (in its floatplane version).
 When the Swordfish
entered service with the Royal Navy's Fleet Air Arm in 1936, it looked like a
refugee from another age, a fabric-covered biplane in the dawning age of metal
monoplanes. By the time war broke out in 1939, the Swordfish was considered
obsolete. However, it would be one of five aircraft in first line service of all
combatants in 1939 that would still be in first line service in 1945, the others
being the German Bf-109 and He-111, and the British Spitfire and Hurricane.
When the Swordfish
entered service with the Royal Navy's Fleet Air Arm in 1936, it looked like a
refugee from another age, a fabric-covered biplane in the dawning age of metal
monoplanes. By the time war broke out in 1939, the Swordfish was considered
obsolete. However, it would be one of five aircraft in first line service of all
combatants in 1939 that would still be in first line service in 1945, the others
being the German Bf-109 and He-111, and the British Spitfire and Hurricane.
Amazing as it may seem to look at the ungainly Swordfish, it is the most successful naval strike aircraft in history. Its exploits are the stuff of legend: a floatplane from the battleship HMS "Warspite" single-handedly sank a German U-boat and directed the fire of the "Warspite" to sink three German destroyers in Narvik during the Norwegian campaign in April 1940.
|
THE KIT |
The first Swordfish kit, (Tamiya kit 61068) was the landplane version, followed by the floatplane version, which is reviewed here. What does a modeler get for this most-expensive ever model of a 1/48 single-engine aircraft? (Editor's note: Actually, several of the Fine Molds kits several years ago retailed at over $70, but add the etched rigging and the Swordfish is so far the most expensive mass-produced injected styrene plastic kit ever done.) It's a big box, full of over 200 crisply-molded parts in traditional Tamiya dark grey plastic, with the typical Tamiya flash-free production.
|
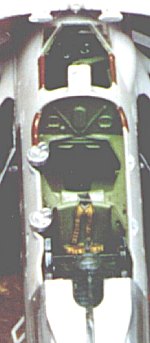
CONSTRUCTION |
 This is a model that starts with the cockpit. The instructions are clear, the
parts work, there are no difficulties encountered in putting together the
sub-assemblies and fitting them into a well-detailed interior.
This is a model that starts with the cockpit. The instructions are clear, the
parts work, there are no difficulties encountered in putting together the
sub-assemblies and fitting them into a well-detailed interior.
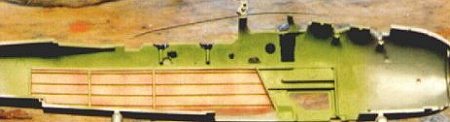
 In
painting the Swordfish interior, the modeler who hasn't built British biplanes
before needs to be aware that the fabric exterior was covered in red primer.
Depending on how well the primer was worked into the fabric, it would be seen in
the interior as blotchy red through the doped fabric, which is generally a light
tan. I accomplished this by air brushing Gunze-Sanyo H-414 "RLM
Rot23," a light brick-red color, then "blotching" that with
Gunze-Sanyo H-085 "Sail Color," which the picky-picky modelers at the
World War One List have determined is a good representation of doped fabric. The
fabric area was masked off when dry and the rest of the interior was painted
Gunze-Sanyo H-312 "Light Green," which is a good approximation of
British Interior Green. The other color used in the Swordfish
In
painting the Swordfish interior, the modeler who hasn't built British biplanes
before needs to be aware that the fabric exterior was covered in red primer.
Depending on how well the primer was worked into the fabric, it would be seen in
the interior as blotchy red through the doped fabric, which is generally a light
tan. I accomplished this by air brushing Gunze-Sanyo H-414 "RLM
Rot23," a light brick-red color, then "blotching" that with
Gunze-Sanyo H-085 "Sail Color," which the picky-picky modelers at the
World War One List have determined is a good representation of doped fabric. The
fabric area was masked off when dry and the rest of the interior was painted
Gunze-Sanyo H-312 "Light Green," which is a good approximation of
British Interior Green. The other color used in the Swordfish
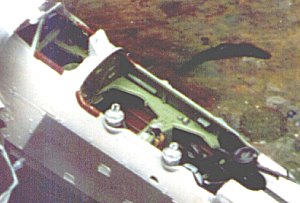 interior is H-002
"Gloss Black" on all metal detail items. I used H-017 "Cocoa
Brown" for the leather padding on the seats and the cockpit coaming pads.
The painting instructions are clear and should be followed.
interior is H-002
"Gloss Black" on all metal detail items. I used H-017 "Cocoa
Brown" for the leather padding on the seats and the cockpit coaming pads.
The painting instructions are clear and should be followed.
I used the seat belt decals, putting them on a piece of lead foil from a wine bottle. Once they were dry, I cut them out and had a nice flexible seat belt assembly that could be placed on the seats with a much more realistic look than otherwise.
Once the interior has
been painted and assembled, it is fitted into the right fuselage half. This is
the one part of the entire construction that is the slightest bit
"fiddly," and it is very important to get it exactly right. Failure to
do so will make much grief down the line and turn the air over the workbench
many shades of purple. The problem here is, there are two pins on
 the interior
assembly, that have to fit into two holes on the fuselage half, exactly. They
don't really want to. I used Cyanoacrylate on each, hitting it with accelerator,
to get the assembly properly positioned. If you get this fit right, the rest of
the fuselage will come together easily without use of any putty. I started
gluing along the upper fuselage aft of the cockpit, and ended up using four
rubber bands to hold the fuselage together for about an hour until it set up.
the interior
assembly, that have to fit into two holes on the fuselage half, exactly. They
don't really want to. I used Cyanoacrylate on each, hitting it with accelerator,
to get the assembly properly positioned. If you get this fit right, the rest of
the fuselage will come together easily without use of any putty. I started
gluing along the upper fuselage aft of the cockpit, and ended up using four
rubber bands to hold the fuselage together for about an hour until it set up.
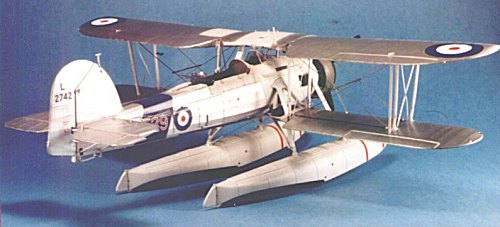
While the fuselage was setting up, I attended to the floats, which assemble easily, including the struts that attach to the fuselage. I had previously drilled out the proper holes for the attachment of these struts as shown in the instructions.
The wings go together easily. A main spar in the upper center section becomes the main support of the wings when deployed. I left off the large bracing struts between the fuselage and lower center stubs, since it makes painting there problematic.
|
PAINT & DECALS |
Painting:
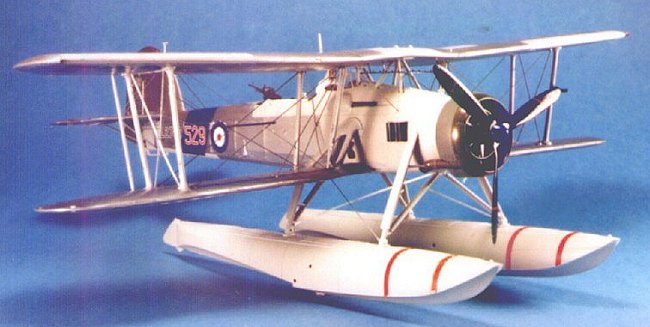
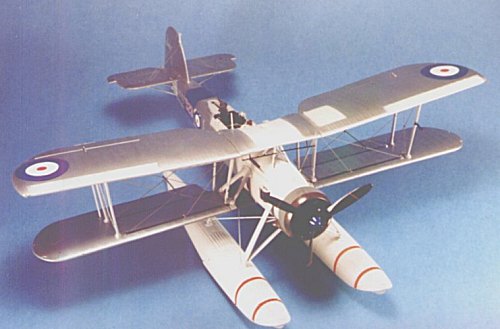
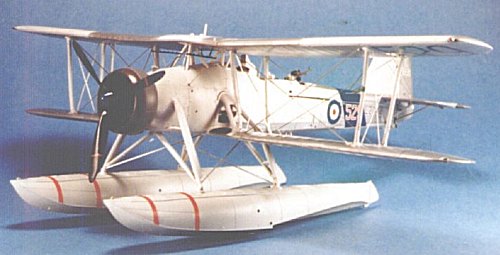
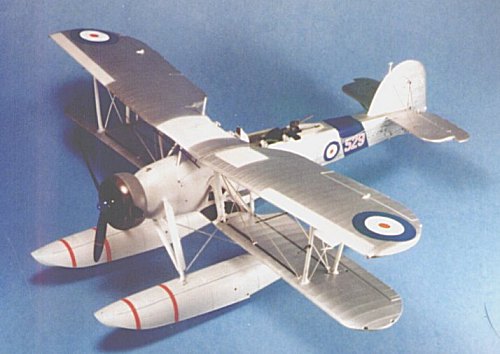
I had already decided I wanted to do a pre-war airplane, the one shown on the box art, a Swordfish from 701 (Catapult) Flight, based at RNAS Kalafrana, Malta, in 1938. This is likely the best-known pre-war Swordfish on floats due to a beautiful Charles Smith air-to-air photograph. The metal sections of the fuselage, as well as all struts, the leading edge slats in the upper wing and the floats, were all painted H-322 "Light Aircraft Grey." When the paint was fully dry it was masked off and all fabric areas were painted with Testors TS1401 "Aluminum," and then covered with TS1409 "Metalizer Sealer," which gave the look of aluminum dope.
Decals:
 Unfortunately, the
Tamiya decals were wrong, having the national insignia in the darker World War
II colors, rather than the lighter (and brighter) pre-war colors, and not having
the full set of underwing markings, as well as an incorrect individual aircraft
number on the fuselage. Tamiya did these markings from the photograph, which
shows the aircraft number as white due to sun reflection - rather than red with
a white border as it should be - and also does not reveal that the underwing
number is also on the lower left wing. Obviously, Tamiya was not conversant with
the markings instructions for FAA pre-war aircraft. Fortunately, Aeromaster had
recently released their two sheets of Swordfish markings, which had the aircraft
with correct-color national markings, correct aircraft number and proper
underwing codes. These all went on with a minimum of fuss, with liberal use of
SuperScale Micro-Sol decal solvent; the new Aeromaster decals, which are no
longer printed by MicroScale, are thicker, and need a bit of extra effort, but
the results still look good.
Unfortunately, the
Tamiya decals were wrong, having the national insignia in the darker World War
II colors, rather than the lighter (and brighter) pre-war colors, and not having
the full set of underwing markings, as well as an incorrect individual aircraft
number on the fuselage. Tamiya did these markings from the photograph, which
shows the aircraft number as white due to sun reflection - rather than red with
a white border as it should be - and also does not reveal that the underwing
number is also on the lower left wing. Obviously, Tamiya was not conversant with
the markings instructions for FAA pre-war aircraft. Fortunately, Aeromaster had
recently released their two sheets of Swordfish markings, which had the aircraft
with correct-color national markings, correct aircraft number and proper
underwing codes. These all went on with a minimum of fuss, with liberal use of
SuperScale Micro-Sol decal solvent; the new Aeromaster decals, which are no
longer printed by MicroScale, are thicker, and need a bit of extra effort, but
the results still look good.
|
CONSTRUCTION |
The photo-etch rigging works. Be careful to use the piece that is called for in the particular position. You will need to widen the slot the outer interplane struts fit into in the lower surface of the upper wing so that it slides in with the wire arttached, but this is the only "fiddly" part of the operation. The lower wings fit well to the stubwing center sections, and the entire assembly was set aside to firmly set up. The airplane was looking good at this point. Since the photo showed this airplane without underwing ordnance, I did not use any of that provided in the kit.
 Tamiya does not include
photoetch for the wire needed for the rear control surface cables. I generally
use a high-E guitar string for this; I attach a weight to one end and tape it to
the wall to straighten it - voila! - .008 stainless steel wire. Be certain to
study photographs when attaching these wires, as they have an idiosyncratic fit
from most control wires.
Tamiya does not include
photoetch for the wire needed for the rear control surface cables. I generally
use a high-E guitar string for this; I attach a weight to one end and tape it to
the wall to straighten it - voila! - .008 stainless steel wire. Be certain to
study photographs when attaching these wires, as they have an idiosyncratic fit
from most control wires.
Once the rigging was done, I sprayed it overall with flat varnish to get rid of the unnatural shininess of the photo-etch.
Option 2: Folding The 'Fish
I have enjoyed folding the wings of naval aircraft since back when I figured out how to do a Corsair using a piece of piano wire set into a wingtip-to-wingtip tunnel inside the wing. I have particularly liked the fact that Tamiya has been giving a folded wing option to the naval aircraft they have done.
I have built a kit of the landplane version with the wings folded per the kit instructions. The engineering of this option is so good that - once finished - you can pick the model up by a wingtip with complete confidence of it holding together. I have also seen a built-up floatplane model with the wings folded, and it looked very good indeed.
|
CONCLUSIONS |
Tamiya has certainly created one of the best kits ever with this Swordfish model. Wings spread or wings folded, on floats or wheels, it looks superb and well worth the price.
If you would like your product reviewed fairly and quickly by a site that has over 800 visits a day, please contact me or see other details in the Note to Contributors.