Hasegawa 1/72 F2A-2 Buffalo
| KIT #: | AP 45 |
| PRICE: | $Currently OOP |
| DECALS: | Two USN options |
| REVIEWER: | Les Dorr Jr |
| NOTES: | Mix of kit and aftermarket decals |
| HISTORY |
For basic historical information on the checkered history of the F2A Buffalo, I’ll defer to Tom Cleaver’s most excellent writeup.
Just let me expand
on some aspects of the F2A-2 version of the Buffalo that may be of interest
to modelers. Visually, the 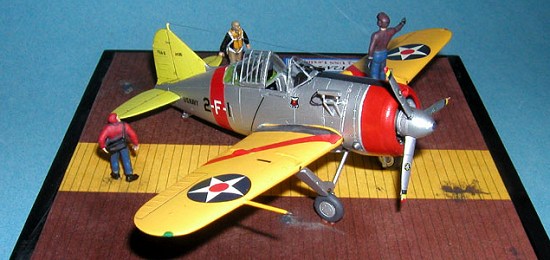 most noticeable differences from the -1 were a
larger spinner and cuffed Curtiss Electric propeller. The –2 also had a
modified cowling, relocated exhaust stacks and a series of gas vents on the
fuselage aft of the cowling.
most noticeable differences from the -1 were a
larger spinner and cuffed Curtiss Electric propeller. The –2 also had a
modified cowling, relocated exhaust stacks and a series of gas vents on the
fuselage aft of the cowling.
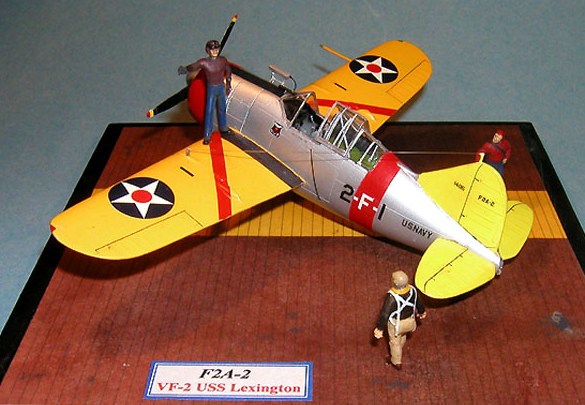
The F2A-2 entered service with fighter squadrons VF-2 (USS Lexington) and VF-3 (USS Saratoga) late in 1940. To eliminate vibration and drag, the VF-2 “Fighting Chiefs” replaced the standard fuselage radio antenna mast with a small stub mast fastened to the port wing. The aircraft initially served in the high-viz scheme featuring aluminum lacquer on the fuselage and lower wing surfaces, yellow-orange upper wing surfaces, tail surfaces in lemon yellow (Lexington) or insignia white (Saratoga) and bright section colors. In 1941, the F2As received the then-standard overall light gray paint scheme with white numerals.
| THE KIT |
Hasegawa’s F2A-2 Buffalo reflects the quality and detail level of their 1/72 kits released in the mid-to-late 1990s. Panel lines are recessed. The cockpit is basic, featuring just a seat, stick, rudder pedals and decal instrument panel. There is no sidewall detail or seat belt harness.
The area behind the cockpit includes the F2A-2’s distinctive life raft container, but you have to open holes for the tabs. The actual rear brace for the container (part A4) is nothing like what’s shown in the instructions. It’s a smaller version of part A3, but you have to fill the slot and chop the legs way down to fit it under the canopy. The canopy itself is molded in three sections, and you can sit the sliding section over the rear if you want an open cockpit.
 The forward and
rear sections of the fuselage halves are broken down into separate pieces
to accommodate different versions of the Buffalo. You have to cut a slot
for the separate tail hook. The wings consist of upper and lower halves
which, when assembled, fit into a box formed by the cockpit floor. The
horizontal stabilizers are single pieces.
The forward and
rear sections of the fuselage halves are broken down into separate pieces
to accommodate different versions of the Buffalo. You have to cut a slot
for the separate tail hook. The wings consist of upper and lower halves
which, when assembled, fit into a box formed by the cockpit floor. The
horizontal stabilizers are single pieces.
The landing gear is decently detailed for the scale, and includes the correct tail wheel assembly for the carrier-based F2A-2. The propeller is a seven-piece affair that features separate blades and the large spinner for this version. The decals are well printed. The national insignia, red/yellow/blue prop tips and section stripes have white underlying decals to help make them opaque.
According to my research, there’s a problem with the markings for one of the VF-2 aircraft. Under the Navy’s identification system at the time, “2-F-5” was the second plane (of three) in the second “section” (of six) in the squadron. As such, it should have had the upper part of the cowling and wing stripes painted insignia white, and should have no fuselage stripe. The instructions, however, tell you to paint the upper cowling lemon yellow and put on fuselage and wing stripe decals of the same color. Wherever Hasegawa got their information from, it’s wrong…unless the actual 2-F-5 went against existing Navy orders for some really odd reason.
I believe Hasegawa’s painting instructions are incorrect in two other important areas. They call out interior green for the cockpit parts and fuselage interior. That may be accurate for the camouflaged F2A-3, but all the references I’ve found for pre-war F2A-1 and -2 cockpits suggest the actual aircraft interior was aluminum lacquer with flat black forward of the third rib. The instructions also tell you to paint the fuselage and underside of the wings light gray, but aluminum lacquer is the right color.
| CONSTRUCTION |
I put some glue in the box, shook it, and out fell a completed Buffalo! OK, not quite...but compared to the Odyssey I normally experience when building a kit, this one was a snap.
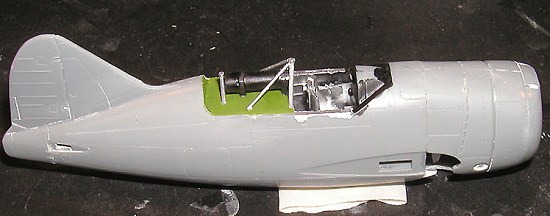
 Since I planned to
display my F2A-2 with the canopy slid back, I enhanced the interior with a
few details. Using photos of an XF2A-2 cockpit as a guide, I added ribs,
stringers, a radio, throttles and some sort of control wheel (for flaps?).
I brush-painted the interior Testors spray can metallic silver (in my
opinion, a good match for aluminum lacquer) and Model Master (MM) aircraft
interior black as appropriate. The cockpit parts themselves went together
perfectly; I painted the seat, floorboard and stick shaft silver, adding a
black stick grip. I also made seat belts from masking tape, with bits and
pieces of spare photoetched brass for buckles.
Since I planned to
display my F2A-2 with the canopy slid back, I enhanced the interior with a
few details. Using photos of an XF2A-2 cockpit as a guide, I added ribs,
stringers, a radio, throttles and some sort of control wheel (for flaps?).
I brush-painted the interior Testors spray can metallic silver (in my
opinion, a good match for aluminum lacquer) and Model Master (MM) aircraft
interior black as appropriate. The cockpit parts themselves went together
perfectly; I painted the seat, floorboard and stick shaft silver, adding a
black stick grip. I also made seat belts from masking tape, with bits and
pieces of spare photoetched brass for buckles.
I deviated from the instructions and glued the forward fuselage parts (C7 and C8) and the tiny wheel well extensions (parts B3 and B4) to their respective fuselage halves, then painted the all the inside surfaces metallic silver. At this point, I also cut out the slot for the hook in the tail pieces and cemented them to the fuselage halves. The now-complete fuselage parts went together with no problems using liquid cement. I did have to use CA glue to seal the seams, but it’s more a reflection of my imperfect technique than any fit issues. The match wasn’t as good between the forward fuselage parts and the bottom insert (part C5). I filled the resulting seams with CA glue and sanded them smooth. I also filled and sanded the tiny gas vent near the tail on each side of the fuselage. It’s a feature of the F2A-1 that wasn’t on the –2.
 Next, I glued the
life raft container halves together, painted them interior black, and cut a
small slot for the assembly’s front peg in the area behind the cockpit. The
triangular rear brace was far too small to fit in the slot provided, so I
filled the slot with plastic strip and CA glue and sanded it smooth. After
studying a photo of the actual aircraft, I painted the rear deck interior
green; it certainly doesn’t look black like the life raft container, but it
doesn’t appear to be aluminum lacquer, either. When the paint was dry, I
carefully glued the container and its supports in place. I also added two
side supports – clearly visible in photos but not included with the kit --
made from plastic rod.
Next, I glued the
life raft container halves together, painted them interior black, and cut a
small slot for the assembly’s front peg in the area behind the cockpit. The
triangular rear brace was far too small to fit in the slot provided, so I
filled the slot with plastic strip and CA glue and sanded it smooth. After
studying a photo of the actual aircraft, I painted the rear deck interior
green; it certainly doesn’t look black like the life raft container, but it
doesn’t appear to be aluminum lacquer, either. When the paint was dry, I
carefully glued the container and its supports in place. I also added two
side supports – clearly visible in photos but not included with the kit --
made from plastic rod.
I painted the engine with MM Steel (cylinders and case) and Engine Gray (front housing), then used a black Sharpie marker to color the pushrods. When everything was dry, I glued the engine and the front of the cowling to the fuselage. I cemented the wing halves together, sanded the seams smooth, and drilled holes to represent the wing-mounted .50 cal. machine guns. The completed parts slipped into the fuselage slots without leaving any gaps.
Before painting, I covered the rear and sliding sections of the canopy with masking tape and secured them with white glue. I also temporarily white-glued the expendable alternate windshield (without the hole for the telescopic sight) in place to mask the forward cockpit. Finally, I sealed the front of the cowling with masking tape and the two small inlets with white glue.
| COLORS & MARKINGS |
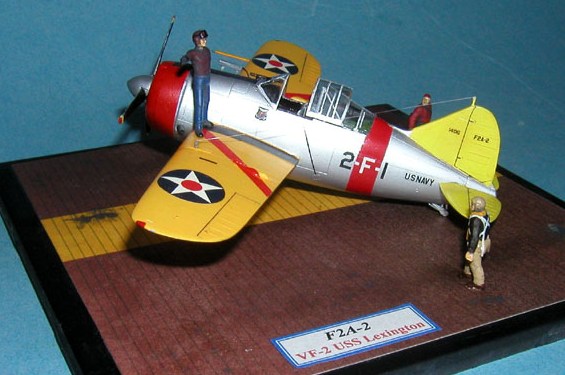
I wanted to build
my F2A-2 as the “2-F-1” aircraft flown by VF-2 squadron leader Lieutenant
Commander H.S. Duckworth because a) I wanted to do something other than the
kit markings and b.) I had found an excellent shot of his plane on the
American Aero Services website.
First step was airbrushing a coat of Testors flat white to check for any imperfections. After fixing a couple minor dings, I hand-brushed the vertical tail and horizontal stabilizers (still separate from the airframe) with a 59-cents-a-bottle acrylic matte color called “Buttercup.” To my eye, it’s an excellent match for the lemon yellow used on the empennages of Lexington’s air group.
The relatively small Buffalo wings (pun intended!) also let me brush-paint their upper surfaces. I relied once again on the el cheapo craft store acrylics, mixing a little “Christmas Red” with “Bright Yellow” to produce a yellow-orange shade somewhat darker than the oft-used “chrome yellow” (FS 13538), which my research over the years suggests is lighter than the actual 1930s Navy wing color.
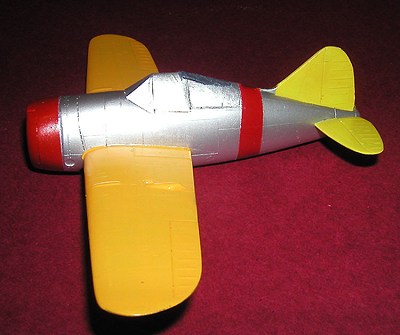
 I masked the upper
wing surfaces, tail, stabilizers and fuselage except for a narrow band aft
of the cockpit and the fuselage forward of the prominent gas vents, then
airbrushed the exposed areas with MM Insignia Red. When the paint was dry,
I covered the red areas, and shot a couple coats of metallic silver over
the airframe, wheels (which I’d skewered on toothpicks) and the landing
gear parts, prop blades and spinner (which I’d left on their sprues). After
pulling all the masking off, I hand-brushed several coats of Future on the
red, yellow-orange and lemon-yellow areas to prepare them for decals.
I masked the upper
wing surfaces, tail, stabilizers and fuselage except for a narrow band aft
of the cockpit and the fuselage forward of the prominent gas vents, then
airbrushed the exposed areas with MM Insignia Red. When the paint was dry,
I covered the red areas, and shot a couple coats of metallic silver over
the airframe, wheels (which I’d skewered on toothpicks) and the landing
gear parts, prop blades and spinner (which I’d left on their sprues). After
pulling all the masking off, I hand-brushed several coats of Future on the
red, yellow-orange and lemon-yellow areas to prepare them for decals.
I used many of the kit decals. The “1” numerals on the fuselage and wings came from a Super Scale sheet of all-purpose Navy markings, as did the red wing stripes after I narrowed them somewhat. I printed the Bu.No. 1406 on clear decal sheet with my inkjet printer using Long Beach USN type. Microscale Super Sol solvent fused all the decals into the paint.
At this point, I installed the horizontal stabilizers. I wrapped up the major painting chores by applying a grimy black “sludge wash” to all the control surfaces. When everything was dry, I airbrushed several coats of MM Semi-Gloss Lacquer over the airplane to cut down the shine of the Future-d parts without dulling the “aluminum” finish too much.
| FINAL CONSTRUCTION |
I assembled the landing gear struts and doors with CA glue -- clever engineering conveniently hides some prominent ejector pin marks – and mounted them to the fuselage. I also painted the tires grimy black and glued them in place. Next, I glued the propeller parts together; the rear of the blades should be flat black, and the tip of the spinner should be a very dark gray (apparently some kind of cap). The multi-colored prop tip decals avoided tedious painting, but they were a bear to work with on the narrow tip surfaces. The hole in the engine front needed a little reaming for the prop shaft to fit.
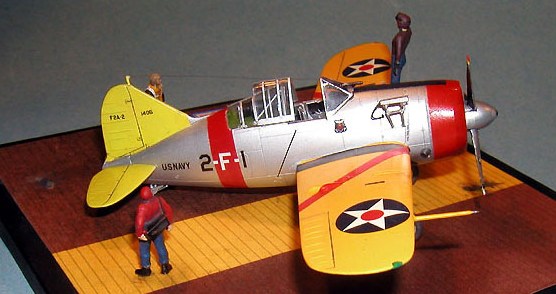
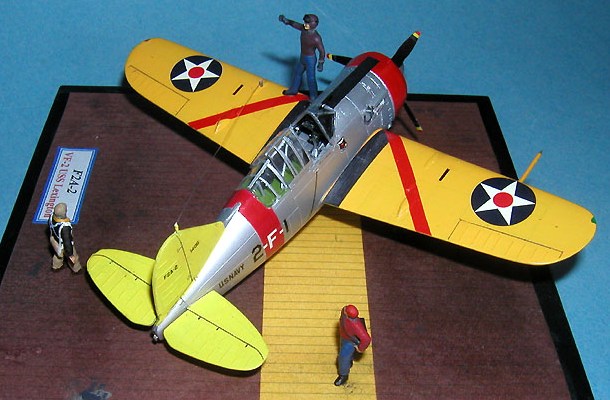 I scratchbuilt
2-F-1’s prominent gun camera from bits of plastic rod and mounted it to
holes I drilled into the fuselage with a #76 bit. The wire (for triggering
the camera?) is a piece of black thread. I also used small pieces of scrap
plastic for the antenna masts on the tail and port wing. (The instructions
don’t mention that VF-2 mechanics dismantled the standard mast forward of
the cockpit.) I replicated the aerial with stretched clear sprue, securing
it to the masts with CA glue. To finish up, I added the pitot tube to the
starboard wing and painted it yellow-orange with a steel tip and mounted
the steel-painted tail hook to its rear fuselage opening.
I scratchbuilt
2-F-1’s prominent gun camera from bits of plastic rod and mounted it to
holes I drilled into the fuselage with a #76 bit. The wire (for triggering
the camera?) is a piece of black thread. I also used small pieces of scrap
plastic for the antenna masts on the tail and port wing. (The instructions
don’t mention that VF-2 mechanics dismantled the standard mast forward of
the cockpit.) I replicated the aerial with stretched clear sprue, securing
it to the masts with CA glue. To finish up, I added the pitot tube to the
starboard wing and painted it yellow-orange with a steel tip and mounted
the steel-painted tail hook to its rear fuselage opening.
I popped off the canopy parts and removed the masking tape. I sprayed metallic silver on a piece of double-sided clear adhesive tape, then cut several small strips with an X-Acto knife. I applied the strips to the rear and sliding canopy sections, cutting them to the correct length. I touched up with silver paint wherever necessary. I hand-painted the windshield frames, removing any excess outside the lines with a sharpened toothpick, then installed the telescopic sight. When all three sections were done, I white-glued them to the fuselage.
The last step was adding the Buffalo’s clear underside window with white glue. Hasegawa provides a light gray decal for the complex framing, but the color difference against the “aluminum” isn’t really obvious.
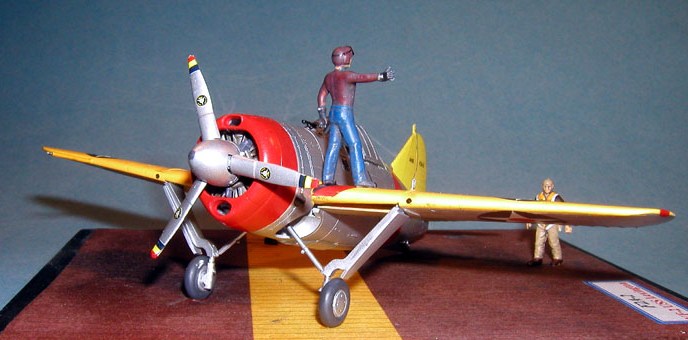
The figures in the vignette, each slightly modified, came from various sources. The “flight deck” is something I created using the drawing functions in Microsoft Word and printed on card stock. The base is a painted ceramic tile.
| CONCLUSIONS |
The Hasegawa F2A-2 was one of the best-engineered kits I’ve ever done…a joy to build. The couple of screw-ups in the instructions are easy to deal with if you’re forewarned. I highly recommend this kit to any “Yellow Wing” enthusiast!
| REFERENCES |
Maas, Jim, F2A Buffalo in Action, Squadron/Signal Publications, Inc., 1987
McKillop, Jack, “Brewster F2A Buffalo”
http://www.microworks.net/pacific/aviation/f2a_buffalo.htm
National Museum of Naval Aviation’s “Featured Aircraft” page: http://broadcast.illuminatedtech.com/display/index.cfm?bp=131
American Aero Services website: http://www.americanaeroservices.com/carrier_page2.htm
March 2005
Copyright ModelingMadness.com. All rights reserved. No reproduction in part or in whole without express permission.
If you would like your product reviewed fairly and quickly, please contact the editor or see other details in the Note to Contributors.