Matchbox 1/72 Supermarine Stranraer
| KIT #: | PK 601 |
| PRICE: | $16.00 on auction |
| DECALS: | Three options |
| REVIEWER: | Greg Ewald |
| NOTES: | Seek ye filler in great quantities. |
| HISTORY |
 After WW1,
Supermarine came into their own with the production of such great planes as
the Southampton and the Scapa…predecessors to the outstanding design of the
Stranraer (named after a coastal town in Scotland). The Stranraer was of
mostly metal construction, and ruggedly built…with a lot of redundancies,
which made it stable as get-out, but something of a tank in a pilot’s
eyes. The biplane configuration made the Stranraer a wonderful spotting
platform, although it did have 3 lewis machine guns as armament, and could
carry a limited amount of bombs or depth charges…it was lauded mostly for
it’s ability to loiter, very useful in anti-submarine warfare.
After WW1,
Supermarine came into their own with the production of such great planes as
the Southampton and the Scapa…predecessors to the outstanding design of the
Stranraer (named after a coastal town in Scotland). The Stranraer was of
mostly metal construction, and ruggedly built…with a lot of redundancies,
which made it stable as get-out, but something of a tank in a pilot’s
eyes. The biplane configuration made the Stranraer a wonderful spotting
platform, although it did have 3 lewis machine guns as armament, and could
carry a limited amount of bombs or depth charges…it was lauded mostly for
it’s ability to loiter, very useful in anti-submarine warfare.
The Stranraer went through several modifications during pre-war, wartime, and post-war service (some of them were still up and running long after WW2), but the basic hull configuration stayed near the same as the original 1934 version. For an in-depth look at the plane, I heartily recommend Mushroom publications #6113, well worth the price for a look at such an amazing aircraft…
| THE KIT |
Please visit the preview to see what comes in the box.
| CONSTRUCTION |
As far as building the kit goes…this one takes a lot of filler, and a lot of sanding to get just right, almost like a limited production kit. Most of the parts fit together nicely, but the major seams need a lot of work.
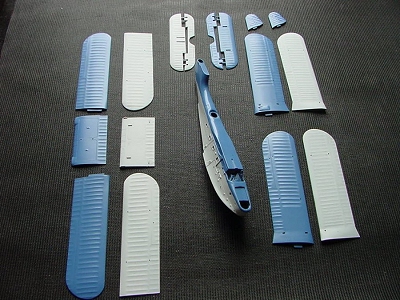 The first thing
to tackle is the three tone casting…I sprayed all of the sprues with light
grey primer, both sides, and set aside to dry. Rustoleum makes a great
spraycan primer that does a good job of covering the odd colours, and
without losing any detail. Since the wings are molded in upper and lower
halves, I took this opportunity to paint the uppers with Testor’s
“intermediate blue” and the lower wings with a 50/50 mix of flat white and
aluminium (again, Testor’s Model Master paints) to represent the aluminium
dope used pre-and mid-war.
The first thing
to tackle is the three tone casting…I sprayed all of the sprues with light
grey primer, both sides, and set aside to dry. Rustoleum makes a great
spraycan primer that does a good job of covering the odd colours, and
without losing any detail. Since the wings are molded in upper and lower
halves, I took this opportunity to paint the uppers with Testor’s
“intermediate blue” and the lower wings with a 50/50 mix of flat white and
aluminium (again, Testor’s Model Master paints) to represent the aluminium
dope used pre-and mid-war.
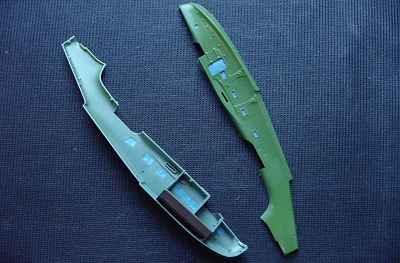 The interior
of the fuselage was painted “R.A.F. interior green”, and set aside to dry.
Once dry enough to handle blue masking tape, I cut out small squares
slightly larger than the hull window openings, and gently taped them into
place. The cabin and walls were painted the same interior green, and
spot-glued into place while the two fuselage halves were carefully put
together…don’t drink too much coffee here, a steady hand is a must to align
the 3 walls, the cabin, and the two halves! Tape the son-of a-gun up, and
set aside to dry.
The interior
of the fuselage was painted “R.A.F. interior green”, and set aside to dry.
Once dry enough to handle blue masking tape, I cut out small squares
slightly larger than the hull window openings, and gently taped them into
place. The cabin and walls were painted the same interior green, and
spot-glued into place while the two fuselage halves were carefully put
together…don’t drink too much coffee here, a steady hand is a must to align
the 3 walls, the cabin, and the two halves! Tape the son-of a-gun up, and
set aside to dry.
The wings go together quite well, but I did remove the location pins to get a flat bond…the leading edges needed a little bit of filler , but the trailing edges glued up just fine. The nacelles were another story…glue them together, and start puttying and sanding. I had to re-scribe details on my kit after all was said and done.
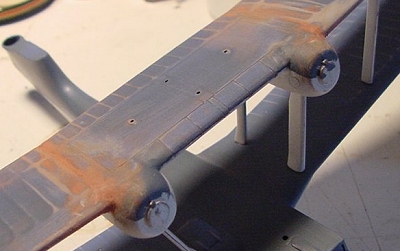 I did not
attach the cowlings and engine to the nacelles until the very end of the
project to ease in painting…and with all of the filling I could see coming
up from my dry fits.
I did not
attach the cowlings and engine to the nacelles until the very end of the
project to ease in painting…and with all of the filling I could see coming
up from my dry fits.
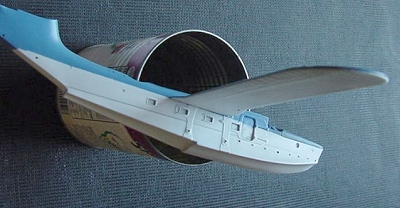 In step 6, you add
on the middle gun tub, and the wings. Putty and sand, putty and sand…I
recommend you have a good cd to listen to , or cable tv on in your studio,
as this process takes quite a while ! Shaving the tub (part 25) to fit
exactly helps save some time…the wings, however, fit o.k., but you may need
to prop the plane up in a jig while the glue sets up… I used a large can to
keep the hull level while I attached each wing.
In step 6, you add
on the middle gun tub, and the wings. Putty and sand, putty and sand…I
recommend you have a good cd to listen to , or cable tv on in your studio,
as this process takes quite a while ! Shaving the tub (part 25) to fit
exactly helps save some time…the wings, however, fit o.k., but you may need
to prop the plane up in a jig while the glue sets up… I used a large can to
keep the hull level while I attached each wing.
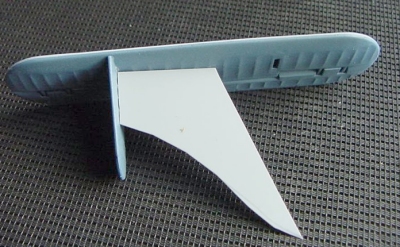
The tail assembly is equally as tricky, but with less putty…I did find that parts 30 and 31 (rudders) needed to be held square while gluing…I made a little styrene square to check the angle as they dried.
Disaster Strikes! It was at this point, while taking a picture of the model in progress, that my tripod and camera fell square upon the delicate thing, and I ended up regluing and refinishing the whole dang fuselage/wing assembly…one of those frustrating things that can happen, and certainly an obstacle…took a deep breath, and decided to push on.
 In step 8, I
left off the tail assembly, reasoning that it would be too hard to rig the
wings with it in the way. Attaching the middle upper wing assembly is
somewhat tricky, the instructions are rather ambiguous as to what goes
where… after several test fits, I determined that the main struts
go all
of the way through the nacelle to meet the bottom of the wing. Gluing
this
In step 8, I
left off the tail assembly, reasoning that it would be too hard to rig the
wings with it in the way. Attaching the middle upper wing assembly is
somewhat tricky, the instructions are rather ambiguous as to what goes
where… after several test fits, I determined that the main struts
go all
of the way through the nacelle to meet the bottom of the wing. Gluing
this 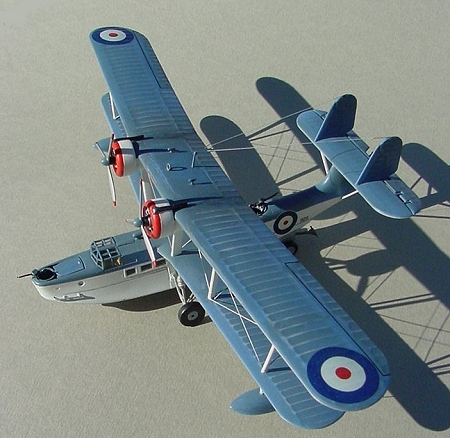 assembly into
place is a little tough, the use of a few draftsmen’s angles helps out with
making sure the whole structure is perpendicular to the lower wing…some
rough eyeballing is also necessary. Set aside to thoroughly dry.
assembly into
place is a little tough, the use of a few draftsmen’s angles helps out with
making sure the whole structure is perpendicular to the lower wing…some
rough eyeballing is also necessary. Set aside to thoroughly dry.
When you go to attach the upper wings to the center section, glue the inner struts (82-85) first, making sure that the wings are centered and at the right dihedral. After this whole thing has set up, attach the uprights (90 and 91) then the angled struts.
These seams required as much time filling and sanding as did the main hull, I used Bondo finishing putty to take care of the divides, with frequent sandings between coats, then rescribing details lost in the process.
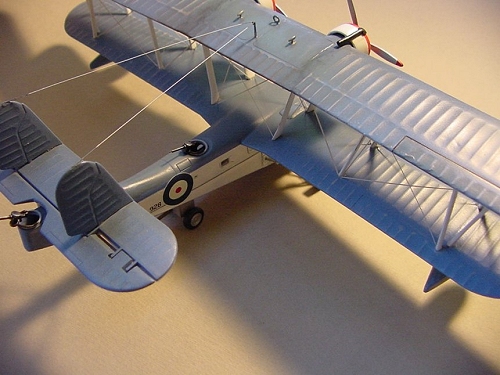
The outrigger floats get the same treatment, while they are drying, you can build the beaching gear cart, putty and sand as necessary. Assemble the wheel halves, sand and paint…but leave the gear unassembled until you attach the main struts to the fuselage. Once the gear was sturdy, I felt free to do the rigging. Using stretched, painted sprue, with a pair of calipers, I attached each one of the cross-riggings as noted in the available photographs and illustrations with white glue…surprisingly enough, this was one of the easiest planes to rig I have ever worked on ! Gluing on the tail was a bit of a process, use a slow setting glue that gives you some maneuvering room and check your angles as it dries.
| COLORS & MARKINGS |
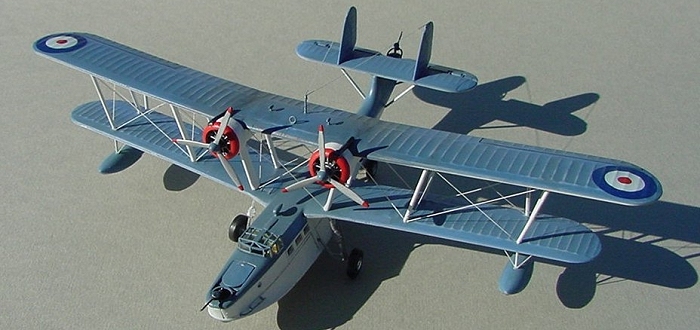
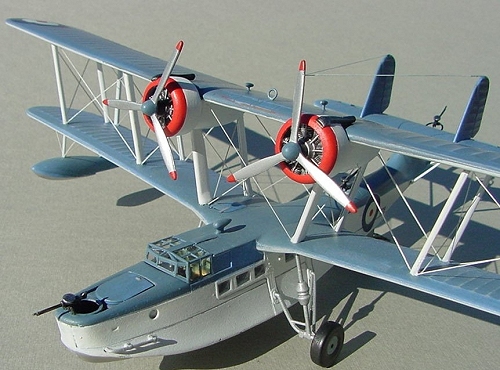
Using Krylon to
prime made this a simple early build, and I went with a common pre-war
scheme of blue over white/aluminium for my Canadian bird. Applying coats
of paint, and sanding in between, brings out the neat fabric details of the
Stranraer, 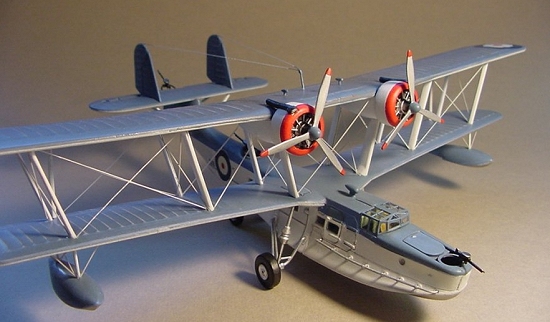 weathering was done using light gull gray with a smattering of
steel…I like airbrushing with Testor’s Model Master Acrylics, as they dry a
little slower than the others I have used, and thin easily.
weathering was done using light gull gray with a smattering of
steel…I like airbrushing with Testor’s Model Master Acrylics, as they dry a
little slower than the others I have used, and thin easily.
The bottom of the hull was painted in layers of aluminium and steel, and burnished to a nice worn glow. I painted the beaching gear with bright steel and chrome…often these were painted grey in the field, but I wanted to depict a coastal craft.
After punching in and removing the blue tape window coverings, Krystal-Kleer was used for the small windows…I used the kit canopy as mine was really quite nice…a quick dip in some future and ‘violla” !! A little bit of weathering with coloured pencils and a ultra-fine Sharpie made the lines stand out on the whole plane.
Kit decals in this box were hideous, and I used some spares…but I am hoping that with the advent of the publication of Mushroom’s #6113, some aftermarket decals may become available…would be a great addition to this kit !
| CONCLUSIONS |
 This model is not
for the weekend build, that is for sure…but it would be perfect for someone
wanting to tackle an interesting subject who is just breaking into limited
edition kits…kind of halfway between the mainstream and the limited, with
the benefits of both. If you have one on your shelves, start it…if you see
one at a sale, I would heartily recommend buying it. Just don’t drop a
camera on it…
This model is not
for the weekend build, that is for sure…but it would be perfect for someone
wanting to tackle an interesting subject who is just breaking into limited
edition kits…kind of halfway between the mainstream and the limited, with
the benefits of both. If you have one on your shelves, start it…if you see
one at a sale, I would heartily recommend buying it. Just don’t drop a
camera on it…
| REFERENCES |
http://www.airforce.forces.gc.ca/equip/historical/stranraerlst_e.asp
http://1000aircraftphotos.com/HistoryBriefs/SupermarineStranraer.htm
the new book: http://squadron.com/ItemDetails.asp?item=QM6113
March 2005
Copyright ModelingMadness.com. All rights reserved. No reproduction in any form without express permission from the editor.
If you would like your product reviewed fairly and fairly quickly, please contact the editor or see other details in the Note to Contributors.