Roden 1/72 He-111B
|
KIT # |
005 |
|
PRICE: |
$23.98 MSRP: Too much considering the hassles |
|
DECALS: |
Three options |
|
REVIEWER: |
Mark Fordham |
|
NOTES: |
Looks good in the box.....but..... |
|
HISTORY |
Only a few planes in WWII aviation history deserved to be called "Great". One of them was the Heinkel He-111. The unsuccessful debut of the first production version of the He 111A was not a disappointment for Ernst Heinkel even though the aircraft was fitted with BMW VI engine, which caused the aircraft to be under powered. The Last of the five pre-production prototypes, He 111V5, was equipped with the new DB 600 engine. The aircraft competed its first take-off in May of 1936. With a full military load it reached a maximum cruising speed of 340 km/h (211 mph), and these results were considered very successful at the time.
 The RLM immediately
ordered the first production batch; the first production samples being
delivered to KG 154 "Boelcke". At the same time, in August of 1936, the
Spanish Civil War began. The Republican Government received military help
from the Soviet Union, Germany, and Italy, together they gave support to
general Franko and his rebels. The Aviation part of this support
consisted of a special group named the "Legion Condor". At first, the
"Legion Condor" received only Ju 52 transport planes; because Germany
declared that its support would be non-military in nature. But during
this time the republicans had obtained new soviet-built bombers, which
they called "Katyushka" (well known as the Tupolev SB), and Hermann
Goring insisted on testing one of the new German bombers in real war
conditions. The Spanish Civil War was an excellent occasion for trials
concerning the new-generation of planes; the He 111B,Do 17E, and Ju 86D.
The RLM immediately
ordered the first production batch; the first production samples being
delivered to KG 154 "Boelcke". At the same time, in August of 1936, the
Spanish Civil War began. The Republican Government received military help
from the Soviet Union, Germany, and Italy, together they gave support to
general Franko and his rebels. The Aviation part of this support
consisted of a special group named the "Legion Condor". At first, the
"Legion Condor" received only Ju 52 transport planes; because Germany
declared that its support would be non-military in nature. But during
this time the republicans had obtained new soviet-built bombers, which
they called "Katyushka" (well known as the Tupolev SB), and Hermann
Goring insisted on testing one of the new German bombers in real war
conditions. The Spanish Civil War was an excellent occasion for trials
concerning the new-generation of planes; the He 111B,Do 17E, and Ju 86D.
During February of 1937 the first four He 111B-1's as well as the Do 17E and Ju 86D arrived from Hamburg. These bombers made up the " Versuchsbomberstaffel" (Experimental Bomber squadron) and operated in the K/88 bomb group. In a short time the He 111B had won a reputation as the "Best of the bombers", and was separated and put into an individual sub-flight with the semi-official name "Pedro". This name would have all the planes together with individual aircraft numbers.
 In March 1937 the
"Pedro's" achieved their first success in battle, when attacking a
Republican airfield near Alcals de Henares. The group destroyed 24 enemy
planes on the ground. Later the "Pedro's" took part in the famous raid on
Guernica, which came into history as a symbol of brutality and cruelty,
more than 1,500 civilians were killed.
In March 1937 the
"Pedro's" achieved their first success in battle, when attacking a
Republican airfield near Alcals de Henares. The group destroyed 24 enemy
planes on the ground. Later the "Pedro's" took part in the famous raid on
Guernica, which came into history as a symbol of brutality and cruelty,
more than 1,500 civilians were killed.
The He 111B served in the "Legion Condor" until mid 1938, when they were re-equipped with the more modern He 111E. The majority of the He 111B's were lost in action; others were withdrawn from service in connection with a considerable amount of damage.
The bloody experience of the Spanish War confirmed that the He 111 would have a potential for large battle campaigns. Massive serial production started in the Dornierwerke (at Wismar), Arado Flugzlugwerke (at Babelsberg), and Algemeine Transportgesell-shaft (in Leipzig); besides, the new Heinkel plant was quickly built at Oranienburg (near North Berlin). Less than a year later, weekly production of He 111 would be 100 aircraft. From the first days of World War II until the end, the He 111 would be the main Luftwaffe medium bomber. History courtesy of the instructions.
|
THE KIT |
The
Roden He 111B was for a long time high on the top of my “to get” list and
thanks to a very good friend of mine and a little dickering on services
for kind I walked away with one of the
 He 111B’s under my arm
one warm and windy March, on arrival at home everything was immediately
pushed off my desk in preparation of building this beastie.
He 111B’s under my arm
one warm and windy March, on arrival at home everything was immediately
pushed off my desk in preparation of building this beastie.
Forewarned by the OOT group build of the Pedro when it was first released I knew that the kit had a few “issues” but never in my life did I realise that this saga would spread out over the next 3 months, consume vast amounts of Tamiya putty and keep the local breweries in profit for the rest of the year, then there’s the cost of the shrink, the weeks of intensive therapy and the nightmares, oh the nightmares, nights and nights of lying there staring at the ceiling trying to piece together part A into slot B without going whoooowhooooo!
As you may gather this kit has the odd fit issue, in fact it would be easier to list the parts that did fit without major hacking and sanding than it would to list every single modification needed to build this piece of …. Err classic aviation history.
Looking at the sprues lulls you into a false sense of security that this will be a shake and bake kit with a high level of detail with pretty much a full interior with detailed bomb bays and unusual for this scale full wheel well detail. The sprues a relatively free of flash and all the panel lines are finely recessed and just the right amount of rivet detail to satisfy an Airfix junkie like myself.
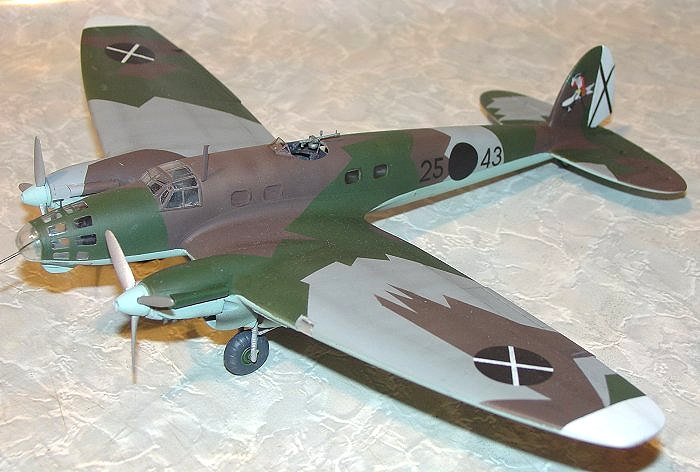
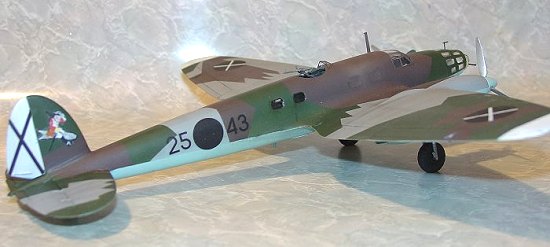
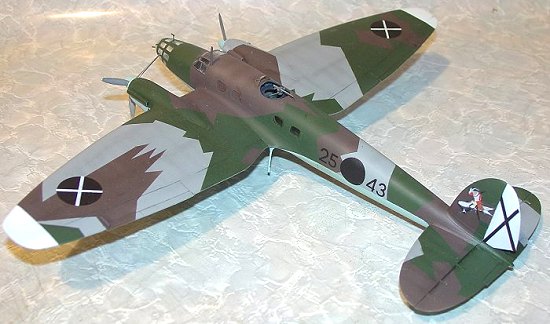
Decals are for three Spanish civil war aircraft two overall grey ones and a three colour splinter camouflaged one.
|
CONSTRUCTION |
Construction starts with a trip to the model shop to stock up on Tamiya putty and a quick detour to the off licence for some liquid calmer. Consulting with some online buddies of mine that had built this beast when it first came out gave me an insight and a few pointers on how to tackle some of the biggest problems, first recommendation was to ditch the bomb bay assembly as it is too wide for the fuselage and sure enough I quickly knocked together the major assemblies of the bomb bay and then tried to close up the fuselage, lo and behold there was a gap of 2 mm at the front of the fuselage, bomb bay goes into the spares box!
 Both
Mike Horrell and Bruno warned me of the fuselage problem with the
cockpit transparency and thankfully I checked the width of the
transparency early on in the game, sure enough IF I had glued the
fuselage together so they fitted without the gaps the canopy would be 1.5
mm too wide, what to do, what to do, hacking up transparencies isn’t
something I like doing at the best of times so I thought that the best
way of fixing this would be to pack the fuselage out and use the
transparency width as a guide.
Both
Mike Horrell and Bruno warned me of the fuselage problem with the
cockpit transparency and thankfully I checked the width of the
transparency early on in the game, sure enough IF I had glued the
fuselage together so they fitted without the gaps the canopy would be 1.5
mm too wide, what to do, what to do, hacking up transparencies isn’t
something I like doing at the best of times so I thought that the best
way of fixing this would be to pack the fuselage out and use the
transparency width as a guide.
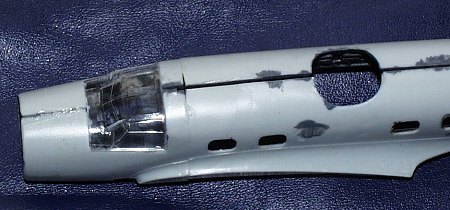
I assembled the cockpit as per instructions and sure enough every piece in the cockpit needed to be trimmed and shaved to fit properly, once painted the cockpit was glued into one side of the fuselage and the internal nose detail added as well. I glued around the rudder as far as the plastic touched and taped the canopy to the fuselage.
 This
left me with a gap of around 1.5 mm at the nose tapering back to nothing
at the rudder. The next course of action was to cut off the nose glass
and tack them together with white glue, once dry this was glued to the
front of the fuselage with white glue again , making sure that the sides
where flush. Once dry I could then go back and cut plastic shims to fill
the gaps, once dry the gap was slathered with putty and put aside to dry
for a few days.
This
left me with a gap of around 1.5 mm at the nose tapering back to nothing
at the rudder. The next course of action was to cut off the nose glass
and tack them together with white glue, once dry this was glued to the
front of the fuselage with white glue again , making sure that the sides
where flush. Once dry I could then go back and cut plastic shims to fill
the gaps, once dry the gap was slathered with putty and put aside to dry
for a few days.
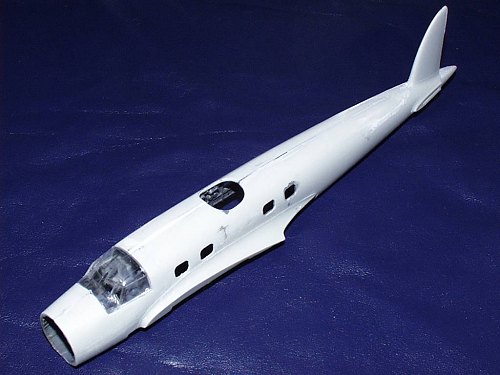
With both the nose and canopy glass masked off I could then reglue them with superglue and fair the glassed area in with putty, a fair amount of sanding was still needed to get everything smooth.
Moving onto the wings presented more problems as although they look really good and detailed on the sprues fit about as well as Fosters at a Kiwi BBQ (Kiwi, Ozzie humour J ) the wing halves need to be shaved, trimmed and sanded to get the two pieces to mate together. A quick word should be said of the undercarriage bays, these need to be added before the wing halves are glued together but 1mm need to be trimmed off the height of the side of the wheel well so they fit and the wings mate together.
 On
mating up the wings to the fuselage there was a step of about 2mm at the
bottom of the wing, I jammed a piece of plastic into the gap between the
wings and managed to decrease the gap down to .5mm, heavy duty sandpaper
finally took out the final step and in the process took out most of the
fine detail on the underside. More detail was lost in assembling the
engine inserts as again lots of filing, filling, sanding and polishing is
needed just to get these pieces to fit. The instructions are rather vague
as to the placement of the engine parts to make matters worse.
On
mating up the wings to the fuselage there was a step of about 2mm at the
bottom of the wing, I jammed a piece of plastic into the gap between the
wings and managed to decrease the gap down to .5mm, heavy duty sandpaper
finally took out the final step and in the process took out most of the
fine detail on the underside. More detail was lost in assembling the
engine inserts as again lots of filing, filling, sanding and polishing is
needed just to get these pieces to fit. The instructions are rather vague
as to the placement of the engine parts to make matters worse.
There is a good 30 hours of solid work involved getting the fuselage, wings and engines assembled on this beastie. Shake and bake it’s not. But finally the thing is starting to take shape. The tailplanes needed very little work apart from a light swish with the sandpaper and in fact is one of the few parts of the kit that didn’t need vast amounts of work or filler just to get it onto the airframe.
The Pedro’s undercarriage is rather complex and like every other assembly so far needed it’s fair share of trimming and “tweaking” I should take the time to say that that has been the underlying issue with this kit right from the start, nothing in this kit can be cut off the sprues and glued straight onto the model, you have to trim, sand, bend, push, poke, lengthen, coax, swear at just to glue the dam thing in place, most frustrating.
|
COLORS & MARKINGS |
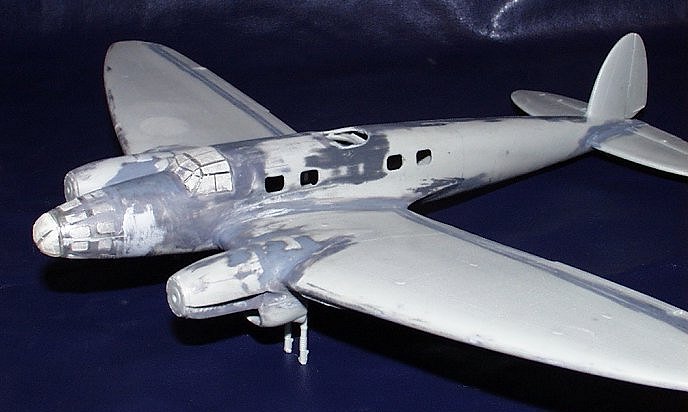
Looking at the decals I had wanted to do the all grey Pedro that was on Roden excellent box art, but again forewarned by the OOT group build I knew there was a better than 50/50 chance that the decals would be useless, so I cut out one that was essential and tried them , sure enough they hit the water and disintegrated into millions of pieces, sigh.
 Surfing the OOT group build site and “Googling” the He III Pedro I
managed to find a Three colour splintered camo’ed aircraft that had
mostly black codes and markings, perfect as I can use my laser printer to
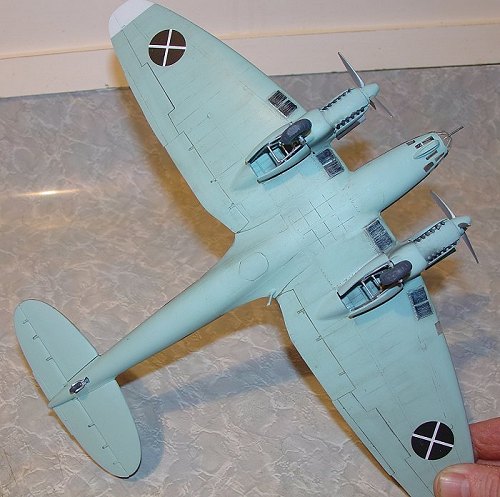
print out the basic marking for this one. The Pedro was sprayed with
overall light gray to act as an undercoat and the first colour of the
three colour splinter camo. The gray was then masked off using the kits
painting quide and the green was then sprayed and left to dry, this was
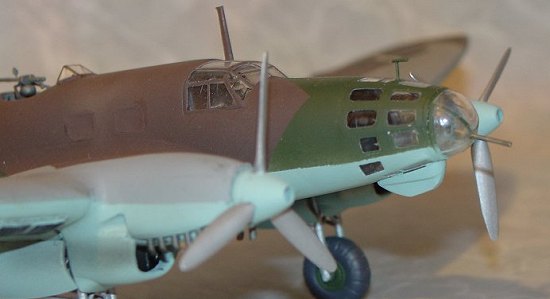
then masked off and the chocolate brown was then sprayed on. The upper
side was the masked of and Humbrol 65 blue was sprayed on the underside
of the Pedro. This is one of those paint jobs that you spend 3 hours
masking and 5 minutes spraying!
Surfing the OOT group build site and “Googling” the He III Pedro I
managed to find a Three colour splintered camo’ed aircraft that had
mostly black codes and markings, perfect as I can use my laser printer to
print out the basic marking for this one. The Pedro was sprayed with
overall light gray to act as an undercoat and the first colour of the
three colour splinter camo. The gray was then masked off using the kits
painting quide and the green was then sprayed and left to dry, this was
then masked off and the chocolate brown was then sprayed on. The upper
side was the masked of and Humbrol 65 blue was sprayed on the underside
of the Pedro. This is one of those paint jobs that you spend 3 hours
masking and 5 minutes spraying!
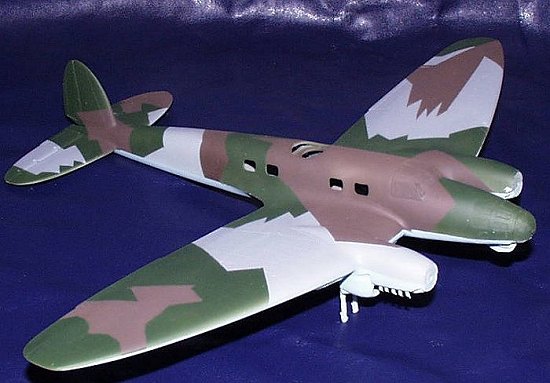
Now
for the moment of truth all the masking tape was peeled off and the odd
overspray spot was the touched up. The white wing tips and rudder were
masked off and sprayed Humbrol White as this give a better coverage than
the Tamiya white. Once the masking tape was removed from the white I them
post sprayed Tamiya smoke along the panel lines to give some definition
of panels and try and trick the eye into not seeing all the missing panel
detail.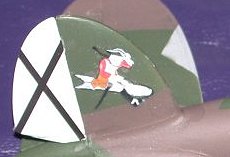
All the decals were home printed on a HP Laser printer and the tail art was “drawn” from a 1/48th scale decal sheet and printed out using my HP 810 deskjet printer on Testors deskjet printer paper, of course a computer printer will not print grey (the bomb) so I had to go back and hand paint that part of the decal and I haven’t done a particularly good job of it. this was the first time I had used this paper and I’m not 100% happy with the decals but I’ve not sealed them and when/if someone brings out this plane in 1/72nd scale decals I can quickly remove the tail art without damaging the paintwork and add better ones.
|
FINAL CONSTRUCTION |
 Again
forewarned about the fuselage windows not fitting I had elected not to
use the supplied glass and opted to fill the windows in with Kristal
Kleer after all the painting had been done, thankfully the Pedro windows
lend themselves to this sort of treatment I found out at the eleventh
hour that the front windows were painted over in the Spanish Pedros so I
had to break out the airbrush again and paint over the Kristal Kleer.
Again
forewarned about the fuselage windows not fitting I had elected not to
use the supplied glass and opted to fill the windows in with Kristal
Kleer after all the painting had been done, thankfully the Pedro windows
lend themselves to this sort of treatment I found out at the eleventh
hour that the front windows were painted over in the Spanish Pedros so I
had to break out the airbrush again and paint over the Kristal Kleer.
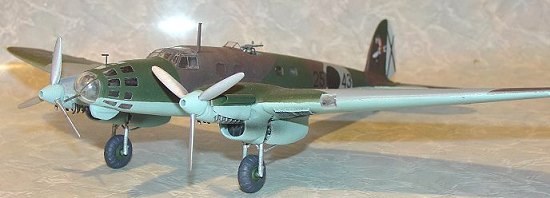
Final weathering was done using water colour paints and pastel chalk and with a final coat of matt kote the Pedro was finished, total build time was just on 3 months with an average 10 hours a week over the course of weeknight evenings as I devote the weekend to family time and don’t model.
|
CONCLUSIONS |
An extremely difficult kit to finish, I bet a lot of these have been started but left to languish in the “to hard” pile, Most people who know me know I get off on really crappy kits but I have to admit this one almost beat me, and in fact if it wasn’t for the fact that my mate Roland Davies went to a lot of effort to get me this particular kit it would still be sitting on my desk now.
 I would
like to thank Roland Davies for the kit, Bruno for the Testors decal
sheet and encouragement and Mike Horrell for the advice on the fuselage,
finally the other members of the OOT Roden (t) Pedro build.
I would
like to thank Roland Davies for the kit, Bruno for the Testors decal
sheet and encouragement and Mike Horrell for the advice on the fuselage,
finally the other members of the OOT Roden (t) Pedro build.
Personally I’m proud to have one in my collection and it has pride of place sitting on top of the TV but I doubt if I would/could built another one, the amount of work needed to get this kit together is mind boggling! It came very close to burning me out and I had to switch to a ship model to regain my interest in modelling again.
|
REFERENCES |
Google He 111 Pedro
Cutting edge decal set CED48238 1/48th scale
June 2004
Copyright ModelingMadness.com. All rights reserved. No reproduction in part or in whole without express permission.
If you would like your product reviewed fairly and fairly quickly, please contact the editor or see other details in the Note to Contributors.