
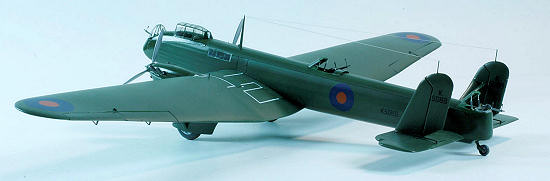
Contrail 1/72 Fairey Hendon
| KIT #: | ? |
| PRICE: | $2.00 in 1980 |
| DECALS: | One option |
| REVIEWER: | Tom Draper |
| NOTES: | Vacuformed plastic. Modeldecals used for roundels |
| HISTORY |
 The Fairey Hendon was a
failed British attempt to design a modern heavy night bomber.
The project started in 1927 and was delayed by the crash of the
prototype. The Air Ministry delayed
things even more while it tried to decide whether to convert Fairey’s stringer
and fabric design to an all-metal aircraft.
In the event, only 14 service examples were manufactured starting in
1936, by which time the aircraft was obsolescent.
All went to 38 squadron.
It’s two 600 HP Kestrel engines provided a stately cruise of 130 mph with a bomb
load of 1660 lbs. Mercifully,
Hendons were taken out of service in 1939 to be replaced with Whitleys.
The Fairey Hendon was a
failed British attempt to design a modern heavy night bomber.
The project started in 1927 and was delayed by the crash of the
prototype. The Air Ministry delayed
things even more while it tried to decide whether to convert Fairey’s stringer
and fabric design to an all-metal aircraft.
In the event, only 14 service examples were manufactured starting in
1936, by which time the aircraft was obsolescent.
All went to 38 squadron.
It’s two 600 HP Kestrel engines provided a stately cruise of 130 mph with a bomb
load of 1660 lbs. Mercifully,
Hendons were taken out of service in 1939 to be replaced with Whitleys.
| THE KIT |
Actually, it took me longer
to build my example than it took the RAF to get their 14 aircraft.
I got out my Putnam, converted the dimensions to 1/72 scale, blew up
their plan to size, and concluded the kit was hopelessly incorrect.
That was that for about twenty-five years until I got it out again.
I really like the lines of the Hendon (it’s roughly the size of a B-17
and quite graceful) and
 spent a day researching the aircraft, this time, on the
Internet. I found out that
Putnam’s info on the Hendon’s dimensions was incorrect, and so was their
drawing. Basic dimensions were
miscalculated. My plan from
Aviation News was correct, but I thought it was wrong because I believed
Putnam’s dimension info.
However, after much investigation, I discovered that the kit itself was
correct as to fuselage and wing dimensions.
Things seemed ready to go and I was in business.
Unfortunately, Contrail’s plan that came with the kit and the kit itself
was based on the incorrect plan in Putnam’s when it came to wing underside shape
and tail dimensions. The prototype
kept getting confused with the production aircraft, the tail of which differed
from the prototype in shape as well as vertical and horizontal measurements.
The kit had the tail shape right, but scaled them to the prototype’s
dimensions.
spent a day researching the aircraft, this time, on the
Internet. I found out that
Putnam’s info on the Hendon’s dimensions was incorrect, and so was their
drawing. Basic dimensions were
miscalculated. My plan from
Aviation News was correct, but I thought it was wrong because I believed
Putnam’s dimension info.
However, after much investigation, I discovered that the kit itself was
correct as to fuselage and wing dimensions.
Things seemed ready to go and I was in business.
Unfortunately, Contrail’s plan that came with the kit and the kit itself
was based on the incorrect plan in Putnam’s when it came to wing underside shape
and tail dimensions. The prototype
kept getting confused with the production aircraft, the tail of which differed
from the prototype in shape as well as vertical and horizontal measurements.
The kit had the tail shape right, but scaled them to the prototype’s
dimensions.
After researching the plane,
and comparing the kit to the photos and info I amassed, here is what I was faced
with:
·
The fuselage was correct in length,
although lumpy, with simplified detail.
The clear part for the nose turret area was useless.
The one-man greenhouse was correct for the first few production aircraft.
·
The tail dimensions were for
the prototype, not for the production aircraft.
All the parts were too narrow and too short, which I discovered after I
had spent many hours following the Contrail drawing, unwittingly making them for
the prototype.
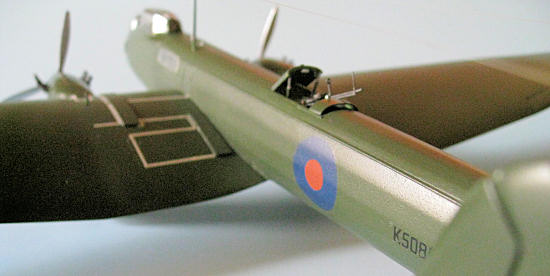 ·
The decal sheet lettering
was correct for the first production aircraft in 1938, early in its service
career, (white underwing serials were changed to black about 1937, as was the
walk way markings) but the roundels were incorrect in size and missing two wing
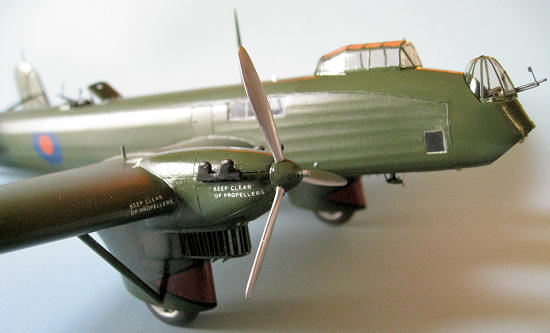
roundels to boot. The decals also
included six tiny “Keep Clear of Propellors” warnings that go on the engine
nacelles and wing leading edge.
·
The decal sheet lettering
was correct for the first production aircraft in 1938, early in its service
career, (white underwing serials were changed to black about 1937, as was the
walk way markings) but the roundels were incorrect in size and missing two wing
roundels to boot. The decals also
included six tiny “Keep Clear of Propellors” warnings that go on the engine
nacelles and wing leading edge.
·
The wing was correct in
dimensions, but in the middle of the build, I found that the curve of the bottom
of the wing was incorrect, necessitating cutting away most of the bottom surface
and replacing it with flat plastic card.
·
The white metal Ram’s Horn
exhausts were correct for the prototype, but not for K5085, which was different
from most of the production run.
·
The wheel spats were ¼” too
short. No main landing gear was
provided.
·
There was only rudimentary
interior detail – and I could find no visual references at all for the specific
interior configuration.
Therefore, I had to design
and scratch build almost all external and internal detail using plastic card,
wire, and a few parts from a Matchbox Supermarine Stranraer, all added at
various stages during the build.
| CONSTRUCTION |
The Wing:
It came in five pieces, capturing the washout of the wingtips and the
gulled center section. I sanded off
all detail, cut off the ailerons, and scribed the complex pattern of bomb cell
doors on the center section.
Later, when mating the wing with the fuselage, nothing looked right.
I found a great photo of K5085 flying overhead.
It exposed all kinds of detail, but proved what I
 feared was true.
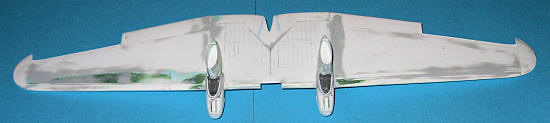
The curve of the bottom of the wing was grossly incorrect.
I cut out the entire bottom of the wing surface except for the leading
and trailing edges and replaced it with flat card stock.
Of course, I had to rescribe all the bomb doors again.
I added internal structure, including a coffee stirring stick for
rigidity, in order to mate the new bottom surfaces with the remaining wing.
This procedure went quite smoothly and allowed the wing and the bottom of
the fuselage to agree with each other – and the photo.
The trailing edge was thinned and the ailerons were shaped to scale and
modified to accept the control horns, which were added later.
feared was true.
The curve of the bottom of the wing was grossly incorrect.
I cut out the entire bottom of the wing surface except for the leading
and trailing edges and replaced it with flat card stock.
Of course, I had to rescribe all the bomb doors again.
I added internal structure, including a coffee stirring stick for
rigidity, in order to mate the new bottom surfaces with the remaining wing.
This procedure went quite smoothly and allowed the wing and the bottom of
the fuselage to agree with each other – and the photo.
The trailing edge was thinned and the ailerons were shaped to scale and
modified to accept the control horns, which were added later.
 The Fuselage:
I found a jar that matched the curves in the fabric scalloping, and
sanded and filled until the lumpiness was gone along the fuselage stringers.
Since the aircraft was used as a troop carrier as well as a night bomber,
I added a catwalk down the interior, curving around the offset pilot station all
the way to the tail gunner’s compartment.
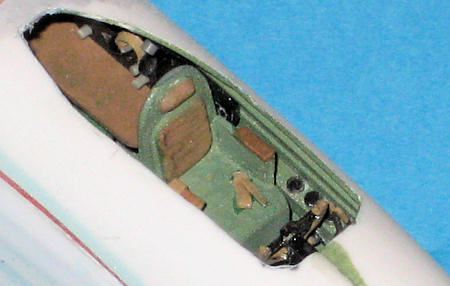
I scratch built a cockpit and a navigator’s station below and behind,
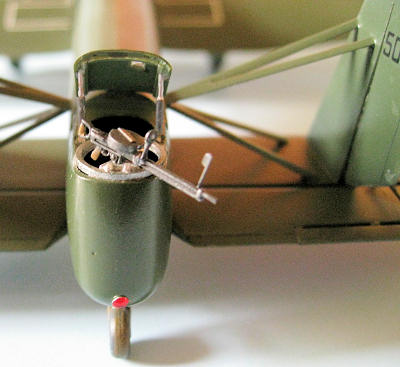
plus a dorsal gun position, and a nose and a tail gunner’s station.
I went into the propeller spare parts box and retrieved a 1/48th
Lindberg He.111 prop spinner, that I modified into a mold (using clear vinyl)
for a vacuformed nose turret, which I made with my Mattel Vac-U-Form machine I
bought in 1965. (One of the most useful modeling tools ever created sez I).
Guns came from a Supermarine Stranraer kit, as did a number of parts that
I used here and there.
The Fuselage:
I found a jar that matched the curves in the fabric scalloping, and
sanded and filled until the lumpiness was gone along the fuselage stringers.
Since the aircraft was used as a troop carrier as well as a night bomber,
I added a catwalk down the interior, curving around the offset pilot station all
the way to the tail gunner’s compartment.
I scratch built a cockpit and a navigator’s station below and behind,
plus a dorsal gun position, and a nose and a tail gunner’s station.
I went into the propeller spare parts box and retrieved a 1/48th
Lindberg He.111 prop spinner, that I modified into a mold (using clear vinyl)
for a vacuformed nose turret, which I made with my Mattel Vac-U-Form machine I
bought in 1965. (One of the most useful modeling tools ever created sez I).
Guns came from a Supermarine Stranraer kit, as did a number of parts that
I used here and there.
I made the unique and very
cool windblast shields that protected the dorsal and tail gunners, plus a
sliding hatch with the Vac-U-Form and a piece of basswood, sanded and sealed
smooth with Aerogloss model airplane dope.
The cockpit canopy came from the kit, which sits offset to port, adding
extra interest to the model.
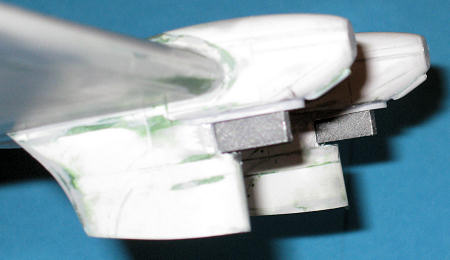 The Engine Nacelles:
Comprised of two times two pieces, the nacelles included the wheel pants,
as well as crudely depicted radiator shells.
I had started these assemblies before I discovered the wing problem, so
they were cut out to conform to the incorrect curved wing undersides.
This, of course, made for mucho rework, but that paled before the fact
that the pants were ¼” too short.
Therefore, I had to cut the bottom portion off and add a horizontal plug halfway
up the pant. This caused all kinds
of problems with the curve of the pants’ trailing edge, but it did give me a way
to mount the kit’s wheels by cutting off a portion of tire and gluing the rest
inside the pants. They also removed
the need for scratch building landing gear, except for the parts nearest the
wheels.
The Engine Nacelles:
Comprised of two times two pieces, the nacelles included the wheel pants,
as well as crudely depicted radiator shells.
I had started these assemblies before I discovered the wing problem, so
they were cut out to conform to the incorrect curved wing undersides.
This, of course, made for mucho rework, but that paled before the fact
that the pants were ¼” too short.
Therefore, I had to cut the bottom portion off and add a horizontal plug halfway
up the pant. This caused all kinds
of problems with the curve of the pants’ trailing edge, but it did give me a way
to mount the kit’s wheels by cutting off a portion of tire and gluing the rest
inside the pants. They also removed
the need for scratch building landing gear, except for the parts nearest the
wheels.
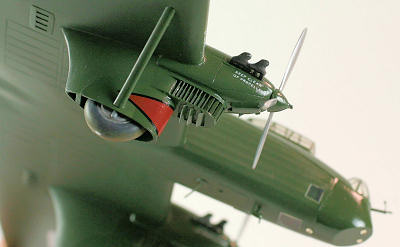
The radiator opening
consisted of scores of adjustable cooling louvers, which opened to let air in
and out of the radiator (not supplied) inside.
I made a radiator, sawed out the kit’s closed louvers, and spent about a
week making new lower chins to the radiator housings and installing scores of
open louvers, which were individually fitted front, side, and bottom.
The kit’s Fairey Reed metal props were supplied in metal.
These props were too
 crude to use, and in any case were used only on the
dual control versions of the production run. I mated modified Stranraer props to
the metal spinners supplied in the kit.
Aligning the two nacelles was a critical step involving much shimming,
filling, sanding, and rescribing.
The Rams Head exhausts were molded
for the dual control Hendons and were incorrect for the early aircraft.
I cut them up, and fashioned them from the incorrect metal pieces
provided. This involved sawing,
supergluing, filling, sanding, losing tiny pieces in the rug, etc.
I cut slots in the sides of the nacelles and installed them at the end of
the build.
crude to use, and in any case were used only on the
dual control versions of the production run. I mated modified Stranraer props to
the metal spinners supplied in the kit.
Aligning the two nacelles was a critical step involving much shimming,
filling, sanding, and rescribing.
The Rams Head exhausts were molded
for the dual control Hendons and were incorrect for the early aircraft.
I cut them up, and fashioned them from the incorrect metal pieces
provided. This involved sawing,
supergluing, filling, sanding, losing tiny pieces in the rug, etc.
I cut slots in the sides of the nacelles and installed them at the end of
the build.
The Tail:
I made the vertical tails too short, and the horizontal tails too narrow
and two short, matching the prototype.
Once I saw my mistake(s), I sawed them up and added pieces of Evergreen
stock, resanding and reshaping everything.
(As with most incorrect model parts, it’s often easier and quicker to
make correct parts from scratch.)
There was no provision to locate the tail on the fuselage, so I sanded a curved
profile to their mating surfaces and tube glued them to the rear fuselage.
This step went more smoothly than most steps in the assembly.
Finally, I made the struts from 30-year-old Airmodel strut material.
| COLORS & MARKINGS |
The entire exterior was
sprayed with Humbrol 114 (NIVO), followed by much clean up and respray, followed
by coats of gloss acrylic, decals, and flat acrylic.
Certain areas of the plane were brush painted with gloss to denote metal
surfaces.
| FINAL CONSTRUCTION |
Fuselage windows were cut from clear plastic sheet, and various details were fashioned from plastic strips, wire, and basswood. Structure for the canopy and turret came from decal strips.
| CONCLUSIONS |
 I must say making this
aircraft gave me a huge amount of satisfaction. Building today’s super-detailed
kits is fun, but today’s modeling seems to be a battle to keep as much detail as
you’re given rather than creating it yourself.
In this case, I fashioned all the detail as well as a lot of the basic
shape of the model. I would have
used resin aftermarket stuff if I had the chance, but for better or worse, the
result is 95% my work, and that’s what vacuform modeling is all about.
I must say making this
aircraft gave me a huge amount of satisfaction. Building today’s super-detailed
kits is fun, but today’s modeling seems to be a battle to keep as much detail as
you’re given rather than creating it yourself.
In this case, I fashioned all the detail as well as a lot of the basic
shape of the model. I would have
used resin aftermarket stuff if I had the chance, but for better or worse, the
result is 95% my work, and that’s what vacuform modeling is all about.
March 2011
Copyright ModelingMadness.com. All rights reserved. No reproduction in part or in whole without express permission.
If you would like your product reviewed fairly and quickly, please contact the editor or see other details in the Note to Contributors.