| KIT: | Airfix 1/72 Spitfire Prototype (conversion) |
| KIT #: | 01071 |
| PRICE: | $8.95 |
| DECALS: | Two options |
| REVIEWER: | Zac Yates |
| NOTES: | Aeroclub set AV057 and Tasman 7204 decals used |
| HISTORY |
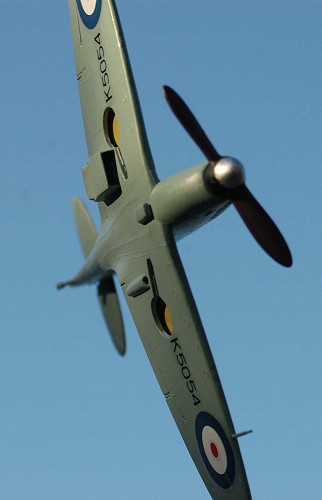
History records that the new fighter, K5054, a direct descendant of the Schneider racers, and soon to become the progenitor of over 22,000 offspring, took to the air on her first flight on March 5 1936. At the controls was Captain J "Mutt" Summers, Vickers' chief test pilot. The maiden flight took about twenty minutes and Summers' comment upon landing that he didn't 'want anything touched' were subsequently misinterpreted and became part of the Spitfire's myth of superiority and technical perfection. K5054's career came to a abrupt end on Monday September 4 1939 when she overturned on landing, killing the pilot. (from "The Supermarine Spitfire: A Comprehensive Guide for the Modeller. Part 1: Merlin Powered" by Robert Humphreys, published by SAM Publications).
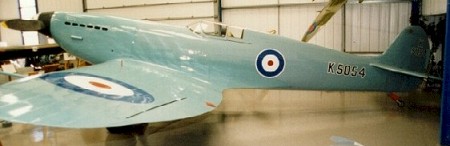
K5054 has been largely ignored by kit manufacturers (Pegasus have produced a short-run injection-moulded kit in 1:72, Czechmaster one in resin) despite its historical significance and for the aftermarket fan, conversion sets are available from Paragon Designs, Tasman (canopy only), and Aeroclub - as used in my build. Even in its full-size form only two replicas have been built: Clive du Cros' airworthy Jaguar V12-powered example which is now ground-bound after a landing mishap in 1997, and the facsimile at the Tangmere Museum of Military Aviation (on which my model is based).
So, on to my first foray into aftermarket conversions!
| THE KIT |
For a look inside the box (and a brief history lesson) please check out Scott's preview.
| CONSTRUCTION |
This began, as it often does with my builds, by removing the fuselage halves from the sprue and cleaning them by cutting any excess sprue from the parts (including the navigation light on the rudder). The cockpit interior was painted with one coat Tamiya Flat Green XF5 followed by another of Yellow Green XF4 (I should mention now that I use Tamiya acrylic exclusively). The cockpit base and seat were painted in the same way, with the pilot's headrest painted in Flat Brown XF10 and the circular protrusion on the other side Flat Black XF1. Rounding out the rather spartan cockpit (typical of Airfix Series 1 kits), the blank instrument panel was painted Flat Black. I left the gunsight on the sprue as none of my reference photos showed this in place. (In retrospect I should have filled the locating hole in the panel for the sight, but this hadn't occurred to me until I started writing this review and besides, the interior is so dark is doesn't matter!)
 While the paint was drying
the three wing sections (one piece lower, two parts upper) were cut from
the sprue using my precision scalpel and cleaned using same, then the lot
was cemented together (my choice is Revell Contacta Professional liquid
cement) and set aside to dry.
While the paint was drying
the three wing sections (one piece lower, two parts upper) were cut from
the sprue using my precision scalpel and cleaned using same, then the lot
was cemented together (my choice is Revell Contacta Professional liquid
cement) and set aside to dry.
Once the paint was dry the cockpit floor and seat were removed from the sprue, cemented together and into the right fuselage half. Then I applied cement to the left side of the cockpit "subassembly" and also to the right fuse half - the two halves were then mated together and set aside to dry. To ensure the bond was solid I used two clothes pegs to prevent gaps appearing along the join.
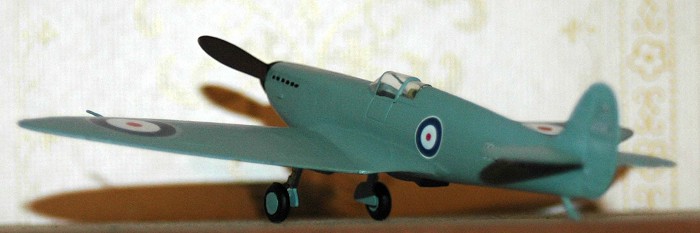
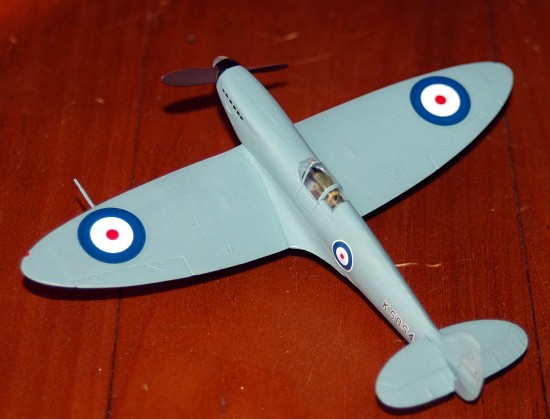
After the fuselage assembly was dry the pegs were removed and the tailplanes cut from the sprue. Once cleaned of excess sprue the tailpanes were cemented into place (after being dry fitted) and aligned using the Mk.I Eyeball - it looks like they're at 90° now. After these had dried out came the filler: I use Red Devil pre-mixed Patch 'n Fill multipurpose filler (sorry if this sounds like a testimonial!). The "detail" aound the engine cowling on both this and Airfix's Mk.Vb is, to be generous, excessive. Think Matchbox's "trench" recessed panel lines coupled with Airfix's trademark king-size rivets and you've got it. I took to the rivets with my scalpel and filled in all of the lines. The filler dries in about an hour, after which I removed the excess with my handy dandy scalpel and sanded with the coarse grain stuff (sorry but I have no idea what grain it is), followed by the fine. The result is all horizontal lines have ceased to exist, whereas areas of the vertical (approximately where the firewall is) are approximately 1/2mm deep. The idea was to totally get rid of the lines, but lesson learned. The joins were also filled and sanded, as was the locating hole for the aerial.
As you can guess, the mainplane was by now dry and ready for my holy trinity of filler, scalpel and sandpaper. The open gun ports were filled and sanded except for the port outer (as were the ammunition chutes in the underside), unfortunate on two counts as a) the gun ports are not totally filled in on the finished model, and 2) I have since discovered that K5054 had her gun ports from the start (although guns were not fitted until some time after her flight trials began). At the same time the locating hole for the navigation light on the underside of the centre section was filled and sanded. According to my references K5054's oil cooler had a shorter lower line than on production examples: I replicated this on the kit's item (integrally moulded with the wing) by checking with the side view in Robert Humphrey's superb book and cutting with my scalpel. The result is satisfying (for me at least). The radiator was cut from the sprue and tidied up before cementing to the wing underside. K5054's radiator housing was longer than on production aircraft, following the shape of the gear well, but I had neither the resources nor drive to represent this (Paragon Design's conversion sets include the elongated radiator in white metal). In addition, K5054's carburettor intake was of a different shape to production aircraft. In Robert Humphrey's build of the prototype (my inspiration for my build) he says the item was shorter and recessed. On his example he ended up with the part 8mm long and 2mm deep, "with its rear curving away in a rounded, flowing line" - I sanded and the result can be seen in the images accompanying this article. Judge for yourself the result. If you happen to have images of K5054's carburettor intake please email me!
The mainplane was now cemented to the fuselage. This is where my only fit issues occurred. The top of the wing did not meet well with the fuselage fairing: far from perfect, the wing surface was nearly 2mm higher than the point on the fuselage where they joined. To (partially) remedy this I sanded hard with coarse grain followed by fine in an attempt to clean up. Again, judge for yourself: I know I could have done better. In addition, the rear wing/fuselage part overlapped the fuse, requiring some quick scalpel work and filler.
 The pitot tube came from
my spares box (I have no experience with stretched sprue and this is
actually more realistic) and was cemented into the port outer gun port. To
create the tailskid, I cut the tailwheel above and below the hub, trimming
and with the result of a nicely formed tailskid. Once the kit was painted I
saw some images of the original and saw the skid was different...c'est la
vie!
The pitot tube came from
my spares box (I have no experience with stretched sprue and this is
actually more realistic) and was cemented into the port outer gun port. To
create the tailskid, I cut the tailwheel above and below the hub, trimming
and with the result of a nicely formed tailskid. Once the kit was painted I
saw some images of the original and saw the skid was different...c'est la
vie!
The undercarriage presented my first use of white metal parts. The covers (the legs and covers are moulded together in Airfix's kit) were painted with Light Blue XF23 and the legs Chrome Silver X11. The wheels themselves were trimmed and the hubs painted Light Blue, the tyres Flat Black. To cement the metal wheels onto the plastic oleos I used Gorilla Clear Bond all purpose craft glue, and left the undercarriage to dry for a couple of days. Due to the amount of travel my models undertake (ie, the amount of time spent zooming around my room in my hand) I decided not to cement the undercarriage to the main aircraft. The locating holes are so perfectly tight that they are almost "snap-tite", practically negating the use of cement. On the original aircraft there were semi-circular covers on the undercarriage leg which completely covered the wheel wells in flight. I have chosen to leave these off for now as I have no suitable materials to produce them. If I can get access to some sheet plastic then I will consider it.
For the penultimate construction step I put filler into the empty slots for the kit's exhaust manifolds and substituted Aeroclub's white metal flush examples (trimmed of their sprue...that's right, metal sprue) and the excess filler scraped off. Some cutting of the plastic around the slots was necessary on the starboard side as the exhaust was larger than its accommodating hole. Now you may be asking yourself "hang on - what about glue?". Well, the filler acted as my bonding material, resulting in the manifolds staying right where they were put.
Finally, the canopy. Ah, vacform. The esoteric modeller's delight. This was, like the white metal parts, my first experience with this medium. I expected to totally ruin the single canopy I received with my conversion set as soon as my scalpel went near it. I separated the canopy from its backing sheet and, with constant dry-fitting, cut it to shape. The result? I felt like I could tackle any vacform project and succeed with style!
| COLORS & MARKINGS |
 The subject of K5054's
external colour scheme has been a controversial one since time immemorial
(well, maybe not that long) and it seems that, unless we somehow invent a
time machine, will remain unresolved. Originally she wore unfinished metal
with her RAF markings over the top, but later a mysterious grey-blue-green
overall scheme was applied (known as French Grey). The exact shade? Lost to
us forever after K5054 was repainted in a camouflage scheme around
March/April 1937. The facsimile at Tangmere is painted in a mix copied from
a model of K5054 owned by Gordon Mitchell (son of RJ Mitchell, the designer
of the type) and produced for presentation to his father by Supermarine
using the same paint as the actual aircraft.
The subject of K5054's
external colour scheme has been a controversial one since time immemorial
(well, maybe not that long) and it seems that, unless we somehow invent a
time machine, will remain unresolved. Originally she wore unfinished metal
with her RAF markings over the top, but later a mysterious grey-blue-green
overall scheme was applied (known as French Grey). The exact shade? Lost to
us forever after K5054 was repainted in a camouflage scheme around
March/April 1937. The facsimile at Tangmere is painted in a mix copied from
a model of K5054 owned by Gordon Mitchell (son of RJ Mitchell, the designer
of the type) and produced for presentation to his father by Supermarine
using the same paint as the actual aircraft.
 I used Tamiya Light Blue
XF23.
I used Tamiya Light Blue
XF23.
I don't know if a mask exists for K5054's canopy, but I used my fine detail brush to apply Light Blue to the finely raised canopy frames. The interior of the wheelwells was painted Yellow Green...AFTER the external paintwork. Luckily, no retouching was needed.
The decals came from Tasman sheet 7204, courtesy of MM editor Scott van Aken (once again, thanks a bunch for your generosity Scott), and despite the editor's warning that they were brittle way back when and undoubtedly more so now, settled nicely into position intact. They are thick, seem to be in register except for the wing roundels which have their blue in two sections: dark outer and light inner. Strange, but I'm not picky, beggars can't be choosers and all that. My only problem with them is that the carrier film is very obvious on the fuselage roundels where the separate white outline meets the blue.
| CONCLUSIONS |
Airfix's Mk.I kit has been around for many moons now, as recounted in Scott's preview, and I found few problems with it: an accurate represenation of the early mark but with some heavy-handed detail around the engine. The Aeroclub conversion set allowed me to peek into the hitherto closed world of aftermarket bits, and gave no problems. Finally, the Tasman decals went on like a dream. The result? My first aftermarket conversion representing the start of a very long line of thoroughbreds. To say I'm very pleased with this build would be an understatement. Sure it won't win any contests (not that I ever enter any), has some differences when compared to photos of the real thing, but to me it's my own representation of possibly the most famous and important Spitfire. One day I aim to build one of those full-size homebuilt Spitfires in K5054 configuration, but until then I'll be very content with K5054 Jr.
November 2005
Review kit courtesy of my hard-earned cash
| REFERENCES |
Classic Wings magazine Vol.11 No.2 Issue 45
Spitfire by Jeremy Flack
Spitfire: A Complete Fighting History by Alfred Price
The Supermarine Spitfire: A Comprehensive Guide for the Modeller Part 1: Merlin Powered by Robert Humphreys
If you would like your product reviewed fairly and quickly by a site that has around 300,000 visitors a month, please contact me or see other details in the Note to Contributors.