KP 1/72 Avia BH-3
| KIT #: | 22 |
| PRICE: | $5.00 at a swap meet |
| DECALS: | Two options |
| REVIEWER: | Robert Myers |
| NOTES: |
| HISTORY |
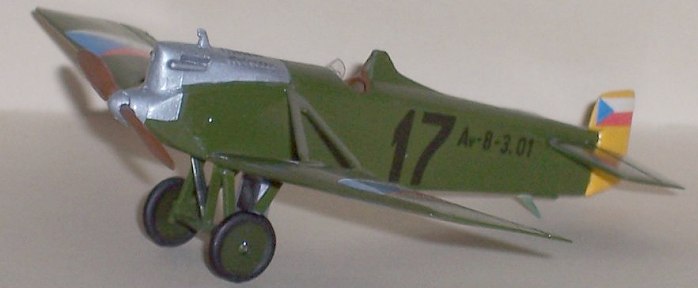
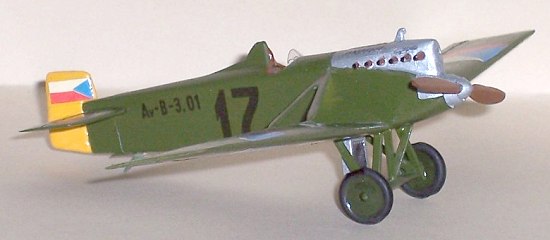
The Avia BH-3 was a very advanced monoplane design for 1921. The aircraft was the design of Pavel Benes and Miroslav Hajn. The aircraft used a strong V strut from the fuselage to the wing in order to eliminate the complex rigging used on the biplanes and early monoplanes. This made for a smother airflow and a top speed of around 240 miles per hour. Ten of these aircraft were ordered by the Czech Government and used in various roles, including training, until 1926 when the remaining aircraft were scrapped.
| THE KIT |
 The kit
consists of 24 parts molded in light grey and one clear windshield. The
plastic is the soft stuff used by KP. However, this one is a little
brittle. Soft and brittle, figure that one out! I used my side clippers
and X-acto knife carefully and had no problems.
The kit
consists of 24 parts molded in light grey and one clear windshield. The
plastic is the soft stuff used by KP. However, this one is a little
brittle. Soft and brittle, figure that one out! I used my side clippers
and X-acto knife carefully and had no problems.
The instructions are printed on one big sheet in English. There are only two exploded views for assembly, but on a kit this simple that is all you really need. The painting instructions are in color on the back of the box. I like the four views of the prototype and production paint schemes. I decided to build the prototype.
| CONSTRUCTION |
I didn’t
find any color pictures of this aircraft on the web. One website did say
the interior was grey. Rather than sweat the color, I painted the inside
area of the cockpit in a wood brown. I assembled the simple seat, floor
and control stick. I thought the seat would look better with
leather cushions, so I used a little Model Master leather paint on it. The control stick was painted a wood brown.
It may not be accurate, but it added a little detail. That is about
all the detail you need. Don’t bother with much instrument panel
detail, you can’t see it. The cockpit is so small it is hard to see
inside.
leather paint on it. The control stick was painted a wood brown.
It may not be accurate, but it added a little detail. That is about
all the detail you need. Don’t bother with much instrument panel
detail, you can’t see it. The cockpit is so small it is hard to see
inside.
Next the cockpit, instrument panel and fuselage were all glued together. I used a little more thick Testors glue than I needed on the seems. Some squished out, as planned. The wings, V struts and landing gear assembly were all glued on. The plane was complete except for the radiator, rudder, wheels and prop.
After everything was dry, I scrapped the fuselage seam with my X-acto knife blade and a very light sanding. The seam disappeared with less than five minutes work. A good washing and it was off to the paint booth.
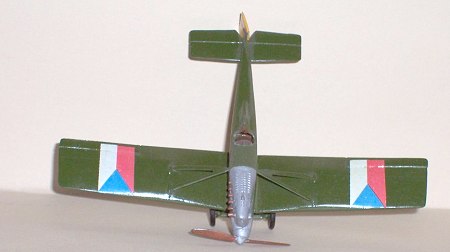
| COLORS & MARKINGS |
Paint:
 Again, I couldn’t find any good
color pictures or paint codes on the web. That was no surprise for a
1921 aircraft.....So I mixed up a gloss cross between olive drab and
light olive. I used gloss to save a few steps on the decaling. While
the paint dried overnight, I brush painted the rudder a gloss yellow,
tires a flat black, and the prop a gloss wood. I found different opinions that the rudder was a yellow or parchment white. I liked the
yellow.
Again, I couldn’t find any good
color pictures or paint codes on the web. That was no surprise for a
1921 aircraft.....So I mixed up a gloss cross between olive drab and
light olive. I used gloss to save a few steps on the decaling. While
the paint dried overnight, I brush painted the rudder a gloss yellow,
tires a flat black, and the prop a gloss wood. I found different opinions that the rudder was a yellow or parchment white. I liked the
yellow.
When the paint had all dried, I painted the nose of the aircraft and the radiator a gloss aluminum. I know that some of you are wondering why the bright tail and semi-gloss or gloss paint. Well, I am building the prototype aircraft. I figured it would be new and shiny like a lot of the aircraft of that era. Since the company would be showing it off for future sales, it would be polished and waxed with no exhaust stains or weathering.
Decals:
The decals are typical older KP. They are slightly out of register and not the brightest colors in the decal industry. I thought about tossing them out and airbrushing the large Czech flags on each wing, but since this is a box stock kit review I decided to use them. The worked ok. I trimmed them so the fuzzy edges are not so obvious. They responded very well to Micro Sol and snuggled down tight. They are opaque and cover the green with no color bleed thru. What a nice surprise!
| FINAL CONSTRUCTION |
 With everything painted I did the
final assembly. All of the small parts fit. The only option I
considered was the radiator. It retracts, so you could just paint an
aluminum rectangle on the bottom of the fuselage. I chose to attach the
radiator. With a little black wash it adds some extra detail. When I
tried to install the clear windscreen, of course, I dropped it on the
carpet. Been there done that? Well, I found it easily. All I had to do
was roll my desk chair back and crush the plastic! Easy fix, I cut a
small windscreen out of clear and managed to glue it in place before
destroying it, too. At this point I decided the airplane was too glossy.
I sprayed semi-gloss on everything and repainted the tires flat black. I
think it looks much better.
With everything painted I did the
final assembly. All of the small parts fit. The only option I
considered was the radiator. It retracts, so you could just paint an
aluminum rectangle on the bottom of the fuselage. I chose to attach the
radiator. With a little black wash it adds some extra detail. When I
tried to install the clear windscreen, of course, I dropped it on the
carpet. Been there done that? Well, I found it easily. All I had to do
was roll my desk chair back and crush the plastic! Easy fix, I cut a
small windscreen out of clear and managed to glue it in place before
destroying it, too. At this point I decided the airplane was too glossy.
I sprayed semi-gloss on everything and repainted the tires flat black. I
think it looks much better.
| CONCLUSIONS |
This simple kit was fun to build. I built it on Friday evening, painted it on Saturday, let it dry overnight, did the detail painting / final assembly on Sunday, applied the decals on Monday evening then let everything sit to dry until the next Saturday when it got a semi-gloss clear coat. No stress just an easy build.
| REFERENCES |
kit instructions
Luftfahrtmuseum.com
March 2005
Robert Myers
Copyright Modeling Madness.com If you would like your product reviewed fairly and quickly, please
contact
the editor or see other details in the
Note to
Contributors.