| KIT #: | 7216 |
| PRICE: | $12.00 or so |
| DECALS: | Six options |
| REVIEWER: | Brian Baker |
| NOTES: | Good little kit of an interesting but little known aircraft. |
| HISTORY |
The Russian Shavrov SH-2 was designed by Vadim B. Shavrov while he
was working with the OMOS Design Bureau during the late twenties, and was
intended as a trainer, fishery patrol aircraft, and air ambulance.
Flying for the first time in 1930, the SH-2
 bore
a close resemblance to the Italian Savoia Marchetti SM-56 amphibian of the
same vintage, and from appearances, may have been almost a direct copy.
The type was produced in limited numbers, and was
used during the thirties and World War II for the above mentioned purposes.
At least one was being used as a crop sprayer in the
early sixties, and the last one was not retired until 1964.
One is reputed to be still flying somewhere in
bore
a close resemblance to the Italian Savoia Marchetti SM-56 amphibian of the
same vintage, and from appearances, may have been almost a direct copy.
The type was produced in limited numbers, and was
used during the thirties and World War II for the above mentioned purposes.
At least one was being used as a crop sprayer in the
early sixties, and the last one was not retired until 1964.
One is reputed to be still flying somewhere in
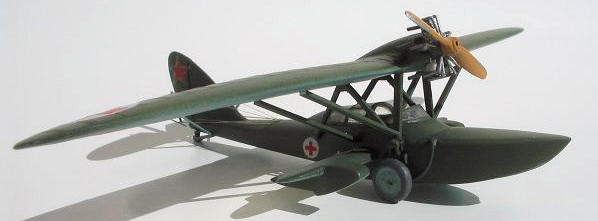
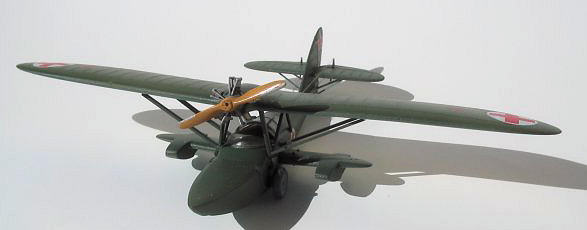
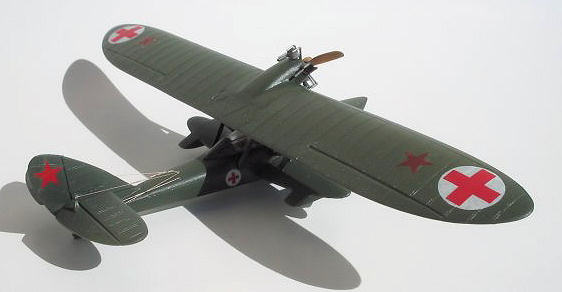
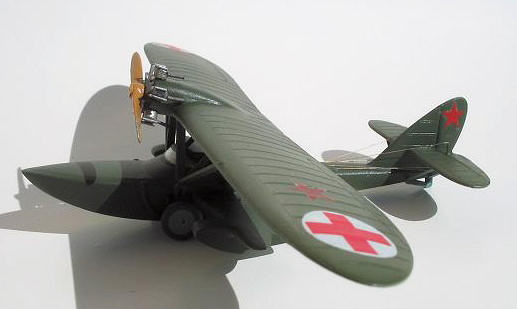
The SH-2 was powered by a single 100 hp. M.11 radial engine with a wooden propeller. It was a parasol wing three seat amphibian with wheels that rotated upwards for water operations. The stabilizing floats were attached to small sponsons which were attached to the fuselage.
| THE KIT |
The kit is cast in three light grey plastic sprues and one clear
sprue which provides several canopy options.
There is some flash, but not what we have come to
expect from these limited issue kits. The kit is a little more complicated
than the average single engine model, mainly because of the parasol wing
arrangement and the sponson-mounted floats.
The wing is made up of no less
 than
seven components, with the outer sections fitting into the three piece
center section, which also includes the engine mount. This leaves a seam in
the middle of the underside of the wing which is difficult to remove without
affecting the wing rib detail.
Some filler is required here, but this is nothing
that a reasonably experienced modeler shouldn’t be able to handle.
than
seven components, with the outer sections fitting into the three piece
center section, which also includes the engine mount. This leaves a seam in
the middle of the underside of the wing which is difficult to remove without
affecting the wing rib detail.
Some filler is required here, but this is nothing
that a reasonably experienced modeler shouldn’t be able to handle.
| CONSTRUCTION |
The fuselage is somewhat complicated, and reminded me of a kayak,
with two side assemblies and a top deck.
A basic interior is included, including two seats,
some bulkheads,
a rudder bar, and a control stick. Several canopy
options are included, and although I couldn’t find any interior information
on the type, I did a fair job of detailing the cockpit.
The only problem here is the
 fact
that the cockpit can’t be seen because of the parasol wing, but at least, I
know the details are in there.
The sponsons look a little odd, but they trim up
nicely,
with the floats being
integral parts of the units. The plane was probably
constructed entirely of wood, so some cross braces and structure could
probably be added. I would suspect that the SM-56 would be almost identical
internally. The canopies include a completely enclosed unit, a partially
enclosed section, and a windshield. There is a rear cockpit cover to be used
on some of the open cockpit variants.
fact
that the cockpit can’t be seen because of the parasol wing, but at least, I
know the details are in there.
The sponsons look a little odd, but they trim up
nicely,
with the floats being
integral parts of the units. The plane was probably
constructed entirely of wood, so some cross braces and structure could
probably be added. I would suspect that the SM-56 would be almost identical
internally. The canopies include a completely enclosed unit, a partially
enclosed section, and a windshield. There is a rear cockpit cover to be used
on some of the open cockpit variants.
The wings and tail unit are easily attached to the fuselage. After
drilling out the mounting holes,
I mounted the cabane struts on the fuselage
at the correct angle, and after gluing the wing to these and letting it set
up to dry, I attached the outer wing struts.
It would probably be wise to paint the main
assemblies before installing the wing and struts.
The tail unit goes on easily, although I replaced
the kit bracing struts with plastic rod, and the landing gear struts and
wheels, while a little spindly, can be easily glued into place. I also added
control horns and control cables, and a mooring hook in the nose.
The engine, which should be installed last, required a little bit of detailing. I added pushrod housings in front, and straight exhaust stacks at the rear of each cylinder, and I was satisfied with the result. Some rigging wire is required between the wing struts, but these areas are easily accessed, so this is simple to do. Don’t forget the control cables.
| COLORS & MARKINGS |
There are a lot of options on this kit, especially if you can
decipher the color information.
The decals are very good, and the since these
airplanes were used mostly in remote areas under very harsh operating
conditions, they
should probably be weathered fairly extensively, although you shouldn’t make
the mistake of using silver for paint chipping, as the structure was
entirely wooden.
| CONCLUSIONS |
This kit is a little gem, a sleeper. It looks a little rough in the box, but with a little TLC, this kit can become a masterpiece. Get at least one if you can find one, and put some effort into it and you’ll have a model that your modeling friends will admire. Highly recommended.
June 2010
Copyright ModelingMadness.com. All rights reserved. No reproduction in part or in whole without express permission from the editor.
If you would like your product reviewed fairly and quickly, please contact the editor or see other details in the Note to Contributors.