Special Hobby 1/32 P-36
| KIT #: | ? |
| PRICE: | $45.00 MSRP |
| DECALS: | See Review |
| REVIEWER: | Tom Cleaver |
| NOTES: |
| HISTORY |
The Curtiss P-36 began with the Model 75 project, originally developed in 1934 by Curtiss’ Chief Designer Don Berlin as the Curtiss response to the US Army Air Corps Request For Proposals for an all-metal monoplane pursuit aircraft, with a competition between prototypes scheduled for May, 1935. Unfortunately, it was decided that the prototype would be powered by the completely-unsuccessful 900 hp Wright XR-1670-5 twin-row air-cooled radial.
Curtiss submitted the Model 75 to the USAAC Material Division's single seat fighter competition on May 27, 1935. The fly-off was to be held that very month, but, the Model 75 was the only competitor ready. The two-seat Seversky SEV-2XP - the primary competitor - had been "heavily damaged" during delivery to Wright Field, and did not officially arrive there until June 18, 1935, though it was soon returned to the factory where it was redesigned to become a single seater with retractable undercarriage. The Air Corps delayed the competition until the SEV-1XP arrived at Wright Field on August 15, 1935. The only other serious competitor - the Northrop 2A - took off on its first flight on July 30, when it flew out over the Pacific, and disappeared into thin air, never to be seen again.
 The competition was
finally held in 1936. Curtiss lost to the Seversky prototype, which was
ordered by the Air Corps as the P-35, which would eventually lead to the
P-47 Thunderbolt. Curtiss protested that the delay gave the Seversky
prototype an unfair advantage, and convinced the Army that it should defer
its decision until after a further competitive evaluation which was to take
place in April of 1936. Curtiss re-engined the prototype with the excellent
Pratt and Whitney R-1830 and came back in 1936 to become the real winner,
with 227 examples sold to the USAAC - the largest single order for an
American fighter since the First World War, mostly due to the Air Corps’
realization the Seversky had no ability to produce their “winner” in the
numbers needed.
The competition was
finally held in 1936. Curtiss lost to the Seversky prototype, which was
ordered by the Air Corps as the P-35, which would eventually lead to the
P-47 Thunderbolt. Curtiss protested that the delay gave the Seversky
prototype an unfair advantage, and convinced the Army that it should defer
its decision until after a further competitive evaluation which was to take
place in April of 1936. Curtiss re-engined the prototype with the excellent
Pratt and Whitney R-1830 and came back in 1936 to become the real winner,
with 227 examples sold to the USAAC - the largest single order for an
American fighter since the First World War, mostly due to the Air Corps’
realization the Seversky had no ability to produce their “winner” in the
numbers needed.
The P-36A had a 1,050 h.p. Pratt & Whitney R-1830-13 Twin Wasp engine driving a Curtiss Electric constant speed propeller. Maximum speed was 300 mph at 10,000 feet, with a normal range of 825 miles. Initial climb rate was 3400 feet/minute, and 15,000 feet could be attained in 4.8 minutes, while service ceiling was 33,000 feet.
The 20th Pursuit Group at Barksdale Field, Louisiana, was designated the first recipient of the new P-36A, and they had relinquished their Boeing P-26s and sent them on to the 18th Pursuit Group in Hawaii while preparing to accept deliveries of the new fighter. However, the P-36As encountered extensive teething troubles almost as soon as they reached the unit. Severe skin buckling around the gear wells dictated increased skin thicknesses and reinforcing webs, while exhaust difficulties and weaknesses in the fuselage structure were encountered. Despite production line and field fixes, the P-36As were grounded again and again. In early 1938, the 20th PG was down to six serviceable P-36As, and even these had to be flown under severe limitations on speed, aerobatics, and combat maneuvers.
 The 1st Pursuit Group
had also been scheduled for conversion to the P-36A in 1938. They were
forced to await the efforts being made by Curtiss to solve out the new
fighter's problems. In the end, only the 94th Squadron received any P-36As
during 1938, operating them alongside P-35s. The 27th Squadron obtained a
few P-36As during early 1939, but neither squadron ever received a full
complement of P-36As, the balance being made up by P-35s.
The 1st Pursuit Group
had also been scheduled for conversion to the P-36A in 1938. They were
forced to await the efforts being made by Curtiss to solve out the new
fighter's problems. In the end, only the 94th Squadron received any P-36As
during 1938, operating them alongside P-35s. The 27th Squadron obtained a
few P-36As during early 1939, but neither squadron ever received a full
complement of P-36As, the balance being made up by P-35s.
In 1939, the 8th Pursuit Group at Langley Field, Virginia was equipped with P-36s. In 1940, the 18th Pursuit Group in Hawaii was re-equipped with the P-36, subsequently passing their airplanes on to the 15th Pursuit Group, which flew their P-36s during the Japanese attack on Pearl Harbor, the only combat use of the P-36 by American units.
Eventually, 753 Hawk75s would be exported, and the airplane would serve on both sides in the Second World War. Steve Hinton, who is the only contemporary pilot to have flown the Hawk 75, P-40B, P-40E and P-40N, says that the Hawk 75 has the best handling characteristics of any of the P-36/P-40 series, with finger-light controls and excellent maneuverability. Kyosti Karhila, who shot down 14 enemy aircraft while flying a Hawk 75A-3 for two years on the Eastern Front, said that “the only problem was it wasn’t fast enough.”
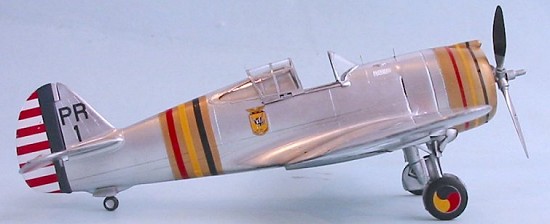
While the P-36 in its foreign derivatives saw combat in the Battle of France, in North Africa, on the Finnish-Russian front and in Southeast Asia, the only time the original P-36 saw combat with the USAAF was on December 7, 1941, during the Japanese surprise attack on Pearl Harbor. The 15th Pursuit Group was still equipped with P-36s, and two pilots of the group scored the only P-36 victories of the war - 2nd Lt. Phil Rasmussen scoring one in a P-36A, while 2nd Lt. Harry Brown shot down two attackers while flying a P-36C.
| THE KIT |
This kit by Special Hobby effectively cancels the only other 1/32 P-36/Hawk 75 models - the Cutting Edge conversions that use the Trumpeter P-40B. With a price comparable to the Trumpeter kit, this kit makes up into a far more accurate P-36/Hawk 75 than can be accomplished with the conversions I did.
 The kit does not
have the overdone fabric effect on the control surfaces, and the cockpit is
the correct depth (which neither Trumpeter nor Cutting Edge got right).
Important only to those who look at the model in plan view, it is the
correct width in the rear fuselage, rather than the “gaunt” look of the
too-thin Trumpeter kit. Given the breakdown of the fuselage, with a
separate forward fuselage/cowling section, it is obvious that the
Cyclone-powered version will be released.
The kit does not
have the overdone fabric effect on the control surfaces, and the cockpit is
the correct depth (which neither Trumpeter nor Cutting Edge got right).
Important only to those who look at the model in plan view, it is the
correct width in the rear fuselage, rather than the “gaunt” look of the
too-thin Trumpeter kit. Given the breakdown of the fuselage, with a
separate forward fuselage/cowling section, it is obvious that the
Cyclone-powered version will be released.
While this kit is listed as a P-36A - which did not have wing guns - the kit comes with four machine gun barrels, the openings in the wing and the scribed detail for the gun bay covers, to do the 6-gun Hawk 75A-3 (another version that will obviously be released soon). A modeler needs to fill in the holes on the wing leading edge and fill in the scribed panel detail for the gun bays to create a P-36A. The good news here is that it will also be possible to do the P-36C - which had a single gun in each wing - and this is important because the decal sheet includes the markings for Harry Winston’s P-36C (which was not a P-36A as the kit instructions would have you believe).
The decals are good, and allow you to make a model of the planes flown by the two pilots who scored on December 7 - Rasmussen’s P-36A still in pre-war polished natural metal and Winston’s P-36C in Olive Drab and Neutral Grey. Fortunately, Cutting Edge created three very nice decal sheets for their Hawk 75 conversions, so you can do several pre-war P-36A’s, a P-36C in the special war games camouflage from 1938, or several Hawk 75A-3s for those who can’t wait for the next release.
One thing has to be done for the model: it comes with open wheel wells, which is incorrect. The P-36A/C/Hawk 75 almost always (and certainly always in pre-war units) had the canvas “boots” in the wheel wells.
| CONSTRUCTION |
 The kit breaks down
into three major sub-assemblies: the engine and cowling, the main fuselage
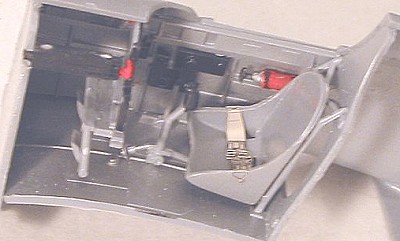
with cockpit, and the wings. I started with the cockpit, which is detailed
sufficiently to look good when compared with the resin cockpits in my
Cutting Edge Hawk 75 conversions. Most importantly, it is the correct
depth. The photo-etch fret is from Eduard and is pre-painted. The kit
comes with two different instrument panels, one for the export Hawks, so be
careful to figure out which is which. I used instrument decals from a
ProModeler sheet for the panel. USAAC aircraft of this period did not use
shoulder harnesses, and the Eduard seat belts look good on the seat.
The kit breaks down
into three major sub-assemblies: the engine and cowling, the main fuselage
with cockpit, and the wings. I started with the cockpit, which is detailed
sufficiently to look good when compared with the resin cockpits in my
Cutting Edge Hawk 75 conversions. Most importantly, it is the correct
depth. The photo-etch fret is from Eduard and is pre-painted. The kit
comes with two different instrument panels, one for the export Hawks, so be
careful to figure out which is which. I used instrument decals from a
ProModeler sheet for the panel. USAAC aircraft of this period did not use
shoulder harnesses, and the Eduard seat belts look good on the seat.
Moving on to the engine, the kit provides a good-looking Pratt & Whitney R-1830, which I painted and installed on the cowling bulkhead, then assembled the cowling after painting the interior light grey. I then glued the cowling to the completed fuselage, which is problematic, since it is a “butt join” with little area. As it turned out, this was not the way to go.
The wings needed to have the panels for the wing guns and the associated holes filled. I did this with cyanoacrylate glue to make sure they really did disappear, then gave them a coat of Mr. Surfacer 500 after sanding the area smooth.
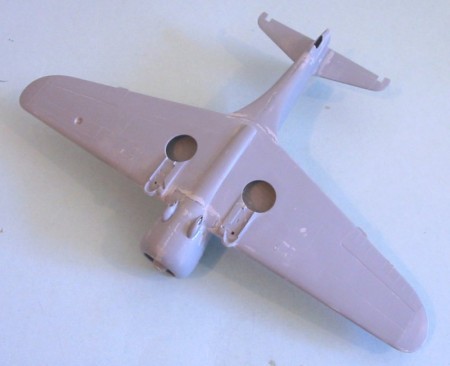 To this point, the
assembly had gone very easily for a limited-run kit. The kit lived up to my
expectations when I made my first attempt to mate the wing to the
fuselage. It wouldn’t fit! Not only that, but the wing dihedral was
nearly flat. I quickly pulled the two assemblies apart and took a moment
to consider the options.
To this point, the
assembly had gone very easily for a limited-run kit. The kit lived up to my
expectations when I made my first attempt to mate the wing to the
fuselage. It wouldn’t fit! Not only that, but the wing dihedral was
nearly flat. I quickly pulled the two assemblies apart and took a moment
to consider the options.
What I finally did was cut the cowling loose from the fuselage and then do some serious test-fitting that resulted in a lot of sanding and shaving of the areas of the fuselage, cowling and upper wing, so that things would go together and result in the correct dihedral. I then attached the cowling to the wing and got it glued in nice and solid. Before the glue set, I attached the fuselage to the wing, then fiddled all three pieces into fitting together. The result needed quite a bit of cyanoacrylate glue in all the seams to fill the gaps, followed by a lot of sanding and several coats of Mr. Surfacer to get everything nice and smooth. After that, attaching the horizontal stabilizers without the elevators was easy.
With all the sanding, surface preparation was crucial if I was going to proceed with a polished aluminum finish. I ended up spending many hours over several days with six different grades of sandpaper and three different grades of micromesh, followed by using two different kinds of rubbing compound to get things smooth. The big deal was getting rid of scratches - just as I would think they were all done, I would hold it up to the light and catch another one, requiring the entire process for that place. Finally, the model was ready for painting.
| COLORS & MARKINGS |
Painting:
I first painted the areas where the gold paint would be applied white, and masked them off. I then applied the Alclad gloss black primer, which took several misted coats to get a smooth finish. A cold snap in southern California resulted in the paint taking almost four days to dry hard.
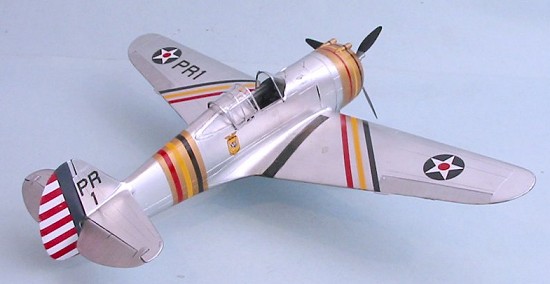 This was followed with
application of the Alclad II Polished Aluminum paint. Once this was on,
the model needed another three days to dry. Once it was hard, I masked off
the areas of the cowling and fuselage and painted these with Gunze Mr.
Color “Gold.” This looked like actual gold when finished, so I gave it a
coat of Testor’s Metalizer Sealer, to make it look like paint. I painted
the fabric control surfaces with Alclad “Aluminum,” which looks like
Aluminum Dope when given a coat of sealer.
This was followed with
application of the Alclad II Polished Aluminum paint. Once this was on,
the model needed another three days to dry. Once it was hard, I masked off
the areas of the cowling and fuselage and painted these with Gunze Mr.
Color “Gold.” This looked like actual gold when finished, so I gave it a
coat of Testor’s Metalizer Sealer, to make it look like paint. I painted
the fabric control surfaces with Alclad “Aluminum,” which looks like
Aluminum Dope when given a coat of sealer.
I ended up seriously disappointed with the Alclad “Polished Aluminum,” because - while it looks like polished metal when done -it is so fragile that it rubs off when the model is handled. I eventually used Floquil Old Silver to cover these areas, and it looked exactly like the Alclad when dry. Not only that, it dried hard to the touch in 24 hours. The next time I do a model that requires a polished aluminum finish, I will use this Floquil paint, and I advise you do the same. To me, Alclad as a line of paint is not only over-sensitive and likely to eat the model if you have not used a good primer to protect the model, but it is irregular in its results: “Duraluminum” and “Aluminum” go on pretty easily, dry hard, look good and stand up to handling. Not so this “Polished Aluminum,” and the gloss black primer is a complete pain-in-the-patootie to use. I suggest you use SNJ Aluminum paint as a primer instead, since it is easier to use and dries hard and smooth in a reasonable time. I had no problem when I painted the propeller with the Alclad Duraluminum with SNJ as the primer.
| FINAL CONSTRUCTION |
 I departed from my
usual construction pattern and attached the landing gear and canopy glass
when the painting was finished, so that the model would sit on its gear and
not be subject to any further contact with surfaces that would lead to the
paint rubbing off again. In retrospect, I should have painted the interior
of the rear glass panels and then attached them before painting the
exterior, because there were “fit issues” that were difficult to solve
without damaging the Polished Aluminum paint.
I departed from my
usual construction pattern and attached the landing gear and canopy glass
when the painting was finished, so that the model would sit on its gear and
not be subject to any further contact with surfaces that would lead to the
paint rubbing off again. In retrospect, I should have painted the interior
of the rear glass panels and then attached them before painting the
exterior, because there were “fit issues” that were difficult to solve
without damaging the Polished Aluminum paint.
Decals:
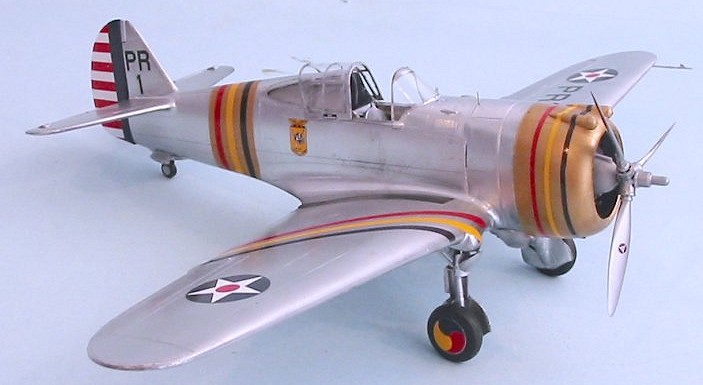
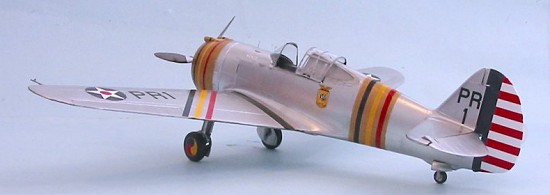
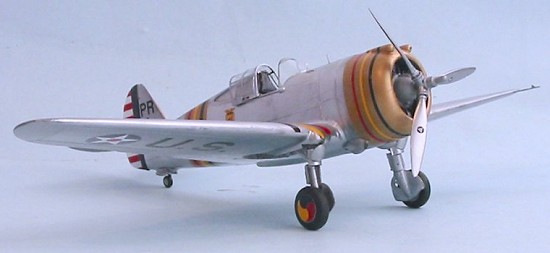
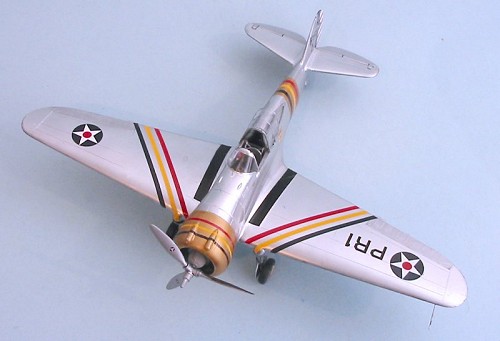
I used the Cutting Edge “P-36 Part II” sheet to do “The Gold Bug,” the P-36A flown by Major Ken Walker, CO of the 18th Pursuit Group, during the summer of 1940 after the group converted from the P-26A. This is one of several very colorful prewar Hawks a modeler can do with the two Cutting Edge sheets for the P-36 - they also have a sheet of foreign Hawks for those who can’t wait for Special Hobby to release a Hawk 75A-3. I used the kit decal for the rudder stripes, since the Cutting Edge decal for this is fitted for the Trumpeter kit, which has an incorrect larger rudder. These Cutting Edge decals are excellent, and I particularly liked how they had very little backing, which allowed them to go down on the polished aluminum surface without the backing changing the overall finish tone.
| CONCLUSIONS |
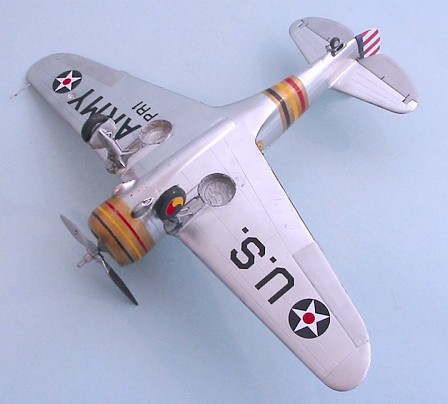
 Looking at the kit
and comparing it with the extensive series of photos I took of the restored
Hawk 75A-1 when it was at Chino last year, this model is accurate in shape
and outline. The real thing has raised rivets overall, with only the
leading edge of the wing back to the main spar being flush riveted, while
the model only has recessed panel lines. Those who obsess over such things
could engrave rivet detail with a pounce wheel, but for the rest of us, the
rivets can’t be seen on the real thing if you’re more than six feet away,
so for the scale of the model - where most of us will be a “scale six feet”
or further away when looking at it - this isn’t really an issue in need of
a fix.
Looking at the kit
and comparing it with the extensive series of photos I took of the restored
Hawk 75A-1 when it was at Chino last year, this model is accurate in shape
and outline. The real thing has raised rivets overall, with only the
leading edge of the wing back to the main spar being flush riveted, while
the model only has recessed panel lines. Those who obsess over such things
could engrave rivet detail with a pounce wheel, but for the rest of us, the
rivets can’t be seen on the real thing if you’re more than six feet away,
so for the scale of the model - where most of us will be a “scale six feet”
or further away when looking at it - this isn’t really an issue in need of
a fix.
The P-36A looks very good sitting next to my French Hawk 75A-3 and British Mohawk. This kit allows a modeler to make a very good model of this important yet often-overlooked airplane. I will definitely be doing another one in Finnish markings.
November 2005
Thanks to Hannant’s for the review sample. http://www.hannant.co.uk
If you would like your product reviewed fairly and quickly, please contact me or see other details in the Note to Contributors.