| KIT #: | 6796 |
| PRICE: | $0.79 when new |
| DECALS: | One options |
| REVIEWER: | Brian Baker |
| NOTES: | Recently reissued by Starfighter Decals. |
| HISTORY |
The Curtiss “Hawk” biplane fighter series originated in about 1924 when
the first
XPW-8B was tested by the Army. This was a development of previous
Curtiss racing planes.
The Navy showed interest, and the first Navy “Hawk”, the
F6C-1, appeared in 1925, powered by a 400 hp. Curtiss D-12 liquid cooled engine.
Different combinations of fuselage, wing, and engine
were tried over the years, and in 1932, the XF11C-2 appeared, powered by a 700
hp. Wright R-1820E
“cyclone” radial engine.
The prototype had originally been built as a company
demonstrator,
and the Navy immediately ordered 28 production models, all of which went
to VF-1B aboard the USS
Saratoga. About a year later, these planes were rebuilt
with different rear fuselages, and partial sliding canopies, and these were
redesignated BFC-2 to denote their role as fighter-bombers.
In fact, these airplanes remained in service for some
time with various squadrons, and it was this aircraft that served as the
prototype for the Navy dive bomber.
They were so impressive that when they were
observed by
 Ernst Udet during the 1933
Cleveland National Air Races, two were bought for the
Luftwaffe, and these sold Luftwaffe planners on the idea of the dive bomber, and
eventually resulted in the development of the Stuka. There was also an XF11C-1,
which was actually a later airplane than the dash 2.
It had a twin row Wright SR-1510 engine and three bladed
prop.
Some of its features later were used on the F11C-2.
Check photos for specific details.
Ernst Udet during the 1933
Cleveland National Air Races, two were bought for the
Luftwaffe, and these sold Luftwaffe planners on the idea of the dive bomber, and
eventually resulted in the development of the Stuka. There was also an XF11C-1,
which was actually a later airplane than the dash 2.
It had a twin row Wright SR-1510 engine and three bladed
prop.
Some of its features later were used on the F11C-2.
Check photos for specific details.
| THE KIT |
 Cast in silver styrene, there are about 22 parts along with, in my
example at least, two clear plastic windshields.
One excellent feature is that the landing gear units and
cabane struts are
Cast in silver styrene, there are about 22 parts along with, in my
example at least, two clear plastic windshields.
One excellent feature is that the landing gear units and
cabane struts are
molded directly into the fuselage halves, so that it virtually
impossible to get the gear or upper wing assembly out of alignment.
All struts are petite, and they fit into adequate
mounting holes on the wing surfaces.
In short, this is a biplane kit that is about as easy to
build as most monoplane kits.
There is no real interior, as the pilot is supposed to
fit into one side of the fuselage, but there is a decal instrument panel that is
supposed to be glued, with paper, into
the little receptacle in front of the cockpit.
A cockpit interior is not difficult to do, but there is
also the Starfighter Decals interior available from them for about $15.00. This
was done by Alex Bernardo, and although I haven’t seen it
but having done
some of his interior conversions, it is probably a first class unit.
| CONSTRUCTION |
 After constructing an interior,
the fuselage goes together easily, and only a little
filler is required for seam removal.
The lower wing fits into place quite nicely, and again,
very little filler is needed, although Monogram’s copyright stamp should be
removed from the lower wing underside, a simple job with a knife and sandpaper.
A little flash must be removed from the wheel pants, but
this kit is really a no-brainer.
I would suggest painting the airframe before installing
the upper wing.
Be sure to make the decision regarding which airplane you are
going to model before you go very far, as you’ll need to check out the details
from your reference
After constructing an interior,
the fuselage goes together easily, and only a little
filler is required for seam removal.
The lower wing fits into place quite nicely, and again,
very little filler is needed, although Monogram’s copyright stamp should be
removed from the lower wing underside, a simple job with a knife and sandpaper.
A little flash must be removed from the wheel pants, but
this kit is really a no-brainer.
I would suggest painting the airframe before installing
the upper wing.
Be sure to make the decision regarding which airplane you are
going to model before you go very far, as you’ll need to check out the details
from your reference
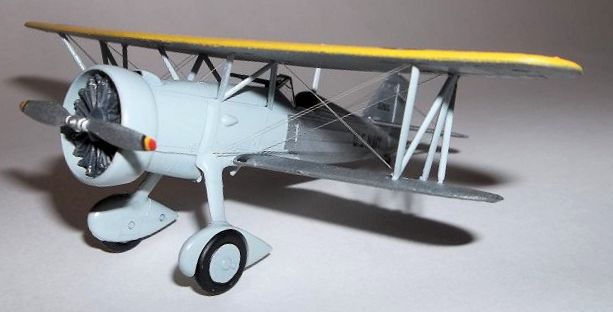
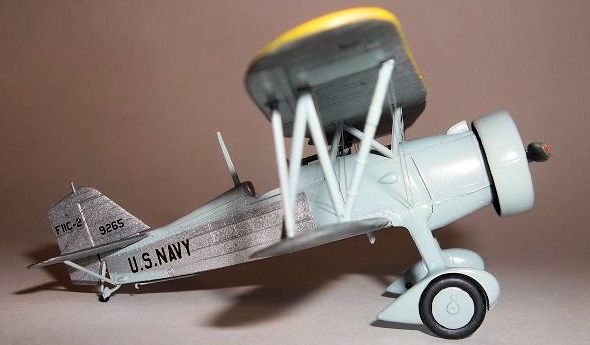
| COLORS & MARKINGS |
I decided against using the kit decals, because I had already built that
airplane, 1-F-4, years
ago. There is a photo of the first production F11C-2 during acceptance testing
at NAS Hampton Roads, VA, in December, 1932 on p. 37 in the Squadron “In-Action”
book on the Navy Hawks.
It had standard Navy
 colors but no markings other than
the designator and the bureau number, 9265, on the fin and rudder.
It also has a tall radio mast behind the cockpit,
something the squadron airplanes did not have. It also does not appear to have a
belly tank installed, although they probably flew the airplanes with and without
them.
colors but no markings other than
the designator and the bureau number, 9265, on the fin and rudder.
It also has a tall radio mast behind the cockpit,
something the squadron airplanes did not have. It also does not appear to have a
belly tank installed, although they probably flew the airplanes with and without
them.
| CONCLUSIONS |
| REFERENCES |
There is quite a bit of material available on the Curtiss Hawks. The old
Profiles
are useful, as are the
Squadron In-Action series. There are a couple of books on
Navy color schemes, including one by Bill Kilgrain and another from Squadron
entitled Navy Air Colors.
Some of the aftermarket decal sheets will also have some
useful information.
Brian Baker
October 2013
If you would like your product reviewed fairly and fairly quickly, please contact the editor or see other details in the Note to Contributors.