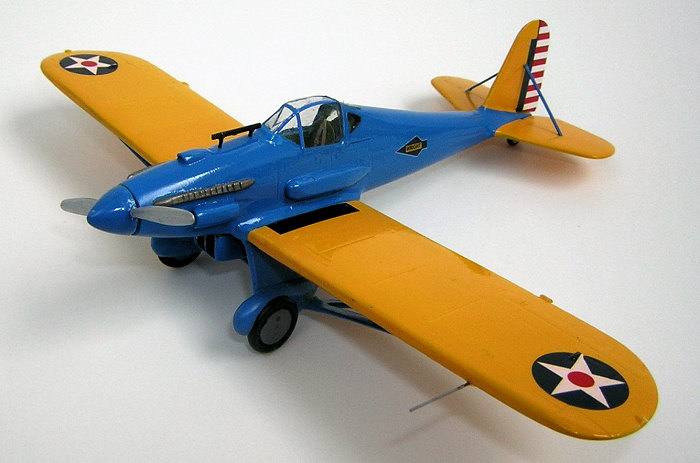
LF Models 1/72 Curtiss XP-31 'Swift'
| KIT #: | 7220 |
| PRICE: | About $35.00 |
| DECALS: | One option |
| REVIEWER: | Joel Hamm |
| NOTES: | Resin with photo etch and vacuformed parts. |
| HISTORY |
Love at first sight.
That’s how it hit and I knew I had to have her; as soon as I saw Scott’s kit
preview about a year ago. Even though she violated my self imposed
stash-limiting notion of sticking to historically significant airplanes. Even
though I had  never built a
complete resin kit. Even though procuring one at the time seemed a major
undertaking. (Hannants has since picked up the LF line, and the entire universe
of resin as well as esoteric injection can now be bought from Modelimex.com,
which is based in the Czech Republic or thereabouts.)
never built a
complete resin kit. Even though procuring one at the time seemed a major
undertaking. (Hannants has since picked up the LF line, and the entire universe
of resin as well as esoteric injection can now be bought from Modelimex.com,
which is based in the Czech Republic or thereabouts.)
Scott pretty well covered that and anything he missed Google can fill in. Briefly - the Swift wasn’t. Its poor performance doomed it as yet another shot at the small, lightweight fighter concept. It took designers many tries to realize that if you’re small and lightweight you’re no fighter. You need guns, ammo, and fuel to get to the fight, which means a big and hefty airframe to carry it all. Performance was in turn sapped by fixed gear, spats, and struts, which the designers could not bring themselves to delete despite the change to modern flapped, slatted, and slotted monoplane-ism.
| THE KIT |
Scott also covered the contents of the miniscule box, but I’ll add my own impressions. Incidentally, the box was so miniscule that I thought it hadn’t been sent, until I discovered it tucked into another kit. I should mention that by the time I was ready to tackle the Swift, I had cut my teeth, so to speak, on an Olymp resin kit, their F4B-2 (which you can q.v. for my tips to first time resiners). That may not have been the best place to start a career in cast stuff, because it’s hard to appreciate your Ford after tooling around in a Rolls Royce. Which is not to imply that LF turns out Edsels or Pintos. Their molding quality is more than might be expected from a small producer. It just lacks the precision and crispness of a gold standard kit.
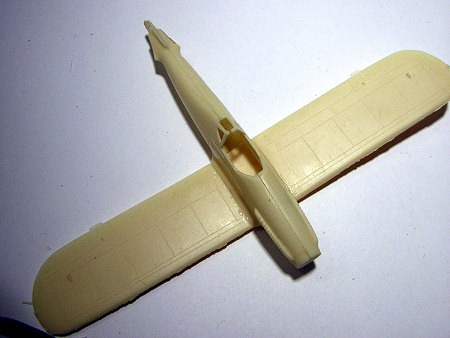
 Specifically, the
wing surfaces had a bit of graininess, which could benefit from polishing – NOT
SANDING! Resin, at least LF’s brand, is highly susceptible to abrasion, and the
few swipes, with even 1000 grit, necessary to smooth the skin also erased the
fine recessed panel lines. Resin’s corollary characteristic is its ease of
scribing. Do this gently with a fine needle. I re-scribed the lost panels with
my usual tool and technique and ended up with repros of Mars’s Vale Marinares.
Matchbox would have been proud.
Specifically, the
wing surfaces had a bit of graininess, which could benefit from polishing – NOT
SANDING! Resin, at least LF’s brand, is highly susceptible to abrasion, and the
few swipes, with even 1000 grit, necessary to smooth the skin also erased the
fine recessed panel lines. Resin’s corollary characteristic is its ease of
scribing. Do this gently with a fine needle. I re-scribed the lost panels with
my usual tool and technique and ended up with repros of Mars’s Vale Marinares.
Matchbox would have been proud.
The only shape issue I might raise is the thin-ness and lack of camber of the wings. But that may be entirely accurate. As far as bubbles and boo-boos, I initially found only one on the stabilizer leading edge. After assembly and priming, however, I discovered that both wing leading edges were badly infected. That was easily fixed with a stroke of a filler-filled brush. Filler was also needed in the wing-fuselage joints.
Only one vacu-formed canopy is provided, but the fret of photo-etched brass cockpit parts has duplicates of everything, which will come in handy on another build.
One feature of the kit definitely deserves demerits – the instruction sheet. True, it has full color 3-views and a clear parts map, but the exploded view is super fuzzy about the precise location of parts. If there were any locator marks engraved in the plastic, my presbyopic baby blues could not discern them.
| CONSTRUCTION |
 The first thing I do
when embarking upon a multi-media model is to cast several male molds of the vac-canopy,
using Durham’s water based wood putty. One is to hold the hood for trimming,
one for painting and framing, and several are for re-sucking duplicates after
the inevitable booger-up. As it turned out, the original transparency fit very
poorly. It was too wide at the rear, too round on the sides, and too short
where the windscreen meets the fuselage. I added some putty to one of the male
molds and sculpted it into a better shape. Once it fit properly I sanded it down
a micron or so in all directions to account for the thickness of the acetate,
then re-vac-ed a more perfect cano
The first thing I do
when embarking upon a multi-media model is to cast several male molds of the vac-canopy,
using Durham’s water based wood putty. One is to hold the hood for trimming,
one for painting and framing, and several are for re-sucking duplicates after
the inevitable booger-up. As it turned out, the original transparency fit very
poorly. It was too wide at the rear, too round on the sides, and too short
where the windscreen meets the fuselage. I added some putty to one of the male
molds and sculpted it into a better shape. Once it fit properly I sanded it down
a micron or so in all directions to account for the thickness of the acetate,
then re-vac-ed a more perfect cano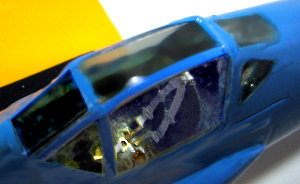 py.
I still have the master, so if anyone out there in MM-Land is building a Swift
and would like a copy, e-mail me your postal, and if I’m in one of my rare good
moods I’ll send you some. Just promise to take it real slow and gentle in
trimming it to fit.
py.
I still have the master, so if anyone out there in MM-Land is building a Swift
and would like a copy, e-mail me your postal, and if I’m in one of my rare good
moods I’ll send you some. Just promise to take it real slow and gentle in
trimming it to fit.
I deferred building the
cockpit to expedite painting and canopy fitting; and deleted the floor and
bulkheads. No reason why the seat could not sit on the wing surface. My kit was
missing part #8, the underwing radiator scoop. I e-mailed the company, but
despaired of ever getting a replacement. Using the very vague drawings I
fashioned a facsimile from resin pour stubs. The day I finished and attached it,
which was about a week after the e-mail, a bubble envelope arrived from the
Czech Republic. (My rural mail carrier thinks I’m some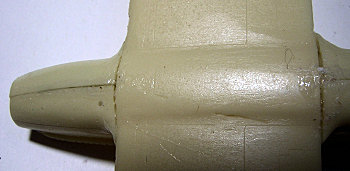 sort of James Bond type with all this foreign correspondence.) Turns out my
facsimile was close- but no cigar. Bit too tall, way too long, and improperly
shaped on the exhaust end. Luckily CA glue bonds can be carefully broken, and I
popped off the DIY scoop and replaced it with the store-bought version.
sort of James Bond type with all this foreign correspondence.) Turns out my
facsimile was close- but no cigar. Bit too tall, way too long, and improperly
shaped on the exhaust end. Luckily CA glue bonds can be carefully broken, and I
popped off the DIY scoop and replaced it with the store-bought version.
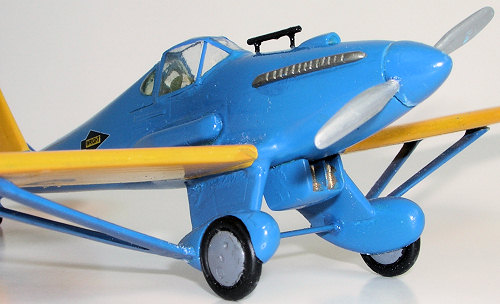
Did I mention the uncertainty in positioning parts? Yes I did. In that case not much more needs to be added to the “Construction” section; except to say that perhaps the wings struts were a tad too hefty and could be fashioned from spares, or Plastrtuct extrusions; though like the wing camber, the steroidal struts may be entirely accurate.
| COLORS & MARKINGS |
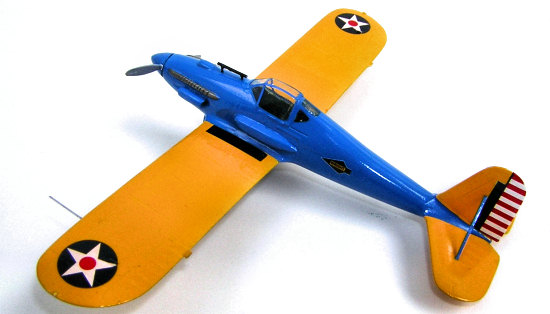
Nothing particularly
notable in this department. Testors little square bottles of yellow and blue
enamel, with white for the rudder. The Instructions call for True Blue but the
matching Model Master stuff is way too gray and purple due to scale effect. Out
in the sunlight held ne xt to an
actual antique plane it’s a perfect match, but on a semi dark shelf generic
medium blue looks more appropriate.
xt to an
actual antique plane it’s a perfect match, but on a semi dark shelf generic
medium blue looks more appropriate.
Kit decals are about as perfect as they can be. No manufacturer is identified, but these latest East European kits, both resin and injected, come equipped with the ultimate water-slide transfers that have solved all the adhesion, silvering, carrier film, register, and other problems of earlier generations.
Everything got covered with a generous coat of Future to which was added a few drops of artist’s acrylic paint flow improver ($7 for 4 oz at Michaels or Ben Franklin). The stuff is a surfactant that helps the varnish form a uniform layer and level when applied either as a super fine mist coat for nearly flat finishes, or a sopping heavy layer for “under glass” decoupages. The additive cures Future’s occasional bad habits of going grainy, or orange peeley, or runny. It should first be mixed with water (distilled) at a rate of around 20 drops per 2 oz, then 10 or so drops of that solution added to a half oz of clear stuff. It may amplify the tendency to fog when laid on generously or in humid conditions; but leave it alone. As it dries it will clear.
| FINAL CONSTRUCTION |
The PEB seat and belts fold up into an impressive cockpit interior. The instrument panel is provided only as a paper drawing. I fashioned one from card then applied the instrument film and etched panel face from an unused brass sprue. Don’t be silly, of course you can’t see any of it through the canopy - even with a magnifier.
 The canopy rear quarter windows
posed a problem. Their framing is molded with the fuselage rather than vac-ing
the complete transparent section. Vacu-formed inserts are provided but they are
barely raised and are in any event not clear enough to bother with. I decided
to cast the panes in-situ using 5-min epoxy. Since that stuff can’t be
stretched across an opening, the aperture first had to be backed with clear
acetate, held in place by a wad of foam rubber stuffed into the aft fuselage.
Epoxy has strong capillarity and will get drawn into the space between the
acetate and the inside wall of the fuselage. If you keep filling it will keep
getting drawn off, so a bit of patience and intelligence has to be employed,
characteristics for the absence of which model airplane people are noted. Let
the first application harden and seal the joint. Then carefully build up the
window. Epoxy also has a strong tendency to form a pronounced meniscus, rather
than a flat surface, so some excess curvature must be accepted; as an
alternative to filing the window flush and flat then polishing to clarity.
The canopy rear quarter windows
posed a problem. Their framing is molded with the fuselage rather than vac-ing
the complete transparent section. Vacu-formed inserts are provided but they are
barely raised and are in any event not clear enough to bother with. I decided
to cast the panes in-situ using 5-min epoxy. Since that stuff can’t be
stretched across an opening, the aperture first had to be backed with clear
acetate, held in place by a wad of foam rubber stuffed into the aft fuselage.
Epoxy has strong capillarity and will get drawn into the space between the
acetate and the inside wall of the fuselage. If you keep filling it will keep
getting drawn off, so a bit of patience and intelligence has to be employed,
characteristics for the absence of which model airplane people are noted. Let
the first application harden and seal the joint. Then carefully build up the
window. Epoxy also has a strong tendency to form a pronounced meniscus, rather
than a flat surface, so some excess curvature must be accepted; as an
alternative to filing the window flush and flat then polishing to clarity.
Some small parts either weren’t included or weren’t recognized as such. The tailplane struts were formed from Evergreen strips. The gun sight from .025 rod. Pitot tube came from an inch of wire. A length of hypodermic needle (blunted) is provided for the gun barrels, but I omitted these, as the few available photos did not evidence them; and it is doubtful the little plane was ever tested in an armed configuration. Performance without the guns was reportedly bad enough to get it the heave-ho prior to that stage of audition.
| CONCLUSIONS |
 From a perfect score
deduct 2 or 3 points for the casting bubbles, then at least 5 for the less than
adequate instruction drawing. Throw in some extra credit for the unusual subject
matter and the undeniable cuteness and you end up with an A- kit. It’s easy to
get addicted to these resin “tweeners” (between the wars), except for the
upscale price and the size of the stash already piled up awaiting builds.
From a perfect score
deduct 2 or 3 points for the casting bubbles, then at least 5 for the less than
adequate instruction drawing. Throw in some extra credit for the unusual subject
matter and the undeniable cuteness and you end up with an A- kit. It’s easy to
get addicted to these resin “tweeners” (between the wars), except for the
upscale price and the size of the stash already piled up awaiting builds.
August 2007
Copyright ModelingMadness.com. All rights reserved. No reproduction in part or in whole without express permission from the editor.
If you would like your product reviewed fairly and fairly quickly, please contact the editor or see other details in the Note to Contributors.