| KIT #: | R72-031 |
| PRICE: | Approx $30.00 |
| DECALS: | Two options |
| REVIEWER: | Joel Hamm |
| NOTES: | Resin multimedia kit |
| HISTORY |
I’ve done resin conversions, and doodled with resin details and accessories; but this is my first all resin kit. This is also my first “Commission”, or “On Assignment” build and review. When Scott asked me to put it together and write it up I was thrilled. Not that I considered it any sort of an honor; or thought it a recognition of my modeling skills; I was simply pleased at the practicality of the offer. I had been working up the nerve to start my LF Resins 1/72 XP-31 Curtiss Swift (“Sexy Shrike” - it says so right on the box). Da Boss’s project proffered the opportunity to lavish my learner’s mistakes on someone else’s baby before boogering up my own. I already have on my shelves several incarnations of the little biplane, so if this one came out less than perfect I would not need to too heavily hit the Dewar’s bottle.
| THE KIT |
Our editor has already
done a preview of
What’s In The Box and covered the subject’s history; so I’ll limit repetitions
on those points only to notable observations from and to first time resiners. A
few years ago the Ukranian Olimp Model Company sprang up and started issuing a
series of 1/72 scale “Yellow Wing ‘Tweeners” - US military aircraft from the
period between the World Wars. Some are done in conventional injected styrene,
under the “Olimp” label; others in resin, boxed with the “Pro RESIN” logo. Both
are in all respects excellent; though it would be interesting to learn the
reason for the division of their labors.
It would be equally interesting to learn the reason for their choice of subjects. Most are or have been available from other molders. The Boeing, Curtiss P-18, and F6C were subjects, in slight variations, of the more than adequate Monogram “49 Center” series that is out of production but still available. Matchbox also did one or two of them; and MPM has a similar F11C. The Jennies, Loenings, and soon-to-be-released Thomies (Thomas Morse Scout) were done by the first and second generation cottage industry kitters; but their quality and availability are both bottom shelf. Mind you – I’M NOT WHINING!!! Any company that wants to mold new subjects is welcomed and encouraged to do so (except, maybe, no more verdamte, ferschlugener Me 109’s and P-47’s).
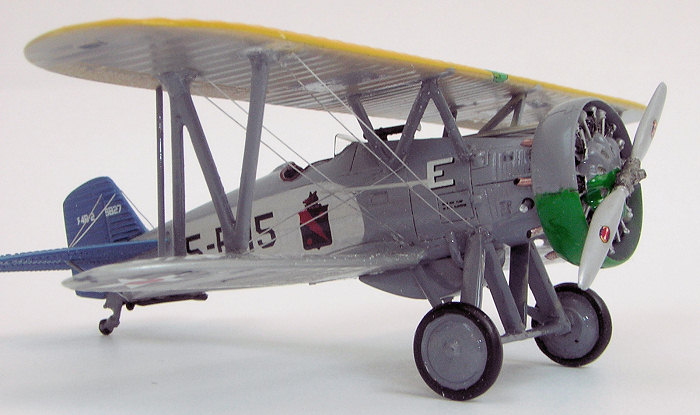
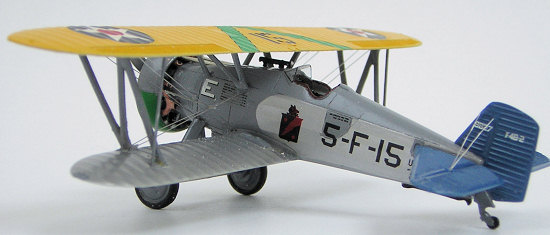
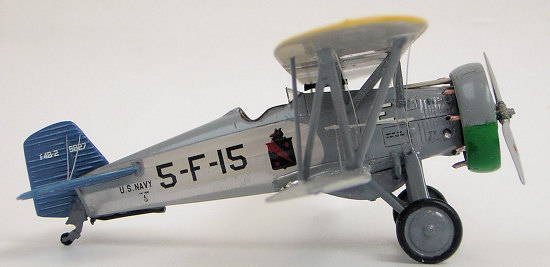
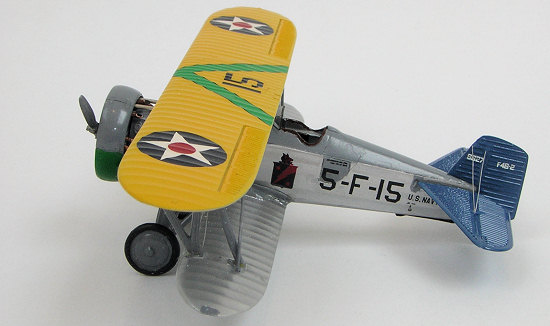
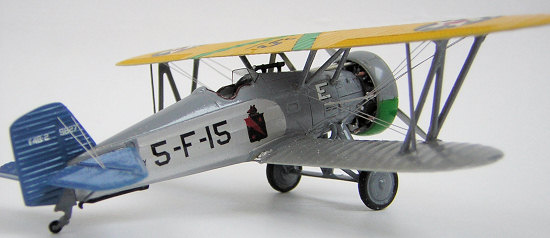
Olimp’s choice of markings is also a bit curious. Decals are super-duper, top notch, can’t say anything but the highest praise about them. (Well – maybe the red is less like Insignia Red and more like Raw Beef Blood Red.) Two marking options are provided in the gaudy squadron scheme that makes this period the Golden Age of aircraft coloration, if not of design and performance: the CO’s A/C of the Saratoga’s VF-6B with a red cowl, wing chevron, and fuselage band preceding a white empennage, and A/C 5-F-15 off the blue-tail Lexington. (Tail color denoted the squadron’s carrier). For the second choice, they could have chosen the section leader’s aircraft, which would have included an even more colorful green fuselage band and fully painted cowl; but to repeat myself: I’M NOT WHINING!!! Painting the cowl, adding a fuselage band, and changing the airplane number from 15 to 13 would not be an impossible modification; but it might induce historical anomalies that would invite attacks by the accuracy Gestapo.
 The graphic construction
diagrams are clear enough, but for builders like me, who are past their
own Golden Age and well into a presbyopic decline, they could benefit from a run
through an enlarging Xerox copier. A clear rigging diagram is included, but
painting instructions are another thing entirely. Some companies are now
printing full color painting guides, but this sheet uses shades of gray to
denote different colors; an arrangement impossible to decipher without at least
a rudimentary knowledge of the general marking scheme, and possession of a
reference, such as The Official Monogram US Navy and Marine Corps Aircraft
Color Guide.
The graphic construction
diagrams are clear enough, but for builders like me, who are past their
own Golden Age and well into a presbyopic decline, they could benefit from a run
through an enlarging Xerox copier. A clear rigging diagram is included, but
painting instructions are another thing entirely. Some companies are now
printing full color painting guides, but this sheet uses shades of gray to
denote different colors; an arrangement impossible to decipher without at least
a rudimentary knowledge of the general marking scheme, and possession of a
reference, such as The Official Monogram US Navy and Marine Corps Aircraft
Color Guide.
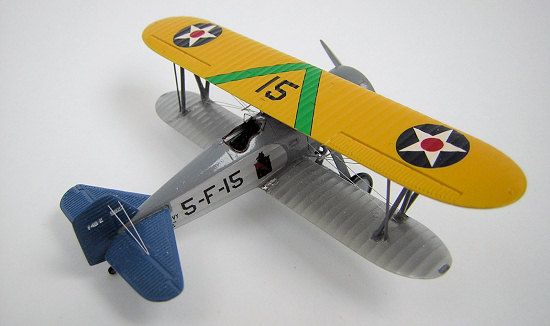
To be fair, many part pictures are tagged with an alphabetic key linked to a three-brand (Humbrol, Model Master, and Revell) “Used Paints” chart on the back of the sheet. Unfortunately, these tags are missing where they are most needed, such as the denotation of Aircraft Gray and Doped Aluminum on the fuselage. They could also be wrong. The 5-F-15 diagram shows the wing underside to be gray. I was quite certain, and the op. cit. confirmed, that the fabric portion should be aluminum, with the sheet metal central portion gray – the same general plan used on the fuselage. Incidentally, while running the instruction sheet through the Xerox, duplicate the paints chart to avoid going batty flipping back and forth.
| CONSTRUCTION |
My first step was shopping
for suitable stickums. Cyanoacrylate is about the only choice. Epoxies are
pretty messy, and even the quickest setting formulas have no “grab” and have to
be clamped for a few minutes. The range of CA glues is almost overwhelming.
Setting time is linked to viscosity. The thinner is the liquid the quicker
will it bond. Also the easier is it for capillarity to suck it into unwanted
meeting places, such as the joint between fuselage side and forefinger skin.
Price is linked to place of 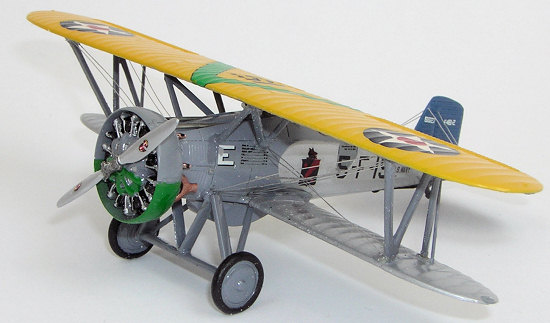 purchase.
A bona-fide hobby shop will rip you a cool $8 for an ounce. Wal Mart or Dollar
Tree sell 4-packs of 1-gram tubes for $1. The department stores only have one
choice of liquid and one of Gel viscosity. I got one pack each of the Wally
World brand, and at HobbyTown sprung for a bottle of the fastest (1-3 seconds)
and slowest (20- 30 seconds). As construction progressed I found each suitable
for particular applications. Of course drops of gel and liquid can be mixed
together on a pallet to form whatever consistency is required.
purchase.
A bona-fide hobby shop will rip you a cool $8 for an ounce. Wal Mart or Dollar
Tree sell 4-packs of 1-gram tubes for $1. The department stores only have one
choice of liquid and one of Gel viscosity. I got one pack each of the Wally
World brand, and at HobbyTown sprung for a bottle of the fastest (1-3 seconds)
and slowest (20- 30 seconds). As construction progressed I found each suitable
for particular applications. Of course drops of gel and liquid can be mixed
together on a pallet to form whatever consistency is required.
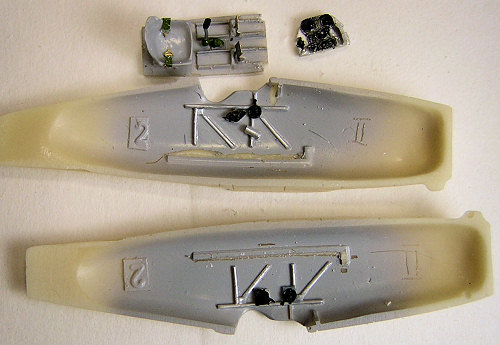
Step Two was spending a long time just admiring the parts. Resin casting seems to allow a level of scale thin-ness and detail crispness not seen in injected styrene. Resin is supposedly susceptible to bubbles and “short shots” – incomplete mold fill; but Olimp’s parts were marred only by the smallest trace of seam flash, and necessary mold webbing on some parts.
Scale thin-ness can be taken to an extreme, however, and some of the struts looked like they would be easily shattered. My third step, therefore, was rummaging in the Parts Department for possible spares. I was hoarding the remains of several of the Monogram and Matchbox bipes – wings, tails, engines, cowls, wheels, props – all except the fuselages; but assembling a Frankenstein out of fresh resin and “post consumer plastic” would defeat the purpose of the review; which I saw as letting prospective resin builders know what they were letting themselves in for. Some of the parts, such as exhaust pipes and interplane aileron rods, could be more easily and cleanly fashioned from sprue or rod stock, so this was my plan; as any (sane) modeler would do the same.
 The “Pro” in Pro RESIN isn’t
just empty advertising. Olimp’s level of detail should satisfy the most finicky
“accurist”. Interior framework and details are molded into the sidewalls, but
that isn’t sufficient. A sprue of photo etched brass includes fiddily-bits, such
as trim wheels and what appears to be a magneto switch, that I would normally
omit, but for the sake of this review decided to give a try. The problem of nano-parts
being launched into earth orbit by the pressure of an Exacto blade can be
alleviated by cutting them on a piece of low-tack tape, or the sticky side of a
Post-a-Note.
The “Pro” in Pro RESIN isn’t
just empty advertising. Olimp’s level of detail should satisfy the most finicky
“accurist”. Interior framework and details are molded into the sidewalls, but
that isn’t sufficient. A sprue of photo etched brass includes fiddily-bits, such
as trim wheels and what appears to be a magneto switch, that I would normally
omit, but for the sake of this review decided to give a try. The problem of nano-parts
being launched into earth orbit by the pressure of an Exacto blade can be
alleviated by cutting them on a piece of low-tack tape, or the sticky side of a
Post-a-Note.
Another Hint From Heloise vital for working in resin: NEVER CLIP, SNIP, SNAP, CHOP, HACK, BEND, BREAK, OR OTHERWISE RESORT TO VIOLENT MEANS TO SEPARATE PARTS FROM THEIR POUR STUBS OR WEBBING!!!!!!!!!!!!!!!!!! This stuff is brittle and the part will likely shatter. Cut parts away using a fresh #11 blade or razor saw.
Another tip I formulated too late to utilize concerns preparation for rigging. Stringing the fore and aft doubled flying wires would have been simplified if attachment of the belly tank was deferred, and in its place an access port routed out. In that manner, the wires could have been pulled through, tightened, and fastened from inside the fuselage. Live and learn.
A minor, but consistent glitch with these Ukranian kits is placement of the seat mounting too far aft, which I discovered after the 1.25 seconds it took for the CA to cure. Perhaps the East Europeans are a race of particularly long-legged people – and only my parents (Galicia, East Prussia) brought here the defective genomes for short and squat. The problem was easily fixed by moving the control stick and rudder pedals aft, and modifying the floorboard so it could slide a few millimeters forward in its mounting rail, but when the fuselage was closed up the seat still sat too far back, so that the pilot would constantly be chafing his neck against the coaming. The seat is provided with only lap belts – no shoulder restraints. If that is historically accurate, then hard landings could not have done much for the pilots’ good looks; and Dental Technician must have been an in-demand naval MOS during the ‘30’s. In its open state, the detailed cockpit is impressive; though all the work becomes invisible when the fuselage comes together. I know it’s there. You know it’s there. God knows it’s there.
| COLORS & MARKINGS |
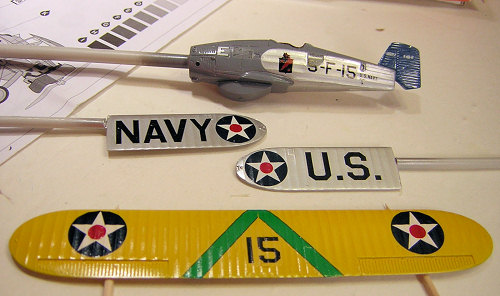 With these gaudy bipes it is
only logical to paint the parts separately; so as soon as the fuselage was
closed and everything else was cleaned up, the whole she-bang was transported to
the paint shop (the opposite end of the work bench). The top of the upper wing
was treated to Testors yellow out of the little square bottle, which seems to be
exactly the same as the stuff with the official Federal Standard Number that
comes out of the far more expensive round “Model Master” bottle. The under side
and all other “fabric” surfaces were painted with Floquil “Old Silver”, which I
was (correctly) advised would withstand the tug of masking tape. “Metal” parts
got doused with Testors grey enamel, which also matches, to my eyes at least,
MM’s “Aircraft Grey”. Tail fins got the official “True Blue” because nothing
less would due.
With these gaudy bipes it is
only logical to paint the parts separately; so as soon as the fuselage was
closed and everything else was cleaned up, the whole she-bang was transported to
the paint shop (the opposite end of the work bench). The top of the upper wing
was treated to Testors yellow out of the little square bottle, which seems to be
exactly the same as the stuff with the official Federal Standard Number that
comes out of the far more expensive round “Model Master” bottle. The under side
and all other “fabric” surfaces were painted with Floquil “Old Silver”, which I
was (correctly) advised would withstand the tug of masking tape. “Metal” parts
got doused with Testors grey enamel, which also matches, to my eyes at least,
MM’s “Aircraft Grey”. Tail fins got the official “True Blue” because nothing
less would due.
Everything else was decals, which worked even more beautifully than promised by the appearance of the sheet. Nothing curled, nothing crumpled, nothing stuck where it shouldn’t. Everything settled and snuggled down tight without any setting fluids. Carrier films dried invisibly without silvering or spotting. I only wish the children that roamed (terrorized) the neighborhood were as well behaved as these decals. Even though the markings appeared painted on and in need of no overcoat, I lightly Futured everything for the sake of longevity.
| MORE CONSTRUCTION |
The only fit issue of the whole kit concerned the mating of lower wing panels to the fuselage. The wing roots are a millimeter or so shorter than the wing chord. Forming extensions and fillets with CA get was a small job, but would have been neater if done pre-paint so they could have been filed and faired.
The styrene struts salvaged from a wreck were too big, so I went with the kit resin parts, except for the aileron link rods, which were Evergreen .035 diam. The struts come with a thin molding web, which would be called “flash” in that other medium but in resin are welcome as a strength-in-packaging aid. I must repeat, reiterate, duplicate, and even voice once again the warning against resort to violence in cleaning this away. If you try and cut through it in one swell foop you will shatter the part. Make multiple LIGHT scoring cuts until it falls away. A #12, curved, scalpel blade works best. If you cannot find one at the hobby shop, do as I did – help put your brother through medical school so he can become a surgeon and supply you with all sorts of nifty modeling paraphernalia.
 Connecting the upper and lower
wings was less of a hassle than expected. Experiments with several of the CA’s
revealed that for this step the cheapest is the best. Wal-Mat’s super glue gel
has just enough grab and workability to attach the interplane struts to the
lower panels, then manipulate them into the locating holes in the uppers before
the stuff sets. Once it did, however, I discovered that the aft upright members
of the struts are a hair too long, imparting a negative incidence to the wing. I
carefully cut away the attach points, which effectively shortened the strut,
and re-glued them, but the planes are still not perfectly parallel. Not
terribly evident unless you look real hard, but in real life this biplane would
have some funny flying characteristics. The cabane struts are also too long and
need trimming to properly span between their attach points on the wing and
fuselage.
Connecting the upper and lower
wings was less of a hassle than expected. Experiments with several of the CA’s
revealed that for this step the cheapest is the best. Wal-Mat’s super glue gel
has just enough grab and workability to attach the interplane struts to the
lower panels, then manipulate them into the locating holes in the uppers before
the stuff sets. Once it did, however, I discovered that the aft upright members
of the struts are a hair too long, imparting a negative incidence to the wing. I
carefully cut away the attach points, which effectively shortened the strut,
and re-glued them, but the planes are still not perfectly parallel. Not
terribly evident unless you look real hard, but in real life this biplane would
have some funny flying characteristics. The cabane struts are also too long and
need trimming to properly span between their attach points on the wing and
fuselage.
Hoo boy! Had I done more careful pre-build planning and preparation the wiring would have been much easier and neater; but I didn’t so it wasn’t. My usual method is to string “invisible thread” (monofilament nylon sewing stuff) between the struts or from pre-drilled holes, tensioning the lines with weights while the CA dries. A trip to NASM (National Air and Space Museum) convinced me that invisible was improper, as both bracing and control wires are highly evident in the real thing. I had used stretched sprue on some planes but the thickness was never uniform; so I decided to try thin wire cut to more or less exact size and stuck between attach points with CA globs. Results are disappointing. Not bad viewed from a distance, particularly with the realistic metallic reflection; but up close the lines are crooked, uneven, not parallel, and oddly spaced. Doesn’t ruin the model; but brings it down from a 9 to a 6 or 7. On future projects I’ll go back to what works, and before connecting any parts drill all the holes and ports necessary to tighten the and hide the attach points.
 The further
assembly progressed into fiddly bits the more astounding seemed the level of
detail resin allows. The master-maker reproduced, and the mold-maker captured,
the sub-microscopic lacing that held the wheel covers to the rims. That’s not
even the best of it. The exhaust pipes are molded with holes in their ends,
which when touched with flat black paint look entirely convincing.
Unfortunately, 4 of the 7 stub pipes were missing so these had to be fashioned
from Everegreen rod. Some of the parts provided are not supported by pics of the
real things. A vacuum venturi, the location of which is anyway in serious
question on the assembly diagram, is shown on no photographs; neither is a
carburetor induction pipe which is diagramed on the starboard side, but not
provided as a part. Both were omitted for realism and laziness. I also left
off the bombs and racks, which were missing from the majority of photos. My
usual practice is to discard all hang-on stores, as they dirty up and detract
from the basic airframe.
The further
assembly progressed into fiddly bits the more astounding seemed the level of
detail resin allows. The master-maker reproduced, and the mold-maker captured,
the sub-microscopic lacing that held the wheel covers to the rims. That’s not
even the best of it. The exhaust pipes are molded with holes in their ends,
which when touched with flat black paint look entirely convincing.
Unfortunately, 4 of the 7 stub pipes were missing so these had to be fashioned
from Everegreen rod. Some of the parts provided are not supported by pics of the
real things. A vacuum venturi, the location of which is anyway in serious
question on the assembly diagram, is shown on no photographs; neither is a
carburetor induction pipe which is diagramed on the starboard side, but not
provided as a part. Both were omitted for realism and laziness. I also left
off the bombs and racks, which were missing from the majority of photos. My
usual practice is to discard all hang-on stores, as they dirty up and detract
from the basic airframe.
| CONCLUSIONS |
An unqualified A+ kit. Resin is little different from injected styrene, with only a few mentionables: Parts are delicate. Treat them gently and with respect – as you did your girlfriend before she became your wife. You will have to stick to cyanoacrylate glues; pun obviously intended, which take a bit of practice and extra neatness. Don’t waste your money on the exorbitant hobby shop formulations. I used just about zero of the super fast and super slow concoctions for which Hobbytown had ripped and raped me to the tune of almost twenty bucks. Wal-Mart’s 4-tubes-for-a-dollar liquid and gel worked fine for all applications. When something in-between was called for I simply mixed droplets of the two on a ceramic tile pallet.
 On the positive side of cast epoxy: “Awesome” is a buzzword robbed by overuse of
its “impact”; but which almost applies to the level of detail and scale
accuracy conferred by the medium. My guess is that liquid glop can pour itself
into molded nooks and crannies that, even under pressure, melted plastic could
never dream of reaching. The mystery remains of how those nooks and crannies
got cut into the mold in the first place. A sharp eyed and steady handed bunch
of sculptors, those Ukrainians.
On the positive side of cast epoxy: “Awesome” is a buzzword robbed by overuse of
its “impact”; but which almost applies to the level of detail and scale
accuracy conferred by the medium. My guess is that liquid glop can pour itself
into molded nooks and crannies that, even under pressure, melted plastic could
never dream of reaching. The mystery remains of how those nooks and crannies
got cut into the mold in the first place. A sharp eyed and steady handed bunch
of sculptors, those Ukrainians.
Because resin’s rubber vs. metal molds obviate the investment in tooling and injection equipment that only a multi-galactic corporation can muster, kitters like Olimp can crank out relatively rapid fire releases of oddball subjects the likes of which the Hasemiyans and Tamigawans would never gamble upon. Expensive, but enticing. For a glimpse into the alternative dimension of model subjects, check in with Hannants or Modelimex.com. This last trait can be viewed positively or negatively, dependent upon the hobbyists degree of compulsiveness, his budget, demeanor of his “soulmate”, and his ability to hide therefrom his stash.
May 2007
Copyright ModelingMadness.com. All rights reserved. No reproduction in part or in whole without express permission.
If you would like your product reviewed fairly and fairly quickly, please contact the editor or see other details in the Note to Contributors.