Accurate Miniatures 1/48 F3F-2
| KIT: | Accurate Miniatures 1/48 F3F-2 |
| KIT #: | 3414 |
| PRICE: | $34.99 MSRP |
| DECALS: | Many optons |
| REVIEWER: | Dan Lee |
| NOTES: | Built out of the box |
| HISTORY |
 The F3F-2 was the 2nd
model of Grumman’s F3F line of carrier based naval biplane fighters. It had a
top speed of 221 knots at altitude while armed with a .30 caliber and .50
caliber machine guns mounted above the cowling and synchronized to fire thru the
propeller as well as carry a couple of small bombs under the lower wing. Tom
Cleaver goes into more detail with his review
http://modelingmadness.com/reviews/preww2/cleaverf3f2.htm about the history
of the plane so I will leave it at that.
The F3F-2 was the 2nd
model of Grumman’s F3F line of carrier based naval biplane fighters. It had a
top speed of 221 knots at altitude while armed with a .30 caliber and .50
caliber machine guns mounted above the cowling and synchronized to fire thru the
propeller as well as carry a couple of small bombs under the lower wing. Tom
Cleaver goes into more detail with his review
http://modelingmadness.com/reviews/preww2/cleaverf3f2.htm about the history
of the plane so I will leave it at that.
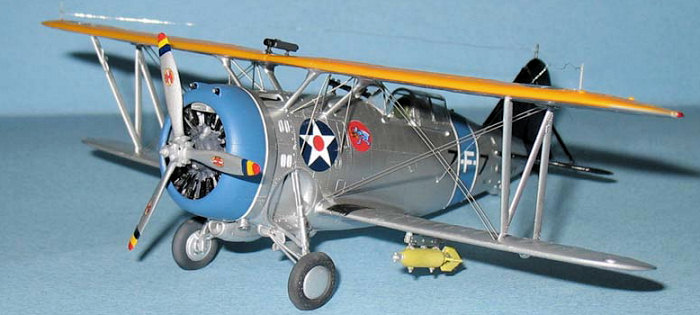
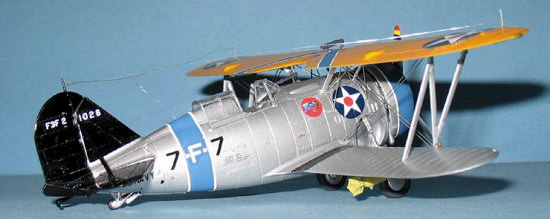
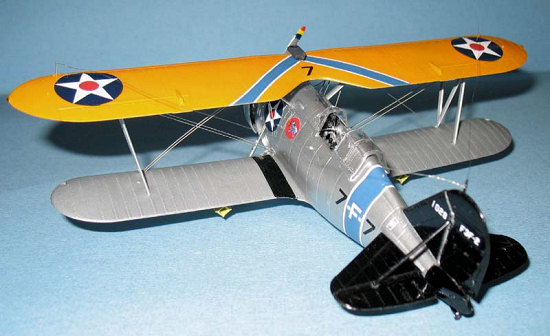
The markings for this particular F3F-2 were selected from photos I found on the internet. Some of you will recognize this as the markings of the one from Kermit Weeks’ Fantasy of Flight museum. The markings are for the 3rd section leader of the USS Wasp’s VF-7.
| THE KIT |
There really isn’t much to say about this kit that hasn’t been said. It is a well detailed and engineered kit with minimal flash and only a minor fit problem. The decal sheet is pretty good if incomplete (more on that later.) The clear parts are very clear with minimal distortion.
| CONSTRUCTION |
I’ve build the F3F-1 kit (although not very well) and found that if you follow the instructions you will be rather successful (for the most part.) The “secret” to decent biplanes is to construct and paint the sub assemblies first and then do final assembly.
I’m always on the look out for an
easier NMF (partially because I’m lazy and don’t like sanding/polishing till my
hands and brain go numb and because I’ve not been as successful with Alclad II
as I’d like to be) so I went with Tamiya Spray Can Lacquers this time.
 If
anyone has read some of my earlier articles, then you would know that I use them
as undercoats for chipped paint. I’ve found these spray cans to have decent
spray control and useful for large surfaces, but not so much on smaller parts.
If
anyone has read some of my earlier articles, then you would know that I use them
as undercoats for chipped paint. I’ve found these spray cans to have decent
spray control and useful for large surfaces, but not so much on smaller parts.
The cockpit bits were sprayed with a thin coat of TS-30 Old Leaf Silver (which is very shiny and close to Alclad Aluminum in my opinion.) and left to dry. When dry, the various colors were brush painted on as per the instructions. The cockpit bits go well together for the most part, but I’ve found that the starboard console does not fit well and needs to be trimmed or the piece bends. I still don’t know why it is (design flaw, stupidity?), but it happened to me with the F3F-1 kit as well. The decal sheet was missing the instrument decals so I used Mike Grant 1/48 prop cockpit decals instead. I put a drop of Future into each dial to make it glossy.
The cockpit was glued into the fuselage and then the fuselage was very carefully glued together as there is a lot of raised details on them that have to be carefully avoided or you will have a lot of rescribing to do. I only used a bit of CA glue to fill on the top seam and Mr Surfacer on the bottom. I carefully sanded everything down and polished it using various grades of Sanding/Polishing pads. When it was done to my satisfaction, I rescribed the sanded rivets and panel lines with a pin.
One deviation from the instructions is that I attached the landing gear before adding the engine mount. The reason why is that I’ve found building the F3F-1 that I had trouble getting a solid attachment for the upper portion of the landing gear. Once the landing gear was secured, I followed the instructions for the painting/assembling the engine and other bits. The engine cowl was assembled, but not attached at the time.
| COLORS & MARKINGS |
I went into the garage and began spraying the fuselage and cowling with TS30. I had to be extra careful spraying so as not to get runs or orange peel and I must admit that I was unusually methodical/uptight in my painting (not my usual spray and pray.)
Fortunately, I did not screw anything
up and only sanded a couple of small areas on the fuselage. Most of my touch
ups were on the smaller parts like the landing gear and bracing because spray
cans do not do a good job on small parts because you need finer control than
what is available with the spray nozzle—like an airbrush for example. If you
are wondering why I didn’t decant
 the lacquer paint from the spray can and use
my airbrush that is because I don’t spray lacquers inside the house and my
previous compressor died due to dirt getting into the bearings from being used
in the garage for Alclad (never buy a cheap compressor!) As a result, I’m
rather overprotective of my equipment.
the lacquer paint from the spray can and use
my airbrush that is because I don’t spray lacquers inside the house and my
previous compressor died due to dirt getting into the bearings from being used
in the garage for Alclad (never buy a cheap compressor!) As a result, I’m
rather overprotective of my equipment.
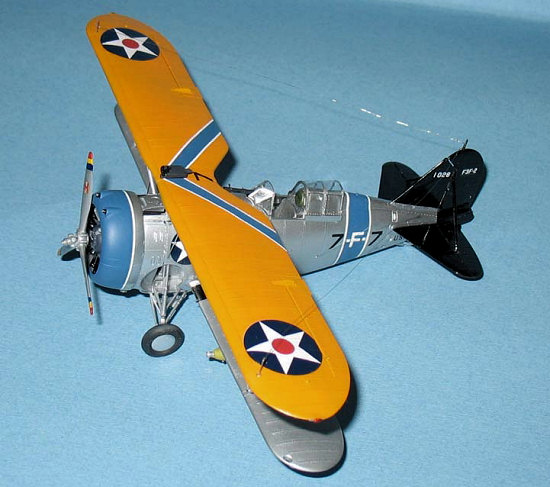
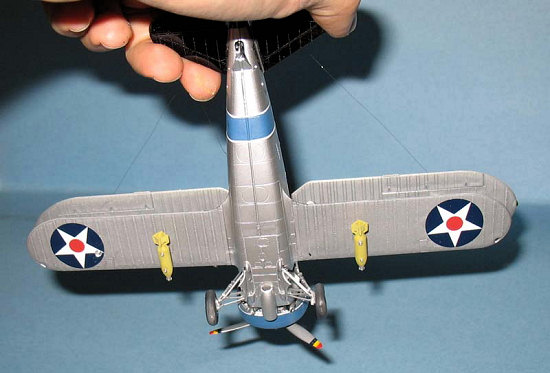
Both the upper and lower wings were sprayed with Tamiya AS-12 Bare Metal which is closer to Aluminum lacquer than shiny bare metal. No problems with painting. The topside of the upper wing was painted with Gunze H24 Orange Yellow and when dry, the bottom was masked off and the leading edge was sprayed. I attached the PE antennas to the upper wing at this time with white glue.
I waited two days for the paint to dry before I masked off the plane’s rudder, lower wing walkways and tailplane parts with 3M and Tamiya tape and sprayed on Tamiya Gloss Black.
 When black was dry on the fuselage,
I masked off the mid fuselage and assembled engine cowl and sprayed them with
Poly Scale True Blue.
When black was dry on the fuselage,
I masked off the mid fuselage and assembled engine cowl and sprayed them with
Poly Scale True Blue.
The prop was sprayed with AS-12. The tip markings were hand painted with Citadel Paints (red, blue and yellow.)
Decals were no problem to put on the model without a gloss coat. I was rather annoyed as the AM decal sheet was incomplete despite their claim one can do any F3F-2 ever built. For instance, the decal sheet for my kit was missing the VF-7 squadron emblem but I was fortunate to have them on the unused decals from the F3F-1 sheet which had them.
Once the decals were dry and the Micro Sol/Set solutions were washed off, the model was spayed with Gunze Gloss coat.
| FINAL CONSTRUCTION |
The wings and bracing struts were glued on at the same time. No issues with alignment thanks to AM’s excellent design unlike most biplanes models.
 The prop proved to be a problem as
the “spinner” portion fell off when I attached it to the engine. I ended up
gluing it and unlike most of my prop planes it does not spin.
The prop proved to be a problem as
the “spinner” portion fell off when I attached it to the engine. I ended up
gluing it and unlike most of my prop planes it does not spin.
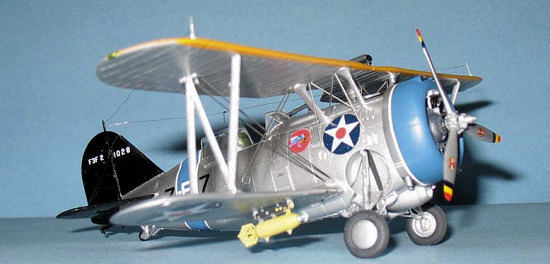
The photo etched wires were attached using white glue. Any excess was removed with a moistened Q-Tip. Patience and care is required to add these parts. The green house canopy parts were masked and painted at the same time the fuselage was and attached using Elmer’s white glue. The bomb racks were assembled and painted. I did not bother to make up any mustard paint and used Tamiya XF-4 yellow zinc chromate (close enough for me.)
The PE bits were glued to the gun sight and then brush painted with Citadel black paint.
The last part was my least favorite assembly step, aerials. I normally would forget them, but they are rather prominent on all F3F fighters. I drilled a hole in the port side fuselage where the instructions said the radio aerial should go. I’ve had lots of problems with attaching aerials and I’m now using a lasso for attaching wire. I make a loop of about a 2cm length (3/4 of an inch for those who are used to Imperial) then put a thin wire thru the loop and twist it so that I have a loop of about slightly less than one mm. The loop of wire is looped over the antenna and secured with either a tiny drop of white glue or CA glue. As you can tell from the photos, my aerials are not that good as they could be much tighter and straighter, but they are more secure than my past ones (no more butt joins or failed attempts to drill very tiny holes in the antenna.)
| CONCLUSIONS |
The AM F3F series are pretty easy builds for biplanes and stand out thanks to the colorful Golden Wings markings. It does require a different approach than monoplanes, but with a bit of care one can build a fairly good model.
My only gripe with the kit is the incomplete decal sheet.
October 2007
If you would like your product reviewed fairly and quickly, please contact me or see other details in the Note to Contributors.