| KIT: | Airfix 1/72 DHC-2 Beaver |
| KIT #: | 3017 |
| PRICE: | LM 2.50 |
| DECALS: | See Review |
| REVIEWER: | Carmel J. Attard |
| NOTES: |
| HISTORY |
The Beaver is a military transport aircraft that has always appealed to me in view of its versatility, graceful design, and variety of colour schemes it has carried. Fortunately there has been a reasonably good kits of it released by Airfix and the more recent one by Hobbycraft, both of which are to 1/72 scale. I have first become interested in this aircraft since long ago, way back in early 60s. It was a US ARMY Beaver U-6A that came slowly limbering on its final approach to runway 024 at Luqa airfield, Malta, wearing an overall white scheme with bright red nose, wing tips and tail unit. Later I was able to spot a British Army one in dark earth and dark green camouflage scheme flying over Ta’ Qali airfield, Malta which was engaged in paradropping in the area.
 Beavers saw extensive use in many
countries particularly UK, Canada, Australia, France, Pakistan, US armed forces
and many countries in the African continent and Asia. Deliveries commenced in
1954 and approximately 1,600 were delivered, the majority of these were exported
to the armed forces of 23 countries. Hence the main reason why it carries such a
vast range of colourscheme finishes. This is very positive creative factor for
modelers to have so many schemes to choose from. There were the camouflaged ones
and also the more colourful paintwork seen on Beavers participating in arctic
expeditions and others on utility duties. Many are still flying today
particularly in Canada and Alaska, some of these in civil registration and
markings. The Beaver could accommodate a pilot and seven passengers, and the
lightweight seats were interchangeable with cargo attachments. Approximately a
quarter of the 970 Beavers that entered service with the U.S.Armed forces went
with the USAF, and the SAC, for missile site support, operated 58 of these. In
1960 the Beaver A.L.Mk1 was selected for service by the British Army, 36 of
which were delivered. The Beaver had a span of 48 ft., length of 3ft. 3in, and a
height of 9ft. It had a range of 778 miles, a max.speed of 140 M.P.H. and a
service sealing of 18,000ft.
Beavers saw extensive use in many
countries particularly UK, Canada, Australia, France, Pakistan, US armed forces
and many countries in the African continent and Asia. Deliveries commenced in
1954 and approximately 1,600 were delivered, the majority of these were exported
to the armed forces of 23 countries. Hence the main reason why it carries such a
vast range of colourscheme finishes. This is very positive creative factor for
modelers to have so many schemes to choose from. There were the camouflaged ones
and also the more colourful paintwork seen on Beavers participating in arctic
expeditions and others on utility duties. Many are still flying today
particularly in Canada and Alaska, some of these in civil registration and
markings. The Beaver could accommodate a pilot and seven passengers, and the
lightweight seats were interchangeable with cargo attachments. Approximately a
quarter of the 970 Beavers that entered service with the U.S.Armed forces went
with the USAF, and the SAC, for missile site support, operated 58 of these. In
1960 the Beaver A.L.Mk1 was selected for service by the British Army, 36 of
which were delivered. The Beaver had a span of 48 ft., length of 3ft. 3in, and a
height of 9ft. It had a range of 778 miles, a max.speed of 140 M.P.H. and a
service sealing of 18,000ft.
| THE KIT |
As Scott Van Aken so correctly
hinted in his Beaver kit review that most men modelers would like the little
Beaver and in fact I have built two. The scale models of the Beaver that I built
came from the Airfix range of 1/72 scale that was released way back in the 70s.
It is kit No.3017 that had a beautiful action artwork on the box lid depicting a
British Army Beaver in flight. This wore dark earth and dark green camouflage
wrap round scheme. Later release of the kit showed a photo of the Beaver scale
model instead of the painting that appeared in the original issue. It is a
surprise to me to note how much these Beavers differ from one another. I
 am
particularly referring to the variety of lumps and bumps, aerials and alteration
to window arrangement to the cabin roof area. One will have to make a thorough
study of the upper and lower fuselage area of each particular selection that one
decides to make. The best way to do this is to make direct reference to the
actual aircraft photos. Even if one decides to do the British Army version one
will have to update on the detail found on the particular aircraft which was
different from that of the original earlier shape when it first entered service.
am
particularly referring to the variety of lumps and bumps, aerials and alteration
to window arrangement to the cabin roof area. One will have to make a thorough
study of the upper and lower fuselage area of each particular selection that one
decides to make. The best way to do this is to make direct reference to the
actual aircraft photos. Even if one decides to do the British Army version one
will have to update on the detail found on the particular aircraft which was
different from that of the original earlier shape when it first entered service.
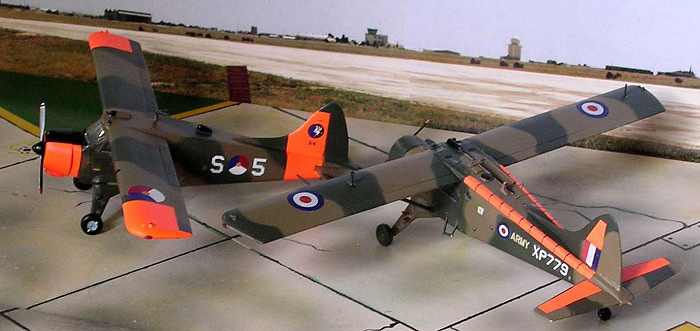
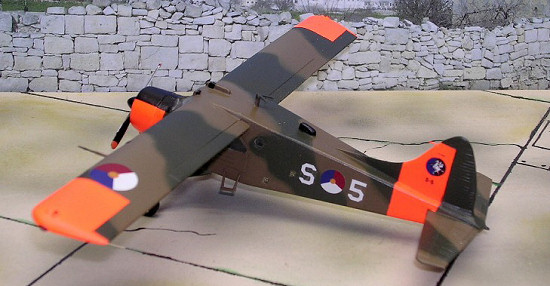
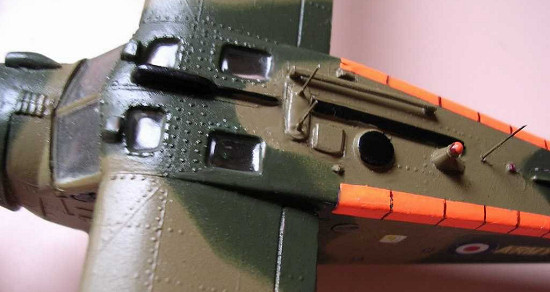
One also has to attend to the somewhat heavy panel line detail or oversize rivets found on the kit. Not so much for the lack of interior detail because unless one elect to open the side cabin doors there is little scope to detail the interior in view of the thick clear Perspex cabin windows. Both of my models had white plastic and relatively devoid of flash though parting lines on tiny parts needed some scraping. The instruction was typical of Airfix but quite easy to follow and paint numbers for Humbrol references are indicated to parts. The kit caters for two versions: A British Army version mentioned earlier or a US Army floatplane version. Skids parts for an aircraft for operations on ice are also found in the kit. I did not use the kit decals that were turning slightly yellowish with time and I preferred to do ones in different colourschemes and registration. In both models I used “Modeldecal” aftermarket transfers which in spite of their age were still as good as new. One of my Beavers was made in Dutch AF markings: DH C2 Beaver of 334Sqn. That was based at Ypenburg, Holland, circa 1967.
| CONSTRUCTION |
Various small items need to be
added to the kit in form of aerials to the cabin roof and other small fairing,
otherwise this was quite a straightforward model to build. Close study of photos
indicated that the aircraft had a short exhaust pipe to port side of nose. I
 realized afterwards that I could have left this item unaltered and use it as
supplied in the kit. This was possible after study of photos of the same
aircraft taken at different period of its operational life. Other aftermarket
decals that I know of are the Zambia AF decal sheet; and Arctic operations
decals issued by the Irish Firm. The interior was painted cockpit green and the
instrument panel was light Grey with the black instrument decal sheet that comes
from Modeldecals which was simply slid on the console panel. Wings and fuselage
assembly was a simple task but the landing gear needed some filling up at the
sink marks. The Dutch Beaver had no cabin roof windows. These were blanked by
filling with putty and smoothened out. Also on this type, the chin intake was
added while the side mounted intake in the kit was omitted. At that time a stab
exhaust was fitted and later picture showed that the extended one was back in
place. The tailplane and aft wheel item were fitted in place. On fitting the
mainplanes to the fuselage the wing struts were put in place too, thus ensuring
that all fits well. Antennae were then added to the cabin roof and under the
fuselage.
realized afterwards that I could have left this item unaltered and use it as
supplied in the kit. This was possible after study of photos of the same
aircraft taken at different period of its operational life. Other aftermarket
decals that I know of are the Zambia AF decal sheet; and Arctic operations
decals issued by the Irish Firm. The interior was painted cockpit green and the
instrument panel was light Grey with the black instrument decal sheet that comes
from Modeldecals which was simply slid on the console panel. Wings and fuselage
assembly was a simple task but the landing gear needed some filling up at the
sink marks. The Dutch Beaver had no cabin roof windows. These were blanked by
filling with putty and smoothened out. Also on this type, the chin intake was
added while the side mounted intake in the kit was omitted. At that time a stab
exhaust was fitted and later picture showed that the extended one was back in
place. The tailplane and aft wheel item were fitted in place. On fitting the
mainplanes to the fuselage the wing struts were put in place too, thus ensuring
that all fits well. Antennae were then added to the cabin roof and under the
fuselage.
| COLORS & MARKINGS |
As for the paintwork this was
carried out in the following sequence. The side clear windows and windscreen
which were now in place were first given a coat of Maskol,. Areas in day glow
were first painted in semi matt white followed by Humbrol dayglow orange paint.
Applying smooth sanding between paint coats when these areas are dry helped a
lot to obtain the final smooth finish. The orange high visibility areas were
then masked with masking tape, noting the extent of areas that should be covered
by 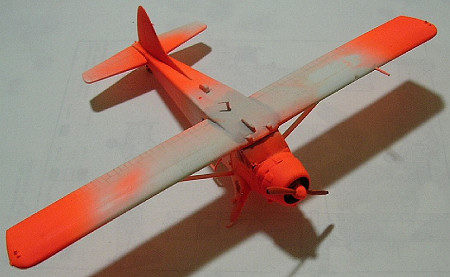 the dayglow orange paint. The kit was then given an overall coat of dark
earth. Incidentally this was Humbrol paint which was lightened with a few drops
of white so that realistic contrast will come out once the dark olive green
disruptive, wrap round camouflage is applied. A black satin finish anti glare
panel was carefully painted in front of the cockpit. Nine Beavers were supplied
to the Dutch AF (serialled S1 to S9) These were initially finished overall olive
green but later repainted in dark earth and dark olive green camouflage. Upon
drying the kit was given a coat of “Lieu” floor polishing liquid. This will give
the model a more realistic modest sheen and a better base for the decals to
adhere well. The window masking was removed and the complete decal set from
Modeldecal sheet No.20 was carefully applied. One should note that when No.334
Sq. subsequently passed its Beavers on to 300 Army Sq., the 334 Sq. crests on
both sides if the tail fin were removed; otherwise the current finish was the
same as with previous Sq. The front of the propeller was natural metal with
gloss white, red, white bands at tips. Rear of blades was matt black with the
tips in gloss orange yellow. The spinner was semi gloss black.
the dayglow orange paint. The kit was then given an overall coat of dark
earth. Incidentally this was Humbrol paint which was lightened with a few drops
of white so that realistic contrast will come out once the dark olive green
disruptive, wrap round camouflage is applied. A black satin finish anti glare
panel was carefully painted in front of the cockpit. Nine Beavers were supplied
to the Dutch AF (serialled S1 to S9) These were initially finished overall olive
green but later repainted in dark earth and dark olive green camouflage. Upon
drying the kit was given a coat of “Lieu” floor polishing liquid. This will give
the model a more realistic modest sheen and a better base for the decals to
adhere well. The window masking was removed and the complete decal set from
Modeldecal sheet No.20 was carefully applied. One should note that when No.334
Sq. subsequently passed its Beavers on to 300 Army Sq., the 334 Sq. crests on
both sides if the tail fin were removed; otherwise the current finish was the
same as with previous Sq. The front of the propeller was natural metal with
gloss white, red, white bands at tips. Rear of blades was matt black with the
tips in gloss orange yellow. The spinner was semi gloss black.
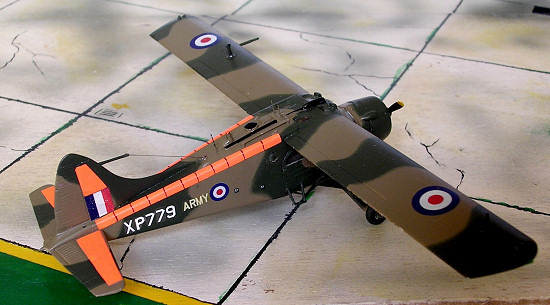
Another Beaver kit was built
simultaneously. This carried a camouflage pattern and colour that closely
resembled to the one used on the Dutch Beaver. With regards to the overall
construction to the previous one the kit was built more or less following the
instruction sheet sequence. Special attention was given to the cabin roof detail
comprising antennae and other communication equipment fairing. These needed
careful reference to photos of the actual aircraft. The R.Arny Beaver built
represented one, which was based in Malaysia and was the only type in Royal Army
service that I know of that carried dayglo orange patches to the
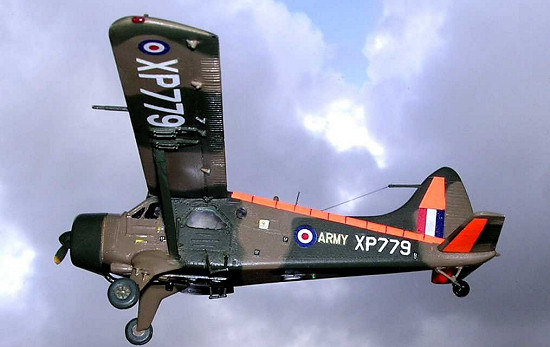 fuselage and tailplanes. Serial registration came from various sources I accumulated in my
spare decal box. As for the Day-Glo orange I have used a different technique
than the one for the Dutch Beaver. Instead of airbrushing with paint I have cut
dayglo decal to the correct size and simply slid carefully onto the appropriate
areas. Such a simple technique, yet it worked well whenever the areas permit and
are of a limited size in nature. Finally the prepainted main wheels were added.
The protruding shaft parts to which the wheels were attached were rather weak
and on both kits this broke which obviously delayed the process of completion.
So a particular care is needed when dealing and handling the kit on its
undercarriage. In other words it couldn’t stand the rough STOL landing that the
real size Beaver could withstand without detaching the main wheels from their
support!
fuselage and tailplanes. Serial registration came from various sources I accumulated in my
spare decal box. As for the Day-Glo orange I have used a different technique
than the one for the Dutch Beaver. Instead of airbrushing with paint I have cut
dayglo decal to the correct size and simply slid carefully onto the appropriate
areas. Such a simple technique, yet it worked well whenever the areas permit and
are of a limited size in nature. Finally the prepainted main wheels were added.
The protruding shaft parts to which the wheels were attached were rather weak
and on both kits this broke which obviously delayed the process of completion.
So a particular care is needed when dealing and handling the kit on its
undercarriage. In other words it couldn’t stand the rough STOL landing that the
real size Beaver could withstand without detaching the main wheels from their
support!
Finding the decals of the correct size was no easy task. This was particularly so to the white lettering under the mainplanes as this proved to be time consuming but in the end I have managed to find ones close to the correct size. The roundels also came from another Modeldecal sheet, which had the complete set to the correct size. The propeller was painted Matt black with yellow tips. Other tiny details such as the wing tip light etc were done at the final stage. The kits was given the same floor polish coat treatment and in the end after the decals were slid in place it was airbrushed in semi Matt sheen varnish.
| CONCLUSIONS |
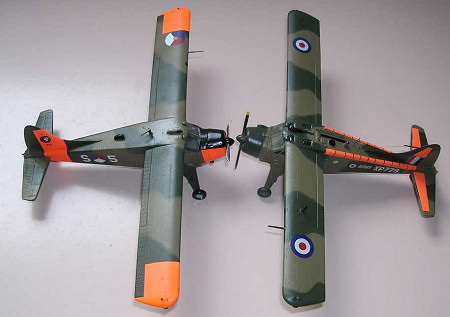 These two Beavers have been waiting
for their turn to be built for a good number of years and now the end result was
now very pleasing. I am now considering building the next two Beavers in USAF
markings with their colourful finish or perhaps as Canadian Armed Forces ones,
or Chilean, Australian, and Argentine AF ones that served in Arctic
Explorations. Such a difficult choice to make considering the lively colour
varieties that all of these offer.
These two Beavers have been waiting
for their turn to be built for a good number of years and now the end result was
now very pleasing. I am now considering building the next two Beavers in USAF
markings with their colourful finish or perhaps as Canadian Armed Forces ones,
or Chilean, Australian, and Argentine AF ones that served in Arctic
Explorations. Such a difficult choice to make considering the lively colour
varieties that all of these offer.
April 2006
If you would like your product reviewed fairly and quickly by a site that has over 300,000 visitors a month, please contact me or see other details in the Note to Contributors.