Monogram 1/48 A-37 Dragonfly
|
KIT # |
5486 |
|
PRICE: |
$9.50 |
|
DECALS: |
Two aircraft |
|
REVIEWER: |
|
|
NOTES: |
|
HISTORY |
As the Vietnam War dragged into the late 60’s, anti-war sentiment began to grow, and there was political pressure to end US involvement. The Vietnamization program was implemented to let South Vietnam take on a larger fighting role. The first step was to upgrade their military capability. One of the areas needed to modernize was the VNAF. Though they had high potentials, it was small and lacked resources to take on the war. Up until 1967, they had only six fighter squadrons, five of which operated the Skyraiders, by then was over 30 years old and rapidly depleted. It was therefore decided that additional fighter squadrons would be added.
Effort was made to revive the Skyraider production did not
materialized, considering the service values it provided and low cost compared
to anything available at the time. However, jets were decided as the mainstream,
and the final choice was the T-37 trainer converted to the A-37A. The Air
Commando Squadron under the code name “Combat Dragon” tested the new fighter in
combat for 12 months in 1967. Upon completion, final bugs needed to be fixed as
the A-37A had many shortfalls. When
 upgraded to the A-37B, it was a potent
attacker, with upgraded J85-17 GE engine, the same engine used in the F-5A,
stiffer wings with eight hard points, and a 7.62mm mini-gun. It filled the
jungle fighting criteria by flying slow and low, operated on short runways, and
easy to maintain by the VNAF crew. In early 1969, four VNAF squadrons converted
to the A-37B.
upgraded to the A-37B, it was a potent
attacker, with upgraded J85-17 GE engine, the same engine used in the F-5A,
stiffer wings with eight hard points, and a 7.62mm mini-gun. It filled the
jungle fighting criteria by flying slow and low, operated on short runways, and
easy to maintain by the VNAF crew. In early 1969, four VNAF squadrons converted
to the A-37B.
By 1972, the Dragonfly was the predominant fighter of the VNAF. For a brief period, it was a successful attacker. Small and agile, it was very difficult to hit because of the low profile – until the introduction of the Soviet SA-7 Strella. Without ECM capability, it was very difficult, if not impossible to out fly the heat seeking missile. As the result, many A-37 pilots met their death by the SA-7.
One feature of the VNAF A-37B, as all of their fighters were, was the lack of air refueling probe. Adding this capability made Washington nervous for fearing the South would take the war straight to north of the DMZ, which they often did before 1965, and turned into an undesirable political situation. This decision proved fatal later on. Without long range aircraft to support troops, it would force them to fight the American’s defensive war style. After 1972, left alone, this was the kind of war the South could not afford in the long run, and would not win. With the NVA preparing the a massive invasion in 1974, request for supply reinforcement from combat losses from the US never came because of political turmoil here in the US as well as in Saigon, and the end was nearby.
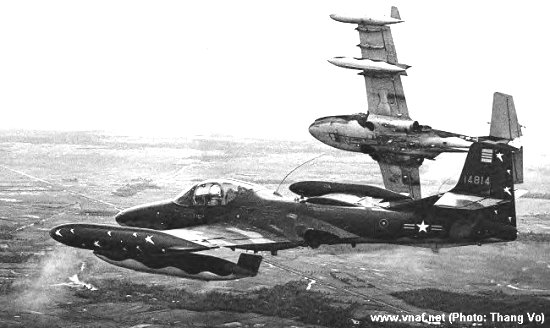
I built this model for a friend. He flew with the 520th FS based at Binh Thuy, the deepest south of Vietnam. During the final days of the war, as Saigon near collapse, President Ford authorized Operation Frequent Wind to evacuate Vietnamese high-ranking officer’s families out of Vietnam. He was trapped behind and spent the next ten years in the “Hanoi Hilton”.
|
THE KIT |
 I remember seeing this kit around the mid-eighties, but not sure when it was
first released. One can assumed that it remained unchanged since. I bought this
model at a bargain price, with 40% off during fall clearance at a local hobby
store. Naturally, I grabbed two. The box contained three medium gray sprues in a
bag, and clear parts in another. As with typical Monogram kits, this has all
raised, but clean and thin crisp panel lines and details. The kit had no flash,
but did have pin marks inside gear doors. A slight warpage on the left upper
wing can be bent back easily. Instructions are pictorial sequences that are easy
to follow. Decals provided for two options, USAF SOS, or VNAF. Decals, as
expected, are very thick and the insignias are out of registered. There are a
lot of tiny parts that can be easily lost. Overall impression, this is a good
quality kit than can be build into a great model.
I remember seeing this kit around the mid-eighties, but not sure when it was
first released. One can assumed that it remained unchanged since. I bought this
model at a bargain price, with 40% off during fall clearance at a local hobby
store. Naturally, I grabbed two. The box contained three medium gray sprues in a
bag, and clear parts in another. As with typical Monogram kits, this has all
raised, but clean and thin crisp panel lines and details. The kit had no flash,
but did have pin marks inside gear doors. A slight warpage on the left upper
wing can be bent back easily. Instructions are pictorial sequences that are easy
to follow. Decals provided for two options, USAF SOS, or VNAF. Decals, as
expected, are very thick and the insignias are out of registered. There are a
lot of tiny parts that can be easily lost. Overall impression, this is a good
quality kit than can be build into a great model.
|
CONSTRUCTION |
This plane would be traveling to a new home; so build strength was taken into considerations. Canopy is close; landing gears and weapon has brass inserts, and fin antennas went on before painting. Ambroid Pro Weld was use for gluing. When bonded, it created a very strong joint.
 The first dilemma was what to do about the nose weight, since this is a tail
sitter. That led to the next dilemma, how to add weights to the very confined
nose cone, as most of the space was taken by the front wheel well. One solution
was to stuff the available space in the nose with Handy Tac. Since this can fill
all empty space, it would be more efficient than trying to fit metal of
restricted size into the limited space. For added insurance, I packed more Handy
Tac inside the instrument panel and dash area. It turned out that was enough
weight to support the tricycle stand. If not, more weights can be added into the
external fuel tanks noses later on.
The first dilemma was what to do about the nose weight, since this is a tail
sitter. That led to the next dilemma, how to add weights to the very confined
nose cone, as most of the space was taken by the front wheel well. One solution
was to stuff the available space in the nose with Handy Tac. Since this can fill
all empty space, it would be more efficient than trying to fit metal of
restricted size into the limited space. For added insurance, I packed more Handy
Tac inside the instrument panel and dash area. It turned out that was enough
weight to support the tricycle stand. If not, more weights can be added into the
external fuel tanks noses later on.
The cockpit had very adequate details. After-market Black Box resin cockpit is available and even more impressive, but at four times the price I paid for the kit. I used the kit cockpit instead. The tub was painted dark gull gray with seats the same color. The instrument panel was given a black coat, and was dry brushed with white to bring out the details
 Wing assembly was next before attaching to the fuselage. One thing to watch for
is the dihedral angle, actually negative dihedral angle. I sanded the upper wing
roots and test fit against the fuselage until the angle looked correct. This is
a multiple iteration process, as I didn’t want to sand too much material off all
at once and have a strange looking wing angle.
Wing assembly was next before attaching to the fuselage. One thing to watch for
is the dihedral angle, actually negative dihedral angle. I sanded the upper wing
roots and test fit against the fuselage until the angle looked correct. This is
a multiple iteration process, as I didn’t want to sand too much material off all
at once and have a strange looking wing angle.
The landing gears went on before painting. This way was better for glue to bond tightly. I drilled a hole along the length and insert a .015 brass rod into it and drill the corresponding hole into the wing to attach the rod, then glued the gear assembly to the wing. This assured additional strength for transportation. Tamiya putty was used to fill the fuselage and wing joints. All fin antennas and canopy was glued on before painting.
|
PAINT & DECALS |
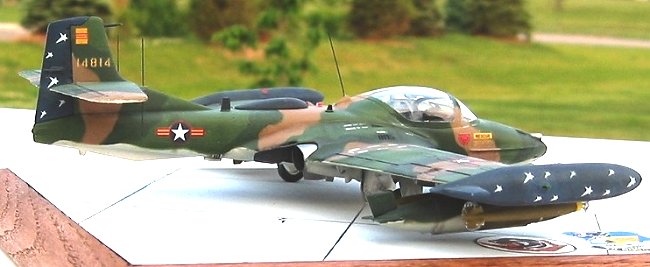
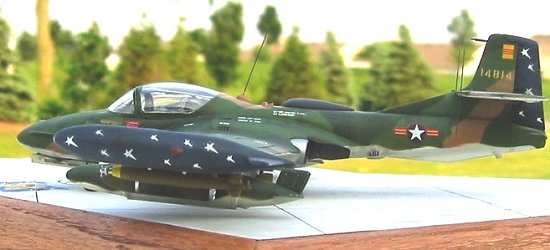
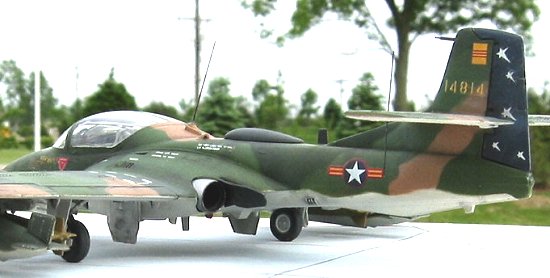
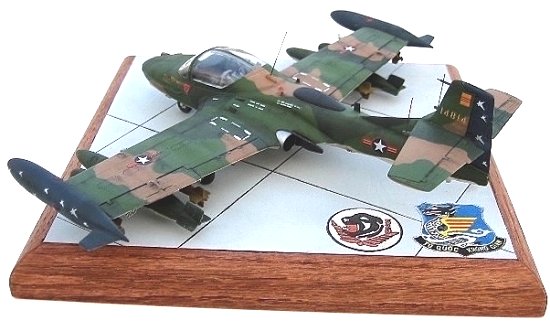
The A-37s of the VNAF wore some of the most colorful scheme. The 520th
FS is recognized by the dark blue tip tanks and rudder filled with patterned
white shooting stars. Paint scheme is in standard SEA tone FS30219 tan, FS34079
medium green, FS34102 dark green, and FS36622 aircraft gray. Model Master enamel
and Tamiya paints were used, and Handy Tac for masking. I sprayed the rudder
Tamiya blue with a little black added to get dark blue, and masked it before the
stabilizers was glued in. This would be easier than painting the blue last
because of masking problems around the stabilizers. The rest of the plane was
sprayed all white enamel. All landing gears and wheel wells were masked, then
underneath was sprayed 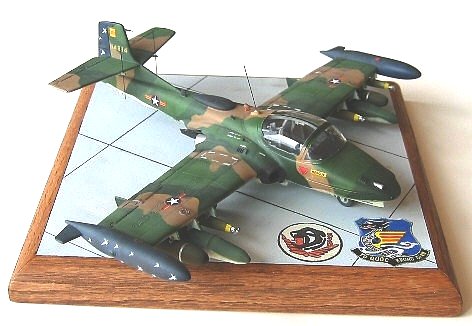 aircraft gray diluted 75% thinner to retain a very light
tone gray. Straight aircraft gray is way too dark. When dried, underneath was
masked off before the tan, medium green, and dark green was painted, all in
order. The wing tip fuel tanks were painted dark blue last.
aircraft gray diluted 75% thinner to retain a very light
tone gray. Straight aircraft gray is way too dark. When dried, underneath was
masked off before the tan, medium green, and dark green was painted, all in
order. The wing tip fuel tanks were painted dark blue last.
I used the kit decals. There are not many choices out there when it comes to VNAF subjects. Incidentally, I bought the Albatros “Ferocious Bugs” A37B decals sheet because it has the two VNAF subjects I planned to do. It was an expensive sheet, but a total disappointment. Despite the rave reviews, my subjects were totally inaccurate. It turned out the aircraft depicted was taken from the book “A-37 In Action” art illustrations. There are better sources elsewhere had the manufacturer looked. I chose accuracy over quality, and dealt with the kit decals. The decals were so thick. Each had to be trimmed very close. For the shooting stars, I cut each one individually, all 30 of them, and used straight Solvaset to get the decals to conform. Two coats of Tamiya gloss helped to hide the decal to surface steps, though not completely. I used a dark gray artist pencil to go over the raised panels very lightly, and pastel for weathered look, as combat planes are suppose to be dirty.
The jet cones were painted gun metal inside and steel outside with Model Master Metalizers. The whip antennas were from .01 brass rods. I drilled a hole through the anti collision lights and painted red inside. The outboard Mk82s were from spares, as well as the LAU rockets. The 7.62mm gun pods were not used often of the A-37. Mk83s were from kit. I inserted brass rods between weapons and pylons for additional strength. The canopy was buffed with car wax for greater shine and cleaned up minor scratches; the results showed a very shiny clear glass.
|
CONCLUSIONS |
 The Monogram Dragonfly 48th scale is still the only model around. Not
a wonder kit, it is nevertheless still an excellent kit, very accurate, and
despite some minor problems, was easy to build. If I had to do it over, the big
rivets would be sanded down since they appeared out of scale, and difficult for
decals to conform. I would also open the canopy; it looked much better that way.
I also wish Monogram would put some efforts into improving their decal quality.
This is not a contest material due to the bad decals, but at least it was a very
accurate depiction of the real aircraft markings.
The Monogram Dragonfly 48th scale is still the only model around. Not
a wonder kit, it is nevertheless still an excellent kit, very accurate, and
despite some minor problems, was easy to build. If I had to do it over, the big
rivets would be sanded down since they appeared out of scale, and difficult for
decals to conform. I would also open the canopy; it looked much better that way.
I also wish Monogram would put some efforts into improving their decal quality.
This is not a contest material due to the bad decals, but at least it was a very
accurate depiction of the real aircraft markings.
After 25 years of lost contact, we were able to locate my friend and his family, and this was the only gift I could think of to bring him. The new owner was quite thrill with the model, which made my effort very worthwhile.
|
REFERENCES |
“Flying Dragons: The South Vietnamese Air Force” by Robert Mikesh. Osprey Pub.
“www.vnaf.net” web page. This site has some of the rarest pictures of the VNAF aircraft.
“VNAF: South Vietnamese Air Force 1945-1975” by Jim Mesko. Squadron Pub.
June 2002
Copyright ModelingMadness.com.
If you would like your product reviewed fairly and fairly quickly, please contact the editor or see other details in the Note to Contributors.