|
KIT: |
Monogram 1/48 AD-6 Skyraider |
|
KIT # |
5419 |
|
PRICE: |
$10.50 |
|
DECALS: |
two aircraft |
|
REVIEWER: |
|
|
NOTES: |
Cutting Edge decals 48-097 used |
|
HISTORY |
Finding words to write about the Skyraider in the Vietnam War in one paragraph is difficult, because it served in a very long war. The review will focus in its early role in Vietnam as part of the VNAF roles, and how it was used to escalate the war.
After the defeat at Dien Bien Phu in 1954, Indo-China was divided into two separate countries. The French still had control in the south; that eventually became South Vietnam. Like Great Britain and Netherlands after WWII, France slowly realized that maintaining colonies were no longer economically feasible, and eventually handed over the remaining Indo-China to a new government in 1955. As the French withdrew, American presence began to take place under the Military Assistance Program (MAP). The fledgling VNAF was upgraded from a few obsolete French aircraft to the Skyraider. During the transition period, the RVN benefited unprecedented growth in economic and military assistance from the US, and with growth came problems.
 After
succeeding Emperor Bao Dai, Ngo Dinh Diem became the first President in 200
years of a sovereign nation since the French occupation. The new regime
quickly found themselves in troubles from all directions. To the north was the
Communist aggression; to the South was internal political corruption, coupled
with series of bizarre policies, and religious persecutions of the Buddhist.
Resentment within the military grew and eventually led to a bloody military
coupe. In February 1962, a pair of 1st Fighter Squadron AD-6 broke
formation and bombed the Presidential Palace in the capital city Saigon with
the intentions of killing President Diem and his brother, Ngo Dinh Nhu, the
head of the police. It was the first time an air strike occurred in a military
coupe in Vietnam. Throughout the early 60s’, the Skyraider was often used in
political coupe as well as anti-coupe by the VNAF. As the result, South
Vietnam did not have a stable government early on to run the war effectively.
The incident was played down as an act of disgruntles pilots, but
nevertheless, a rebellion had started to end a vicious regime. The coupe was
supported by JFK inner circle, though they stayed away from direct
involvement. Embarrassed by the Bay of Pig, Kennedy was determined not to let
communist aggression succeed in Vietnam. However, Diem hampered the effort by
refusing to escalate a large American force presence in SVN. The initial coupe
did not succeed, but a year later on Octorber 1963, another uprising started.
This time, Diem was assassinated, and the government of SVN was headed by the
military. With Diem out of the way, the battle map was drawn, and America was
about to enter a turbulent war.
After
succeeding Emperor Bao Dai, Ngo Dinh Diem became the first President in 200
years of a sovereign nation since the French occupation. The new regime
quickly found themselves in troubles from all directions. To the north was the
Communist aggression; to the South was internal political corruption, coupled
with series of bizarre policies, and religious persecutions of the Buddhist.
Resentment within the military grew and eventually led to a bloody military
coupe. In February 1962, a pair of 1st Fighter Squadron AD-6 broke
formation and bombed the Presidential Palace in the capital city Saigon with
the intentions of killing President Diem and his brother, Ngo Dinh Nhu, the
head of the police. It was the first time an air strike occurred in a military
coupe in Vietnam. Throughout the early 60s’, the Skyraider was often used in
political coupe as well as anti-coupe by the VNAF. As the result, South
Vietnam did not have a stable government early on to run the war effectively.
The incident was played down as an act of disgruntles pilots, but
nevertheless, a rebellion had started to end a vicious regime. The coupe was
supported by JFK inner circle, though they stayed away from direct
involvement. Embarrassed by the Bay of Pig, Kennedy was determined not to let
communist aggression succeed in Vietnam. However, Diem hampered the effort by
refusing to escalate a large American force presence in SVN. The initial coupe
did not succeed, but a year later on Octorber 1963, another uprising started.
This time, Diem was assassinated, and the government of SVN was headed by the
military. With Diem out of the way, the battle map was drawn, and America was
about to enter a turbulent war.
To those who grew up during the war, the Skyraider and the UH-1 defined the image of the Vietnam War. When an AD-6 formation flew above, it was a fine symbol of a rising young nation. Some pilots learned to fly before learning to drive, and by the end of the war many were hardened veterans with 10 years of flying combat missions. In 1963, most of the nation’s transportation system was through animal carriage, and many did not know where the United States was located. For a new government just got out of colonialism, having to run a country and fight a war was no easy task. Having to learn English and fly a warplane with an 8000-pound bomb load was remarkable. Imagine you are learning to fly a Russian combat plane and the language at the same time.
|
THE KIT |
Re-released again in 2000, this is an old kit by Monogram that is over 20 years old. The first time I saw the kit was around 1980, and later boxed as the “Tour of Duty” A-1H Skyraider, an old Vietnam War TV series, around 1986.
The box
now portrayed the famous USN bumblebee Mig killer, and 516th FS
VNAF. Inside the box contained 3 sprue trees and one clear, but no bags. As
with Monogram, decals are thick and out of registered. Aftermarket decals for
these two versions 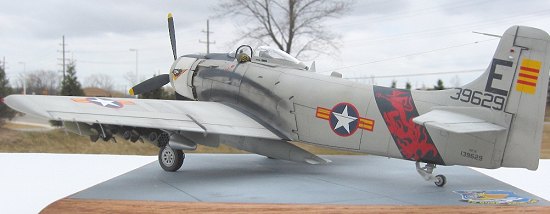 are available, and should be used instead of kits’, but
check your reference about the VNAF scheme. The majority of after-market
decals have gross errors when depicting this subject.
are available, and should be used instead of kits’, but
check your reference about the VNAF scheme. The majority of after-market
decals have gross errors when depicting this subject.
All panel lines are raised with very heavy thick lines; some are measured about 0.5mm wide. Pin marks are rather heavy and are located in all gear doors. The cockpit is well detailed except for the seat. Cowl and exhaust flaps are molded in one piece, and would be better came separated. In many ways, the kit constructions resembled the Tamiya’s Skyraider kit.
Since Tamiya released the A-1H, the Monogram’s version was forgotten. But at a 3rd the cost of the Tamiya’s kit, it is worthwhile to revisit this old classic. The kit is no match to its counterpart, and builders should expect more challenges. Though not terribly difficult to build if you possess average skills like me, with some work this kit can be built into a very nice model.
|
CONSTRUCTION |
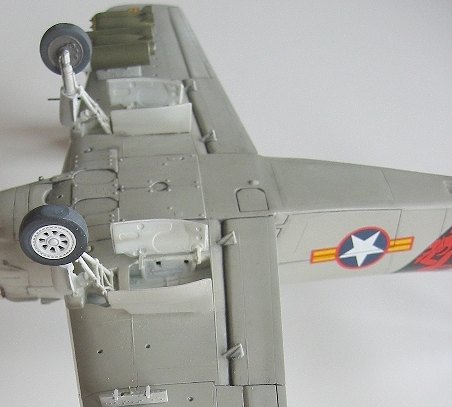
First, here are some modifications I made to improve the model:
· Removed raised panel lines and re-scribed.
· Made cowl diameter larger, kit cowl was small.
· Separated and rebuilt cowl flaps
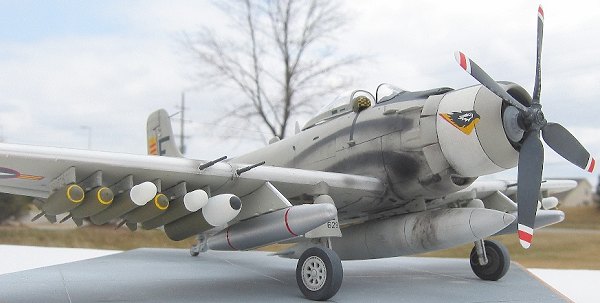
· Separated weapons from pylons, kit molded as one.
· Rebuilt rear wheel
· Added 1/8th inch to inner wing pylon height, kit pylons were much too short
· Reduced center pylon height by half, otherwise, fuel tank will touch ground
· Rebuilt canopy sliding rail
· Replaced exhaust pipe with aluminum tubes
Before construction started, test fitting the kit should be done. This is where I discovered the rudder and right wing warpage. I bent the wings and rudder to its normal but the wing tips now didn’t line up. Fillers are needed in this area.
 The
cockpit is quite adequate with lots of raised detail gauges and switches. But
the bucket seat is integrated into the floor and needed improvements. Since
I’m building an AD-6, bucket seat is a must. It wasn’t until around 1966 that
ejection seats were introduced, but only for the US Navy and USAF. If the VNAF
Skyraiders were delivered before 1966, it may have never switched to the
ejection seats. There are no after market bucket seats currently available
that I am aware of, so the kit cockpit was used with one modification. The
molded seat belt was sanded off and replaced with homemade belts.
The
cockpit is quite adequate with lots of raised detail gauges and switches. But
the bucket seat is integrated into the floor and needed improvements. Since
I’m building an AD-6, bucket seat is a must. It wasn’t until around 1966 that
ejection seats were introduced, but only for the US Navy and USAF. If the VNAF
Skyraiders were delivered before 1966, it may have never switched to the
ejection seats. There are no after market bucket seats currently available
that I am aware of, so the kit cockpit was used with one modification. The
molded seat belt was sanded off and replaced with homemade belts.
After the pit was painted dark gull gray and attached to fuselage, wheel wells, gear doors, wings, fuselage were glued in using Ambroid Pro Weld. Re-scribing was done next to get rid of those huge panel lines. The task was not difficult, but very time consuming. I borrowed a page from a great modeler and applied his techniques. Using a pin vise and sewing needle, new lines over scribed over the old ones. They should be deep enough so that when the old lines are sanded off, the new lines are still visible. The first sanding with 400 grit got rid of the old lines, but also revealed many surface imperfections on the model that cannot be seen by the eyes. Further wet sanding finally got rid of the dimples. Additional wet sanding with a 1000 grade gave it a smooth surface all around. After the dust is cleaned out with a toothbrush, I brushed on the Ambroid cement along all new panel lines. This will melt away all rough edges created by the needle and turned into very smooth straight lines. I did not re-scribe all panel lines; some lines at the fuselage bottom were left out as I felt they were not that important.
 The cowl
was modified since the kit cowl was too small. I didn’t notice it until
someone pointed out. I used a compass divider to measure the difference
between the Tamiya’s and the Monogram’s A-1. The Tamiya’s was larger by 3.5mm
in diameter. After looking closely at many references, it appeared that on the
real aircraft, there is a step up near the exhaust flaps going forward of the
nose. The kit is molded straight out. This would account for some differences.
I cut out many small strips of 0.01 inch Evergreen sheet of about 3mm in width
and glued them around the cowl circumference, stopping near the nose edge.
After the third layer, I stopped. The cowl was still smaller than the Tamiyas’,
but it was also getting too large to mate into the fuselage. That was okay,
the goal here is to make the cowl a little more respectable size. It was time
for filler, and sanding until I was satisfied. The Evergreen styrene is easy
to sand but very difficult to scribe panel lines. I scratch build the cowl
flaps and use CA to attach. The cowl assembly was painted the appropriate
colors before went on the fuselage.
The cowl
was modified since the kit cowl was too small. I didn’t notice it until
someone pointed out. I used a compass divider to measure the difference
between the Tamiya’s and the Monogram’s A-1. The Tamiya’s was larger by 3.5mm
in diameter. After looking closely at many references, it appeared that on the
real aircraft, there is a step up near the exhaust flaps going forward of the
nose. The kit is molded straight out. This would account for some differences.
I cut out many small strips of 0.01 inch Evergreen sheet of about 3mm in width
and glued them around the cowl circumference, stopping near the nose edge.
After the third layer, I stopped. The cowl was still smaller than the Tamiyas’,
but it was also getting too large to mate into the fuselage. That was okay,
the goal here is to make the cowl a little more respectable size. It was time
for filler, and sanding until I was satisfied. The Evergreen styrene is easy
to sand but very difficult to scribe panel lines. I scratch build the cowl
flaps and use CA to attach. The cowl assembly was painted the appropriate
colors before went on the fuselage.
The kit exhaust pipes are badly formed, and were replaced by aluminum tubes glued into the original housing. When done, it was given a coat of flat brown and set aside. Before the cowl and exhaust pipes glued on, the fuselage was painted flat gull gray around the exhaust area. This was done so that I don’t over-spray the exhaust pipes later on with gull gray. So plan accordingly in this area. Once the cowl assembly is glued, a final check for mistakes was done before the paint job.
|
CAMOUFLAGE & MARKINGS |
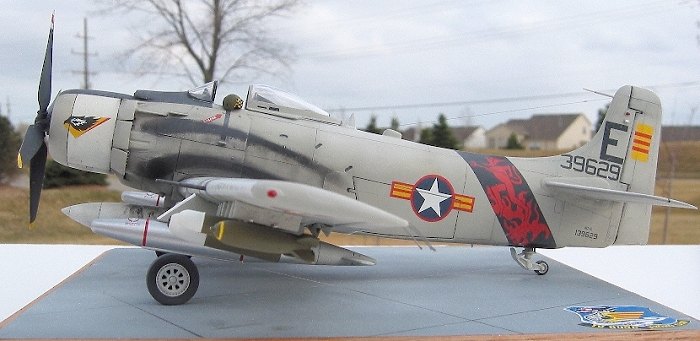
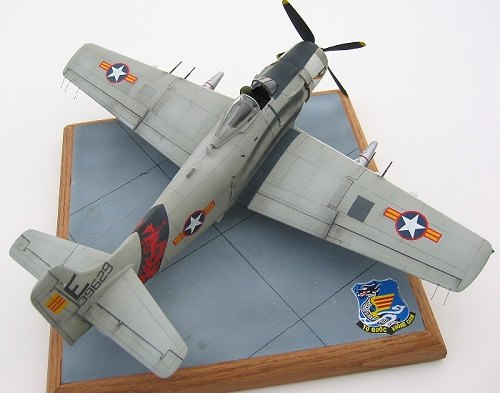
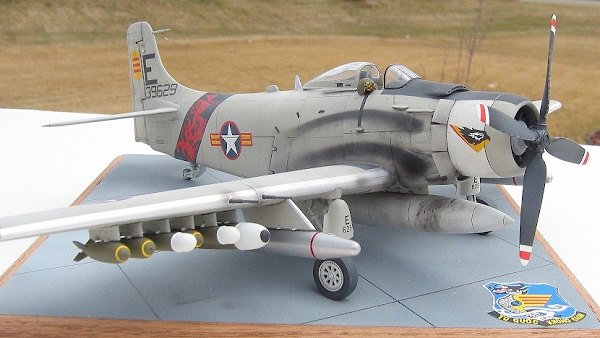
The VNAF early paint schemes were overall gull gray
FS36440 if the aircraft was delivered from the Navy or ADC gray FS36473 if
delivered from USAF. This one was overall gull gray with white in the center
cowl. I used Model Master acrylic, and painted with a Badger XF-100. After the
first coat, I used heavily diluted white to get a faded paint look in various
spots.  Tamiya gloss went on next. Cutting Edge sheet 48097 did a great job on
the accuracy of the VNAF Skyraider aircraft. I chose to do the 1st
Fighter Squadron from Bien Hoa, “the Devils Flight Squad”. This squad was
believed to be responsible for the attacking of the Presidential Palace in
1962. There were problems with the decal disintegrating in water, especially
the fuselage bands. Thanks to Meteor’s quick service, I got a replacement in a
short time. Again, the fuselage decals fell apart in water. Rather than
wasting more time asking for replacements, I pieced them together and touched
the up black areas later. Luckily, the red devil stayed in tact. Solvaset
solution snuggled decals into place. The model was given a dark gray wash
afterward.
Tamiya gloss went on next. Cutting Edge sheet 48097 did a great job on
the accuracy of the VNAF Skyraider aircraft. I chose to do the 1st
Fighter Squadron from Bien Hoa, “the Devils Flight Squad”. This squad was
believed to be responsible for the attacking of the Presidential Palace in
1962. There were problems with the decal disintegrating in water, especially
the fuselage bands. Thanks to Meteor’s quick service, I got a replacement in a
short time. Again, the fuselage decals fell apart in water. Rather than
wasting more time asking for replacements, I pieced them together and touched
the up black areas later. Luckily, the red devil stayed in tact. Solvaset
solution snuggled decals into place. The model was given a dark gray wash
afterward.
Bare Metal Foil was used for the leading edges and inner pylon edges, and landing gear oleos. Model Master flat went on last to seal everything. The smoke stains were masked with papers and sprayed at an angle to get a fuzzy appearance at one end. A coat of Poly Scale Flat went on last.
At this stage, a typical model would be nearly finished, but this one had some dreaded tasks ahead.
|
FINAL CONSTRUCTION |
 The front wheel hubs were
taken from the Tamiya kit. They are more accurate but needed shimming. I
shimmed the tires with 0.01inch styrene sheets. The hubs fitted so tight that
I did not glue them in. For added realism, I sanded the back of the hubs until
the spoke walls were paper thin, then poked out the backing so that only the
spokes remained. I also shortened the wheel axles because they were too long.
The front wheel hubs were
taken from the Tamiya kit. They are more accurate but needed shimming. I
shimmed the tires with 0.01inch styrene sheets. The hubs fitted so tight that
I did not glue them in. For added realism, I sanded the back of the hubs until
the spoke walls were paper thin, then poked out the backing so that only the
spokes remained. I also shortened the wheel axles because they were too long.
The rear wheel was cut off because it depicted a solid rubber wheel, which was not used in land base. I scratch built the wheel with 0.16 inch rod and layers of styrene for tire thickness.
The canopy sliding-rail was cut off and replaced with 0.015 brass rod, and static discharges were also added during this time using brass rods. A grill mesh was added in the radiator lower scoop. Pitot tube and cannons were replaced with Minimeca tubes. The formation lights were lost of during sanding, so I drilled in some brass rods and used super glue gel to form a bead around the rods, then painted them with clear colors. The canopy was waxed to buff out minor scratches. I cut off the pilot helmet, drilled out the inside, and painted the design that my father wore during the war. The actual helmet had finer checker patterns, but that’s just the limitations of my eyesight.
All of these final pieces took up half the build time, but they enhanced the model quite a bit.
|
CONCLUSIONS |
 This model took about 40 hours to complete in my spare
time, stretching over 6 months. I corrected the errors of the model that are
obvious to me, but may have missed some. Overall, it turned out okay, with a
little help from the Tamiya parts.
This model took about 40 hours to complete in my spare
time, stretching over 6 months. I corrected the errors of the model that are
obvious to me, but may have missed some. Overall, it turned out okay, with a
little help from the Tamiya parts.
If you are concern about the high cost of modern kits, try an old one like this. It’s a little more challenged, but the challenges will improve your skill and imaginations a little. The total project cost $20.00 including decals, much less than the Tamiya kit in my area, which is $35.00 but better engineered. As always in life, trade-off is the normal we face. The pictures were taken with the Canon S-30.
Review April 2003.
Dedicate to those who fought and died while flying the Skyraiders over Vietnam.
|
REFERENCES |
“Flying Dragon: The South Vietnamese Air Force” by Robert Mikesh. Osprey Pub.
“www.vnaf.net” web page. Devoted for VNAF subjects, have many A-1H and E pictures
“Skyraider.org” web page.
“VNAF: South Vietnamese Air Force 1945-1975” by Jim Mesko. Squadron Pub.
“Douglas A-1 Skyraider” by Frederick Johnsen.. Schiffer Pub.
“Twenty Years and Twenty Days” Nguyen Cao Ky. Stein & Day Pub.
And my dad, a former Raider pilot
If you would like your product reviewed fairly and quickly by a site that has 200,000 visitors a month, please contact me or see other details in the Note to Contributors.