Hobbycraft 1/48 CT-114 Tutor
| KIT #: | 1426 |
| PRICE: | $27.99 |
| DECALS: | One option |
| REVIEWER: | Pablo Calcaterra |
| NOTES: |
Hobbycraft should know better... |
| HISTORY |
1/48
Hobbycraft Snowbird
The
Canadair CT-114 Tutor (or CL-41 for Canadair) was a trainer developed and
manufactured in Canada that entered service in 1961. 190 trainers were built for
the RCAF/CAF. The remaining planes were in 2000 by the CT-156 Harvard II and
CT-155 Hawk. Today, the Tutor is flown primarily by 431 Squadron’s Snowbirds.
However, it is also used in aircraft testing at the Aerospace Engineering Test
Establishment (AETE) in Cold Lake, Alberta.
Another 20 were built as CL-41G were exported to the Royal Malaysian Air Force
as ground attack planes where they served until 1985.
Canadian Forces 431
Air Demonstration Squadron, the Snowbirds are Canada's
military aerobatics air
show flight
demonstration team. They have been flying the CT-114 since 1971.
Every
year I have attended at least one of the air shows
that the Snowbirds attended in Southwestern Ontario. The first time was in 2003
at the Expo in Toronto...when walking downtown they flew almost at tree height
towards the air show. What a moment!
During the last air show (St. Thomas 2013) we managed to collect the signature
of all the pilots except for one. And it had been a great achievement because on
this date the pilots were flying to Ottawa for Canada Day (July 1) and there was
going to be no official signing session after the air show. Just their debrief
and then back to the planes. My kids were sent on the mission of getting as many
signatures of the pilots when these returned from the debrief and were milling
close to their planes. So there were running here and there after the guys o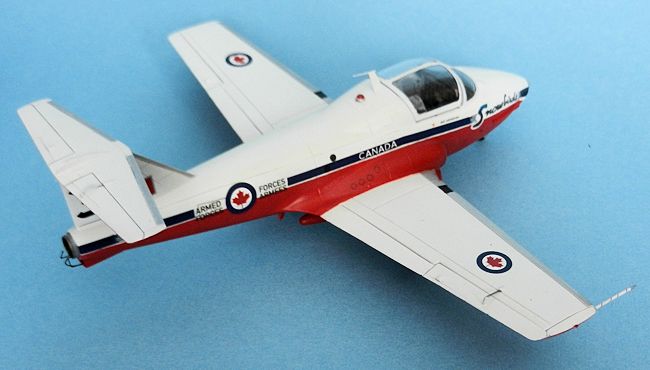 n
the red flying suits. But we were not able to find one and that signature was
missing. It turned out that the
deployment to Ottawa was postponed for a few hours. In the meantime with almost
everyone gone from the St. Thomas Airport we also left. The boys wanted to have
a stop at the local Tim Horton's and I had to oblige as they had behaved
fantastically during the 8+ hours. So were are there in line to pay for some
goodies when a car pulled up, parked and 2 of the Snowbirds pilots entered the
restaurant...one of them being the one we were missing! So out came the poster
and he proceeded to sign it! Call it fate! Now the painting is framed and
displayed in the “aviation room” downstairs.
n
the red flying suits. But we were not able to find one and that signature was
missing. It turned out that the
deployment to Ottawa was postponed for a few hours. In the meantime with almost
everyone gone from the St. Thomas Airport we also left. The boys wanted to have
a stop at the local Tim Horton's and I had to oblige as they had behaved
fantastically during the 8+ hours. So were are there in line to pay for some
goodies when a car pulled up, parked and 2 of the Snowbirds pilots entered the
restaurant...one of them being the one we were missing! So out came the poster
and he proceeded to sign it! Call it fate! Now the painting is framed and
displayed in the “aviation room” downstairs.
Canadian Forces in '84 where he was posted to
CFB Moose Jaw following basic trades training as an Airframe Technician.
Tony was selected to join 431 Air Demonstration Squadron for the
90-91 air show seasons.
Flew with #3 Inner Left Wing both years.
After leaving the 2 year assignment he was selected to undergo training
as a Non-Destructive Testing Tech and got posted to CFB Trenton, then back to
CFB Moose Jaw and CFB Comox where he retired from the Forces after 20 years. He
enjoyed a post military career as a Offshore Pipeline Weld Inspector until May
2013, when he retired for good!
 Born into an Air force family, Steve’s father, an aircraft mechanic, sparked his
early interest in aviation. At age 12 he joined the Royal Canadian Air Cadets
and thus began a lifelong passion for aviation. The Air Cadets also introduced
Steve to the fundamental concepts of leadership, which he has built upon for his
entire life.
Born into an Air force family, Steve’s father, an aircraft mechanic, sparked his
early interest in aviation. At age 12 he joined the Royal Canadian Air Cadets
and thus began a lifelong passion for aviation. The Air Cadets also introduced
Steve to the fundamental concepts of leadership, which he has built upon for his
entire life.
During his 25-year Air force career Steve amassed over 5,000 hours in high
performance jet aircraft. After completing Wings training in 1986 he was
assigned as a jet instructor pilot in Moose Jaw. After a two-year tenure he was
selected to fly with the Snowbirds as Number 3, in the inner left wingman
position. Following his Snowbird tour, Steve realized his life-long dream of
becoming a fighter pilot on the F18 Hornet. His Fighter Group tenure included
operational
Steve now flies as an airline pilot for Westjet, but still remains dedicated to
the Royal Canadian Air Force. In 2009 he was the team lead/project director for
the Hawk One project, an all volunteer joint military, civil, and industry
endeavour, which restored an F-86 Sabre jet and flew it at 72 events during the
2009 celebration of 100 years of flight in Canada. In 2010 the Air Force
recalled Steve from civilian life to once again take command of the Snowbirds in
order to orchestrate a complete reorganization of the
squadron’s command and control structure.
| THE KIT |
This kit was issued several years ago. It is highly surprising that, having been
molded and manufactured by a Canadian company (Hobbycraft) the kit has so many
mistakes, especially in the panel lines and parts location department. It is a
basic kit that with lots of work can be turned into a decent one. It is molded
in light grey plastic...but the surfaces have a grainy texture that must be
dealt with from the get go.
 The landing light cover (nose) is the original style being short and round (pre
1977). So cannot be used for any of the modern Snowbirds. Aileron trim tab rods
and elevator trim tab rod along with flap hinges are wrong in shape, the faring
over the oil pipes (for smoke generation) is missing...
The landing light cover (nose) is the original style being short and round (pre
1977). So cannot be used for any of the modern Snowbirds. Aileron trim tab rods
and elevator trim tab rod along with flap hinges are wrong in shape, the faring
over the oil pipes (for smoke generation) is missing...
The panel lines are too wide and deep (like trenches). The shroud for the
instrument panel is molded in clear (?!) when it will be painted in fainted
black...
Decals are good for versions flown between years 74-76 and 77-86.
You really need a good source of information to turn the kit into an accurate
representation of the Tutor. For this I have used the invaluable support given
by Tony Edmunson, who was an Airframe Technician at AFB MooseJaw and serviced
the Snowbirds. You can Google his name and you will find his very detailed and
informative review elsewhere (i.e. CFB
Moose Jaw. Member of 431 AD
Sqn Snowbirds 90-91. Tony can also be found on MM as 'Snowbird3a')
| CONSTRUCTION |
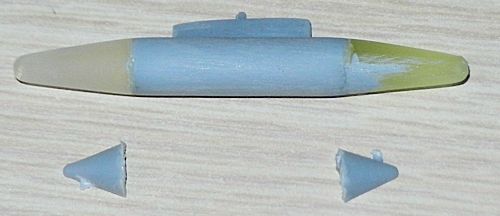
Guided by Tony's experience and several pictures he shared with me (plus some
resin seats and corrected tips for the oil tanks among other parts) I tackled
the build.
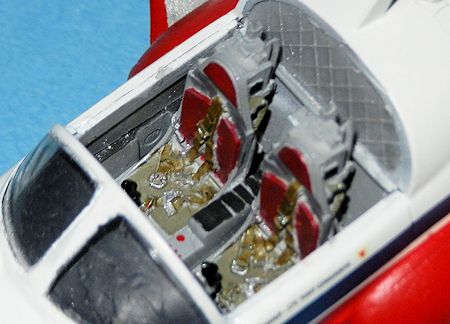 The cockpit area was painted in light grey. The cushioned panel behind the seats
in aluminium with the missing panelling marked with a knife forming rhomboids.
The instrument panel was painted in also in grey with black dials and touches of
red and yellow following references. Rudder pedals were painted same grey as
rest of cockpit with some dry silver to represent wear.
The cockpit area was painted in light grey. The cushioned panel behind the seats
in aluminium with the missing panelling marked with a knife forming rhomboids.
The instrument panel was painted in also in grey with black dials and touches of
red and yellow following references. Rudder pedals were painted same grey as
rest of cockpit with some dry silver to represent wear.
Weight was added to the nose and the fuselage sides were glued together. Fit was
fairly good requiring some putty in the nose area. With the fuselage firmly
glued I started the tough work of covering the wrong panels, making the others
thinner and re scribing the rest. There are many round access doors missing
(especially behind the cockpit) and the panels on the nose and wing roots were
corrected.
The air brakes were also corrected. Panel lines in the border of attack of the
tail were added. In short, many hours and nights using putty, sanding and
scribing again and again. Next the wings were
attached. There were several gaps to be fixed with acrylic base paste (top) and
putty (fuselage to wings underside).
The support for the oil pipes was scratch-built and added under the fuselage. It
is a square with rounded edges. The shroud for the instrument panel was glued in
place and to represent the wrinkled fabric I laid strokes of glue. When dry I
painted the fabric in very dark grey.
 With this
ready I masked the windshield and added it in place. Two small air intakes were
added on either side (scratch) as were the corrected rectangular fairings for
the anti-icing system placed in front of the windshield. A very thin line of
black paint represents the opening facing the windshield.
With this
ready I masked the windshield and added it in place. Two small air intakes were
added on either side (scratch) as were the corrected rectangular fairings for
the anti-icing system placed in front of the windshield. A very thin line of
black paint represents the opening facing the windshield.
The
fairing under the tail for the oil pipes was made using a thin layer of plastic
bent to shape and glued and puttied. light. As the one supplied by Hobbycraft is wrong I looked for large blobs of clear plastic in the spares box.
After lots of searching I found one that had the correct base size and was long
enough to allow me to shape it. So I gave it a drop of white and a drop of amber
(red and yellow) and glued it on the nose. It looked like the plane now had got
a clear clown nose! Very carefully and slowly I proceeded to sand the sides of
the blob and merge them to the fuselage while shaping it with a flat underside
and rounded top and sides ending it up in a low sharp point.
light. As the one supplied by Hobbycraft is wrong I looked for large blobs of clear plastic in the spares box.
After lots of searching I found one that had the correct base size and was long
enough to allow me to shape it. So I gave it a drop of white and a drop of amber
(red and yellow) and glued it on the nose. It looked like the plane now had got
a clear clown nose! Very carefully and slowly I proceeded to sand the sides of
the blob and merge them to the fuselage while shaping it with a flat underside
and rounded top and sides ending it up in a low sharp point.
 As Tony
had pointed out that the trim tabs on ailerons and elevators for moveable
surfaces were wrong I scratch built them.
As Tony
had pointed out that the trim tabs on ailerons and elevators for moveable
surfaces were wrong I scratch built them.
| COLORS & MARKINGS |
First the
entire plane was given a coat of light grey to check for imperfections in all
the work with panelling and scratch-building that I had done. Once this was done
and some minor problems were fixed the plane was now given a coat of Model
Master Acryl gloss white. The air
intakes, border of attack of wings, tail and horizontal tail surfaces were
painted in Aluminium.
The most
delicate part of the process was to mask the line between the red and white
colours. For this I made a copy of the decal sheet, cut the copy and used it as
a template for the union. Once masked properly and after checking many times
that the lines on both sides were following the same panel lines at the same
exact points I painted the undersides with Model Master Acryl Soldiers Red.
 The
(diesel) oil tanks were painted in red and white.
A
thin black line represents the opening in front of the square structure under
the fuselage from which the smoke generating pipes come out. Landing gear was
painted aluminium and the wheels in the same colour with black for the tires.
The
(diesel) oil tanks were painted in red and white.
A
thin black line represents the opening in front of the square structure under
the fuselage from which the smoke generating pipes come out. Landing gear was
painted aluminium and the wheels in the same colour with black for the tires.
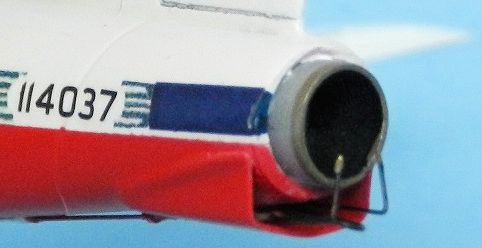
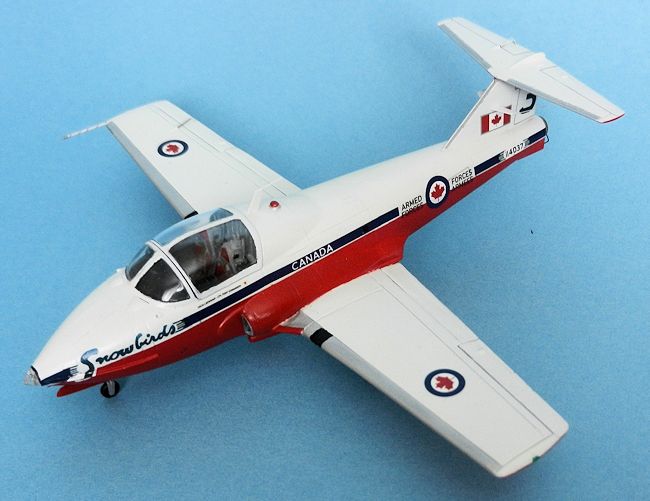
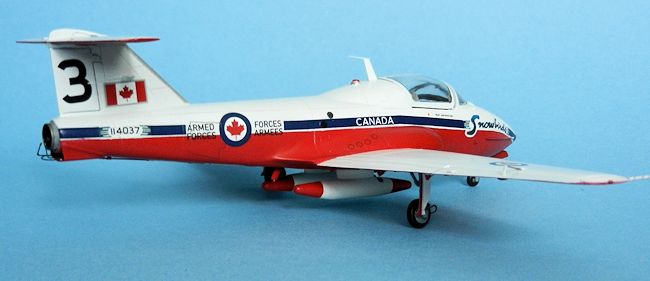
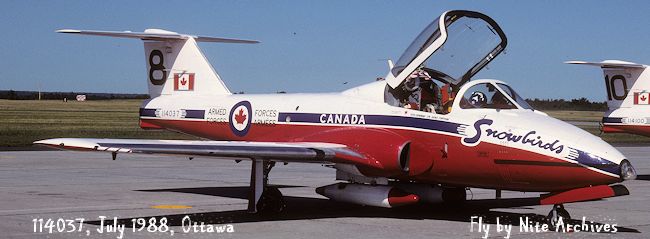
Having
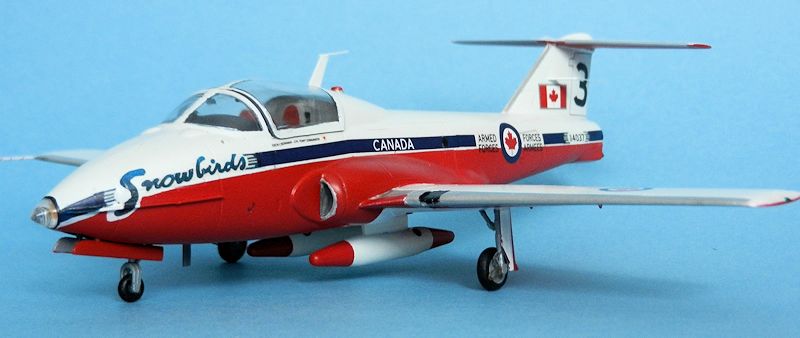
received so much help from Tony I decided to go with one of the planes he took
care of. I settled on 037, the plane flown by Steve during the 1990 season.
I added the landing gear to be able to better manage the plane during the
process.
As I
wanted to represent one of the planes serviced by Tony the decals were not good
enough. The Snowbirds words were the wrong style. I searched a lot of pictures
in Internet until I found a couple that, taken from each side of the plane, were
clear enough and had been taken from the correct angle and they would allow me
to print them and replace the wording in the kit's decals. Same applies to the
serial numbers and the “flaked” areas of the blue lines around them on the
fuselage close to the tail.
I had to
play a lot with the colour of the design and the size of it so it would match,
as close as possible, the dark blue colour and width of the Hobbycraft decals.
 The large
white Snowbird decal for the undersides was somehow difficult to manage due to
its size but reacted admirably to Set and Sol solutions conforming to the
different turns and cavities with no problem.
The large
white Snowbird decal for the undersides was somehow difficult to manage due to
its size but reacted admirably to Set and Sol solutions conforming to the
different turns and cavities with no problem.
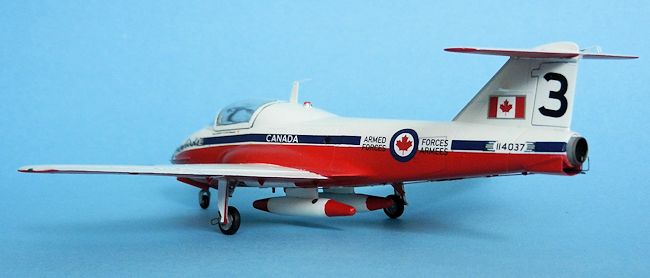
The
numbers for the tail (please note that Hobbycraft's version don't have the right
'lean' for both LH & RH numbers) and undersides plus the Canadian flag and Maple
Leaf came from the Hobbycraft decal sheet.
| FINAL CONSTRUCTION |
Lots of
them!
I glued
the wheels (the main ones previously reduced in diameter per Tony's
instructions), the anti-collision light behind the cockpit in silver and then
clear red.
 The smoke
generating oil tanks were glued under the fuselage. From these I started one of
the most difficult tasks: the pipes for the smoke system. These were made with
several cuts of wire bent to shape and installed using cyano glue. Small pieces
of aluminium foil represent the support for the pipes. All the pipes and
supports were hand painted in red or white depending on the surface beneath
them.
The smoke
generating oil tanks were glued under the fuselage. From these I started one of
the most difficult tasks: the pipes for the smoke system. These were made with
several cuts of wire bent to shape and installed using cyano glue. Small pieces
of aluminium foil represent the support for the pipes. All the pipes and
supports were hand painted in red or white depending on the surface beneath
them.
A black
area was painted on the centre of the fairing and the pipes were “sent” thru
that “hole”. Then 4 pipes that stick out from the fairing (2 of which are bent
so they stick in front of the exhaust pipe) were glued and painted black.
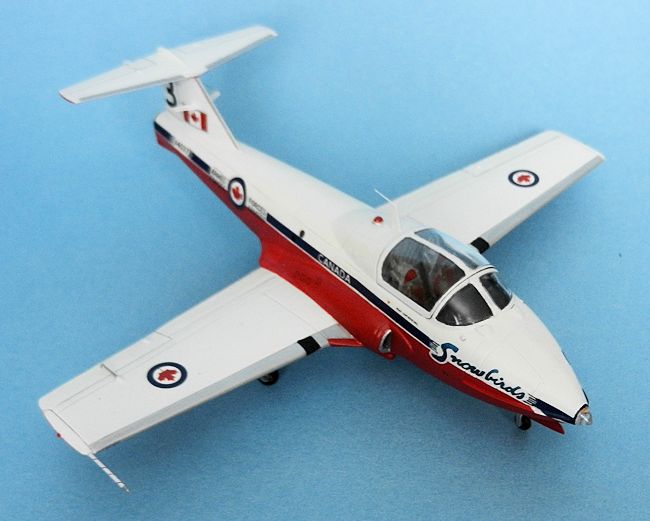
3 x
scratch-built VHF antennas were added (one behind the cockpit, 2 on the tail).
They are made of thin Evergreen plastic and short strips of aluminium wire.
Hobbycraft has you installing the pitot in the wrong location as it should come
out of the wingtip, not the wing. Pitot on the right wing was glued in the
correct spot and the tip was painted in aluminium with a thin red decal from the
spares wrapped around it.
The brake
lines were added with bent copper wire. The tail pipe was glued in place after
it was painted aluminium, burnt iron and black (inside). Three scratch-built
antennas were added below the nose behind the landing gear along with another
red navigation light I made.
Once I
almost finished I realized that the locating holes for the oil tanks were too
far behind and thus the red and white areas did not match the ones of the large
Snowbird in the undersides. As the pipes were glued and in place relocating
these tanks would have been a monumental and most likely paint destroying task
so I left them as they are...but we warned then!
 Towards
the end of the build and I was sharing the pictures of the progress with him,
Tony pointed out that the top part of the wings landing lights were painted in
black. And that the paint scheme by Hobbycraft for the area of the border of
attack of the wings was not right...as I had followed them I had to re do them
masking carefully the rest of the kit...Hobbycraft!
Towards
the end of the build and I was sharing the pictures of the progress with him,
Tony pointed out that the top part of the wings landing lights were painted in
black. And that the paint scheme by Hobbycraft for the area of the border of
attack of the wings was not right...as I had followed them I had to re do them
masking carefully the rest of the kit...Hobbycraft!
Four rear
mirrors were painted in black (front and edge) and aluminium and added to the
front of the canopy.
The navigation lights on the wing tips received red and green clear paint (with a drop of silver underneath). Regretfully after all was done and pictures for the article had been taken Tony pointed out that I had painted them the other way round...well...once I take it out from the shelf in the future I will correct this mistake.
| CONCLUSIONS |
My
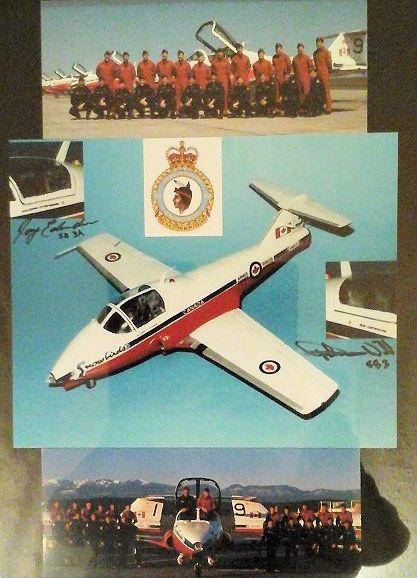
tribute to the Snowbirds and especially to Tony and Steve. Thanks guys!
I sent a nice picture of the kit to Tony, who signed it and Steve came home one day (of all of Canada this unique pilot who is the only one to have commanded the Snowbirds twice and a CF-18 Squadron lives in London, Ontario like I do!) and did the same. So now the picture of my Snowbird is signed by pilot and ground crew along with a nice postcard of the entire team in the years the guys were in charge of this plane!
| REFERENCES |
Wikipedia
Tony
and Steve
Royal
Canadian Air Force website
(http://www.rcaf-arc.forces.gc.ca/en/aircraft-current/ct-114.page)
April 2015
If you would like your product reviewed fairly and fairly quickly, please contact the editor or see other details in the Note to Contributors.