|
KIT: |
Hasegawa 1/48 A-4E/F Skyhawk |
|
KIT # |
7221 |
|
PRICE: |
$36.00 |
|
DECALS: |
See review |
|
REVIEW & |
|
|
NOTES: |
|
HISTORY |
Every introduction of new technology and new capability in succeeding generations of aircraft has generally resulted in an increase in size. This was particularly true with the advent of jet propulsion, with the need for increased fuel. Additional avionics, armor to protect engine and fuel, etc., led to an ever-increasing weight spiral. Ed Heineman, who by the end of the Second World War was chief designer at Douglas Aircraft, hated this. Heineman had begun his career working for Jack Northrop, and had inherited his mentor's desire for aeronautical excellence and elegance, which had resulted in well-designed, lightweight aircraft (at least for their mission, compared with their competitors.
When the Navy issued a specification for a jet-powered light attack aircraft to replace the Douglas Skyraider, capable of carrying a then-heavy nuclear store, they expected something that would generally be about the size of a Skyraider, if not perhaps a bit larger. Reversing the trend of increasing weight and size, Heineman presented the Navy with the smallest jet yet designed for operation from carrier decks. It was in fact so small it did not need wing folding, since the span was less than the size of a standard Navy deck elevator. It was immediately dubbed "Heineman's Hotrod." While some doubted, many looked at Heineman's record as designer of the SBD Dauntless, A-20 Havoc, A-26 Invader, and AD Skyraider, and gave the proposal serious thought. When the Navy's review of the design came up with the answer that it should do what Mr. Heineman said it would, a contract was let on June 21, 1950, for the XA4D-1, which first flew on June 22, 1954.
 Powered by a Wright J-65
Sapphire providing 7,200 lbs. of thrust and armed with two 20mm cannon, the
"Skyhawk" as it was then known had LABS provisions for a MK-7 nuclear
store on the centerline, with wing racks for either drop tanks or conventional
bombs. The A4D-1 entered service in September 1956 with VA-72.
Powered by a Wright J-65
Sapphire providing 7,200 lbs. of thrust and armed with two 20mm cannon, the
"Skyhawk" as it was then known had LABS provisions for a MK-7 nuclear
store on the centerline, with wing racks for either drop tanks or conventional
bombs. The A4D-1 entered service in September 1956 with VA-72.
On June 12, 1961, the A4D-5 first flew with a Pratt & Whitney J52-P-6A giving 8,500 lbs of thrust. The armament was augmented with multiple ejector racks on a total of five stations, allowing the airplane to carry up to 9,155 lbs of bombs, missiles, rockets or drop tanks. The airplane went into production as the A-4E, with 500 delivered by April 1966. Vietnam combat brought forth the A-4F, first flown August 31, 1966, with a J52-P-8A that powered the airplane with 9,300 lbs of thrust. The main visual difference at the time was an avionics "hump" aft of the cockpit, though this was later retrofitted to the surviving A-4Es.
Between August 3, 1964 and the bombing halt of March 31, 1968, the little Skyhawk was the principal Navy attack aircraft used over North Vietnam, as well as the main close air support aircraft in South Vietnam for the Marines. It finally left U.S. service with the Marines nearly 25 years later.
|
THE KIT |
The Monogram A-4 Skyhawk has been the primary kit of this airplane in 1/48 scale for nearly 30 years. An ESCI offering in the late 70s/early 80s was not nearly as good, though it provided more versions of the airplane. This new kit from Hasegawa effectively replaces both entirely on all reasons other than cost.
 The kit comes on 7 sprues
of light grey plastic and one clear sprue for the canopy. It is obvious from the
engineering of the kit that later versions will come out, such as the A-4M and
A-4K. Right now the Australian A-4G can be modeled, since the kit includes both
the straight refueling probe for USN aircraft as well as the angled probe fitted
first to the Australian version. The molds are crisp with recessed panel lines.
On first review, there appears to be at least as much attention to detail as
exists in the company's N1K2-J "Shiden-Kai" released earlier this
year.
The kit comes on 7 sprues
of light grey plastic and one clear sprue for the canopy. It is obvious from the
engineering of the kit that later versions will come out, such as the A-4M and
A-4K. Right now the Australian A-4G can be modeled, since the kit includes both
the straight refueling probe for USN aircraft as well as the angled probe fitted
first to the Australian version. The molds are crisp with recessed panel lines.
On first review, there appears to be at least as much attention to detail as
exists in the company's N1K2-J "Shiden-Kai" released earlier this
year.
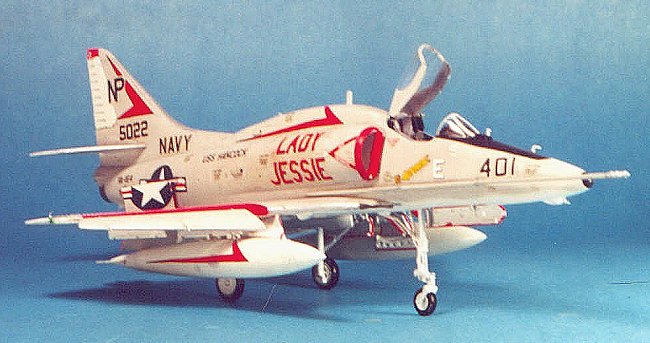
The cockpit is basic, but provides everything any modeler other than a Skyhawk-aholic will need to make a very good-looking model. The decals are for two CAG aircraft: an A-4E from VA-192 of Carrier Air Wing 19 aboard U.S.S. "Ticonderoga" in 1966, and an A-4F from VA-22 aboard the U.S.S. "Bon Homme Richard" in 1967. Fortunately, a myriad of A-4 decals were released in the 1970s and early 1980s by MicroScale, and these will provide many markings options for modelers. I think the red is too dark (think British WW2 red) in the markings, but I did not use the kit decals in doing my model so cannot confirm my suspicions.
|
CONSTRUCTION |
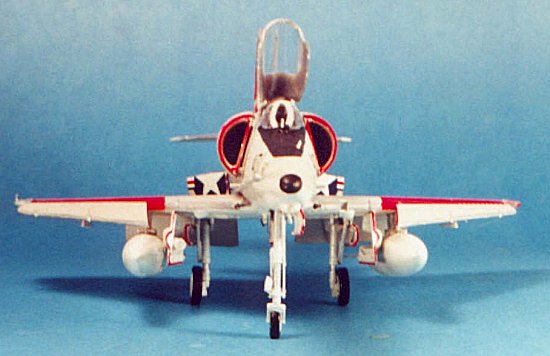
Construction is very straightforward: this is a well-engineered kit that fits well (though I have heard some people complaining about the wing/fuselage joint - I had no problems). My suggestion is follow the instructions and put it together the way they suggest, other than leaving off the slats, flaps, dive brakes, underwing pylons and landing gear until after the model has been painted and decaled. The only real difficulty I experienced is that there are a number of small parts you should take care with because if you drop them you will likely never find them.
|
PAINT & DECALS |
Painting:
The big problem with painting the model is that the area of the wing inside the slats and the flaps, and the area inside the dive brakes on the fuselage are gloss red; it's a bear. The only thing to do is tough it out and paint the red first. I used Tamiya gloss red, and cleaned it off all the surrounding areas as soon as I was through airbrushing. Once that had dried, I masked it over. I then shot the leading edges of wings, slats, horizontal stabilizer and vertical fin with SnJ; when that was dry I masked off those areas.
I did my "pre-shading" using Tamiya Dark Sea Grey instead of black, due to the light shade of the final colors. I shot the underside with Gunze-Sanyo H-316 US Navy Gloss White; this is an off-white, and very thin, but it looks right when you have covered a relatively large area with one light color, as opposed to the effect you get with the easier-to-apply flat white, which results in a surface that is way too bright. The upper surfaces were painted with Gunze-Sanyo H-51 Light Gull Grey.
 I masked the area for the
anti-glare shield and painted that with Tamiya black.
I masked the area for the
anti-glare shield and painted that with Tamiya black.
Keeping the masking over the gloss red areas and the NMF leading edges, I painted the rest of the airplane with Future to prepare for the decals.
Decals:
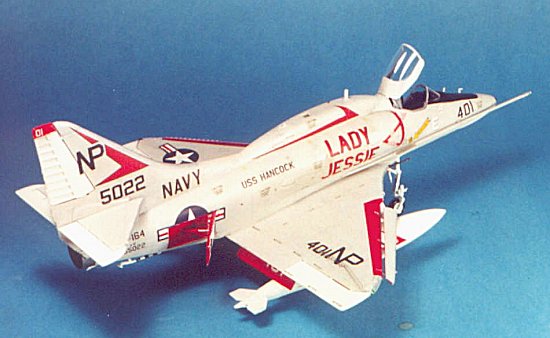
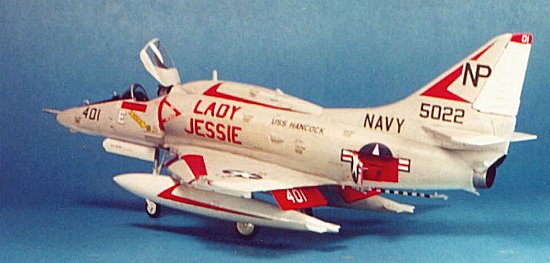
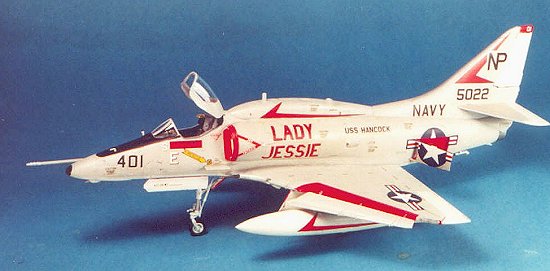
I used an old SuperScale sheet for the Skyhawk that gives the well-known "Lady Jessie," the lead aircraft for VA-164 aboard the U.S.S. "Hancock" in 1967-68. There are several of these sheets that were done over the years, and you should be able to find them still - this way you have a lot of possibilities for doing either an A-4E or A-4F.
Final Assembly and weathering.
I shot the upper surfaces with my "Flat Future" mix, and gave the lower surfaces a shot of Future with a bit of the "Flat Future" mixed in to tone down the gloss to a more realistic tone.
Once that was dry, I unmasked the red and NMF areas. I highlighted inside the wheel wells and the dive brake area with Tamiya "Smoke," thinned and applied with a brush.
I then attached the landing gear , underwing pylons, dive brakes, and leading edge slats. I considered hanging some Zuni pods from the Tamiya Skyraider on the outer pylons, but didn't follow through, though I may later.
|
CONCLUSIONS |
 Several very picky
modelers I know have labeled this kit "a beauty." I have to agree.
While I primarily build aircraft from the pre-1945 period, the Skyray and its stable mate
the Skyhawk have been favorites of mine since I used to watch both operating at
NAS North Island during the early 1960s. My one complaint is that the kit does
not have underwing ordnance, though people who model modern airplanes tell me
this is standard with Hasegawa, so you buy their weapons sets.
Several very picky
modelers I know have labeled this kit "a beauty." I have to agree.
While I primarily build aircraft from the pre-1945 period, the Skyray and its stable mate
the Skyhawk have been favorites of mine since I used to watch both operating at
NAS North Island during the early 1960s. My one complaint is that the kit does
not have underwing ordnance, though people who model modern airplanes tell me
this is standard with Hasegawa, so you buy their weapons sets.
The Skyhawk looks nice sitting next to its stable mates, the Skyraider and Skyray.
Review sample courtesy Marco Polo Imports (http://www.marcopoloimport.com/).
If you would like your product reviewed fairly and quickly by a site that has over 1,700 visits a day, please contact me or see other details in the Note to Contributors.