|
KIT # |
32202 |
|
PRICE: |
$124.95 MSRP |
|
DECALS: |
See review |
|
REVIEWER: |
Emilio Diaz |
|
NOTES: |
500 parts |
|
HISTORY |
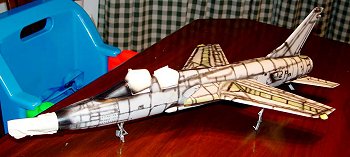
What happens when a prolonged air campaign starts to go bad? What do you send in to do the job when B-52’s can’t? You send in the “Ultra Hogs” and go right to Hanoi to deliver your packages. Many a “THUD” where lost along the way north to” Thud Ridge” and something had to be done.
The solution to the problem was the “Wild Weasels”. While other aircraft avoided air-defense sites, the “Weasels” would go in to attract the attention of the defenses and launch their deadly missiles to destroy the controlling radar. Thus allowing the strike mission to continue on to the target. The F-105G’s where the last “Thunderchiefs” to leave Vietnam and the record they set, tells of the heavy price paid for “Going Downtown”.
|
THE KIT |
 Just
finished this monster of a kit, over 2’ long, for a buddy of mine for
Christmas. With over 500 plus parts this kit can be built as impressive
as you would like, or skip a few steps to speed construction. The model
is well worth the effort to super detail it, if you have more time and
money. As I built the kit, it assembles into a very nice replica of the "Thunderchief".
It represents a late build “G” model with all of the developed
improvements added during the Vietnam War. I only question the wing
stiffeners that are present on the wings. I don’t think these where
installed till after the war.
Just
finished this monster of a kit, over 2’ long, for a buddy of mine for
Christmas. With over 500 plus parts this kit can be built as impressive
as you would like, or skip a few steps to speed construction. The model
is well worth the effort to super detail it, if you have more time and
money. As I built the kit, it assembles into a very nice replica of the "Thunderchief".
It represents a late build “G” model with all of the developed
improvements added during the Vietnam War. I only question the wing
stiffeners that are present on the wings. I don’t think these where
installed till after the war.
The model is packaged in a huge box, with the parts laid out in 16 trees of light gray plastic, 2 trees of clear plastic, 1 tree of black vinyl, 1 photo etched, 2 film sheets for instruments, “TwoBoB’s” decal sheets and a bag for of 3 different sized steel pins.
|
CONSTRUCTION |
I chose to complete this model following the illustrated directions, but a warning; I always trial fit the parts before gluing. Started out building some of the major subassemblies, like the cockpit, with little or no improvement since the model had to be completed before Christmas.
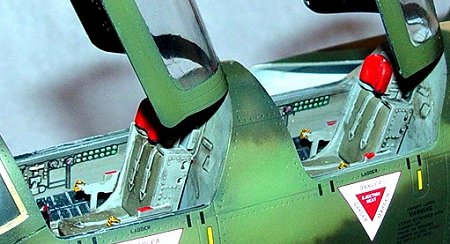 The
cockpit main parts all fit well and the level of detail is acceptable in
this scale except for the lack of detail on the canopies. The 5 piece
ejection seats are nice but look a little under scale. They have just
enough detail to look busy, but definitely need more detail after you see
what the actual seats look like. The instrument panels are made up of a
back panel with a film with instrument faces and a front panel with very
nice raised details. The panels can stand thinning as the faces of the
instruments look like they are sitting in tunnels. Be careful when
installing the front panel, it sits about 1/16th to high,
shaved the base so the panel would fit better. The cockpit was painted
and colors picked out using Bert Kinzey’s F-105 book as a guide. After a
few washes with oil paint, followed by light dry brushing, I was
satisfied that the interior looked well used I moved on to the next area.
The
cockpit main parts all fit well and the level of detail is acceptable in
this scale except for the lack of detail on the canopies. The 5 piece
ejection seats are nice but look a little under scale. They have just
enough detail to look busy, but definitely need more detail after you see
what the actual seats look like. The instrument panels are made up of a
back panel with a film with instrument faces and a front panel with very
nice raised details. The panels can stand thinning as the faces of the
instruments look like they are sitting in tunnels. Be careful when
installing the front panel, it sits about 1/16th to high,
shaved the base so the panel would fit better. The cockpit was painted
and colors picked out using Bert Kinzey’s F-105 book as a guide. After a
few washes with oil paint, followed by light dry brushing, I was
satisfied that the interior looked well used I moved on to the next area.
I decided that the super detailed 20mm Gatling gun, the refueling probe, bomb bay and most of the engine detail would be not be seen. This kit was being built as a gift, would be handled regularly and the detail would be wasted, or damaged. So these construction steps where skipped and the parts cosigned to the parts bin.
 The
J-75 engine is a complete model in itself. The engine assembled well but
the after- burning section is covered with a mass of ejector pin marks on
the inside of can. These can be seen when the engine is viewed from
behind and will need addressing with putty and files, or replaced with an
after market item when available. Trumpeter engineered the aft fuselage
to come apart, so most of the detail parts can be seen. I joined the aft
section together, left off most of the detail parts and the buried the
J-75. Too bad though, the J-75 is massive, would look great on a scratch
built engine change cart.
The
J-75 engine is a complete model in itself. The engine assembled well but
the after- burning section is covered with a mass of ejector pin marks on
the inside of can. These can be seen when the engine is viewed from
behind and will need addressing with putty and files, or replaced with an
after market item when available. Trumpeter engineered the aft fuselage
to come apart, so most of the detail parts can be seen. I joined the aft
section together, left off most of the detail parts and the buried the
J-75. Too bad though, the J-75 is massive, would look great on a scratch
built engine change cart.
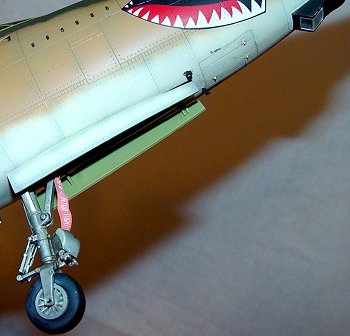
The front landing gear was assembled, the parts fit great and seams cleaned up. I used Andrea Aero Colors U.S. interior green for the bay and Monogram Promodeler aluminum for the gear. The wheel hub shaft was replaced with a cut down steel pin. This was done to allow painting the gear with out the wheel hub and tire.
The subassemblies were then installed in the
fuselage and care must be taken with this step as the parts fit loose in
the locking boxes. This allows some of the parts to be misaligned once
assembled. The fuselage was glued together using Testor’s tube cement on
the locating pins and Tenex liquid glue run down the seams to finish
welding the parts together. I then added a ¼” bolt and nuts to the area
that the gun bay was in the nose so the model would not tail sit. I was
impressed by the fact that given the length of the major seams, I only
had to dress them down with an X-Acto blade to finish.
The wings, elevators and tail fin where assembled, but with out the movable slats, flaps and rudder. These parts can be built using the photo etched hinges and steel pivot pins. But I was afraid the parts would be damaged, since the wings are a natural pick up point. All the parts blended into their recesses except the port leading edge slat. I had to adjust this open to meet the recess in the wing with out a major seam. I think I damaged this while the glue was setting as I used way to big a clamp to hold it together.
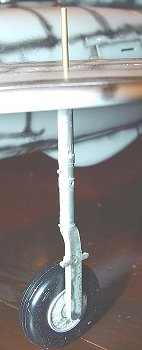 The
landing gear really needs help. I drilled and pinned the gear so it would
not break off. The gear will not support the weight of the model due to
it be near scale thickness. I painted the well hubs and then mounted the
vinyl tires. Coated the gear with acrylic varnish and then applied oil
washes to the gear to give it depth. There are no details on the inside
of the main gear covers and these should be dressed up or replaced. The
gear bays have moderate detail with the retraction cylinders, wing spar
and the auxiliary engine intake present. Note, even with the pins
installed, the model sways on its gear every time it is bumped or
touched. Not much can be done with it except scratch build new gear out
of metal.
The
landing gear really needs help. I drilled and pinned the gear so it would
not break off. The gear will not support the weight of the model due to
it be near scale thickness. I painted the well hubs and then mounted the
vinyl tires. Coated the gear with acrylic varnish and then applied oil
washes to the gear to give it depth. There are no details on the inside
of the main gear covers and these should be dressed up or replaced. The
gear bays have moderate detail with the retraction cylinders, wing spar
and the auxiliary engine intake present. Note, even with the pins
installed, the model sways on its gear every time it is bumped or
touched. Not much can be done with it except scratch build new gear out
of metal.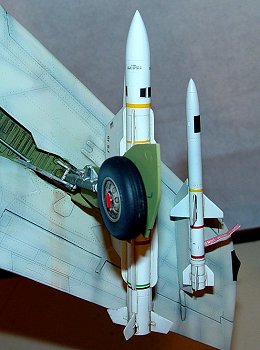
The radar bay is completely detailed but the nose cone would not fit flush when closed. So off comes the detail parts and the nose cone is cemented closed. This is the only part of the kit that needed putty to contour to the rest of the fuselage.
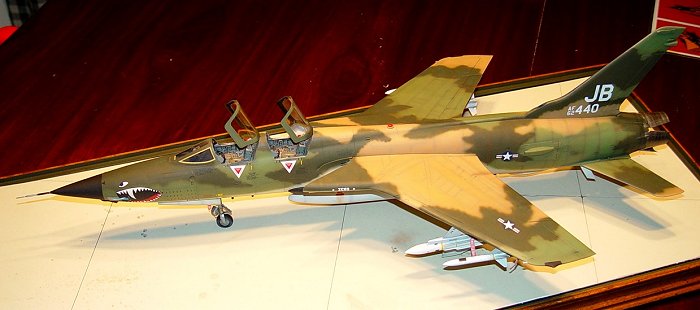
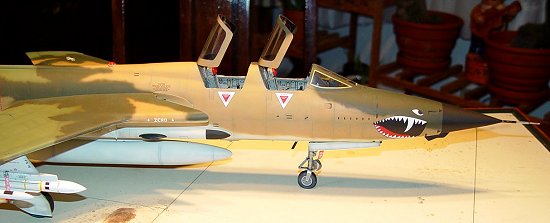
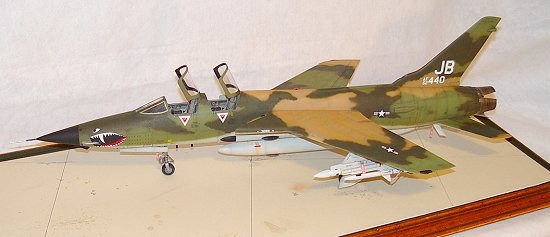
The model provides a lot of weapon options. There are 5 full trees of nothing but Shrikes, Standard ARMs, Bullpups, MER’s, Mk-82 bombs, Mk-117 bombs, Napalm tanks, ECM pods, and center and wing fuel tanks. I used the center fuel tank with 2 Shrikes and 2 Standard ARM’s, as this model will be configured as an “Anti-SAM-Site” strike bird. These parts went together beautifully with not a single seam to fill or scrape.
The wings, tail fin, elevators and aft fuselage where glued together and set aside to dry. The engine intakes have large seams in the front half, but really can’t be seen. There is no detail present that represents the variable-geometry ducts. Seam-Less Suckers could make a replacement kit, like they did for the Tamiya Phantom’s. I had started the kit just before Thanksgiving and so far every thing went together well. I dressed all the seams and the model is now ready for paint.
|
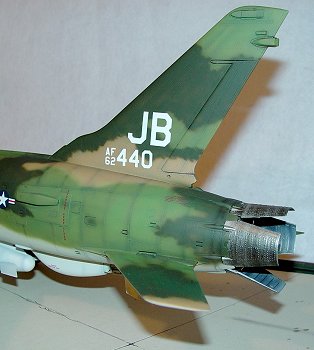
COLORS AND MARKINGS |
 The
kit was ready for painting in just a week. I first preshaded the model
and then applied the Southeast Asia camo using Gunzie acrylics. All
colors where sprayed very thin with a Badger airbrush using a CO2 bottle
for air supply. The model was sealed with Testor's Metalizer Sealer to
prep the model for the kit decals. The “TwoBobs” kit decals are one of
the high points as they lay down with little or no problems. The options
provide decals to represent aircraft from the 561st TFS and
the 17th WWS from the 388th TFW, based at Korat Air
Base,
The
kit was ready for painting in just a week. I first preshaded the model
and then applied the Southeast Asia camo using Gunzie acrylics. All
colors where sprayed very thin with a Badger airbrush using a CO2 bottle
for air supply. The model was sealed with Testor's Metalizer Sealer to
prep the model for the kit decals. The “TwoBobs” kit decals are one of
the high points as they lay down with little or no problems. The options
provide decals to represent aircraft from the 561st TFS and
the 17th WWS from the 388th TFW, based at Korat Air
Base,  Thailand, and
there is a whole sheet just devoted to the markings for the weapons.
Thailand, and
there is a whole sheet just devoted to the markings for the weapons.
All decals where set using Micro Sol and the model wiped down to remove all residues when the decals had dried. To protect the thin finish I then sprayed acrylic satin floor varnish and allow drying for 24 hours before I started weathering. I weather using a combination of pastels, over spraying with original colors and heavy washes. Then I simulate chips in the paint using a Prisma Color silver pencil and lock the whole finish with a light coat of Testor's Dullcote. The masking is removed and the doors, aerials, racks and missiles are installed and any touch ups done.
|
FINAL ASSEMBLY |
The kit supplies all of the little antennas,
formation lights and navigation lights. These parts and the canopies were
installed using Elmer’s wood glue. I find that this glue dries relatively
clear and with a flat finish. Be careful of the
 pitot tube. I broke it
off 3 times all ready.
pitot tube. I broke it
off 3 times all ready.
The model is basically done at this point but needs something to show it off. I built a base using a scrap piece of 3/4" by 12" pinewood and trimmed it with picture frame moulding. I simulated the concrete runway pad using colored matt board from Hobby Lobby. Laid out the pattern and weathered the surface using oil washes and pastels.
I then finished off the model by printing out some "Remove Before Flight" tags on my computer and adding these to points on the model using fuse wire. .
|
CONCLUSIONS |
I enjoyed this “Quick Build” very much. It gave me
a chance to see what Trumpeter is able to produce. It looks like there’s
a new kid on the block and he is definitely a player. REFERENCES Walk Around F105 Thunderchief, #23, by Ken Neubeck,
Squadron/Signal Publications F-105 Thundercief, by Bert Kinzey, Detail & Scale,
Vol.8 Thundercief, by Richard Caruana, Scale Aviation
Modeler International, Vol.5, Issue 8 Requiem for a Heavyweight, by Blake Morrison,
Internet article
January 2004
Copyright ModelingMadness.com. All rights reserved. No reproduction in part or in whole without express permission.
If you would like your product reviewed fairly and fairly quickly , please contact the editor or see other details in the Note to Contributors.