Heller 1/72 T-28 'Fennec'
|
KIT # |
80279 |
|
PRICE: |
$7.00 |
|
DECALS: |
Two schemes; French and VNAF |
|
REVIEWER: |
|
|
NOTES: |
Superscale 72-373 decal sheet used. |
|
HISTORY |
Rather than reinvent the wheel concerning the history of the venerable Trojan, let me quote from the description on the website of the National Museum of Naval Aviation in Pensacola, FL:
"Originally produced by North American for the Air Force, the
all-metal, tricycle landing gear T-28A 'Trojan' made its maiden flight on
September 26, 1949. With a top speed of 292 mph, 800 nm range and service
ceiling of 31,650 ft, the Navy began evaluating it as a replacement for
the SNJ 'Texan' trainer. The results showed that the Navy version
required a more powerful engine and North American responded with t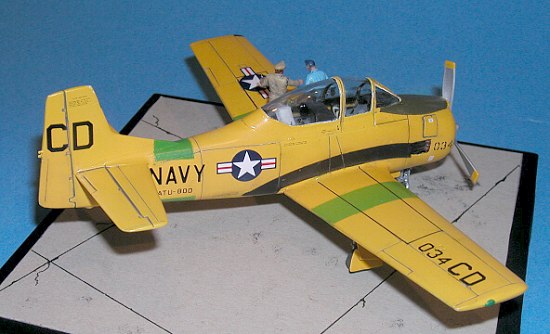 he
T-28B that was fitted with a 1,425 hp Wright R-1820 engine that upped the
speed to 343 mph. First flown on April 6, 1953, the delivery of 489 of
this model began in 1954 to ultimately equip eleven training squadrons in
both the primary and basic training roles.
he
T-28B that was fitted with a 1,425 hp Wright R-1820 engine that upped the
speed to 343 mph. First flown on April 6, 1953, the delivery of 489 of
this model began in 1954 to ultimately equip eleven training squadrons in
both the primary and basic training roles.
The success of the T-28Bs resulted in the placement of an order for the
tailhook-equipped T-28C with a strengthened rear fuselage to absorb the
tremendous stress of carrier landings. Making its first flight on
September 19, 1955, the T-28C became the centerpiece for all Navy flight
training - basic, primary, instrument and carrier qualifications.
The T-28 was actively used in the Viet Nam war as the T-28D 'Nomad'
equipped to carry a variety of weapons ranging from bombs and rockets to
napalm and used for counterinsurgency missions throughout Southeast
Asia."
Several other nations operated versions of the T-28. The French air force flew more than 200 "Fennecs" against nationalists in Algeria and other French colonies during the early 1960s. Converted from the T-28A airframe, the Fennec was powered by the Wright 1425 hp engine. It could carry four .50 cal. machine guns or rockets in two underwing pods, plus bombs on external racks.
|
THE KIT |
The T-28 has always been my favorite U.S. Navy trainer. I recall ham-fistedly slapping together at least two of the simplistic 1/48 Monogram kits as a kid. When I switched to 1/72 about 10 years ago, the Heller kit -- the only one in that divine scale -- was one of my first trade acquisitions.
 Heller's kit has many of the features that distinguish a Fennec from a
Navy Trojan. It sports the higher canopy and small cockpit ventilation
air scoop of the French plane. Stubs for the underwing rocket/gun pylons
are molded as part of the lower wing piece. Panel lines are raised, and
the major airframe parts are covered with hundreds of rivets. The cockpit
includes a tub with raised console details and a pair of decent
instrument panels with raised dials. The kit's engine is simplified, and
there is no detail in the wheel wells. The speed brake under the fuselage
is molded closed.
Heller's kit has many of the features that distinguish a Fennec from a
Navy Trojan. It sports the higher canopy and small cockpit ventilation
air scoop of the French plane. Stubs for the underwing rocket/gun pylons
are molded as part of the lower wing piece. Panel lines are raised, and
the major airframe parts are covered with hundreds of rivets. The cockpit
includes a tub with raised console details and a pair of decent
instrument panels with raised dials. The kit's engine is simplified, and
there is no detail in the wheel wells. The speed brake under the fuselage
is molded closed.
I had decided long ago to build a U.S. Navy T-28B from ATU-800 using markings from SuperScale sheet 72-373. Two obvious modifications were needed: The air scoop in front of the windshield had to be removed and replaced with a longer duct to meet the inlet on the cowling face, and those weapons pylons had to go. The kit nose wheel is appropriate for a Fennec, but Navy Bs and Cs mounted a slightly smaller wheel with a different hub design. I decided to live with the inaccurate canopy profile. The only way I could figure to fix the problem would be to somehow cut down the bottom of the framing, sand it all off, and vacuform a new canopy -- something I wasn't prepared to do.
|
CONSTRUCTION |
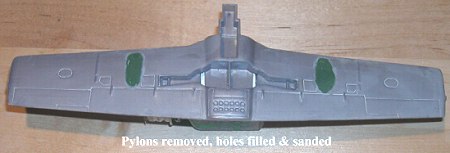
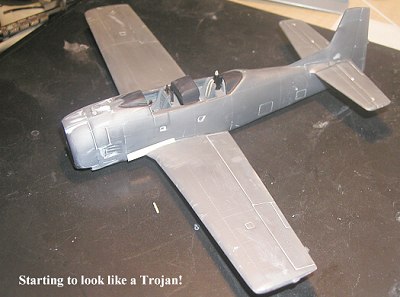
I began by getting rid of the lower wing pylons with a razor saw and filling the resulting holes with putty, followed by a thin application of gap-filling super glue. I then sanded and feathered the filled areas to match the surrounding plastic.
The sanding obliterated the rivets and raised panel lines on the lower wing...not a problem, since I planned to remove them from the entire airplane. For me, the latter was the most labor-intensive part of building the kit. I started with 320-grit wet-and-dry sandpaper, followed successively by 400- and 600-grit to obtain a reasonably smooth surface. The wing and tail roots resisted my efforts; I had to go back and remove die-hard rivets several times before I was satisfied with the job.
I next tackled the cockpit. My philosophy about 1/72 cockpit detailing, especially with a closed canopy, is to create an impression rather than trying to duplicate every switch, dial and box. I'm quite content with using decals for consoles and instrument panels whenever possible, and that's essentially what I did with the T-28B.
First, I airbrushed the cockpit tub, instrument panels and fuselage interior dark gull gray. I then brush-painted the center section of each instrument panel light ghost gray. When the parts were dry, I cut out and applied bits and pieces of various decals to produce decent representations of the console panels shown in photos on Chuck's Flying Page (see address below), my main online reference. I downloaded a photo of the website owner's T-28 instrument panel, reduced it to 1/72 using Corel Photo-Paint, then printed out two tiny copies on glossy photo paper. I cut them out fastened them to the front and rear instrument panels with white glue.
 After cementing the panels and control sticks into position on the
tub, I made throttle handles and the forward seat belt support from
plastic rod, and added the small glass ADF cover behind the rear seat
from clear sprue. I used thin strips of masking tape for seat belts and
small scraps of plastic sheet for buckles. Finally, I formed a folded
canvas instrument flying hood from tissue paper placed over a strip sheet
plastic form and soaked with diluted white glue.
After cementing the panels and control sticks into position on the
tub, I made throttle handles and the forward seat belt support from
plastic rod, and added the small glass ADF cover behind the rear seat
from clear sprue. I used thin strips of masking tape for seat belts and
small scraps of plastic sheet for buckles. Finally, I formed a folded
canvas instrument flying hood from tissue paper placed over a strip sheet
plastic form and soaked with diluted white glue.
The next step in the project was gluing most of the various airframe parts together. I began by assembling the fuselage halves, and then inserted the completed cockpit through the bottom wing opening. After painting the engine and mounting it on the firewall, I glued the cowling in place. Fit of the parts was excellent as I cemented the left and right upper wing halves to the one-piece lower wing and then the completed wing structure to the fuselage. Once the horizontal stabilizers were in place, I began rescribing panel lines.
 My approach to rescribing is similar to my attitude toward cockpit
detailing. I don't try to duplicate every panel on the real airplane, but
I try to make sure those I do reproduce are correctly placed.
Using the three-view drawings in Squadron/Signal's T-28 in Action,
I used an old dental tool to engrave some of the major panel line
divisions. As a guide for long, straight lines, I used Dymo label tape
cut into strips. For curved surfaces and some shorter lines in tight
places, I used doubled-up thin strips of good ol' Mk. I black electrical
tape.
My approach to rescribing is similar to my attitude toward cockpit
detailing. I don't try to duplicate every panel on the real airplane, but
I try to make sure those I do reproduce are correctly placed.
Using the three-view drawings in Squadron/Signal's T-28 in Action,
I used an old dental tool to engrave some of the major panel line
divisions. As a guide for long, straight lines, I used Dymo label tape
cut into strips. For curved surfaces and some shorter lines in tight
places, I used doubled-up thin strips of good ol' Mk. I black electrical
tape.
I finished off the cockpit by brush-painting the instrument panel glare shields and the area behind the rear seat aircraft interior black. I removed the short air scoop, filled the gap between the front of the canopy and the nose inlet with gap-filling super glue, and then sanded the duct to shape. The final step before painting was to secure the canopy to the fuselage with white glue.
|
CAMOUFLAGE & MARKINGS |
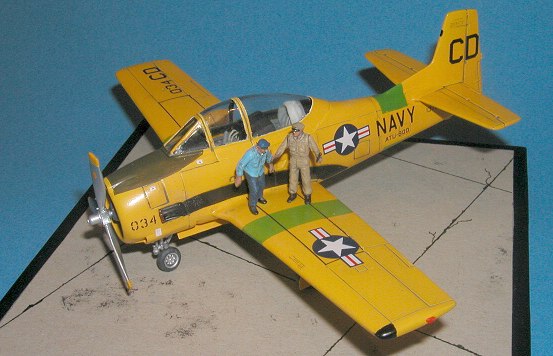
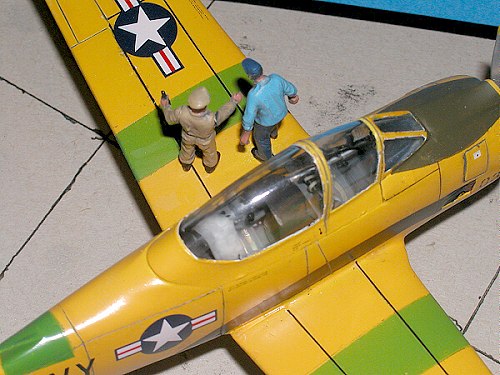
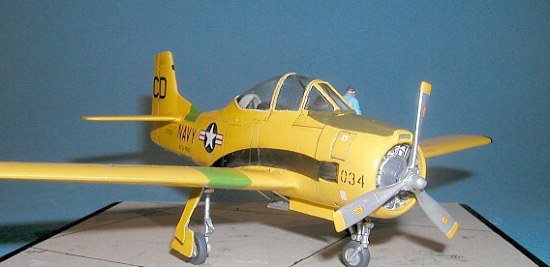
The ATU-800 aircraft depicted by the SuperScale decals flew with the overall orange-yellow color scheme (FS13655) worn by early Navy T-28s. The aircraft also sports willow green (FS14187) bands around each wing and the after fuselage. (NOTE: The instructions for a new Aeromaster 1/48 decal sheet show the bands for this aircraft as red, and there are some differences in the codes. You may want to do further research!) The anti-glare panel in front of the windshield is an olive drab variant (FS34151) and there are black areas behind each set of exhaust pipes. Color of the wheel wells, inside gear door surfaces and wheel hubs is a toss up. I've seen pics of early T-28s with either orange-yellow or aluminum. I went with the latter.
 I masked the canopy with a combination of tape and liquid masking
film, and then airbrushed a thin coat of interior black over the framing.
After letting it dry for a day, I shot a primer coat over the entire
airplane using flat white straight from a spray can. After allowing the
paint to dry for a couple of days, I was ready to airbrush the color
coats.
I masked the canopy with a combination of tape and liquid masking
film, and then airbrushed a thin coat of interior black over the framing.
After letting it dry for a day, I shot a primer coat over the entire
airplane using flat white straight from a spray can. After allowing the
paint to dry for a couple of days, I was ready to airbrush the color
coats.
To paint the orange-yellow overall color, I had intended to use my proven method of applying several flat coats, followed by a thin application of the gloss color. As I airbrushed chrome yellow, I couldn't figure out why the finish looked so *&^%$#@ shiny. I applied about six coats before I looked at the bottle. Oops! Trojan Man had accidentally used gloss yellow! Despite my goof, the coverage was pretty good, although the thicker-than-planned paint job forced me to go back and rescribe some panel lines that had nearly disappeared. After the gloss coat had dried for several days, I masked and painted the green trainer bands, anti-glare panel and black exhaust areas.
On the real airplane, thin black stripes stretch along the major panel lines on the upper wing from the fuselage to a major panel line about one-third the distance from the wing tip, where a perpendicular black stripe closes off the open-ended rectangle. These stripes aren't included on the SuperScale decal sheet, so I duplicated them with scraps found in my decal spares box. The SuperScale decals themselves went on without a hitch. The sheet includes a wealth of stenciling, some barely visible to the naked eye. I applied only those I thought I could make out in my photocopied picture of the real aircraft.
After letting the decals settle for a couple days, I applied a "sludge wash" of thinned medium gray acrylic paint to the panel lines. I had to supplement the wash with a No. 2 pencil in a few areas where the rescribed lines were too shallow for the wash to take. Overall, I think the technique produced the effect I wanted: a paint job showing the effects of some time in service.
To seal the wash and decals, and to produce a more realistic finish, I airbrushed semi-gloss lacquer over the airframe and the gear doors that I had painted separately with a brush. The propeller received a sparing dose of metallic silver from a spray can. After gluing on the prop, struts, doors and wheels -- I scrounged a smaller, Navy-style nose wheel from my spares box -- my Trojan was complete.
|
FINAL CONSTRUCTION |
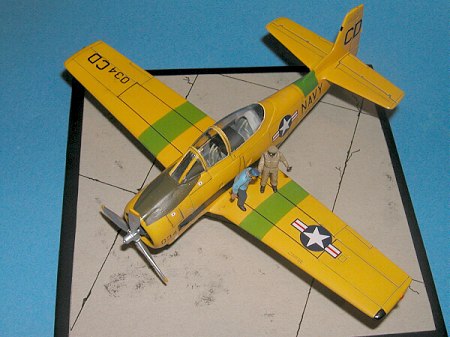 I mounted my T-28B to a homemade base using white glue. I created the
"concrete" section from a piece of model box top cut to shape. I applied
the tar lines with a black permanent marker, taking care not to make them
too uniform. I then weathered the concrete by drybrushing some smears of
grimy black and placing small drops of used thinner in strategically
placed spots. The finished section was then attached to a section of
black ceramic tile using spray adhesive.
I mounted my T-28B to a homemade base using white glue. I created the
"concrete" section from a piece of model box top cut to shape. I applied
the tar lines with a black permanent marker, taking care not to make them
too uniform. I then weathered the concrete by drybrushing some smears of
grimy black and placing small drops of used thinner in strategically
placed spots. The finished section was then attached to a section of
black ceramic tile using spray adhesive.
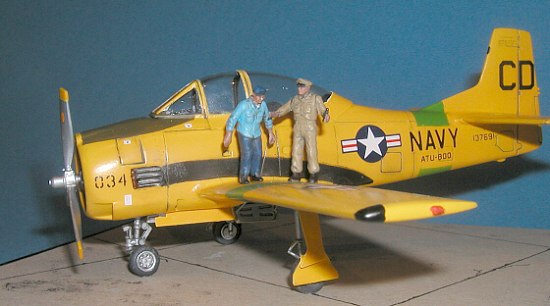
Since airplanes are flown and maintained by people, I always put pilots, ground crew or both in my mini-dioramas. In this case, art imitates life. The photo of the ATU-800 bird I modeled shows an enlisted sailor and an officer or chief standing on the port wing, apparently discussing something about the surface. I tried to duplicate the scene using a bit of artistic license. The figures came from my spares box. I did my usual Dr. Frankenstein bit of switching arms, heads and, for the officer, an entire torso. The figures were secured to the wing with white glue.
|
CONCLUSIONS |
Modelers who prefer 1/72 have no option: The Heller kit is the only
Trojan/Fennec in that scale. Overhauling it to better represent a T-28B
wasn't particularly challenging, just time-consuming. To build a
carrier-capable "C," you'd have to
 perform the mods detailed in the
narrative, plus cut out the lower tail and add a tailhook. If you'd
rather make an armed version of the aircraft, the kit includes rocket
pods. I didn't extensively research how well the kit depicts a T-28D or
Fennec out of the box.
perform the mods detailed in the
narrative, plus cut out the lower tail and add a tailhook. If you'd
rather make an armed version of the aircraft, the kit includes rocket
pods. I didn't extensively research how well the kit depicts a T-28D or
Fennec out of the box.
Both Airwaves and Eduard make photoetched details for this kit if you're inclined to super-detail the cockpit and replace some of the overscale plastic parts. Engines & Things carries several types of 1/72 R-1820s, but none of them appears to be the exact model in the Navy T-28.
Overall, Heller's T-28 was an enjoyable build. It would be great if some enterprising manufacturer made a vacuformed canopy to help in building a better-looking Navy T-28. (Your editor would like to mention that NAF at one time did such a canopy as I have one [slowly yellowing] in a parts bin somewhere)
|
REFERENCES |
T-28 Trojan in Action, Squadron/Signal Publication #89,
50's navy and Navy Archives, http://www.50snavy.org
Chuck's Flying Page, http://www.cwahl.com/flying/t28/t28.htm
July 2003
Copyright ModelingMadness.com. All rights reserved.
If you would like your product reviewed fairly and fairly quickly, please contact the editor or see other details in the Note to Contributors.