| KIT #: | R0001 |
| PRICE: | CDN$100.00 |
| DECALS: | Many options |
| REVIEWER: | Dan Lee |
| NOTES: | Royal Class kit with oodles of extras |
| HISTORY |
Born out of a lightweight fighter
spec from the late 1950s, the Mirage
 The Six Day
War proved to be it’s first and most important combat as Israeli pilots flying
Mirage IIICJs (J for Jewish, naturally) helped destroy several Arab air forces
in a matter of hours on June 5, 1967.
This success helped the French sell many Mirages
world wide, but also helped end the relationship between France and Israel in
1968.
Despite being cut off, the Israelis would fly the Mirage
IIICJ and its variants thru the 1970 War of Attrition and the 1973 Yom Kippur
War till the French built Mirages were replaced by Israeli made Daggers, Neshers
and Kfirs which were based on the Mirage.
The Six Day
War proved to be it’s first and most important combat as Israeli pilots flying
Mirage IIICJs (J for Jewish, naturally) helped destroy several Arab air forces
in a matter of hours on June 5, 1967.
This success helped the French sell many Mirages
world wide, but also helped end the relationship between France and Israel in
1968.
Despite being cut off, the Israelis would fly the Mirage
IIICJ and its variants thru the 1970 War of Attrition and the 1973 Yom Kippur
War till the French built Mirages were replaced by Israeli made Daggers, Neshers
and Kfirs which were based on the Mirage.
| THE KIT |
See my preview of the kit.
| CONSTRUCTION |
First thing to do is clean the parts with soapy water and let them dry.
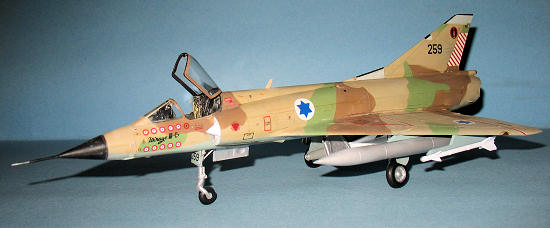
I started with the cockpit tub and added the various unpainted PE bits. Once the CA glue was set, the part was sprayed flat black then dry brushed with dark grey and silver to highlight some of the details. The pre painted PE bits were added once the paint was dry. I did not assemble the instrument panel till later (I’m glad I didn’t.)
There are two options for the ejection seat, resin or styrene. I opted for the resin seat as it looked much better than the styrene version. It was painted NATO black and then hand painted with various colors (OD, Buff, yellow and red.) The PE seat belts were added on using CA glue. I left out the seat till final assembly.
 Next to be
assembled and painted were the landing gear wells, and intakes.
These assemblies were spray painted with Tamiya
spray can TS-30 Old Silver.
The one thing I liked about the Eduard Mirage
intakes was that they didn’t attempt to show an interior that will never be
seen.
Next to be
assembled and painted were the landing gear wells, and intakes.
These assemblies were spray painted with Tamiya
spray can TS-30 Old Silver.
The one thing I liked about the Eduard Mirage
intakes was that they didn’t attempt to show an interior that will never be
seen.
The tailpipe was a bit more
complicated than the standard exhaust but it did not require extensive sanding
in tight places as most of the tailpipe detail is provided by a PE sheet which
is rolled and glued in place.
I did a little bit of filling and sanding at the lip
of the exhaust tube, but that was it.
The engine nozzle (which was not installed at the
time) had various PE bits including “lips” that proved to be a pain the rear
later in the assembly process.
Once all the various internal assemblies were glued in place, I assembled the fuselage and wings. Tom Cleaver’s Mirage review highlighted a lot of the issues one needs to watch out for including the leading edges and wing roots. I ended up using 10 thou plastic card shims to close up the gaps where the wings and fuselage meet while the leading edges and underside of the tail were filled in with Vallejo Plastic Putty. The fuselage gaps were more prominent. I initially used Vallejo Plastic Putty to fill the gaps, but this is where I discovered the limitations of the stuff as it peeled away after vigorous sanding. I corrected my mistake using CA glue instead which took several tedious sessions of filling and sanding to get the join smooth.
There was a lot of work involving careful filling (CA glue) and sanding around then engine nozzle to remove obvious seams. I only filled about a 1/2 inch deep into the fuselage as the rest would be covered up by the engine nozzle itself.
 The intakes
were another area which required a deft sanding touch as the seams were not
anywhere near a panel line and the plastic was thin.
I do wish that Eduard had put these things on a
panel line, but I suspect that it would have made assembly of the lower fuselage
more difficult.
The intakes
were another area which required a deft sanding touch as the seams were not
anywhere near a panel line and the plastic was thin.
I do wish that Eduard had put these things on a
panel line, but I suspect that it would have made assembly of the lower fuselage
more difficult.
Turns out the worst area on the Mirage was the area in front of the canopy, but I did not realize this till later. At the time, I just did a bit of simple filling and sanding plus rescribing lost details.
The most difficult part was adding the PE instrument panel because it didn’t fit as well it should have. I had to clip and bend the plastic and PE bits to get it to fit inside the tiny cockpit which also meant that I lost all the carefully added prepainted PE handles. I jammed the instrument panel in and glued it in tight.
Otherwise the rest of the assembly went on without issues.
| COLORS & MARKINGS |
Colors
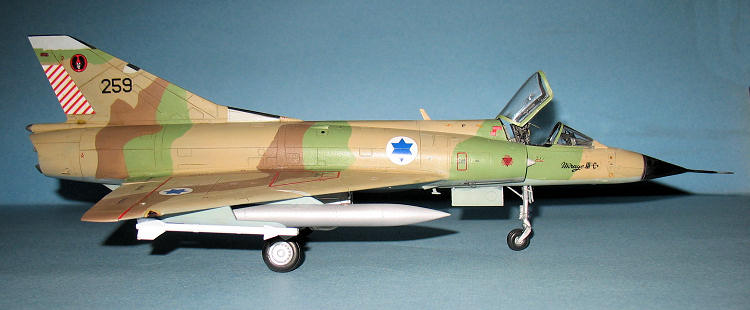
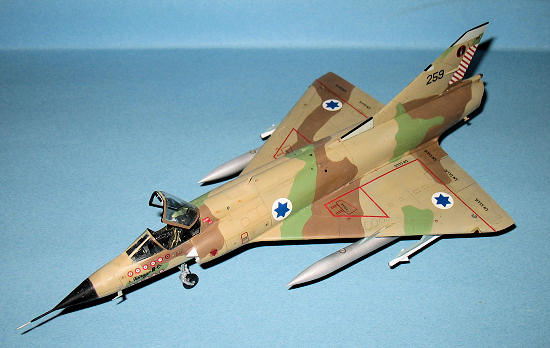
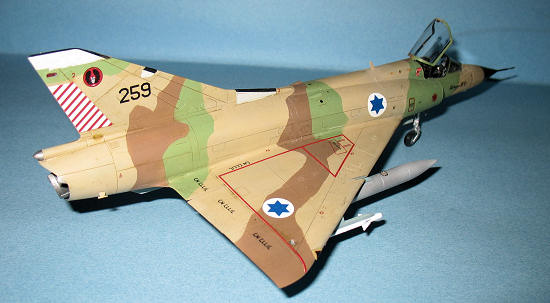
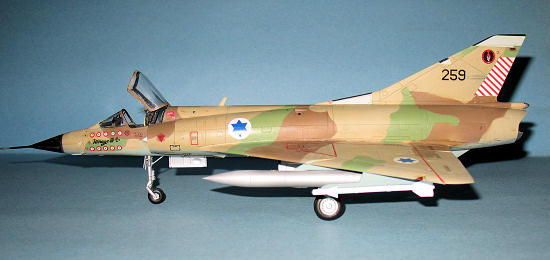
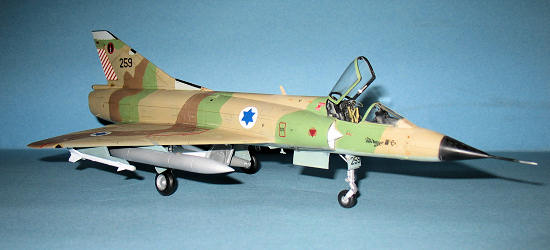
I decided to do the Israeli 101 Squadron’s 259 with markings from the 1970 War of Attrition because of two reasons: I like the challenge of painting the complex Israeli camo pattern and I don’t like using big decals (the 1973 versions include the Orange/Black ID triangles used by IAF to identify their Mirages which Eduard made big decals for.)
I used the colors Eduard identified for this particular scheme. The light underside blue was close to RLM65, The light tan was Buff. The green was FS34227. The brown was close to British Dark Earth. As it turns out, I had all these colors in Gunze or Tamiya which meant no panicked rush to the Local Hobby Shop (LHS) to get the colors I needed.
 The plane
was preshaded using flat black and then the underside color was sprayed on in
two light coats to get a slightly non uniform paint coat.
I
know that the Israelis maintained their aircraft beautifully based on “research”
(google) and photos.
I let the paint dry for a couple of days before
staring on the topside.
Once the demarcations for the underside were masked,
I sprayed on Tamiya Buff in a similar manner as the underside
I wanted the paint to look a little worn and faded,
but not World War 2 South West Pacific worn and faded.
The plane
was preshaded using flat black and then the underside color was sprayed on in
two light coats to get a slightly non uniform paint coat.
I
know that the Israelis maintained their aircraft beautifully based on “research”
(google) and photos.
I let the paint dry for a couple of days before
staring on the topside.
Once the demarcations for the underside were masked,
I sprayed on Tamiya Buff in a similar manner as the underside
I wanted the paint to look a little worn and faded,
but not World War 2 South West Pacific worn and faded.
I used hard masks (as opposed to freehand) for the light green and dark earth. The hard masks were made using scissors and painters tape. It took about 3 hours to do each color, but I was fortunate that I did not have any paint leak under the tape (which is not normal for me.)
The canopy bits were masked off using the kit provided vinyl masks at the same time and painted. The interior color for the canopies was flat black while all three exterior colors were used at one point or another. At this point I added the various PE bits (mirrors and consoles) to the forward portion of the canopy.
Once the paint was dry, I sprayed on a thin coat of Future as a gloss coat for the decals.
Decals
 These
Eduard decals went on smoothly.
It took a couple of weeks for me to decal the Mirage
as it included a lot of stencils which is one reason why I don’t build as many
jet models as I’d like.
I did not have any silvering (again unusual for me)
that I remember.
These
Eduard decals went on smoothly.
It took a couple of weeks for me to decal the Mirage
as it included a lot of stencils which is one reason why I don’t build as many
jet models as I’d like.
I did not have any silvering (again unusual for me)
that I remember.
Wash/Final Coat
I used a very thinned watercolor wash of burnt sienna topside just to highlight details, but not to make the plane dirty. The underside was a little darker, but just as thin. The excess wash was removed with slightly wet Q-tips and sealed with Future/Tamiya Flat Base. I used a three parts Future with one part Flat Base to make a semi-gloss coat.
| FINAL CONSTRUCTION |
There was still a lot of work to do.
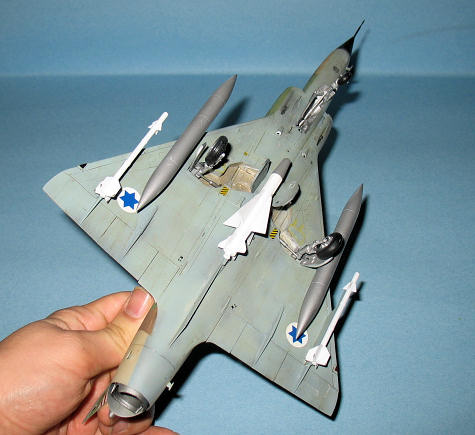
I assembled the fuel tanks and missiles.
One of the problems with the kit is that there is a
slight misalignment of a couple of molds (weapons) that require a bit more work
than just cleaning the mold lines.
The R530 and Sidewinders were painted white while
the tanks were done with Tamiya AS-12 spray paint.
The R530
The landing gear and doors required some careful sanding and assembly thanks to fiddly parts and PE. The various landing gear bits and interior of the doors were sprayed with Tamiya XS-30 Old Silver while the wheels were hand painted black (NATO black) and the gear doors were sprayed with the exterior color.
 No issues
gluing in the forward landing gear, but the rear landing gear needed a bit of
work (sanding) to fit in properly.
Once in I used CA glue to secure them in place.
The various PE bits were installed, but not as big
an issue as the rear landing gear.
No issues
gluing in the forward landing gear, but the rear landing gear needed a bit of
work (sanding) to fit in properly.
Once in I used CA glue to secure them in place.
The various PE bits were installed, but not as big
an issue as the rear landing gear.
Next I added the various clear bits. I regret not installing the wing tip lights earlier in the process. I am not happy with the fit and the fact that Eduard did not put them on a panel line. If I were doing this model for a competition I would have used clear resin bits instead or filled them in with CA glue and done some sanding/filling.
When I installed the canopy, I was
horrified to discover that I had a step between the canopy and the nose.
I tried sanding down the canopy (not too much), but
the step was too big for that solution.
I didn’t want to fix this (read lazy) but that gap
bugged me so much that I popped off the forward portion of the canopy, glued on
a piece of 20 thou plastic card and used Tamiya surface primer to fill in the
gaps.
It took some careful sanding and a lot of swearing before I
got it “right.”
Then everything needed to be masked off and painted
again.
I was tempted to add the surface detail, but at this point
I didn’t bother.
The final bits like pitot tubes, ejection seat, missiles, gun barrels and engine nozzle were added to the model. I was not happy that the engine nozzle PE “lips” broke off when I added the nozzle to the engine tube. I ended up mangling one so badly that I had to use the spare PE lip.
I found one final mistake to correct. The Israeli Mirages in the 1970s had their shock cones painted white instead of bare metal. It took some careful work with a paint brush and Citadel White to correct.
Voila, one Israeli Mirage
| CONCLUSIONS |
 After
building this Mirage, I can understand why it seems so few have been built.
This kit is not an easy one to build and can test
one’s patience at times.
Even forewarned, I still found myself dealing with
unexpected headaches.
However, the older Mirage kits require the same
amount of hard work (for modeling anyway) in particular if you want an accurate
Mirage.
I happen to like the Mirage (it has the wide variety of
interesting markings for a “modern” jet) and wanted one badly enough to finish
it which is why this kit didn’t end up in my half built kit pile of frustration.
After
building this Mirage, I can understand why it seems so few have been built.
This kit is not an easy one to build and can test
one’s patience at times.
Even forewarned, I still found myself dealing with
unexpected headaches.
However, the older Mirage kits require the same
amount of hard work (for modeling anyway) in particular if you want an accurate
Mirage.
I happen to like the Mirage (it has the wide variety of
interesting markings for a “modern” jet) and wanted one badly enough to finish
it which is why this kit didn’t end up in my half built kit pile of frustration.
In conclusion, if you like 1/48 scale Mirages and are an experienced builder then I recommend this kit for you in particular if you care to have a reasonably accurate Mirage.
April 2009
If you would like your product reviewed fairly and quickly, please contact me or see other details in the Note to Contributors.