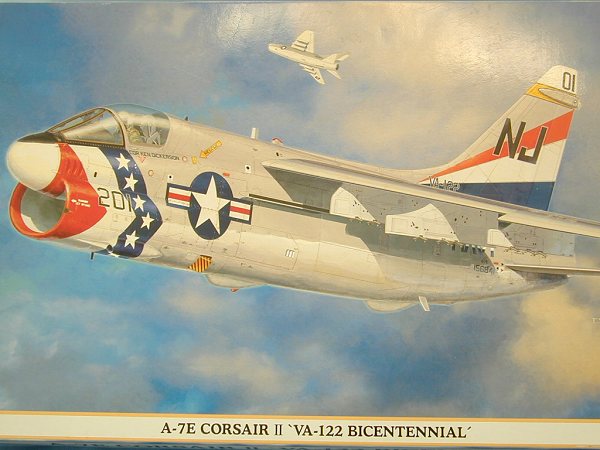
Hasegawa 1/48 A-7E Corsair II
|
KIT # |
9343 |
|
PRICE: |
$39.98 |
|
DECALS: |
One aircraft |
|
REVIEW : |
|
|
NOTES: |
'VA-122 Bicentennial' boxing |
|
HISTORY |
The A-7 Corsair II represented
the last in a long, proud line of naval aircraft to bear the name of the
Vought Aircraft Company. This attack aircraft, affectionately known as the
SLUF (Short Little Ugly,uh. Fellow) to its Air Force caretakers and crew,
enjoyed a long and
distinguished career that started in Vietnam and ended with the Gulf War In the early 1960s, the US Navy was looking for a light attack aircraft
that could replace the A-1 Skyraider and the A-4 Skyhawk. The term "light
attack" is a misnomer, as a significant amount of ordnance carrying capability
was specified in the initial VAX (V – heavier than air, A - attack, X -
experimental) proposal. With storm clouds gathering in southeast Asia, the
Navy felt that VAX aircraft development would take too much time, so a VAL (L
- light) study was authorized, imploring the use of existing technology. Using
knowledge from the F-8 Crusader program, LTV (Ling-Temco-Vought) was able to
design the A-7 quickly using a similar design layout (but no common
components) and was awarded the contract in February 1964 after beating out
two offerings from North American Aviation (one based on the A-4, another on
the FJ-1 Fury) and Grumman (based on the A-6).
 The big issue was speed. The Navy wanted a subsonic aircraft because it
felt that it was more cost effective than supersonic aircraft, and that
excessive speed was not really needed for precision application of ordnance
anyway, as demonstrated by the successful A-1 Skyraider. Instead, the VAL
aircraft would rely on sophistication in ordnance delivery and electronic
countermeasures systems for survivability, a concept that was proved in the
A-7’s long service career, with remarkably low attrition. VA-147 took the A-7A
model of the Corsair to war in September 1967, where it performed very well
with a high rate of readiness. The Air Force took notice, and in a rare step
across service lines (just like it did for the F-4 Phantom II. Ed.),
contracted for its own version of the A-7, to be known as the D model. The Air
Force addressed complaints about engine power by replacing the F-111 derived
non-afterburning Pratt & Whitney TF30 with an Allison TF41 engine that
increased top speed at sea level by over 100 MPH, although at the expense
giving up over a 1000 miles of range. In addition to the plumbing for the
flying boom refueling system, the Air Force changed the armament from two 20
mm cannon to a single M61A1 Vulcan Gatling-style gun. The Navy jumped on board
the improvement train and designated their version the A-7E, which became the
most numerous variant of the line with 535 aircraft built.
The big issue was speed. The Navy wanted a subsonic aircraft because it
felt that it was more cost effective than supersonic aircraft, and that
excessive speed was not really needed for precision application of ordnance
anyway, as demonstrated by the successful A-1 Skyraider. Instead, the VAL
aircraft would rely on sophistication in ordnance delivery and electronic
countermeasures systems for survivability, a concept that was proved in the
A-7’s long service career, with remarkably low attrition. VA-147 took the A-7A
model of the Corsair to war in September 1967, where it performed very well
with a high rate of readiness. The Air Force took notice, and in a rare step
across service lines (just like it did for the F-4 Phantom II. Ed.),
contracted for its own version of the A-7, to be known as the D model. The Air
Force addressed complaints about engine power by replacing the F-111 derived
non-afterburning Pratt & Whitney TF30 with an Allison TF41 engine that
increased top speed at sea level by over 100 MPH, although at the expense
giving up over a 1000 miles of range. In addition to the plumbing for the
flying boom refueling system, the Air Force changed the armament from two 20
mm cannon to a single M61A1 Vulcan Gatling-style gun. The Navy jumped on board
the improvement train and designated their version the A-7E, which became the
most numerous variant of the line with 535 aircraft built.
A-7s served into the 1990s, where the type was replaced by F/A-18s for the Navy and F-16s for the Air Force. Ironically, it appears that the go-fast proponents finally won the argument, with the replacement of those types slated to go to the new Lockheed Joint Strike Fighter, which also has supersonic cruise capability. Vought Aircraft Industries, Inc. continues to exist today, making components for many civilian and military aircraft. They no longer compete in the prime contractor arena, preferring to let the aerospace behemoths slug it out in that brutal environment. Portugal and Greece both operate export versions of the A-7, where it still flies today.
|
THE KIT |
Scott Van Aken has an excellent preview that can be seen here.
 Hasegawa’s kit, when first released, represented a landmark in jet aircraft
models in this scale. The model has delicate engraved panels lines, numerous
open panels revealing detailed avionics bays, excellent clear parts,
photoetched parts for the external cable conduits, a boarding ladder, a pilot
figure, and a few things to hang under the wings. Two large fuel tanks, a FLIR
pod, two MERs, and two AIM-9E Sidewinder missiles are provided, which is
disappointing for an attack aircraft. This is typical of Hasegawa’s practice
of getting one to purchase the separate weapons sets to fully outfit the
model. The canopy can be built in either the open or closed positions, the
wings can be depicted either folded or extended, and the wing leading edges
and the flaps can also be positioned either up or down. I have inspected
hundreds of photos of A-7s, and there seems to be no hard and fast rule on
what position these surfaces were in when the aircraft was on the ground,
other than to note that the speed brake is never open. For my model, I elected
to depict the wings extended, but the flaps and leading edges in the down
position. I also closed up all the avionics bays, but kept the boarding ladder
and steps open.
Hasegawa’s kit, when first released, represented a landmark in jet aircraft
models in this scale. The model has delicate engraved panels lines, numerous
open panels revealing detailed avionics bays, excellent clear parts,
photoetched parts for the external cable conduits, a boarding ladder, a pilot
figure, and a few things to hang under the wings. Two large fuel tanks, a FLIR
pod, two MERs, and two AIM-9E Sidewinder missiles are provided, which is
disappointing for an attack aircraft. This is typical of Hasegawa’s practice
of getting one to purchase the separate weapons sets to fully outfit the
model. The canopy can be built in either the open or closed positions, the
wings can be depicted either folded or extended, and the wing leading edges
and the flaps can also be positioned either up or down. I have inspected
hundreds of photos of A-7s, and there seems to be no hard and fast rule on
what position these surfaces were in when the aircraft was on the ground,
other than to note that the speed brake is never open. For my model, I elected
to depict the wings extended, but the flaps and leading edges in the down
position. I also closed up all the avionics bays, but kept the boarding ladder
and steps open.
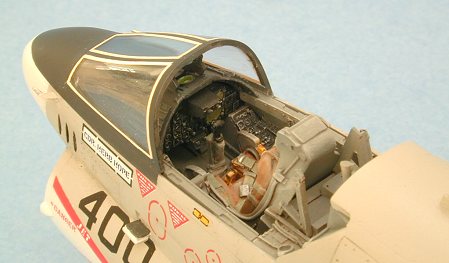
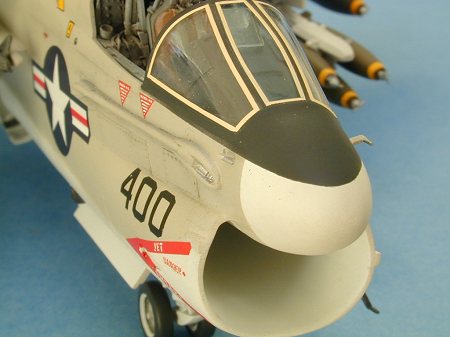
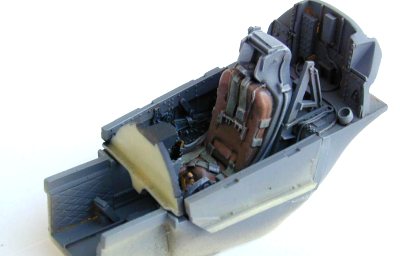 The cockpit is fair in detail, with a decent representation of the SJU-8
ejection seat. Decals are provided for the side consoles and the instrument
panel. The main panel itself is very good and can be drybrushed if you don’t
care for the cartoonish character of instrument decals. Hasegawa even gives
you the rear view mirrors, but they look a little small to my eye. Being a
proponent of resin aftermarket cockpits of modern aircraft, I elected to use
Black Box’s set. It is the nicest that I have ever used, fitting very well
with only one exception: the canopy cannot be positioned open without cutting
the rear canopy shield to make room for the ejection seat rails. It is
possible that I made a mistake when installing the set, but I couldn’t get the
canopy to sit properly without notching the shield piece to make room for the
upright rails and their braces. It really isn’t noticeable, so I don’t
consider it a huge problem.
The cockpit is fair in detail, with a decent representation of the SJU-8
ejection seat. Decals are provided for the side consoles and the instrument
panel. The main panel itself is very good and can be drybrushed if you don’t
care for the cartoonish character of instrument decals. Hasegawa even gives
you the rear view mirrors, but they look a little small to my eye. Being a
proponent of resin aftermarket cockpits of modern aircraft, I elected to use
Black Box’s set. It is the nicest that I have ever used, fitting very well
with only one exception: the canopy cannot be positioned open without cutting
the rear canopy shield to make room for the ejection seat rails. It is
possible that I made a mistake when installing the set, but I couldn’t get the
canopy to sit properly without notching the shield piece to make room for the
upright rails and their braces. It really isn’t noticeable, so I don’t
consider it a huge problem.
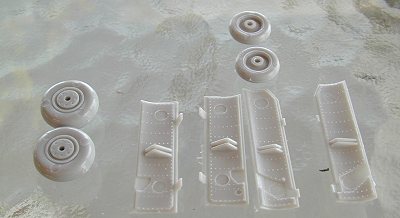 First inspection of the sprues reveals some problem areas. The wheels and
inside surfaces of the wheel well doors have pronounced ejector pin marks that
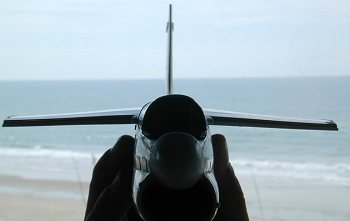
need to be cleaned up. Whenever one looks at an A-7, the eye is instantly
drawn to the huge gaping maw of an air intake in the front, which means that a
lot of gap filling will be needed to insure a seamless intake trunk. Seamless
Suckers makes a resin replacement that you can use, but since I have
experience in such matters (see the Airfix Vulcan review), I chose to do it on
my own. Lastly, the vertical stabilizer on my model was warped and needed to
be gently coaxed back into position with a dip in very hot water.
First inspection of the sprues reveals some problem areas. The wheels and
inside surfaces of the wheel well doors have pronounced ejector pin marks that
need to be cleaned up. Whenever one looks at an A-7, the eye is instantly
drawn to the huge gaping maw of an air intake in the front, which means that a
lot of gap filling will be needed to insure a seamless intake trunk. Seamless
Suckers makes a resin replacement that you can use, but since I have
experience in such matters (see the Airfix Vulcan review), I chose to do it on
my own. Lastly, the vertical stabilizer on my model was warped and needed to
be gently coaxed back into position with a dip in very hot water.
When I first started to get serious about modeling as a teenager, I was
introduced to the Challenge Publication’s magazine Scale Modeler. I’ll
never forget the issue I saw that had a photo spread of a 1/72 scale A-7E (Airfix,
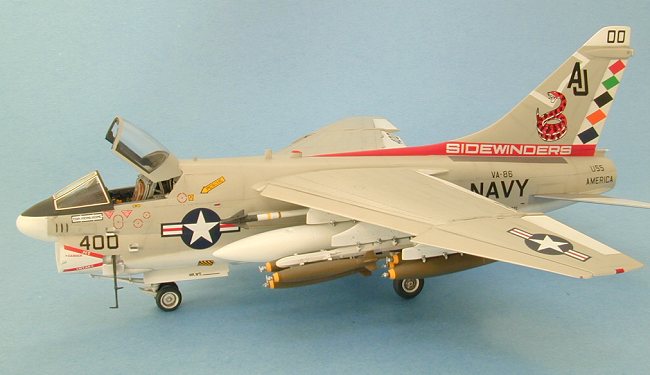
maybe?) done up as the CAG bird of VA-86 "Sidewinders", serving aboard the USS
America in 1972. As an impressionable youth, I was t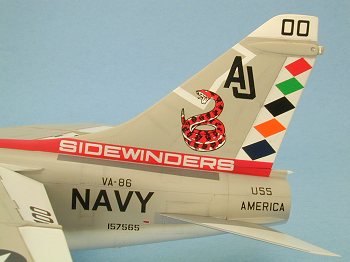 ransfixed by the beauty of
the model and made a resolution to do one myself, which I did. I felt that
model, which is now long gone, was the finest job I had ever done in my short
career. It was the first time I vacuformed my own canopy, using a real Mattel
machine that my modeling buddy and I bought together. It was also the first
time I used an aftermarket decal sheet from Micro Scale, and I was mightily
impressed. I even made my own "remove before flight" tags from masking tape
and glued them on the model. I was very proud of my efforts, and built several
more colorful A-7s before going on a twelve year hiatus to take care of less
important things like a college education, the start of a career, courtship
and marriage, and starting a family. Imagine my pleasure when I stumbled
across an old Micro Scale decal sheet 48-94 that a vendor was selling at a
contest that had the exact same markings for the VA-86 aircraft, only this
time in 1/48 scale! I eagerly grabbed it and began a three-year wait for
Hasegawa to re-release the A-7E kit again. Earlier this year, my wishes were
answered and I was able to take an updated stroll down memory lane.
ransfixed by the beauty of
the model and made a resolution to do one myself, which I did. I felt that
model, which is now long gone, was the finest job I had ever done in my short
career. It was the first time I vacuformed my own canopy, using a real Mattel
machine that my modeling buddy and I bought together. It was also the first
time I used an aftermarket decal sheet from Micro Scale, and I was mightily
impressed. I even made my own "remove before flight" tags from masking tape
and glued them on the model. I was very proud of my efforts, and built several
more colorful A-7s before going on a twelve year hiatus to take care of less
important things like a college education, the start of a career, courtship
and marriage, and starting a family. Imagine my pleasure when I stumbled
across an old Micro Scale decal sheet 48-94 that a vendor was selling at a
contest that had the exact same markings for the VA-86 aircraft, only this
time in 1/48 scale! I eagerly grabbed it and began a three-year wait for
Hasegawa to re-release the A-7E kit again. Earlier this year, my wishes were
answered and I was able to take an updated stroll down memory lane.
|
CONSTRUCTION |
 As with most modern jets, things start with the cockpit. I followed the
Black Box instructions and removed all the sidewall detail from the fuselage
halves. The resin pieces were painted in Dark Gull Gray FS36231, with a
semi-gloss black instrument panel and consoles. The instruments and switches
themselves were picked out with a white Berol colored pencil, and a drop of
Micro Crystal Clear was placed on each dial to simulate the glass front. Light
green paint was used to simulate the look of a radar screen in the off
position. The ejection seat was also painted Dark Gull Gray with khaki
cushions and greenish gray harnesses. A dark gray wash was applied to all the
crevices and a final drybrushing with light gray brought the highlights out.
The cockpit was glued into the fuselage half along with the intake trunking
and the engine exhaust. I didn’t need to add any weight to the nose area. The
fuselage was glued together and the
As with most modern jets, things start with the cockpit. I followed the
Black Box instructions and removed all the sidewall detail from the fuselage
halves. The resin pieces were painted in Dark Gull Gray FS36231, with a
semi-gloss black instrument panel and consoles. The instruments and switches
themselves were picked out with a white Berol colored pencil, and a drop of
Micro Crystal Clear was placed on each dial to simulate the glass front. Light
green paint was used to simulate the look of a radar screen in the off
position. The ejection seat was also painted Dark Gull Gray with khaki
cushions and greenish gray harnesses. A dark gray wash was applied to all the
crevices and a final drybrushing with light gray brought the highlights out.
The cockpit was glued into the fuselage half along with the intake trunking
and the engine exhaust. I didn’t need to add any weight to the nose area. The
fuselage was glued together and the
 seams were attended to with CA glue and
judicious sanding. I spent several hours on the intake trunk, dabbing the
seams with CA glue, applying accelerator, and sanding with wet-or-dry
sandpaper wrapped around various tool handles of the appropriate shape. It
took several iterations, but I finally got a smooth intake that would stand up
to close inspection.
seams were attended to with CA glue and
judicious sanding. I spent several hours on the intake trunk, dabbing the
seams with CA glue, applying accelerator, and sanding with wet-or-dry
sandpaper wrapped around various tool handles of the appropriate shape. It
took several iterations, but I finally got a smooth intake that would stand up
to close inspection.
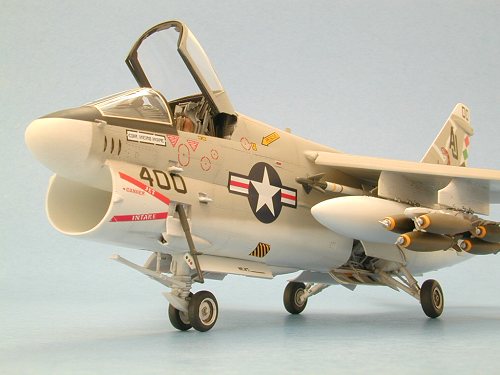
Turning my attention to the exterior, I glued all the avionics bay doors and the speed brake closed. My personal preference is to depict my models looking like they are ready for the pilot to climb on board and fly off on another dangerous mission. This means boarding ladders are still attached, weapons are loaded, FOD covers removed, and the canopy open. This also means that the access panels are all closed. Unfortunately, the panels don’t fit very well, so I had to fill the gaps and rescribe later. The speed brake was especially troublesome, and I wondered why Hasegawa bothered to even provide one, as it can’t be deployed when the aircraft is on the ground.
 The outer wing pieces were glued together and red and green colored styrene
pieces were inserted into cutouts made for the navigation lights. Note that
the A-7 had two lights on each wing, one on the leading edge flap, and a
larger one in the middle of the wingtip. The colored pieces were sanded to
shape and polished with a tri-grit sanding stick to return their clarity. I
glued the inner wing assembly together and then attached it to the fuselage
and filled the resulting seams. I then glued on the outer wing sections in the
open position, paying careful attention to maintaining the proper incidence
angle. The joint required a spot or two of CA glue to fill gaps that were
larger than desired. I chose to position both the wing leading edge and
trailing edge flaps in the down position, so they were glued on. The fit of
these is a little sloppy, requiring some amount of fiddling and attention to
unrealistic gaps. The stores pylons were then glued onto each wing, along with
three sway braces for each pylon. Missile pylons were also glued to the both
sides of the fuselage. It appears that early A-7s had these pylons attached
most of the time, but late in life the pylons became less frequently mounted.
The outer wing pieces were glued together and red and green colored styrene
pieces were inserted into cutouts made for the navigation lights. Note that
the A-7 had two lights on each wing, one on the leading edge flap, and a
larger one in the middle of the wingtip. The colored pieces were sanded to
shape and polished with a tri-grit sanding stick to return their clarity. I
glued the inner wing assembly together and then attached it to the fuselage
and filled the resulting seams. I then glued on the outer wing sections in the
open position, paying careful attention to maintaining the proper incidence
angle. The joint required a spot or two of CA glue to fill gaps that were
larger than desired. I chose to position both the wing leading edge and
trailing edge flaps in the down position, so they were glued on. The fit of
these is a little sloppy, requiring some amount of fiddling and attention to
unrealistic gaps. The stores pylons were then glued onto each wing, along with
three sway braces for each pylon. Missile pylons were also glued to the both
sides of the fuselage. It appears that early A-7s had these pylons attached
most of the time, but late in life the pylons became less frequently mounted.
I turned my attention to the wheel wells by cleaning up the landing gear struts and wheels and doors. Each bay is nicely detailed. I drilled three small holes in the front of the port nosewheel door to simulate the approach indicator lights. From top to bottom I put a drop of green, yellow, and red paint in the respective holes and topped them off with another drop of Micro Crystal Clear. The main struts were glued in. Spend some quality time with this step, as very slight misalignments in the angles of the landing gear will have a very noticeable affect on how the model sits, which is a major point of inspection for judges in model competitions, if you’re into that sort of thing. During handling of the model, I broke off the nosewheel attachment points on the strut and had to replacement them a short length of cut paper clip.
The windscreen was dipped in Future and tinted with Testor Acryl Clear Blue by spraying a very light coat on the inside of the front panel. It was then glued to the model and was blended into the lines of the fuselage with CA glue and more sanding and polishing with a tri-grit stick to restore clarity to those areas that were accidentally scratched in the process.
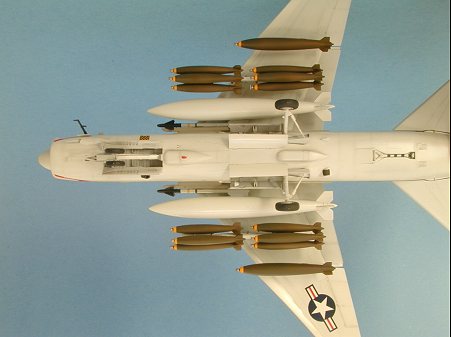
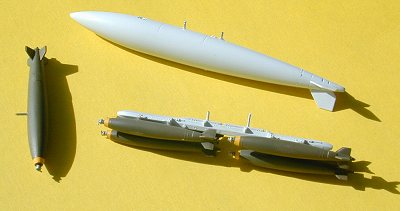
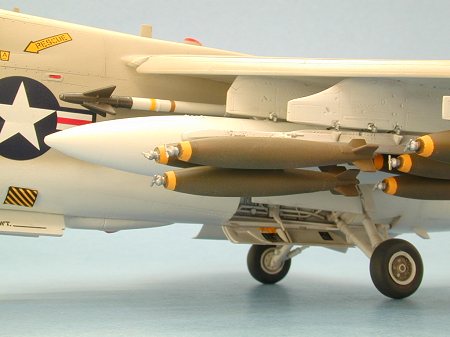 For ordnance, I assembled the two large fuel tanks, and cleaned up the
AIM-9E Sidewinder missiles and the MERs (Multi Ejector Racks). I selected a
dozen 500 lb Mk 82 and two 1000 lb Mk 83 LDGP (Low Drag General Purpose) bombs
from Hasegawa Weapons Set A, as I wanted to depict my aircraft with a typical
load for a Linebacker II mission in 1972. My bombs are smooth, but note that
Navy bombs beginning in the late 1970s have a rough texture, consisting of a
special fire-resistant coating to prevent them from "cooking off" in case of
an on-board fire, a lesson painfully learned with the inferno aboard the USS
Forrestal in 1967.
For ordnance, I assembled the two large fuel tanks, and cleaned up the
AIM-9E Sidewinder missiles and the MERs (Multi Ejector Racks). I selected a
dozen 500 lb Mk 82 and two 1000 lb Mk 83 LDGP (Low Drag General Purpose) bombs
from Hasegawa Weapons Set A, as I wanted to depict my aircraft with a typical
load for a Linebacker II mission in 1972. My bombs are smooth, but note that
Navy bombs beginning in the late 1970s have a rough texture, consisting of a
special fire-resistant coating to prevent them from "cooking off" in case of
an on-board fire, a lesson painfully learned with the inferno aboard the USS
Forrestal in 1967.
The kit has very fine panel lines, with less depth than usually found on engraved injection-molded kits. I debated whether to deepen them so that they could accept a wash, but I deferred to my ham-fisted nature with scribing and left them alone. I rescribed any lines obliterated in the seam filling process using the back of an X-acto knife blade, using Dymo label tape as a guide. The model was given a good cleaning with dishwashing soap and warm water and allowed to air dry. Then it was time for paint.
|
PAINT & DECALS |
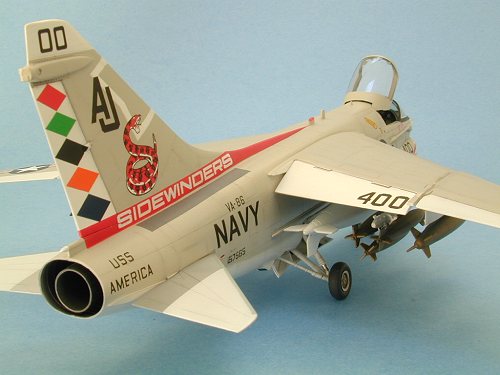
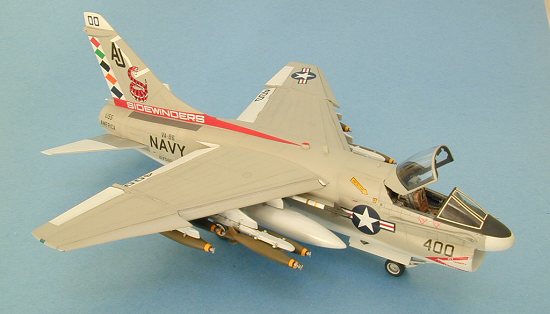 The old Micro Scale decals in this scale were undoubtedly designed for the
Monogram kit, which was a reworking of the ancient Aurora kit. I was concerned
about the fit of several markings, including the long red "Sidewinders" band
at the base of the vertical stabilizer. I decided to paint the band on the
model with Testors Acryl Insignia Red, and only applied the lettering of the
word "Sidewinders" as a decal. It worked out just fine, with the red field
behind the letters blending perfectly with the red paint. The rest of the
decals went on just as delightfully as I remembered from twenty-seven years
ago, a grand testament to the quality of the products produced by the Krasel
brothers. I don’t know when the sheet I used was originally printed, but it
certainly was more than a decade ago, and just might be closer to two. Of
course I had to deal with the usual poor placement instructions, a Super Scale
failing. To my consternation, I discovered that sheet didn’t include the large
"NAVY" markings for the aft sides of the fuselage. A search of my decal stash
came up empty, so I made some new markings using my computer and laser
printer. Fiddling around with fonts and letter sizes, I came up with a good
match and printed the markings onto blank decal paper. A quick coat of Micro
Superfilm sealed the lettering and the decals were on the model just a few
minutes later.
The old Micro Scale decals in this scale were undoubtedly designed for the
Monogram kit, which was a reworking of the ancient Aurora kit. I was concerned
about the fit of several markings, including the long red "Sidewinders" band
at the base of the vertical stabilizer. I decided to paint the band on the
model with Testors Acryl Insignia Red, and only applied the lettering of the
word "Sidewinders" as a decal. It worked out just fine, with the red field
behind the letters blending perfectly with the red paint. The rest of the
decals went on just as delightfully as I remembered from twenty-seven years
ago, a grand testament to the quality of the products produced by the Krasel
brothers. I don’t know when the sheet I used was originally printed, but it
certainly was more than a decade ago, and just might be closer to two. Of
course I had to deal with the usual poor placement instructions, a Super Scale
failing. To my consternation, I discovered that sheet didn’t include the large
"NAVY" markings for the aft sides of the fuselage. A search of my decal stash
came up empty, so I made some new markings using my computer and laser
printer. Fiddling around with fonts and letter sizes, I came up with a good
match and printed the markings onto blank decal paper. A quick coat of Micro
Superfilm sealed the lettering and the decals were on the model just a few
minutes later.
The part of the fuselage where the stabilators move up and down is unpainted, so I used cut wedges from a piece of solid color aluminum decal sheet to simulate this instead of using paint. Thanks here go to modeling buddy Caz Dalton for introducing me to these useful accessories from the model-railroading world. I used very thin strips of clear decal that I painted a creamy yellowish-white to simulate the fiberglass reinforcing strips around the clear panels of the windscreen.
I hand-painted the tires with a dark gray and had quite a bit of difficulty getting a crisp demarcation line around the twin nosewheels. I looked at on-line pictures of completed Hasegawa A-7s and noticed that other modelers had the same problem I did. The lip between the tire and the rim is not very pronounced and it is easy to slop paint into areas where you don’t want it to go. A mask might be a better way to do it next time.
 The AIM-9E Sidewinders were painted gloss white with a dark gray seeker
head and steel rollerons. Decal strips were used to replicate the yellow and
brown stripes. The fourteen bombs were painted with yellow noses first, masked
off, and then painted with Polly Scale Olive Drab. The fuse assemblies were
hand-painted with Metalizer Steel.
The AIM-9E Sidewinders were painted gloss white with a dark gray seeker
head and steel rollerons. Decal strips were used to replicate the yellow and
brown stripes. The fourteen bombs were painted with yellow noses first, masked
off, and then painted with Polly Scale Olive Drab. The fuse assemblies were
hand-painted with Metalizer Steel.
After another coat of Future to seal the decals, it was time to weather the model. Knowing that a CAG commander’s aircraft ("double nuts") would receive extra attention from the maintenance crew, I was very light-handed in my approach. I applied a dark gray wash in the wheel well bays and the wheels to highlight the detail there. Since the panel lines on the kit are so shallow, I only used the wash in the control surface separation lines. The rest of the panel lines where highlighted very subtly by using gray pastel chalk applied with a small, stiff brush. I’m quite please at how well it turned out.
I sprayed a 50/50 mix of Polly Scale clear flat and semi-gloss clear acrylic on the sides and top of the fuselage to simulate the dulling of the camouflage as mentioned above. The tops of the wings received a heavier flat coat, reflective of the withering effect of the tropical sun.
I spent a lot of time working on the ordnance, especially attaching the 500 lb bombs to the two MERs. At first I used CA glue to attach each one, but the problem with that is the slightest accidental knock will send the bomb skittering away off the MER and insure a blue streak of profanity from the bereaved modeler. Enter master modeler David Aungst, who e-mailed me a tutorial on how to attach the bombs using short pins made of brass wire. I tore all the bombs off, cleaned them up, and drilled two small holes in the MER attachment point and in each bomb, which I filled with the wire and a tiny drop of CA glue. It was simple, effective, and strong.
In looking at all the photos of A-7s, it was remarkable how few of them show the aircraft loaded with any ordnance at all. This is kind of surprising, considering how many different weapons the SLUF was capable of carrying. The few combat photos I found from both Vietnam and Desert Storm show the A-7 carrying Sidewinders, so I glued them to their respective launch rails, again with a piece of stiff wire as a foundation.
 Working on the same principle of strength through metal, I glued the MERs
themselves to the pylons by inserting a length of cut paper clip between the
two. This was also done for the fuel tanks and the larger Mk 83 bombs. This
gives great stability to the joint and insures correct alignment. If you are
careful in drilling the holes slightly off from perpendicular (a Roger Jackson
tip), you won’t even need any glue as the parts stay on the model with a
friction fit.
Working on the same principle of strength through metal, I glued the MERs
themselves to the pylons by inserting a length of cut paper clip between the
two. This was also done for the fuel tanks and the larger Mk 83 bombs. This
gives great stability to the joint and insures correct alignment. If you are
careful in drilling the holes slightly off from perpendicular (a Roger Jackson
tip), you won’t even need any glue as the parts stay on the model with a
friction fit.
Little things were attended to in the final stages of the project. I scratchbuilt new rear view mirrors and attached them to the inside of the canopy. I made an anti-collision beacon light from clear read styrene and glued it on top of the fuselage. The A-7 had red formation lights in four positions on the fuselage sides, so I dropped a tiny bit of silver paint in each, followed by another tiny drop of Testors Acryl Clear Red paint. I scratchbuilt pitot tubes for each side of the nose (translation: I lost the ones provided in the kit) and attached them. The stabilators were glued on in the at-rest position most often seen in photographs. Like the flaps, there is variation here, too. As mentioned above, it took some judicious cutting of the rear canopy shield to get the canopy posed in the open position. The boarding ladder was the final piece of the puzzle, and my wonderful A-7E model was complete. The clock stopped at just over 75 hours worth of work, a lot of that taken with ordnance activity. It happens when you delve into the world of modern attack aircraft.
|
CONCLUSIONS |
|
REFERENCES |
Kinzey, Bert: A-7 Corsair II In Detail and Scale, volume 22
Kinzey, Bert, and Leader, Ray: Colors and Markings of the A-7 Corsair II, volume 2, Pacific Coast Squadrons
Bar, Dennis: A Carrier at War, 1972 - www.vwam.com/vets/carrierwar/carrierwar.html
Vought Aircraft Industries, Inc. – www.vought.com
Aungst, David: e-mail conversations about attaching
Copyright ModelingMadness.com
If you would like your product reviewed fairly and fairly quickly, please contact the editor or see other details in the Note to Contributors.