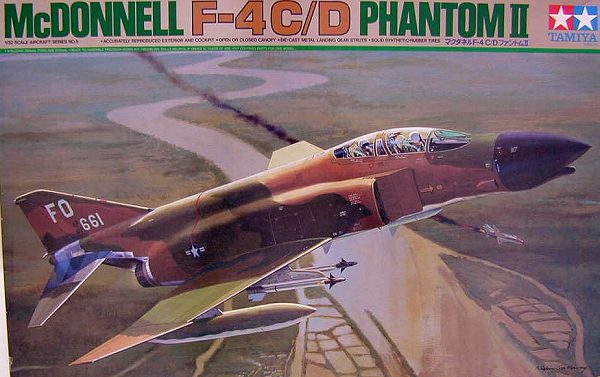
Tamiya 1/32 F-4C/D Phantom II
|
KIT: |
Tamiya 1/32 F-4C/D Phantom II |
|
KIT # |
60305 |
|
PRICE: |
$115.00 |
|
DECALS: |
Three aircraft |
|
REVIEW & |
|
|
NOTES: |
Cutting Edge resin fuel tank and Mk 117 bombs, TAC Scale Dynamics resin MB Mk 7 ejection seats, Reheat resin FOD covers, Decals by Fox One` |
|
HISTORY |
The McDonnell Douglas F-4 Phantom II is the second most successful western jet fighter aircraft ever made (the F-86 Sabre being number one) with over 5,000 units built and hundreds still flying today, more than forty years after its introduction as a US Navy fleet defense fighter. Over the years there is surprisingly little that the Phantom hasn’t done, expanding from its initial design point to become an air superiority fighter, a ground attack aircraft, a tactical nuclear bomber, a Wild Weasel anti-radar attack vehicle, a capable reconnaissance platform, a target drone, and the mount of both the Thunderbirds and Blue Angels acrobatic teams. It is somewhat ironic to note that while Secretary of Defense Robert McNamara was desperately striving to introduce hardware commonality between the competing branches of service, he had the platform to do it in the big F-4, rather than the much-maligned F-111. The Phantom came as close to realizing the potential of the concept as was possible for the time.
The F-4C model represented the Air Force’s admittance that the Navy’s fighter
was superior to the other Century Series aircraft in its inventory. After a
fly-off between the F-106A and the then-designated F-110 demonstrated that the
Phantom was the more versatile aircraft, an order was placed with McDonnell
Douglas for a version built to Air Force specifications. This meant larger,
lower pressure tires (which gave a
 resulting bump in the wing to accommodate
them in the enlarged wheel well), anti-skid brakes, a complete set of flying
instruments for the rear cockpit, different electronics, and plumbing for the
Air Force’s flying boom aerial fueling system to replace the Navy
probe-and-drogue hardware. Retained from the Navy F4H-1 (renamed the F-4B during
McNamara’s crusade for simplification of nomenclature in 1962) were the arrestor
hook, the folding wings, and the catapult attachment points.
resulting bump in the wing to accommodate
them in the enlarged wheel well), anti-skid brakes, a complete set of flying
instruments for the rear cockpit, different electronics, and plumbing for the
Air Force’s flying boom aerial fueling system to replace the Navy
probe-and-drogue hardware. Retained from the Navy F4H-1 (renamed the F-4B during
McNamara’s crusade for simplification of nomenclature in 1962) were the arrestor
hook, the folding wings, and the catapult attachment points.
The new Phantom was quickly deployed to the conflict in South East Asia and became the main instrument of choice for aerial operations. As the F-105 Thunderchief suffered from appalling attrition in the brutal air-to-ground mission, the capable F-4 began to take on more and more of the responsibilities. The success of the Phantom led to further orders for the Air Force, and several models, notably the E and G, went on to provide front line service for the next three decades.
One remarkable story of an incident over North Vietnam dramatically illustrates the resourcefulness that the aircrews demonstrated while flying their beloved fighter jet. Known as "Pardo’s Push", the tale is one of a desperate effort to escape certain captivity by two crippled F-4Cs on March 10, 1967 after a raid on the steel factory at Thai Nguyen, just north of Hanoi. Call sign Cheetah 04 was assigned to a F-4C flown by Earl Aman and Cheetah 03 to another F-4C, serial number 64-0839, flown by Bob Pardo, both of the 433 TFS based in Ubon, Thailand. Both were hit by anti-aircraft fire during their bombing runs. Aman’s aircraft was hit the worst, with 5,000 pounds of jet fuel pouring out of gaping holes in the fuel tanks in less than a minute. It was clear that Aman and his crewmate Robert Houghton would have to eject over hostile enemy territory, facing sure capture or even death. Captain Pardo had an idea: he would use his aircraft to push Aman’s out of North Vietnam towards the border of neutral Laos and let Aman and Houghton punch out there! At first, Pardo attempted to nudge the stricken aircraft with the nose of his Phantom by placing it against the rear parachute pack housing of Aman’s F-4. The vortices coming off the lead aircraft made it impossible to stay connected. Next, Pardo flew underneath Aman and tried to lift the aircraft with the spine of his. That was unsatisfactory, so Pardo asked Aman to drop his arrestor hook. He then maneuvered his aircraft behind Aman’s so that the hook was planted on the windscreen of Pardo’s Phantom. The exhaust from Aman’s engines prevented continuous contact, so Pardo had Aman shut them down. This helped a bit. Powered only by the engines of Pardo’s F-4, the two aircraft droned on towards Laos. The hook slipped off the one-inch thick glass of the windscreen over a dozen times, and Pardo had to back off and re-engage as gingerly as possible, praying that a mistake wouldn’t send the hook crashing through the windscreen and directly into his face. Cracks started to appear in the glass, so Pardo concentrated on using the lower metal portion of the windscreen frame as his leverage point. As improbable as it sounds, the glide ratio was increasing and prospects were looking good for success. That is, until an engine fire light came on in Pardo’s aircraft, which immediately caused him to shut down the left J-79. On restart, the fire light went off, but the engine’s internal temperature had soared to 1000 degrees Celsius, instead of the normal 600. Pardo had no recourse but to shut down the engine for good, and tried to keep both aircraft aloft with only one good turbojet.
 Down to 6000 feet and only two minutes of flying time, the two aircraft
disengaged and Aman and Houghton ejected over Laos. They floated down towards a
small village, where the natives were preparing a hostile reception. Houghton
suffered a compression fracture of a vertebra in his back when he ejected, but
still hit the ground running as fast as he could to escape the gunshots that
were aimed in his direction. Search and Rescue helicopters supported by A-1
Skyraiders found and rescued both he and Aman. Meanwhile, Pardo and his crewman,
Lt. Steve Wayne, also hit the silk as their aircraft ran out of fuel before they
could get to the circling tankers, and were rescued as well.
Down to 6000 feet and only two minutes of flying time, the two aircraft
disengaged and Aman and Houghton ejected over Laos. They floated down towards a
small village, where the natives were preparing a hostile reception. Houghton
suffered a compression fracture of a vertebra in his back when he ejected, but
still hit the ground running as fast as he could to escape the gunshots that
were aimed in his direction. Search and Rescue helicopters supported by A-1
Skyraiders found and rescued both he and Aman. Meanwhile, Pardo and his crewman,
Lt. Steve Wayne, also hit the silk as their aircraft ran out of fuel before they
could get to the circling tankers, and were rescued as well.
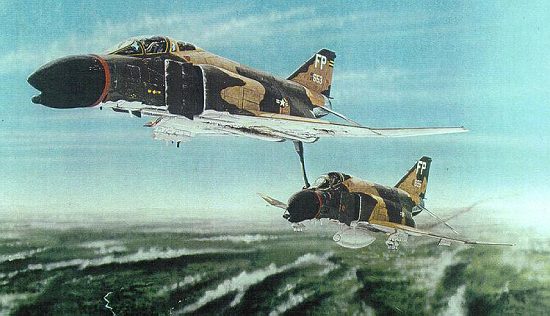
Back at Ubon, the four officers met joyously, then endured a frosty reception by their commanders, who were unsure whether to court-martial Pardo for the stunt that resulted in the loss of an aircraft that probably could have made it back to the base safely. After extensive deliberation, nothing happened. Only through pressure from Senator John Tower two decades later did Pardo and Aman both receive the Silver Star for their heroic bravery and airmanship. Earl Aman contracted Lou Gehrig’s disease in his later life, and Bob Pardo was a champion for his cause until Aman’s death in 1998. Combat artist Steve Ferguson also immortalized the mission in a painting he did to help raise funds for Earl Aman’s affliction.
|
THE KIT |
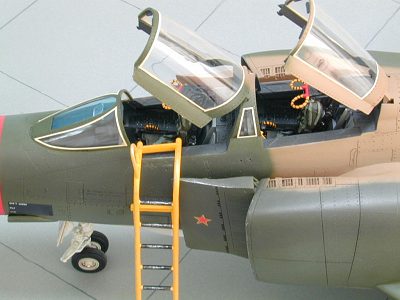
Released in 1995, The Tamiya F-4C/D Phantom II kit created quite a buzz in the modeling world and promised to be the finest example of molding technology ever produced. New techniques give the modeler a remarkable one-piece seamless fuselage, dispensing with the usual left/right engineering of most kits. Molded in light gray plastic, the modeler gets a big, sturdy box to hold the contents, which also includes crystal clear canopy pieces, metal landing gear (with styrene surrounds), and synthetic rubber tires. The major subassemblies are held together with small screws, and Tamiya thoughtfully supplies a tiny screwdriver to drive them. One has the choice of either making an F-4C or an F-4D, which also includes the relatively rare LORAN "towel rack" antenna on the spine. The supplied weapons are of high quality, with Mk 82 LDGP bombs both with and without the "daisy cutter" extended fuse, AIM-9E Sidewinders, AIM-7E Sparrows, and two ALQ-87 ECM pods being provided. Two 370-gallon fuel tanks, two MERs, and two TERS are also included. The only thing really missing is a 600-gallon centerline fuel tank.
 The cockpit is nicely detailed, as are the ejection seats. Unfortunately no
harnesses, either in photo-etch or decals, are provided. Some of the instruments
are represented by decals that are applied to the back of clear styrene panels
and look convincing. The rear stabilator moves, and the airbrakes can be built
either open or closed. Two crew figures are included, as well as a boarding
ladder. The kit decals are made by Scale Master, and include markings for three
aircraft, including Colonel Robin Olds’ Scat XXVII. Typical of Tamiya,
the US star and bar markings are printed in blue-black, instead of the proper US
Insignia Blue.
The cockpit is nicely detailed, as are the ejection seats. Unfortunately no
harnesses, either in photo-etch or decals, are provided. Some of the instruments
are represented by decals that are applied to the back of clear styrene panels
and look convincing. The rear stabilator moves, and the airbrakes can be built
either open or closed. Two crew figures are included, as well as a boarding
ladder. The kit decals are made by Scale Master, and include markings for three
aircraft, including Colonel Robin Olds’ Scat XXVII. Typical of Tamiya,
the US star and bar markings are printed in blue-black, instead of the proper US
Insignia Blue.
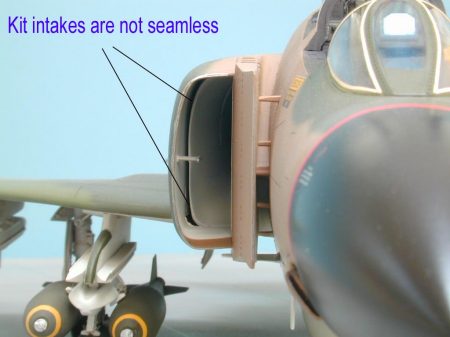
Some trouble spots are immediately evident. The first involves the
engineering of the air intake trunks. Tamiya does nothing to avoid large and
unrealistic seams from being very evident about three inches inside each of the
two intakes, and the modeler cannot do anything about them, other than purchase
the clever Cutting Edge resin replacement pieces for $15. Another problem is
seen in the length of both of the air scoops on either side of the lower nose of
the aircraft – they’re much too long in that they extend past the start of the
radome. Cutting off about a quarter of an inch (6 mm) from the front of each
scoop will quickly fix this. A third problem involves the angle of the outer
wing panels. On the F-4, the panels have a dihedral angle of 12.5 degrees. If
you glue on the outer wing panels as Tamiya engineered them, you will realize an
angle of at least 25 degrees, which is quite noticeably wrong. Careful sanding
of the joint and the outer wing panel is needed to bring everything back into
proper 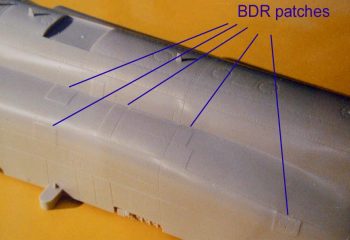 alignment. The last and perhaps most visible problem is the presence of
lots of raised strengthening patches all over the skin of the fuselage and the
wings. As the legend goes, Tamiya used a BDR (Battle Damage Repair) aircraft
frame based at Kadena Air Force Base in Okinawa to do all its measurements for
the kit and faithfully reproduced the BDR patches. Whether it is true or not,
the patches need to be sanded off and the panel lines rescribed. It is
especially bad on the rear portions of the fuselage.
alignment. The last and perhaps most visible problem is the presence of
lots of raised strengthening patches all over the skin of the fuselage and the
wings. As the legend goes, Tamiya used a BDR (Battle Damage Repair) aircraft
frame based at Kadena Air Force Base in Okinawa to do all its measurements for
the kit and faithfully reproduced the BDR patches. Whether it is true or not,
the patches need to be sanded off and the panel lines rescribed. It is
especially bad on the rear portions of the fuselage.
I had dreamed of owning this kit ever since its release, and good fortune coincided with my attendance at a grand opening of a local Hobbytown USA store. At the event, the owner handed me a 50%-off coupon, good for any model kit in the store. Any kit, I asked innocently? Any, came the reply. So I skipped (maybe even ran) to the plastics isle and grabbed the Tamiya kit off the top shelf and proudly purchased it for only $50. I was one happy camper.
Of course, it promptly sat in my "to build" pile for another two years before I had the nerve to begin the project. I knew that I wanted to do Captain Bob Pardo’s aircraft Cheetah 04, but I knew that I would need to get some more items from the aftermarket. Using the outstanding Fox One decal sheet as a reference, I ordered a bunch of things from Meteor Productions. I got resin replacement ejection seats so that I would have the needed seat harnesses, FOD covers to hide the intake trunks (they were cheaper and much less difficult to install than the replacement intake set), eight 750 LB Mk 117 resin bombs (I only needed six, but alas, they come in packs of four), and a resin 600 Gallon centerline tank. The fuel tank is not totally accurate, as the F-4C had a tank of slightly different shape than the one that Cutting Edge makes (called a "high speed" tank that is also used on F-15s). But the difference isn’t that noticeable, and I avoided buying an entire Revell RF-4C kit just for its centerline fuel tank parts.
Armed with enough stuff to easily double the original $50 purchase price (a true sign of AMS), I sat down to begin construction. It was at this point that I discovered that this kit, for all of its wonderful technology, would be a real challenge to build well. For the investment I made, I wanted to make sure that I would have a finished model that I could be proud of. Because of my desire to do well, I became somewhat intimidated by the kit, and it languished in the closet for a few more months. I started to wonder whether I really wanted to do it or not. Some may remember these fears when they were outlined in a Modeler’s Musings column. That piece triggered a lot of words of encouragement from other modelers (like Ronnie Murray, James McFarland, and Tom Cleaver), so I decided to take the plunge and begin the odyssey.
|
CONSTRUCTION |
 I started, of course, with the cockpit. First I painted the pieces in overall
Dark Dull Gray, FS36231. I painted each side panel in Scale Black and picked out
the little knobs and buttons with a white Berol colored pencil. On the
instrument panels, some of the larger gauges are provided in decal form, which
you apply from behind under a clear styrene insert. This worked quite well and
looks sharp. I applied a wash to the recessed areas and did a little drybrushing
to pop out the highlights. All of the smaller gauges were given a drop of Micro
Crystal Clear to simulate the glass of the dial. I replaced the kit ejection
seats with resin ones from TAC Scale Dynamics, which were painted flat black
with dark green cushions and pale greenish-gray harnesses. The prominent
ejection grab handles were painted yellow and thin black stripes were created
with a fine point black Sharpie marker. I find that the marker gives me much
more control than using a tiny paintbrush. The completed cockpit was then
screwed into the one-piece fuselage section.
I started, of course, with the cockpit. First I painted the pieces in overall
Dark Dull Gray, FS36231. I painted each side panel in Scale Black and picked out
the little knobs and buttons with a white Berol colored pencil. On the
instrument panels, some of the larger gauges are provided in decal form, which
you apply from behind under a clear styrene insert. This worked quite well and
looks sharp. I applied a wash to the recessed areas and did a little drybrushing
to pop out the highlights. All of the smaller gauges were given a drop of Micro
Crystal Clear to simulate the glass of the dial. I replaced the kit ejection
seats with resin ones from TAC Scale Dynamics, which were painted flat black
with dark green cushions and pale greenish-gray harnesses. The prominent
ejection grab handles were painted yellow and thin black stripes were created
with a fine point black Sharpie marker. I find that the marker gives me much
more control than using a tiny paintbrush. The completed cockpit was then
screwed into the one-piece fuselage section.
 Lots of sanding was necessary to get rid of all those irritating raised BDR
patches on the fuselage and wings. According to the wonderful research done by
the guys at Fox One, the F-4C that I was doing did not have the triangular
reinforcement patches on the stabilators, so those were removed as well. Moving
on to the air intakes, I got depressed when I saw how much work would be
necessary just to remove the seams on the deepest sections of the trunks. I did
the best I could using thick CA glue and creative sanding tools. I know that I
had the choice of hiding everything with FOD covers, but I wanted to see what I
could do before I exercised that option. Everything was painted in semi-gloss
white before the trunks were glued to the fuselage. I also painted camouflage
colors on the inside lip of the two outer intake pieces. According to discussion
board posts by F-4 crew chiefs, the external color wrapped around the lip of the
intake to a point three feet back. I masked this off and painted the TAC Tan and
Dark Green for each respective side before attaching the pieces to the fuselage.
One thing that I didn’t do, and had to do inconveniently later, was fill the
seams on the backside of the air splitter plates. These are quite visible so
don’t forget to attend to them when it’s much easier to do so. The seams created
between the fuselage and the external intake pieces were quite prominent and
required a lot of work to eliminate.
Lots of sanding was necessary to get rid of all those irritating raised BDR
patches on the fuselage and wings. According to the wonderful research done by
the guys at Fox One, the F-4C that I was doing did not have the triangular
reinforcement patches on the stabilators, so those were removed as well. Moving
on to the air intakes, I got depressed when I saw how much work would be
necessary just to remove the seams on the deepest sections of the trunks. I did
the best I could using thick CA glue and creative sanding tools. I know that I
had the choice of hiding everything with FOD covers, but I wanted to see what I
could do before I exercised that option. Everything was painted in semi-gloss
white before the trunks were glued to the fuselage. I also painted camouflage
colors on the inside lip of the two outer intake pieces. According to discussion
board posts by F-4 crew chiefs, the external color wrapped around the lip of the
intake to a point three feet back. I masked this off and painted the TAC Tan and
Dark Green for each respective side before attaching the pieces to the fuselage.
One thing that I didn’t do, and had to do inconveniently later, was fill the
seams on the backside of the air splitter plates. These are quite visible so
don’t forget to attend to them when it’s much easier to do so. The seams created
between the fuselage and the external intake pieces were quite prominent and
required a lot of work to eliminate.
The exhausts were tackled next. The main afterburner pipe assembly has many ejector pin marks, as well as visible seams that have to be filled when the top and bottom halves are glued together. Once again, this calls for unconventional filling and sanding, which I did with thick CA glue and sore fingers wrapped with pieces of sand paper. After screwing the piece to the fuselage, the stabilators and the entire rear portion of the fuselage were assembled and glued on. The fit here was not very good, with substantial gaps and steps between the pieces. It was kind of surprising for a supposedly state-of-the-art kit. Since this entire rear area is painted with metallic paints, some modelers opt to leave these pieces off until the very end. I don’t see how one could do that without leaving prominent seams. The stabilator piece also suffered from molding swirl marks that had to be sanded out and polished, owing to the metallic finish.
Next on the list was the wing assembly. As instructed, I glued the two top halves to the single bottom piece, sanded the seams, and then screwed and glued the whole thing to the fuselage. This turned out to be a big mistake. What I got were large, 1/8 inch gaps at the wing-to-fuselage joint. A spreader bar inserted in the fuselage would not work, so I opted to span the gap with CA glue. In retrospect, I should have glued the wing tops to the fuselage first, and then glued on the bottom piece after the top halves had dried. As it was, I had to deal with gaps that required lots of CA glue and smoothing with sandpaper wrapped around a steel ruler, which helped me access the awkward 90-degree angle of the pieces. Also filled were the seams present in the aileron cutout. Phantom ailerons (or are they flaperons?) usually droop down when at rest, so Tamiya provides them in this exact position, making the internal cutout area visible. Next, I had to get the outer wing panels to fit at 12.5 degrees of dihedral, which was tricky. I sanded the attachment point down until I got the right angle, repeatedly checking progress with dry fitting. When the panel was glued on, the resulting piano hinge fairing was mismatched, so more sanding was needed to get that looking right.
 Moving to the nose, I lopped off a quarter of an inch from the front of each
of the two air-conditioning air scoops. The Infrared seeker was glued to the
radome, and the resultant seams were filled and sanded. On the other end, the
tailpiece was glued on, which resulted in more large gaps that had to be filled.
Have you noticed a pattern here? Every major subassembly seemed to introduce
substantial gaps that had to be attended to. What happened to the famous Tamiya
engineering and fit?
Moving to the nose, I lopped off a quarter of an inch from the front of each
of the two air-conditioning air scoops. The Infrared seeker was glued to the
radome, and the resultant seams were filled and sanded. On the other end, the
tailpiece was glued on, which resulted in more large gaps that had to be filled.
Have you noticed a pattern here? Every major subassembly seemed to introduce
substantial gaps that had to be attended to. What happened to the famous Tamiya
engineering and fit?
I inserted a piece of clear red styrene into the leading edge of the tailpiece and polished it up, and I replaced the plastic pitot tubes with new ones made from hypodermic tubing and stainless steel wire. I’m always breaking these things off, and I have found that only by making replacements out of metal do I stand an even chance of them surviving the building process.
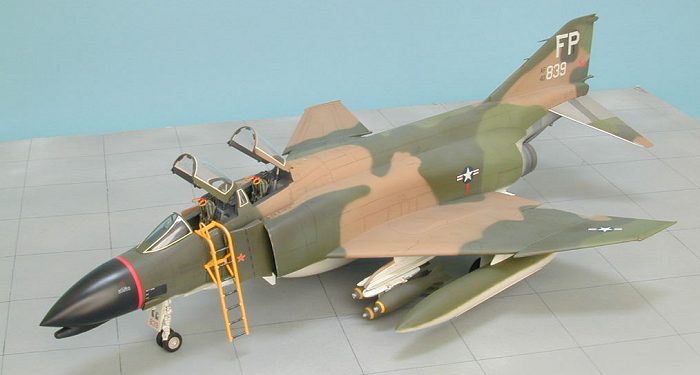
The landing gear was next. The nose gear strut is half metal and half plastic, so a seam right down the middle between two dissimilar materials had to be filled. The metal piece had several pour marks that had to be filed off and polished. The two main landing struts have plastic pieces that surround a metal insert. I glued the air brakes in the closed position, as they were rarely open on the ground, as far as I can tell.
Attention was next given to the underwing thingees. The resin centerline tank was glued together, seams filled, and attached to the center pylon with a slight modification of the Roger Jackson school of aircraft stores modeling: pins were cut from a large paper clip and slipped into holes drilled in both the tank and the pylon. The angle of the holes was intentionally slightly off from vertical, so that no glue is needed to keep the tank attached firmly to the model. After all those years of using CA glue to put on my fuel tanks and bombs, only to have the slightest bump knock them off, I no longer live in fear, secure in the knowledge that my ordnance is going to stay put. Thanks, Roger!
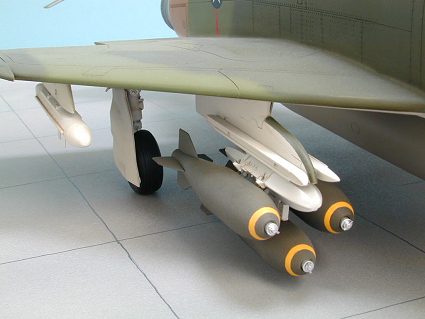 Cheetah 03 was loaded asymmetrically with a 370-gallon drop tank on the left
outer pylon and a single ALQ-87 ECM pod on the right. To obtain just the pylon
to mount the pod, I had to cut it off the other 370 gallon fuel tank and fill
the resulting center section to make it solid. Once again, cut pieces of paper
clip were used to attach the pod after it was painted flat white. The two inner
pylons were attached, but modelers should note that the structures at the rear
of the pylon (I don’t really know what they are) were not present on F-4s at the
time, so I left them off and filled the holes. Both inner pylons were loaded
with three 750 LB Mk 117 bombs attached to Triple Ejector Racks (TER). I
assembled and painted the Cutting Edge resin bombs, which was a project in
itself, and secured them firmly to the TER with cut lengths of paper clip. The
heavy resin pieces present a real load to the pylon, so I chose to mount them
only for the photographs in this review. Long-term display of the model will
depict the aircraft as it was configured for a typical MiGCAP mission, with
non-extended launch rails (I cut off the rail extension legs, which weren’t
available until June 1967) and early AIM-9B Sidewinder missiles (another
modification of the kit-provided AIM-9Es, done by lopping off the pointed nose
and replacing it with a drop of epoxy to represent the silicate seeker head). To
be technically accurate, I should have left the launch rails off the inner
pylons for the photographs, and then glued them on with the missiles later, but
I didn’t because I know would have done a sloppy job attaching them after
painting. So sue me.
Cheetah 03 was loaded asymmetrically with a 370-gallon drop tank on the left
outer pylon and a single ALQ-87 ECM pod on the right. To obtain just the pylon
to mount the pod, I had to cut it off the other 370 gallon fuel tank and fill
the resulting center section to make it solid. Once again, cut pieces of paper
clip were used to attach the pod after it was painted flat white. The two inner
pylons were attached, but modelers should note that the structures at the rear
of the pylon (I don’t really know what they are) were not present on F-4s at the
time, so I left them off and filled the holes. Both inner pylons were loaded
with three 750 LB Mk 117 bombs attached to Triple Ejector Racks (TER). I
assembled and painted the Cutting Edge resin bombs, which was a project in
itself, and secured them firmly to the TER with cut lengths of paper clip. The
heavy resin pieces present a real load to the pylon, so I chose to mount them
only for the photographs in this review. Long-term display of the model will
depict the aircraft as it was configured for a typical MiGCAP mission, with
non-extended launch rails (I cut off the rail extension legs, which weren’t
available until June 1967) and early AIM-9B Sidewinder missiles (another
modification of the kit-provided AIM-9Es, done by lopping off the pointed nose
and replacing it with a drop of epoxy to represent the silicate seeker head). To
be technically accurate, I should have left the launch rails off the inner
pylons for the photographs, and then glued them on with the missiles later, but
I didn’t because I know would have done a sloppy job attaching them after
painting. So sue me.
Before heading to the paint shop, I rescribed all the panel lines obliterated by my seam-filling activities, then cleaned the model with soap and water to remove all finger prints and dust. Tissue was stuffed into the cockpit, and the clear parts of the canopy piece between the pilot and the RIO were masked with Scotch transparent tape.
|
PAINT & DECALS |
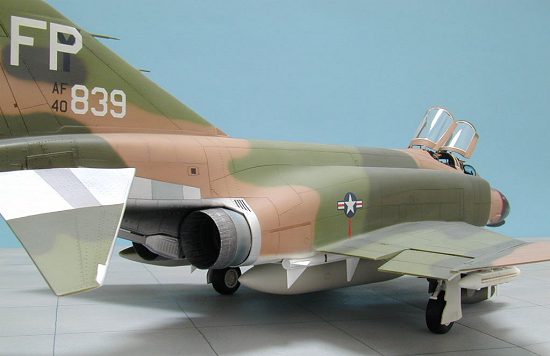
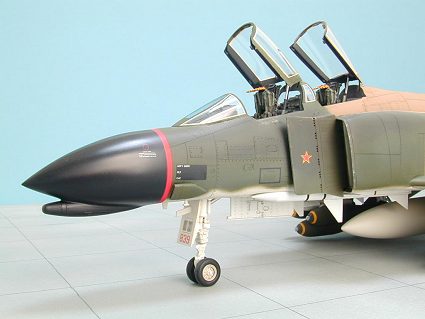
The first thing I painted were the metallic sections on the rear fuselage. SnJ Spray Metal and several shades of Testor’s Metalizers were used. First I laid down a base coat, and then I used progressively darker tints of SnJ (using a few drops of black enamel paint) to pick out alternating panels. Then Metalizer was applied here and there, using the Burnt Metal, Steel, and Stainless Steel shades. When satisfied with the look, I sealed the area with AeroMaster semi-gloss clear acrylic. The nose radome was painted with Model Master Acryl semi-gloss black. The interiors of the wheel wells were painted flat white. The oleos were covered in Bare-Metal foil, but I didn’t like the "crinkly" look and removed the foil, replacing it with my old standby, Testors Chrome Silver enamel. No matter how hard I try, I can’t seem to get the foil to lay down perfectly smooth.
Captain Pardo’s F-4C was painted in a variation of the Technical Order 1-1-4 "South East Asia" paint scheme. Early F-4s were delivered to the Air Force in the standard Navy colors of Light Gull Gray over gloss white, with the camouflage colors being applied later at supply depots or even in the field. Model Master Acryl paints were used exclusively. First, Camouflage Gray FS36622 was applied to the belly, then Tan FS30219 to the topsides. I always lighten the Tan with flat white, because out of the bottle it is way too dark when compared to photographs, owing to the severe fading characteristics of the real paint. With a pencil, I traced out the rest of the camouflage pattern, and then carefully applied the TAC Middle Green FS34102 (also lightened with flat white) and the Dark Green FS34079 with my airbrush. For those who think that this was easy: forget it. I always resign myself to going over and over and over the transitions between the colors until I get what I perceive to be a believable amount of scale overspray. Some modelers use cut masks for this, but I prefer to do it freehand. It takes dozens of minor corrections to get it all looking right, but the end result is worth it, I think.
I painted the decking of the cockpit using Polly Scale’s Scale Black. The engine air bleed doors were painted Acryl Insignia Red inside. I elected not to outline the aileron cutout in red (a hold-over from the Navy practice), feeling that this probably got wiped out when the SEA camouflage colors were hastily applied. Photographs show that later factory-camouflaged Phantoms retained the red areas around all the moveable portions of the aircraft.
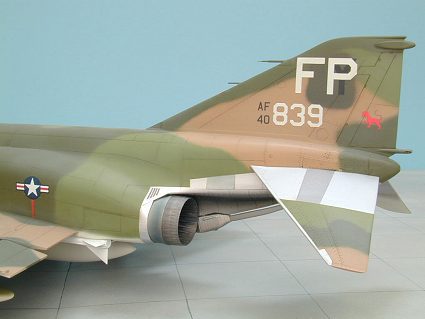 The tail of 64-0839 had been repainted several times because of squadron
transfers, so I painted a sloppy blob of Green Drab FS34086 on each side of the
vertical stabilizer to match the erasure of the code letters. The port side of
the nose also got some Green Drab as well, which conveniently wiped out all the
ejection seat warning markings. The same is true for nearly all the stenciling
on the aircraft, which is a good thing. I have come to hate stenciling on
models, mostly because of the great potential of silvering. The port fuel tank
got an uneven Dark Green top half. The AIM-7E Sparrows were painted gloss white
with Light Gray FS36495 warheads. The AIM-9B Sidewinders were overall gloss
white. Decal stripes and stencils were applied, and Future was used to make the
missiles all look nice and shiny. The Mk. 117 bombs were first painted with flat
white, followed by flat yellow. I cut thin slices of drafting tape and placed
them in a circular pattern on the nose of each bomb, then sprayed a final coat
of Olive Drab. I peeled off the tape, made a few corrections to the yellow
stripes by hand, and called it good.
The tail of 64-0839 had been repainted several times because of squadron
transfers, so I painted a sloppy blob of Green Drab FS34086 on each side of the
vertical stabilizer to match the erasure of the code letters. The port side of
the nose also got some Green Drab as well, which conveniently wiped out all the
ejection seat warning markings. The same is true for nearly all the stenciling
on the aircraft, which is a good thing. I have come to hate stenciling on
models, mostly because of the great potential of silvering. The port fuel tank
got an uneven Dark Green top half. The AIM-7E Sparrows were painted gloss white
with Light Gray FS36495 warheads. The AIM-9B Sidewinders were overall gloss
white. Decal stripes and stencils were applied, and Future was used to make the
missiles all look nice and shiny. The Mk. 117 bombs were first painted with flat
white, followed by flat yellow. I cut thin slices of drafting tape and placed
them in a circular pattern on the nose of each bomb, then sprayed a final coat
of Olive Drab. I peeled off the tape, made a few corrections to the yellow
stripes by hand, and called it good.
Several thin coats of Future floor polish prepared the model for the Fox One decals. One minor complaint I have is that the placement instructions for each marking are not as clear as they could be. I tried to use the kit decals for the US insignia, but they disintegrated when put in water. I replaced them with some ancient markings I found in my spares box from a Micro Scale sheet I originally bought in 1974 (!) and they went on perfectly. If that isn’t a great testimonial for the quality of Micro Scale decals, I don’t know what is! A single star on the side of the port intake splitter vane depicts a MiG-21 kill from January 6, 1967 while Richard Pascoe and Norman Wells were flying the plane. Pardo and Wayne got themselves a MiG-17 kill in another aircraft, F-4C 63-7623 on May 20, 1967.
8th TFW Phantoms were pretty heavily weathered, with extensive staining on the undersides, paint chips on the leading edges of the air intakes, faded camouflage, and the presence of large repainted areas in poorly matching paint. I made a wash using Winsor & Newton artists oils (a mix of Payne’s Gray and Burnt Umber) dissolved in Turpenoid, and used it to accent the panel lines. I faded the paint by overspraying a very thin light gray all over the model, with slightly heavier application on the top of the spine and the wings. The panel lines were further highlighted by dark gray pastels, with lighter pastels in various colors being used to brighten the center of selected panels. This was very carefully done and mostly obliterated by the final overcoat of clear flat, which is what I wanted. Too often weathered models look like patchwork quilts instead of a representation of the real thing. Subtlety is the key here. The rear fuselage exhaust area of the model received more dark gray and black pastels, as well as an overspray of Tamiya X-19 Smoke acrylic paint. Acryl Clear Blue was used on the afterburner cans to give that heat-tempered look, which was followed up by drybrusing with silver and black and more dusting with black pastel. Everything was sealed with a coat of AeroMaster Clear Flat, with the exception of the metallic areas and nose radome, which received a coat of AeroMaster Semi-gloss clear.
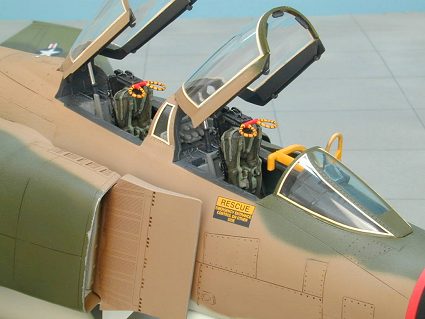 The canopy pieces were dipped in Future and masked with drafting tape before
the frames were sprayed first with Scale Black, then with the external
camouflage color. The front windscreen was tinted by spraying Acryl Clear Blue
on the inside of the piece. The way Tamiya molds the canopy pieces introduces a
very visible flaw at the sprue attachment point. I sanded this down and polished
it out with a tri-grit file, but it was still noticeable. The fiberglass
reinforcing tape around the clear canopy panels was replicated with very thin
strips of clear decal sheet, which I had painted in a pale cream color. Note
that this reinforcing tape was not present on all Phantoms (unlike F-105s, where
it was ubiquitous). I have been told that this tape was later manufactured in
black, which explains why it is often so hard to see in photographs.
Fortunately, the slivers of decal stripes I used to outline each clear piece
mostly hid the sprue attachment flaws, saving the model from the unsightly
blemishes.
The canopy pieces were dipped in Future and masked with drafting tape before
the frames were sprayed first with Scale Black, then with the external
camouflage color. The front windscreen was tinted by spraying Acryl Clear Blue
on the inside of the piece. The way Tamiya molds the canopy pieces introduces a
very visible flaw at the sprue attachment point. I sanded this down and polished
it out with a tri-grit file, but it was still noticeable. The fiberglass
reinforcing tape around the clear canopy panels was replicated with very thin
strips of clear decal sheet, which I had painted in a pale cream color. Note
that this reinforcing tape was not present on all Phantoms (unlike F-105s, where
it was ubiquitous). I have been told that this tape was later manufactured in
black, which explains why it is often so hard to see in photographs.
Fortunately, the slivers of decal stripes I used to outline each clear piece
mostly hid the sprue attachment flaws, saving the model from the unsightly
blemishes.
The boarding ladder was painted yellow after a primer of flat white, and scuffed up with a silver Berol pencil. The pencil was also used to add paint chipping to the edges of the air intakes and random areas around the cockpit sills.
|
FINAL ASSEMBLY |
The ordnance was placed on the pylons, the ejection seats glued in, the landing gear screwed on, and the canopy pieces attached in the open position. After the rubber tires received a coat of Testor’s Dullcote Lacquer, they were placed on the wheels. The landing gear doors were glued on, and the canopy retraction struts fitted. Navigation lights were painted silver, then Clear Red for port and Clear Green for starboard. The F-4 wingtip actually has two lights, so the rearmost light was simulated with tiny pieces of clear red and green styrene, sanded to the appropriate shape and then polished.
I scratch-built canopy retraction hooks and also some rear-view mirrors out of sheet styrene. Most F-4s have the mirrors mounted to the underside of each canopy, rather than the way Tamiya provides, which gives you no mirrors at all for the pilot, and inside the central section between the two cockpits for the WSO.
With the model done, I gave it one last good look over and realized that the starboard stabilator was drooping significantly lower than the port side. I fixed this by pointing a hot air blow drier at the joint and gently coaxed it back into alignment. This was somewhat nerve-racking, as I faced the very possibility of melting the plastic or marring the metallic finish. By heating the joint slowly, I was able to avoid a disaster. Whew!
|
CONCLUSIONS |
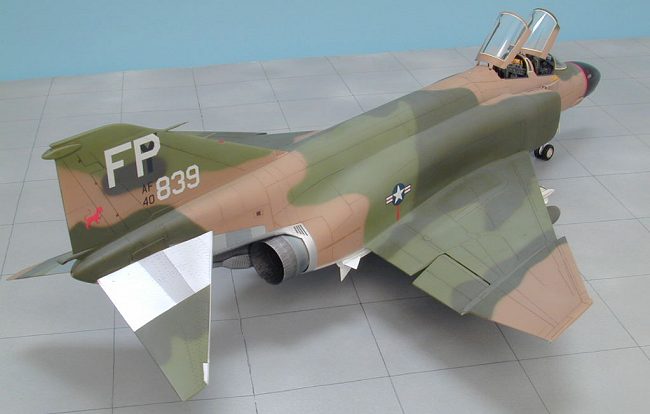
Despite being one of the more impressive model kits on the market, this is not a box-shaker in the Tamiya tradition. In the past, I have often seen these big models at contests and was surprised to note that they usually have a lot of fundamental modeling mistakes evident. I now understand why: this kit has a lot of things that can go wrong and a number of little things that need to be fixed. To me, the most disappointing part was the fit of the wings, the vertical stabilizer, and the rear fuselage pieces. But there is nothing that cannot be overcome with patience and a methodical approach. This kit is still a remarkable achievement for our hobby and one that I hope will lead to further releases in this scale.
I am happy with the results, and had fun most of the time. The model took me six months and over 120 hours of effort to complete. All for a kit that was built essentially out of the box! To be fair, I spent some extra time with the ordnance specific to Bob Pardo’s aircraft, but one has to be cognizant of the fact that building this model will take some time. My recommendation to anyone considering it is to go slow, pay attention to the subassembly at hand, and expect to do a lot of work to make the little things right. With that attitude, you will be rewarded with a stunning model of one of the greatest aircraft that ever took to the skies.
|
REFERENCES |
Lake, Jon: McDonnell F-4 Phantom: Spirit in the Skies
Drendel Lou: …And Kill MiGs, Air to Air Combat from Vietnam to the Gulf War
Wetterhahn, Ralph: "Change of Command" Air & Space Smithsonian, September 1997
Phantom’s Lair: http://members.js-net.com/phantom/index2.htm
Air Force Magazine: Pardo’s Push, http://www.af.mil/news/airman/1296/pardo.htm
Horner, Chuck: E-mail conversations about fiberglass reinforcing tape
Van Aken, Scott: E-mail conversations about wheel well interior colors
McFarland, James: E-mail conversations about the Tamiya kit
If you would like your product reviewed fairly and quickly, please contact me or see other details in the Note to Contributors.