|
KIT: |
ESCI 1/72 RF-8G Crusader (Conversion) |
|
KIT # |
9066 |
|
PRICE: |
£5.00 |
|
DECALS: |
Two USMC Aircraft |
|
REVIEWER: |
Tim N Mansfield |
|
NOTES: |
Final Touch resin conversion and Tasman Decals used |
|
HISTORY |
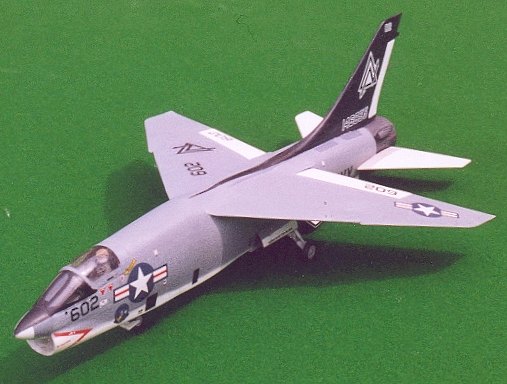
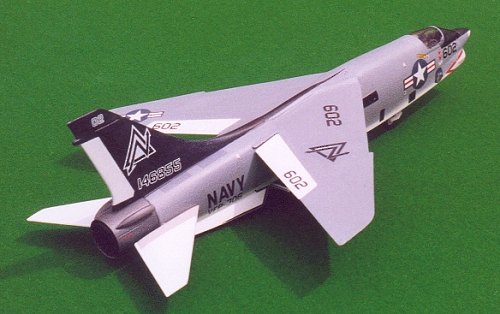
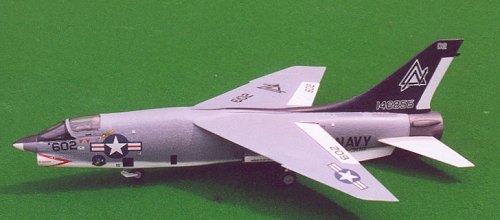
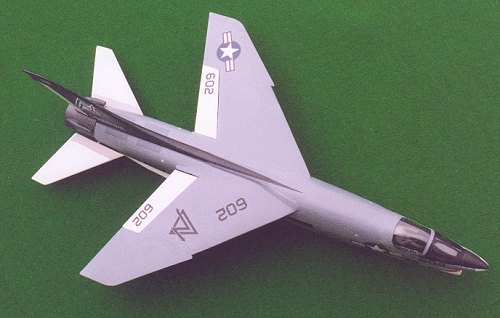
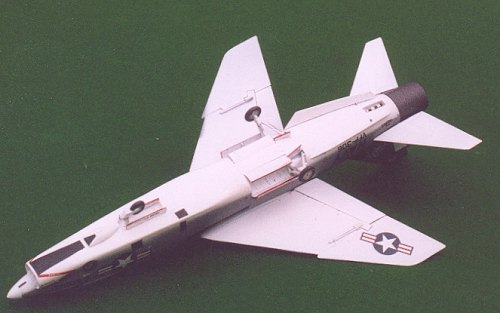
The Vought RF-8G was the Photo-Reconnaissance version of the carrier-born Crusader fighter. This is a single engine, high wing aircraft – with the unique feature of a variable incidence wing. In order to improve the pilot’s view, and reduce the risk of tailstrikes at landing, the wing leading edge is raised for take-off and landing.
The Photo Crusaders has a different front fuselage, with a squared off lower section enabling the side and downward cameras to look through flat windows. The forward fuselage was uncompromised by cannon ports, or the refueling probe bulge. Original RF-8As served during the Cuban crisis, and differed from the G version by the under fuselage strakes. The RF-8G was roughly equivalent to the F-8E with a Pratt & Whitney J57-P-22 giving it a speed of Mach 2, and served during Vietnam.
My kit was inspired by the superb Peter Mersky Osprey book on Crusaders. I didn’t think my Crusader collection was complete without a camera-ship, and Final Touch was the only way I could find to fill that gap.
|
THE KIT |
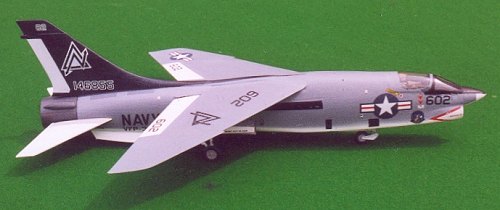
Having built 2 Hasegawa Crusaders previously – that was my preference, but I couldn’t find another, and settled for an ESCI kit. This looked about the right shape an size to me – but without having built one fully I can’t comment much on its accuracy. It is moulded in soft grey plastic, is free from flash, but the wings and undercarriage are a little more flimsy than those of Hasegawa, and the main wheels look especially thin.
Comparison ESCI v Hasegawa
 I have
compared the ESCI and Hasegawa finished models with calipers and found all
dimensions to be similar (not necessarily accurate) – except for one major
component. The hinged canopy is much more shallow, and a full 1mm wider at
the front on ESCI than Hasegawa – my suspicion is that ESCI got this vital
area wrong! However both fit their respective windscreens perfectly - and the
ESCI canopy fitted this conversion without any major gaps or ridges. I
haven’t seen a completed ESCI Crusader to know how it looks.
I have
compared the ESCI and Hasegawa finished models with calipers and found all
dimensions to be similar (not necessarily accurate) – except for one major
component. The hinged canopy is much more shallow, and a full 1mm wider at
the front on ESCI than Hasegawa – my suspicion is that ESCI got this vital
area wrong! However both fit their respective windscreens perfectly - and the
ESCI canopy fitted this conversion without any major gaps or ridges. I
haven’t seen a completed ESCI Crusader to know how it looks.
One are where ESCI scores, is separate flaps – which makes them easier to paint. I lowered the flaps on my Hasegawa model with a scalpel. The rest of the parts and kit breakdown look very similar. (Just to add something to this comparison, most modellers will agree that in 1/72, the Heller kit is probably the best one in terms of shape. Ed)
The Conversion
The Final Touch conversion is a resin adaptation of the Ventura original - for which Scott has produced a preview. The resin parts are disappointingly crude, and don’t offer much confidence of a good result.
The components are: two very rough, hollow fuselage front halves, the under-fuselage camera fairing, and the over-wing hump. Instructions comprise a single sheet explaining how to trim the resin components, and assemble them to the Hasegawa kit. There is a non-scale diagram to show the vital cut line.
 I bought my conversion in 1997, and
then started hunting a Crusader kit. The project was completed by the end of
that year - hence no construction photos.
I bought my conversion in 1997, and
then started hunting a Crusader kit. The project was completed by the end of
that year - hence no construction photos.
This conversion contains no decals. The only set I found listed for an RF-8 was Tasman set V7205 for various aircraft – including an RF-8G of VFP-306. Fortunately a friend had this set, and agreed to let me have the Crusader portion, so thanks go to Nick Carlyon.
Cockpit
This comprises a tub, seat, stick and instrument panel and is assembled as per instructions. There are decals for the instruments and side consoles which need to be firmly set before the consoles can be slimmed down to fit the thicker front fuselage sides. The instruments decal is for a standard fighter – and I left mine unmodified, so it doesn’t feature the camera viewfinder. My Hasegawa model has a low seat, and I had installed a small pilot – who can’t see over the sides. The ESCI seat is also a little insignificant, so I hid it - and a multitude of other sins with a HUGE pilot!
|
CONSTRUCTION |
Fuselage
The instruction sheet diagram showed the vital cut as the seam line at the forward end of the main undercarriage doors, so having assembled the basic fuselage halves, I took a deep breath and wielded my hacksaw. Having cleaned up the cut line, and dry-fitted the fuselage fronts it becomes apparent that they won’t fit without an enormous amount of work!
 Having taped
the fuselage fronts to the rear, the cockpit, canopy and nosecone several
times it becomes apparent that: the cockpit needs sliming down a lot, and
tapered plasticard wedges are required top and bottom to achieve a reasonable
fit. This was all assembled quite well with huge amounts of superglue and
filler, but it became apparent that the upper fuselage joint would be best
hidden with the wing in the lowered position.
Having taped
the fuselage fronts to the rear, the cockpit, canopy and nosecone several
times it becomes apparent that: the cockpit needs sliming down a lot, and
tapered plasticard wedges are required top and bottom to achieve a reasonable
fit. This was all assembled quite well with huge amounts of superglue and
filler, but it became apparent that the upper fuselage joint would be best
hidden with the wing in the lowered position.
My fitting of the forward looking camera fairing was straightforward – but I’ve since found out that fairing should be longer with its rear part incorporated into the lengthened front undercarriage doors.
When it was all smoothed off I was quite pleased with the result, but any surface detail was lost.
Completing the Airframe
The wing was assembled un-modified, and mated into the fuselage quite nicely. Then I had to smooth out the forward end of the fin and profile the whole lot to the upper forward fuselage.
I have to confess that I was so pleased with the result that I didn’t risk spoiling it all for the resin over-wing hump, and now have a shallow dip in that region of the fuselage.
Although you may notice that one of my Hasegawa models has its wing raised, I’ve since discovered that this action is coupled with an automatic lowering of the slats and flaps.
|
CAMOUFLAGE & MARKINGS |
 I painted
the tail of my model with Humbrol Gloss Black, masked it – then aerosolled my
model with Poundland White primer underneath, and Poundland Grey primer on
top. My demarcation was achieved with pieces of cereal boxes held just off
the surface – this achieves a feathered edge. Anybody else trying this paint
needs to be aware that it is cellulose, does not adhere very well – and will
come off with any sort of masking adhesive.
I painted
the tail of my model with Humbrol Gloss Black, masked it – then aerosolled my
model with Poundland White primer underneath, and Poundland Grey primer on
top. My demarcation was achieved with pieces of cereal boxes held just off
the surface – this achieves a feathered edge. Anybody else trying this paint
needs to be aware that it is cellulose, does not adhere very well – and will
come off with any sort of masking adhesive.
National insignia and non-squadron markings came from the kit. They were in register, easy to apply, and bedded down well onto Klear floor polish. Fortunately, the same can be said of the squadron markings from Tasman decals. The camera ports and lower anti-dazzle panel are rectangles of black decal positioned according to the photos in my book.
Once all decals were applied I brushed a coat of Humbrol MattCote overall.
|
FINAL CONSTRUCTION |
All those bits that can be omitted prior to painting can now be installed – mostly following the instructions. The only components differing slightly being the front undercarriage. Here I had to drill a location hole into the resin prior to fitting. The well is slightly longer than the doors - by the depth of the fighter’s forward hinging door, so ideally these should be replaced with thin plasticard. Although this loses any detail on the doors – the inside surface of the resin is a bit of a moonscape, so it’s best to discourage inspection there!
Accuracy
For the purposes of completeness, I have measured the models, multiplied the measurements by 72 to see how large the model would expand to. Then I obtained dimensions from my reference books, and calculated the difference to explain away. According to books - the RF-8 should have the same dimensions as the fighter.
Height. 70mm, x72= 5040mm 4.8M Diff= 240mm
Span 148mm, x72= 10656mm, 10.87M, Diff= 214mm
Length 229mm, x72= 16488mm, 16.61M, Diff= 122mm
Height 66mm, x72= 4754mm, 4.8M, Diff= 46mm
As can be seen from the figures, both models are extremely accurate,
122mm short in length is about 5 inches – both these models should have air data probes, which would make them spot-on!
214mm short in wingspan span is about an adult’s open hand span – nothing to fuss about!
46mm low in height for ESCI is probably down to me flattening the mainwheels,
and 240mm high for Hasegawa, again an adult hand span, is probably due to my undercarriage fitting.
Overall extremely accurate results, and they both look the part!
|
CONCLUSIONS |
Overall I am
delighted with the outcome of my RF-8G Photo Crusader, which completes my
Crusader collection. Scrutiny for this review has highlighted a flaw with the
canopy, which probably indicates that the Hasegawa kit completes to a better
 model – and would have been a better start-point. I won’t be making another
Photo-Crusader but look forward to see this conversion reviewed with a
Hasegawa kit as its base – over to you Scott!
model – and would have been a better start-point. I won’t be making another
Photo-Crusader but look forward to see this conversion reviewed with a
Hasegawa kit as its base – over to you Scott!
Whilst I am pleased with the completed RF-8G – I was very disappointed with the quality and fit of the conversion parts, but the degree of improvement is proportional to the satisfaction derived with the result. For Crusader fans, your collections are incomplete without a recce version – and this is the only way to get one that I know of. (Again, your editor would like to butt in and mention that Ventura does/did a replacement nose conversion. It is rather crude as these things go, so the choice is yours. I believe a review in the Conversion Sets Archives. Ed)
Note: my only previous conversion had been the Maintrack P1101 Tandem Trainer based on a Matchbox Hunter. No sawing and excellent fit – this Crusader brought me right back to reality!
May 2003
If you would like your product reviewed fairly and quickly by a site that has 200,000 visitors a month, please contact me or see other details in the Note to Contributors.